

**My thoughts on the VOLANT CAI System - PICS INSIDE**
 12-23-2008, 05:29 PM
#41

Marc
 12-23-2008, 05:45 PM
#42

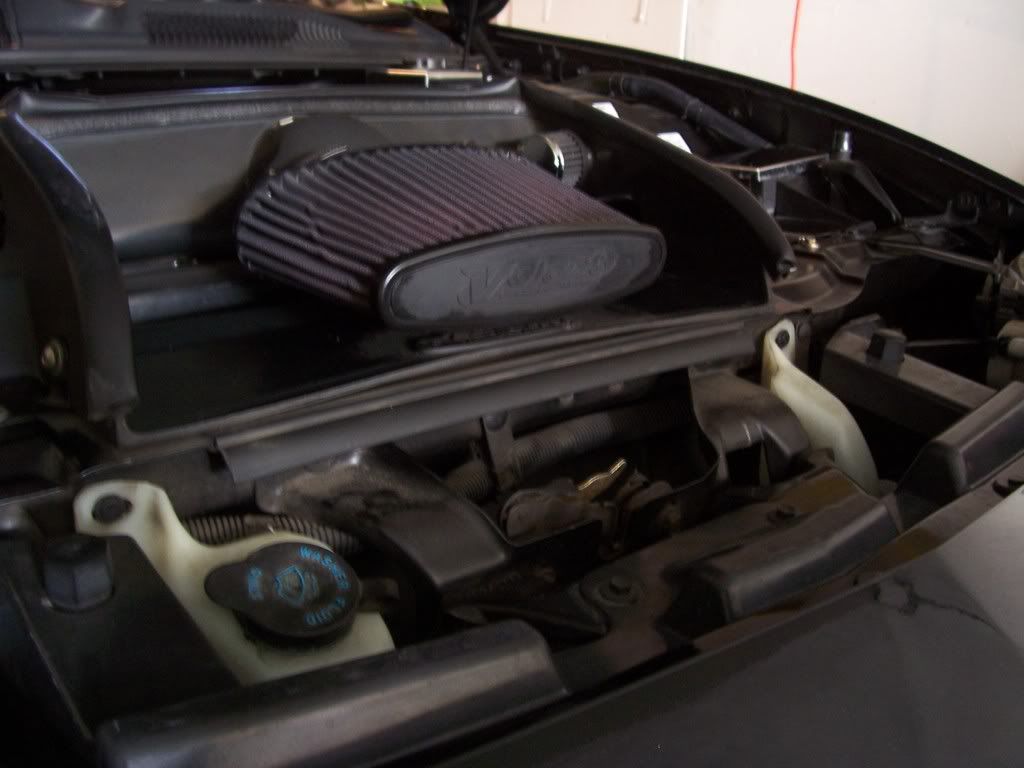
See here's the pics that I took:
here's the side view with the SLP smooth bellow

Front view. I didnt have to chop the top of the box like Wes did.
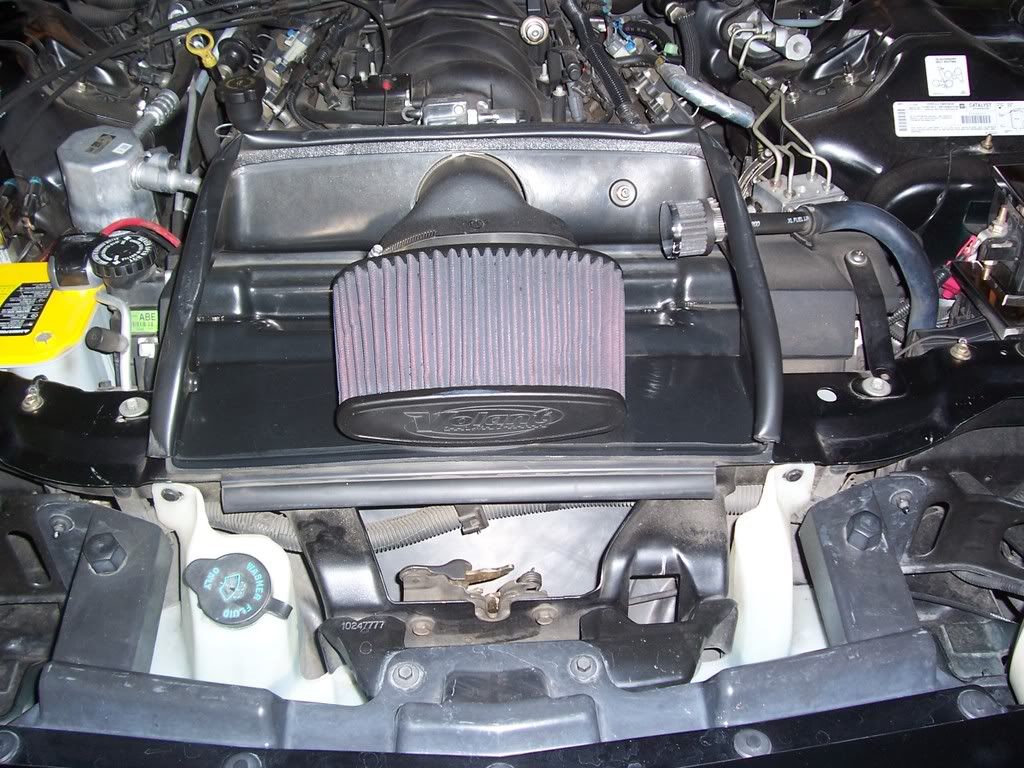
The holes and the factory holes where the brackets are SUPPOSED to be screwed into failed miserably, I had to bring the holes closer to the front which did force the radiator away from the fan belt and all that moving crap, and by doing THAT it also allowed the closed box to really seal a lot better than before.
The front of my Volant has a little soft rubber lip and it basically fits flush on the sheetmetal, not like Wes's.
here's the side view with the SLP smooth bellow
Front view. I didnt have to chop the top of the box like Wes did.
The holes and the factory holes where the brackets are SUPPOSED to be screwed into failed miserably, I had to bring the holes closer to the front which did force the radiator away from the fan belt and all that moving crap, and by doing THAT it also allowed the closed box to really seal a lot better than before.
The front of my Volant has a little soft rubber lip and it basically fits flush on the sheetmetal, not like Wes's.
12-23-2008, 05:54 PM
#43
Ok, as requested, here are the pics I promised.
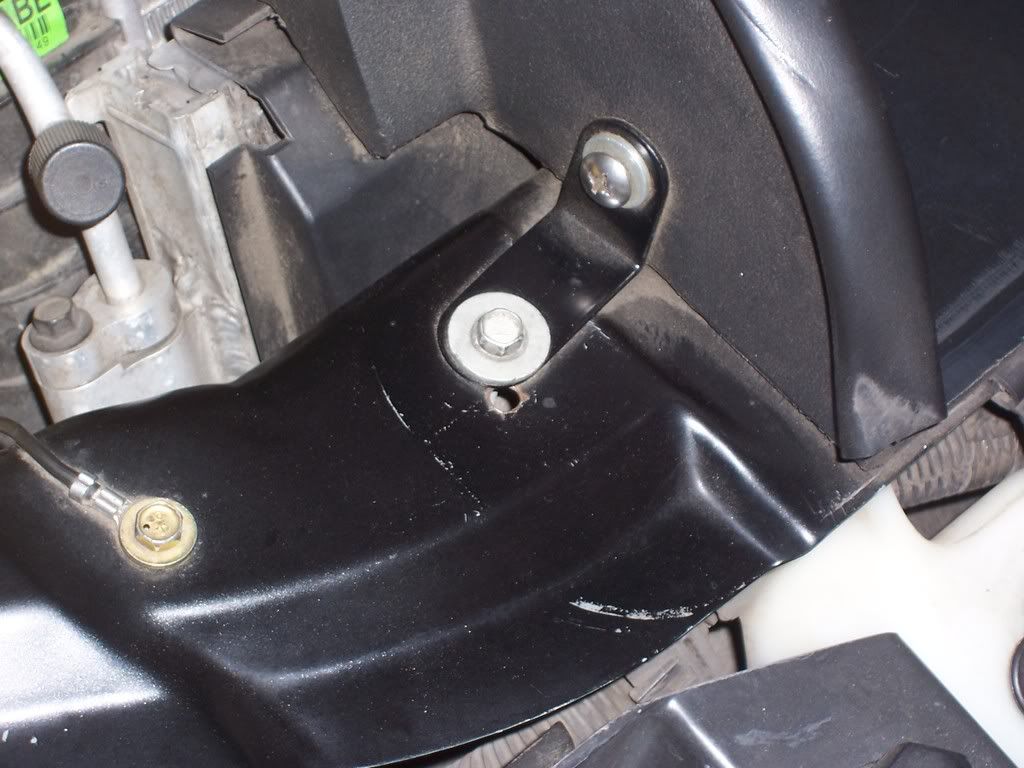
-1st pic is of the underside. you can see the L bracket I made to fill in where I cut out that piece so it would fit over the radiatior.
-2nd pic is of the top side of the bracket. You cant really see it with the filters installed.
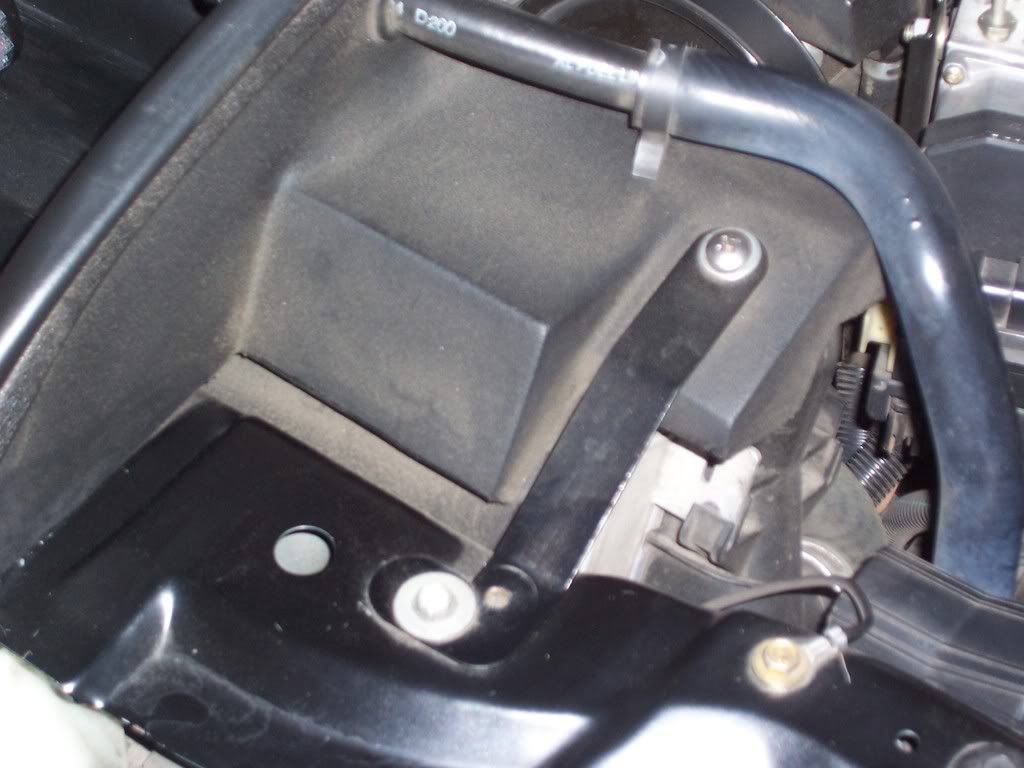
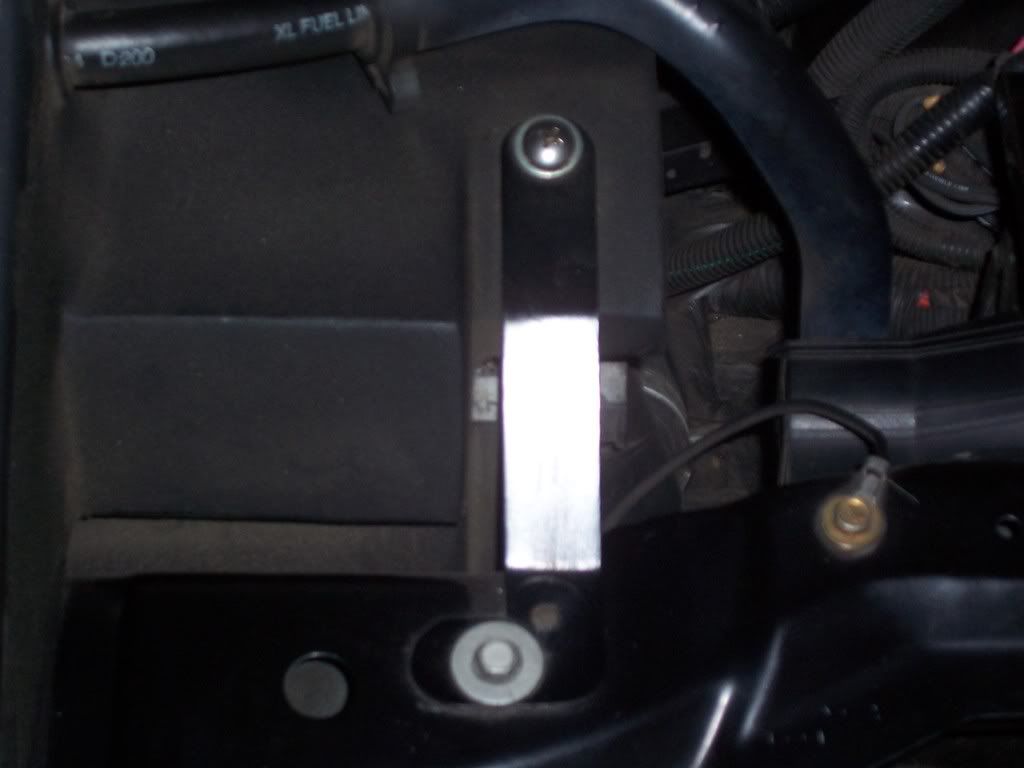
-3rd pic is where I dremeled the left side of the hole so that the "y" part would line up straight to the tb.
-4th pic is where I dremeled the inside of the "y" piece so that the MAF would fit.
-5th pic is the installed pic. You can see where I modified the IAT location just for piece of mind. Its not necessary.
BTW, everything fits nice and tight now (like it should have from Volant)
-1st pic is of the underside. you can see the L bracket I made to fill in where I cut out that piece so it would fit over the radiatior.
-2nd pic is of the top side of the bracket. You cant really see it with the filters installed.
-3rd pic is where I dremeled the left side of the hole so that the "y" part would line up straight to the tb.
-4th pic is where I dremeled the inside of the "y" piece so that the MAF would fit.
-5th pic is the installed pic. You can see where I modified the IAT location just for piece of mind. Its not necessary.
BTW, everything fits nice and tight now (like it should have from Volant)
12-23-2008, 06:07 PM
#44
See here's the pics that I took:
here's the side view with the SLP smooth bellow
http://img.photobucket.com/albums/v4...antpics001.jpg
Front view. I didnt have to chop the top of the box like Wes did.
http://img.photobucket.com/albums/v4...antpics004.jpg
The holes and the factory holes where the brackets are SUPPOSED to be screwed into failed miserably, I had to bring the holes closer to the front which did force the radiator away from the fan belt and all that moving crap, and by doing THAT it also allowed the closed box to really seal a lot better than before.
http://img.photobucket.com/albums/v4...antpics006.jpg
http://img.photobucket.com/albums/v4...antpics009.jpg
http://img.photobucket.com/albums/v4...antpics008.jpg
The front of my Volant has a little soft rubber lip and it basically fits flush on the sheetmetal, not like Wes's.
http://img.photobucket.com/albums/v4...antpics010.jpg
12-23-2008, 06:17 PM
#45
TECH Fanatic
iTrader: (4)
Join Date: Jul 2003
Location: Orange Park/ Jacksonville, FL
Posts: 1,075
Likes: 0
Received 0 Likes
on
0 Posts
yea, the hole in mine is offset too... I'll be adjusting that as well... as far as the L-Bracket goes... i'm a little confused on it... I wonder if the design was modified... if you look at my second post I put up pics of it out of the box, it already has an indention for the radiator... 
Where my bracket is, there was a molded piece that was shaped the same (like a "L") but flipped the other way, so it would fit over the radiator, but was hitting it instead. I cut out that piece, and made a metal version of it but installed it flipped to where the 90* angle was facing the filters rather than pointing toward the radiator, and it made room so that the box actually clipped on to the radiator like it was supposed to. Did that make any sense???
Basically, that indention for the radiator you are talking about was hitting it and not allowing it to seat right, so I cut it out.
At 1st I just cut it out so it would fit, but it looked like crap and allowed a lot of heat from the radiator to come up into the filters, so I made that little bracket, painted it black, and riveted it in place. No one ever notices it until I point it out.
12-23-2008, 08:17 PM
#48
TECH Fanatic
iTrader: (4)
Join Date: Jul 2003
Location: Orange Park/ Jacksonville, FL
Posts: 1,075
Likes: 0
Received 0 Likes
on
0 Posts

 12-24-2008, 12:18 AM
#51
TECH Resident
iTrader: (7)
Join Date: Apr 2007
Location: STL, Mo
Posts: 954
Likes: 0
Received 0 Likes
on
0 Posts

Yo man I feel your pain! I solved my problems though. I got some pics that will solve all the problems that you are having.
I drilled a hole in each corner and put bolts in there for the extra holding and it got rid of them ugly brackets that didnt line up. Also with it not holding the radiator shroud, I just drilled a couple holes and put come screws in the shroud and it works great!
One more thing. I think you were a bit extreme on the hole for the filters. I only had to grind some of the plastic out. I also have the smooth bellows.
12-24-2008, 01:27 AM
#52
LOL, i'm sorry, but you guys are not installing that correctly.
First off, the MAF is not supposed to be shoved up into the plastic piece, thats just silly. You need a coupler (silicone hose) that goes from the plastic piece to the MAF, and then from the MAF to the throttlebody, your smoothbellow.
Secondly, the L-bracket on the bottom that you're talking about not holding up the radiator....well, it does. What happens when you pull the old lid off, the radiator sags, so, simply pull the radiator back up, set the Volant CAI in place. As shown in the picture above, that is wrong. The lips there go inbetween the top flaps on the top of the STOCK radiator (aluminum flaps at the top, you'll know what i'm talking about), not so far back that its over the shroud of the radiator. It will not hold up a aftermarket radiator because they do not have those tabs. To clarify, i'm not talking about any tabs on the ends of the radiator like in the video that was posted. I'm talking about the top of the radiator, running along the entire length of the radiator, is where the L-bracket on the bottom of the volant cai sits into.
Lastly, yes the holes for the brackets don't line up perfectly, but thats because the setup is pulled back because of the radiator. Its pulling the whole setup back into the engine bay (by like a 1/4" to even 1" depending on the sag). Once you have the CAI seated holding up the radiator, simply pull the whole configuration slightly forward, start one bolt, then move on and start the other. Make sure that you already have the brackets attached TO the CAI intake itself, start the bolts that go into the support.
Tighten everything down, and walla, no modifications needed. It took me a while at first to get it to sit right, but those are the little things that you'll see need to be done to get it to fit, simply some adjustments. Sorry to see you guys chopping yours up. As far as sticking the MAF into the pipe? I dunno where you guys thought that was right haha.
I've taken this off and put it on a million times now, and every time it always takes a little finagling to get it to sit right, but never any modifications. You just gotta know how to install it correctly. Only modification I did was so i can fit a 4" hose through that thing.
Last edited by Haans249; 12-24-2008 at 01:42 AM.
12-24-2008, 01:50 AM
#54
LOL, i'm sorry, but you guys are not installing that correctly.
First off, the MAF is not supposed to be shoved up into the plastic piece, thats just silly. You need a coupler (silicone hose) that goes from the plastic piece to the MAF, and then from the MAF to the throttlebody, your smoothbellow.
Secondly, the L-bracket on the bottom that you're talking about not holding up the radiator....well, it does. What happens when you pull the old lid off, the radiator sags, so, simply pull the radiator back up, set the Volant CAI in place. As shown in the picture above, that is wrong. The lips there go inbetween the top flaps on the top of the STOCK radiator (aluminum flaps at the top, you'll know what i'm talking about), not so far back that its over the shroud of the radiator. It will not hold up a aftermarket radiator because they do not have those tabs. To clarify, i'm not talking about any tabs on the ends of the radiator like in the video that was posted. I'm talking about the top of the radiator, running along the entire length of the radiator, is where the L-bracket on the bottom of the volant cai sits into.
Lastly, yes the holes for the brackets don't line up perfectly, but thats because the setup is pulled back because of the radiator. Its pulling the whole setup back into the engine bay (by like a 1/4" to even 1" depending on the sag). Once you have the CAI seated holding up the radiator, simply pull the whole configuration slightly forward, start one bolt, then move on and start the other. Make sure that you already have the brackets attached TO the CAI intake itself, start the bolts that go into the support.
Tighten everything down, and walla, no modifications needed. It took me a while at first to get it to sit right, but those are the little things that you'll see need to be done to get it to fit, simply some adjustments. Sorry to see you guys chopping yours up. As far as sticking the MAF into the pipe? I dunno where you guys thought that was right haha.
I've taken this off and put it on a million times now, and every time it always takes a little finagling to get it to sit right, but never any modifications. You just gotta know how to install it correctly. Only modification I did was so i can fit a 4" hose through that thing.
First off, the MAF is not supposed to be shoved up into the plastic piece, thats just silly. You need a coupler (silicone hose) that goes from the plastic piece to the MAF, and then from the MAF to the throttlebody, your smoothbellow.
Secondly, the L-bracket on the bottom that you're talking about not holding up the radiator....well, it does. What happens when you pull the old lid off, the radiator sags, so, simply pull the radiator back up, set the Volant CAI in place. As shown in the picture above, that is wrong. The lips there go inbetween the top flaps on the top of the STOCK radiator (aluminum flaps at the top, you'll know what i'm talking about), not so far back that its over the shroud of the radiator. It will not hold up a aftermarket radiator because they do not have those tabs. To clarify, i'm not talking about any tabs on the ends of the radiator like in the video that was posted. I'm talking about the top of the radiator, running along the entire length of the radiator, is where the L-bracket on the bottom of the volant cai sits into.
Lastly, yes the holes for the brackets don't line up perfectly, but thats because the setup is pulled back because of the radiator. Its pulling the whole setup back into the engine bay (by like a 1/4" to even 1" depending on the sag). Once you have the CAI seated holding up the radiator, simply pull the whole configuration slightly forward, start one bolt, then move on and start the other. Make sure that you already have the brackets attached TO the CAI intake itself, start the bolts that go into the support.
Tighten everything down, and walla, no modifications needed. It took me a while at first to get it to sit right, but those are the little things that you'll see need to be done to get it to fit, simply some adjustments. Sorry to see you guys chopping yours up. As far as sticking the MAF into the pipe? I dunno where you guys thought that was right haha.
I've taken this off and put it on a million times now, and every time it always takes a little finagling to get it to sit right, but never any modifications. You just gotta know how to install it correctly. Only modification I did was so i can fit a 4" hose through that thing.
first... the silicone hose you recommended... (might work I dunno... but here it is straight from the horses mouth)

second... the hole radiator sagging thing... sorry, but in my case, the radiator did not budge when we took off the old stock shroud. I could easily go outside now and take off the volant, and stick the stocker back on, without having to pull the radiator into place... it never moved or sagged... It's just simply not being supported or held back anymore... and the small little lips that the volant has on the back, are not near enough to hold it in place...
third... the bolt thing... eh... I gotta say, that's the one part that came the closest to fitting correctly
I'm not bashing you at all so don't take it that way... just saying in my case, none of that will solve the problem. If it helps others on here though that great! Which is kinda the point of this thread
 12-24-2008, 01:52 AM
#55
Yo man I feel your pain! I solved my problems though. I got some pics that will solve all the problems that you are having.
I drilled a hole in each corner and put bolts in there for the extra holding and it got rid of them ugly brackets that didnt line up. Also with it not holding the radiator shroud, I just drilled a couple holes and put come screws in the shroud and it works great!
One more thing. I think you were a bit extreme on the hole for the filters. I only had to grind some of the plastic out. I also have the smooth bellows.
http://i89.photobucket.com/albums/k2...P1010007-1.jpg
http://i89.photobucket.com/albums/k2...P1010008-1.jpg
http://i89.photobucket.com/albums/k2...P1010009-1.jpg
http://i89.photobucket.com/albums/k2...P1010010-2.jpg
http://i89.photobucket.com/albums/k2...P1010011-1.jpg
except for the radiator part... looks like you put two screws straight into the fan shroud?
12-24-2008, 12:06 PM
#56
TECH Fanatic
iTrader: (4)
Join Date: Jul 2003
Location: Orange Park/ Jacksonville, FL
Posts: 1,075
Likes: 0
Received 0 Likes
on
0 Posts
LOL, i'm sorry, but you guys are not installing that correctly.
First off, the MAF is not supposed to be shoved up into the plastic piece, thats just silly. You need a coupler (silicone hose) that goes from the plastic piece to the MAF, and then from the MAF to the throttlebody, your smoothbellow.
Secondly, the L-bracket on the bottom that you're talking about not holding up the radiator....well, it does. What happens when you pull the old lid off, the radiator sags, so, simply pull the radiator back up, set the Volant CAI in place. As shown in the picture above, that is wrong. The lips there go inbetween the top flaps on the top of the STOCK radiator (aluminum flaps at the top, you'll know what i'm talking about), not so far back that its over the shroud of the radiator. It will not hold up a aftermarket radiator because they do not have those tabs. To clarify, i'm not talking about any tabs on the ends of the radiator like in the video that was posted. I'm talking about the top of the radiator, running along the entire length of the radiator, is where the L-bracket on the bottom of the volant cai sits into.
Lastly, yes the holes for the brackets don't line up perfectly, but thats because the setup is pulled back because of the radiator. Its pulling the whole setup back into the engine bay (by like a 1/4" to even 1" depending on the sag). Once you have the CAI seated holding up the radiator, simply pull the whole configuration slightly forward, start one bolt, then move on and start the other. Make sure that you already have the brackets attached TO the CAI intake itself, start the bolts that go into the support.
Tighten everything down, and walla, no modifications needed. It took me a while at first to get it to sit right, but those are the little things that you'll see need to be done to get it to fit, simply some adjustments. Sorry to see you guys chopping yours up. As far as sticking the MAF into the pipe? I dunno where you guys thought that was right haha.
I've taken this off and put it on a million times now, and every time it always takes a little finagling to get it to sit right, but never any modifications. You just gotta know how to install it correctly. Only modification I did was so i can fit a 4" hose through that thing.
First off, the MAF is not supposed to be shoved up into the plastic piece, thats just silly. You need a coupler (silicone hose) that goes from the plastic piece to the MAF, and then from the MAF to the throttlebody, your smoothbellow.
Secondly, the L-bracket on the bottom that you're talking about not holding up the radiator....well, it does. What happens when you pull the old lid off, the radiator sags, so, simply pull the radiator back up, set the Volant CAI in place. As shown in the picture above, that is wrong. The lips there go inbetween the top flaps on the top of the STOCK radiator (aluminum flaps at the top, you'll know what i'm talking about), not so far back that its over the shroud of the radiator. It will not hold up a aftermarket radiator because they do not have those tabs. To clarify, i'm not talking about any tabs on the ends of the radiator like in the video that was posted. I'm talking about the top of the radiator, running along the entire length of the radiator, is where the L-bracket on the bottom of the volant cai sits into.
Lastly, yes the holes for the brackets don't line up perfectly, but thats because the setup is pulled back because of the radiator. Its pulling the whole setup back into the engine bay (by like a 1/4" to even 1" depending on the sag). Once you have the CAI seated holding up the radiator, simply pull the whole configuration slightly forward, start one bolt, then move on and start the other. Make sure that you already have the brackets attached TO the CAI intake itself, start the bolts that go into the support.
Tighten everything down, and walla, no modifications needed. It took me a while at first to get it to sit right, but those are the little things that you'll see need to be done to get it to fit, simply some adjustments. Sorry to see you guys chopping yours up. As far as sticking the MAF into the pipe? I dunno where you guys thought that was right haha.
I've taken this off and put it on a million times now, and every time it always takes a little finagling to get it to sit right, but never any modifications. You just gotta know how to install it correctly. Only modification I did was so i can fit a 4" hose through that thing.
Maybe a silicone coupler would work for the MAF, but according to Volant, it was not needed because the MAF IS SUPPOSED to be fit into the "y" piece (as shown in the previous post), so I dont know why you found that funny, I'm not stupid. Every other Volant I've seen had no issues with the MAF sliding into place, just mine.
I also had no problems with the 2 "L" brackets lining up either, but when lined up correctly, the hole for the "Y" piece was offcenter to the tb, so I had to dremel the left side for it line up. That was no big deal though, took 2min. So like I said, I think we got a couple of bad intakes, because I've dealt with these on other peoples cars and didnt encounter these issues.
Anyways, thanks for pointing out that we are all "silly" and aren't capable of installing an air intake. If I can't even get that right, maybe I should go back and double check all head, cam, and clutch installs I've done.
 12-24-2008, 12:37 PM
#57
hey bro, thanks for your input and tips, but I still have to disagree... I'm glad yours worked out, but I'm convinced we have two different intake shroud molds...
first... the silicone hose you recommended... (might work I dunno... but here it is straight from the horses mouth)
second... the hole radiator sagging thing... sorry, but in my case, the radiator did not budge when we took off the old stock shroud. I could easily go outside now and take off the volant, and stick the stocker back on, without having to pull the radiator into place... it never moved or sagged... It's just simply not being supported or held back anymore... and the small little lips that the volant has on the back, are not near enough to hold it in place...
third... the bolt thing... eh... I gotta say, that's the one part that came the closest to fitting correctly
I'm not bashing you at all so don't take it that way... just saying in my case, none of that will solve the problem. If it helps others on here though that great! Which is kinda the point of this thread

I do not believe we have two different shrouds. Let me explain this a little better as it is kinda confusing what i said.
The stock radiator has along the entire top portion, two walls, maybe call them flashing that run along the ENTIRE top portion of the radiator, parallel from left to right. Your aftermarket radiator does not have this, it does have the tabs on the ends of the radiator as you showed in your video, but those are not what I was referring to, and the volant doesn't support the radiator with those tabs.
As far as the MAF going into the y-piece,
 Volant, they're retarted. By no means should you shove the MAF into it. Get a small silicone coupler piece and hook it up that way, and you will not have any problems. I guess I don't remember reading that part of the directions and just hooked it up my way haha.
 I do agree with you on one very important fact. For 280 bucks, they really did produce one piece of ****. But its the only piece of **** that is available to us right now that does what it does. It is a great idea, but the build quality on that thing is just terrible. Plus, where is your "Volant" emblem? Looks like they started skimping on the emblem as well, garbage.
12-24-2008, 12:47 PM
#58
Thanks for the suggestions, but I know the radiator sags when you remove the old lid. Me & a friend tried getting it to fit and wouldn't. He pulled the radiator back into place while I tried to get the air box to fit, and after 30 min of trying, nothing worked, so I just cut it out.
Maybe a silicone coupler would work for the MAF, but according to Volant, it was not needed because the MAF IS SUPPOSED to be fit into the "y" piece (as shown in the previous post), so I dont know why you found that funny, I'm not stupid. Every other Volant I've seen had no issues with the MAF sliding into place, just mine.
I also had no problems with the 2 "L" brackets lining up either, but when lined up correctly, the hole for the "Y" piece was offcenter to the tb, so I had to dremel the left side for it line up. That was no big deal though, took 2min. So like I said, I think we got a couple of bad intakes, because I've dealt with these on other peoples cars and didnt encounter these issues.
Anyways, thanks for pointing out that we are all "silly" and aren't capable of installing an air intake. If I can't even get that right, maybe I should go back and double check all head, cam, and clutch installs I've done.
I'm not denying the problems, but some of the problems are from improper installation or lack of a stock setup. All in all, it is a piece of ****, but it functions, and I believe that the main point the poster was trying to make is there should be a better product out there for the price you have to pay for this one.
12-24-2008, 01:33 PM
#59
TECH Fanatic
iTrader: (4)
Join Date: Jul 2003
Location: Orange Park/ Jacksonville, FL
Posts: 1,075
Likes: 0
Received 0 Likes
on
0 Posts
Sorry if I sounded insulting, i just found it amusing about sticking the MAF into the plastic piece. I didn't mean any insult to you. Also, I guess I was describing the wrong thing when i said "L-bracket" i was referring to the support piece for the radiator that is on the bottom it looks like an L from the side. If the radiator sags, it won't seat properly.
I'm not denying the problems, but some of the problems are from improper installation or lack of a stock setup. All in all, it is a piece of ****, but it functions, and I believe that the main point the poster was trying to make is there should be a better product out there for the price you have to pay for this one.
I'm not denying the problems, but some of the problems are from improper installation or lack of a stock setup. All in all, it is a piece of ****, but it functions, and I believe that the main point the poster was trying to make is there should be a better product out there for the price you have to pay for this one.

And yes, I agree, it should be a lot better quality for the money. The only reason Im not sweating it is cause I got it @ cost, then subtract the $80 I got for my lid, it was dirt cheap. So yeah, they should reduce the cost, or make a higher quality piece!
I do like the setup though. In combination with no baffles in the hood and no honeycomb pieces, its a straight shot of air to the filters.
oh, and I did know what you meant by "L" bracket, I couldn't get it to seat right no matter what, so I cut it out. It was like it was molded at a weird angle. I was referencing the other guy that had to drill in order to get the 2 L-shaped mounting brackets to work. Luckily, I didnt have that problem.
Last edited by JBIRD02; 12-24-2008 at 01:38 PM.
12-24-2008, 02:00 PM
#60

that intake looks like crap IMO...better hp out of a LID/FTRA(ram air) combined over any other intake...just need to use a little weather stripping under the lid around the edge so it seals tight...