


 04-25-2016, 04:04 PM
Last edit by: IB Advertising
See related guides and technical advice from our community experts:
Browse all: Air Intake and Exhaust Guides
- Camaro and Firebird: Header Reviews and How to Install Headers
Review and how-to
Browse all: Air Intake and Exhaust Guides

My Long Review, QTP 1 3/4 LT's & TSP 3" True dual System (LOTS O' PICS)
06-05-2006, 08:40 PM
#41
12 Second Club
Thread Starter
iTrader: (8)
Join Date: Jul 2004
Location: Vancouver, BC
Posts: 708
Likes: 0
Received 0 Likes
on
0 Posts

Holy crap! I didn't realize anyone read this anymore.
Awesome, I hope it helped people out.
I had to move my images from one hosting provider that I was paying for, to photobucket, so I may have screwed up the resolution or whatever that made it difficult for smaller monitor people to read the post easily. WILWAXU, fixed this earlier, if it needs to be done again, I would appreciate it.
Again, thanks for the feedback folks, and Viper, I'll certainly go back and tighten those bolts to be sure. I may be extending this system out the back sometime soon, and potentially painting the entire kit black, just cause I like it purty.
If i can get some good video here one of these days, ill post that up too.
I think some good audio of a stock motor with this kit would be beneficial, as I've never seeon one, and this seems like an earlier mod for folks.
Rock on.
DJ

 10-04-2006, 09:21 PM
#44
TECH Veteran
iTrader: (3)
Join Date: Feb 2004
Location: Lynnwood, WA (North of Seattle)
Posts: 4,729
Likes: 0
Received 0 Likes
on
0 Posts
I know this is old but I just got done installing a set of TSP TD's on my Trans Am about 30 mins ago and I just don't see how/where the mufflers are going to connect. I know they have the hangers but where the heck are they supposed to connect if I don't want to bend the hangers in a vice? (I don't have a vice so I am SOL there). Any suggestions would be greatly appreciated. 
Thanks in advance.
Thanks in advance.
10-04-2006, 11:49 PM
#45
TECH Addict
iTrader: (35)
Join Date: Dec 2005
Location: Cherry Hill, NJ
Posts: 2,373
Likes: 0
Received 0 Likes
on
0 Posts
what metal clucks were there, welds? Did you grind/smooth them down?
Any ideas of gains? It doesn't get better than QTP's and true duals in terms of flow and sound
Any ideas of gains? It doesn't get better than QTP's and true duals in terms of flow and sound
10-05-2006, 08:14 AM
#46
12 Second Club
Thread Starter
iTrader: (8)
Join Date: Jul 2004
Location: Vancouver, BC
Posts: 708
Likes: 0
Received 0 Likes
on
0 Posts
Originally Posted by Rottluver
I know this is old but I just got done installing a set of TSP TD's on my Trans Am about 30 mins ago and I just don't see how/where the mufflers are going to connect. I know they have the hangers but where the heck are they supposed to connect if I don't want to bend the hangers in a vice? (I don't have a vice so I am SOL there). Any suggestions would be greatly appreciated.
Thanks in advance.
Thanks in advance.
Are the hangers too far away from the seatwell area, or just not lining up properly?
If they are too far away, then you'll need to work the pipe around the front side of the X pipe to get more insertion. Getting the pipe on the header collectors is easy, but getting the X oriented with the two connecting points just right is the hard part.
You got to wiggle it, just a little bit.
That's right I said that.
Oh yeah, make sure the X is on right side up, if I had a nickel...
10-05-2006, 12:05 PM
#47
TECH Veteran
iTrader: (3)
Join Date: Feb 2004
Location: Lynnwood, WA (North of Seattle)
Posts: 4,729
Likes: 0
Received 0 Likes
on
0 Posts
Originally Posted by DirtyJohn
How do they not connect?
Are the hangers too far away from the seatwell area, or just not lining up properly?
If they are too far away, then you'll need to work the pipe around the front side of the X pipe to get more insertion. Getting the pipe on the header collectors is easy, but getting the X oriented with the two connecting points just right is the hard part.
You got to wiggle it, just a little bit.
That's right I said that.
Oh yeah, make sure the X is on right side up, if I had a nickel...
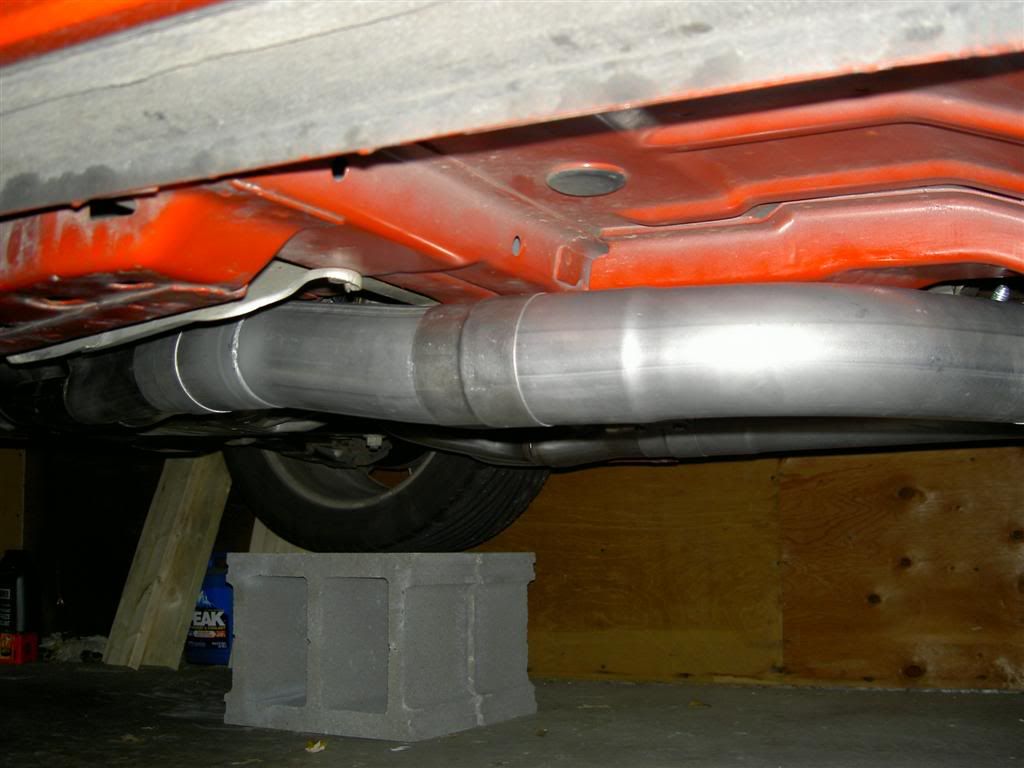
 Once I got the mufflers on, they hung low (like I said, about 6 inches from the painted seatwell area) and there were no bolts or holes or anything to connect it to.........
10-05-2006, 12:17 PM
Once I got the mufflers on, they hung low (like I said, about 6 inches from the painted seatwell area) and there were no bolts or holes or anything to connect it to.........
10-05-2006, 12:17 PM
#48
12 Second Club
Thread Starter
iTrader: (8)
Join Date: Jul 2004
Location: Vancouver, BC
Posts: 708
Likes: 0
Received 0 Likes
on
0 Posts
There are no holes, you will have to drill for the TSP kit, sucks but its the way it is.
Its not a big deal, you can always cover em up if you switch exhaust later.
I thought i put the supplies you need in the writeup, 3/8" bolts, matching washers, locking washers, and nuts. Something like that.
Your gonna have to spend time on the front X section to get them to slide closer to the seat wells. 6" tells me you have some more pipe to insert yet.
Try twisting the X at certain angles, and twisting the connecting pipes for more insertion. The points at the collectors are the easy part, the X section is the one that you have to spend time on to get the fitment you want.
I think I was at the same point you were at the first time, just get some good leverage and muscle that X into those front sections as much as possible.
10-05-2006, 12:23 PM
#49
TECH Veteran
iTrader: (3)
Join Date: Feb 2004
Location: Lynnwood, WA (North of Seattle)
Posts: 4,729
Likes: 0
Received 0 Likes
on
0 Posts
Originally Posted by DirtyJohn
There are no holes, you will have to drill for the TSP kit, sucks but its the way it is.
Its not a big deal, you can always cover em up if you switch exhaust later.
I thought i put the supplies you need in the writeup, 3/8" bolts, matching washers, locking washers, and nuts. Something like that.
Your gonna have to spend time on the front X section to get them to slide closer to the seat wells. 6" tells me you have some more pipe to insert yet.
Try twisting the X at certain angles, and twisting the connecting pipes for more insertion. The points at the collectors are the easy part, the X section is the one that you have to spend time on to get the fitment you want.
I think I was at the same point you were at the first time, just get some good leverage and muscle that X into those front sections as much as possible.
Its not a big deal, you can always cover em up if you switch exhaust later.
I thought i put the supplies you need in the writeup, 3/8" bolts, matching washers, locking washers, and nuts. Something like that.
Your gonna have to spend time on the front X section to get them to slide closer to the seat wells. 6" tells me you have some more pipe to insert yet.
Try twisting the X at certain angles, and twisting the connecting pipes for more insertion. The points at the collectors are the easy part, the X section is the one that you have to spend time on to get the fitment you want.
I think I was at the same point you were at the first time, just get some good leverage and muscle that X into those front sections as much as possible.
Buy nuts & bolts, gotcha...mighta been there, I was tired when I read this.
Wedge X further up, I will see what I can do.......it is a tight fit and was a beotch to get on in the first place. And sadly I have no one to help me, so we shall see how it goes.
Just curious........if the X pipe WAS upside down, how would I know?
10-05-2006, 12:40 PM
#50
12 Second Club
Thread Starter
iTrader: (8)
Join Date: Jul 2004
Location: Vancouver, BC
Posts: 708
Likes: 0
Received 0 Likes
on
0 Posts
If THIS
were installed on the car just like this. It would be upside down.
Notice on the left pipe side in this picture (by the 'Te' in Texas) there is a ridge section.
this side should be on the bottom and on the drivers side.
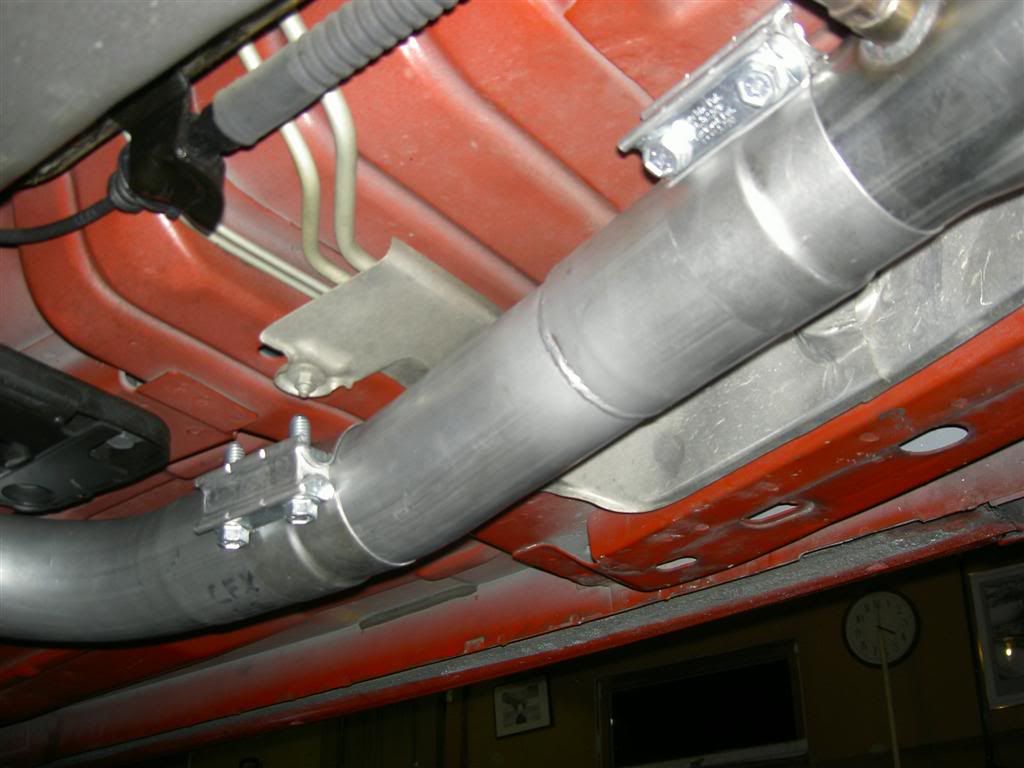
Another way to look at it, would be that if installed properly, it seems to dip appropriately to accomodiate the torque arm in that very area, if the pipe doesn't look like its dipping to accomodate for that, its prob upside down.
Also, if upside down the bullets or whatever muffler will almost angle downward.
Thats the best description I can give you short of whipping up a 3D animation, ...which I might do anyway.
were installed on the car just like this. It would be upside down.
Notice on the left pipe side in this picture (by the 'Te' in Texas) there is a ridge section.
this side should be on the bottom and on the drivers side.
Another way to look at it, would be that if installed properly, it seems to dip appropriately to accomodiate the torque arm in that very area, if the pipe doesn't look like its dipping to accomodate for that, its prob upside down.
Also, if upside down the bullets or whatever muffler will almost angle downward.
Thats the best description I can give you short of whipping up a 3D animation, ...which I might do anyway.
10-05-2006, 01:02 PM
#51
TECH Veteran
iTrader: (3)
Join Date: Feb 2004
Location: Lynnwood, WA (North of Seattle)
Posts: 4,729
Likes: 0
Received 0 Likes
on
0 Posts
Originally Posted by DirtyJohn
If THIS
were installed on the car just like this. It would be upside down.
Notice on the left pipe side in this picture (by the 'Te' in Texas) there is a ridge section.
this side should be on the bottom and on the drivers side.
Another way to look at it, would be that if installed properly, it seems to dip appropriately to accomodiate the torque arm in that very area, if the pipe doesn't look like its dipping to accomodate for that, its prob upside down.
Also, if upside down the bullets or whatever muffler will almost angle downward.
Thats the best description I can give you short of whipping up a 3D animation, ...which I might do anyway.
 10-05-2006, 04:10 PM
#52
TECH Veteran
iTrader: (3)
Join Date: Feb 2004
Location: Lynnwood, WA (North of Seattle)
Posts: 4,729
Likes: 0
Received 0 Likes
on
0 Posts
Well, my car must be some sort of genetic mutant..........x pipe is on properly and even after marking the spot where the pipes are all supposed to slide to with a marker, getting them there and then putting the mufflers up, it is STILL a good 5" off.........looks like me & Mr. Dremel are going to have to hack 5" off the ends of the x-pipe.....cant see any other way to make this work.
10-30-2006, 01:16 PM
#53

I guess mine aren't on quite correct because I have **** for ground clearance. I also have an issue on the driver side where L1 is supposed to clear that body piece. Whenever I jacked the bullets up to get my certain clearance, it was all over the body. And now it rattles like no other.
Any ideas? Or maybe another picture of L1 so I can get a better idea of how I needs to be on to get the best clearance.
Any ideas? Or maybe another picture of L1 so I can get a better idea of how I needs to be on to get the best clearance.
10-30-2006, 01:53 PM
#54
TECH Veteran
iTrader: (3)
Join Date: Feb 2004
Location: Lynnwood, WA (North of Seattle)
Posts: 4,729
Likes: 0
Received 0 Likes
on
0 Posts
Originally Posted by Cybnext
I guess mine aren't on quite correct because I have **** for ground clearance. I also have an issue on the driver side where L1 is supposed to clear that body piece. Whenever I jacked the bullets up to get my certain clearance, it was all over the body. And now it rattles like no other.
Any ideas? Or maybe another picture of L1 so I can get a better idea of how I needs to be on to get the best clearance.
Any ideas? Or maybe another picture of L1 so I can get a better idea of how I needs to be on to get the best clearance.
10-30-2006, 02:25 PM
#55
12 Second Club
Thread Starter
iTrader: (8)
Join Date: Jul 2004
Location: Vancouver, BC
Posts: 708
Likes: 0
Received 0 Likes
on
0 Posts
Originally Posted by Cybnext
Any ideas? Or maybe another picture of L1 so I can get a better idea of how I needs to be on to get the best clearance.
The drivers side is the easiest one to get the clearance on b/c its in 2 pieces and with that you have degrees of freedom the 1 piece pass side does not, although that side has lots more room anyway.
1) What headers?
2) Whats rattling?
3) Check for upside down X, thats the #1 killer of clearance.
10-30-2006, 03:13 PM
#56
On The Tree
iTrader: (1)
Join Date: Jan 2006
Location: Houston, TX
Posts: 131
Likes: 0
Received 0 Likes
on
0 Posts
This is a good write up. Excellent choice in your header selection. I hope this helps anyone researching what brand of headers, and ease of install. I hope everyone read your disclamer. Anybody can do this them self. Just dont get in a hurry, and your arms will look like you got in a fight with a cat. Good job!!
10-30-2006, 04:48 PM
#57
Originally Posted by DirtyJohn
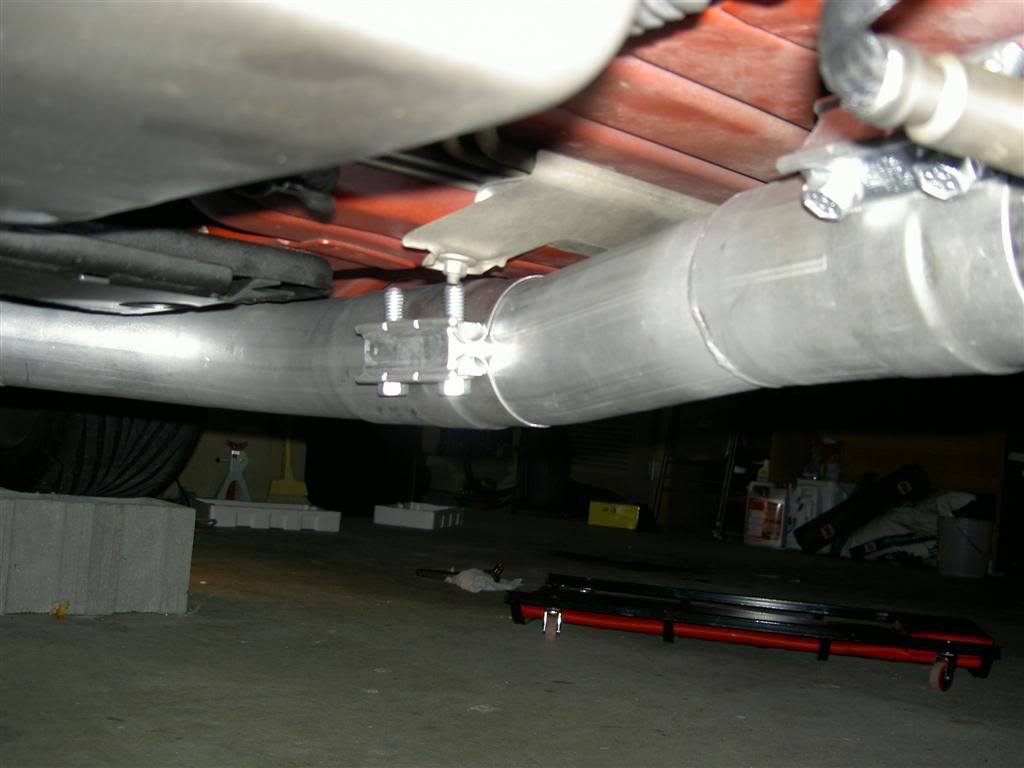
These are the best pix I have. That section turns pretty easy just turn it until its tight up to the floorboard, maybe a small fingers width from it.
The drivers side is the easiest one to get the clearance on b/c its in 2 pieces and with that you have degrees of freedom the 1 piece pass side does not, although that side has lots more room anyway.


1) What headers?
2) Whats rattling?
3) Check for upside down X, thats the #1 killer of clearance.
The drivers side is the easiest one to get the clearance on b/c its in 2 pieces and with that you have degrees of freedom the 1 piece pass side does not, although that side has lots more room anyway.
1) What headers?
2) Whats rattling?
3) Check for upside down X, thats the #1 killer of clearance.
As far as I know, the only thing rattling is the pipe that goes right over that brace.
I was worried about the X being upside down, but after looking at your pictures, I'm 95% sure that its on the correct way.
10-30-2006, 09:09 PM
#59
12 Second Club
Thread Starter
iTrader: (8)
Join Date: Jul 2004
Location: Vancouver, BC
Posts: 708
Likes: 0
Received 0 Likes
on
0 Posts
Originally Posted by Cybnext
Pacesetter Race
As far as I know, the only thing rattling is the pipe that goes right over that brace.
As far as I know, the only thing rattling is the pipe that goes right over that brace.
Not the stamped metal brace that the stock Y went through?
That gets removed.
I'd just take the time and flip the X over to rule it out, I know it sux but its like night and day.
10-30-2006, 09:26 PM
#60
!LS1 11 Second Club


Very comprehensive write up. Congrats for the time and effort.
One thing caught my eye when I saw your pics- particularly this one:
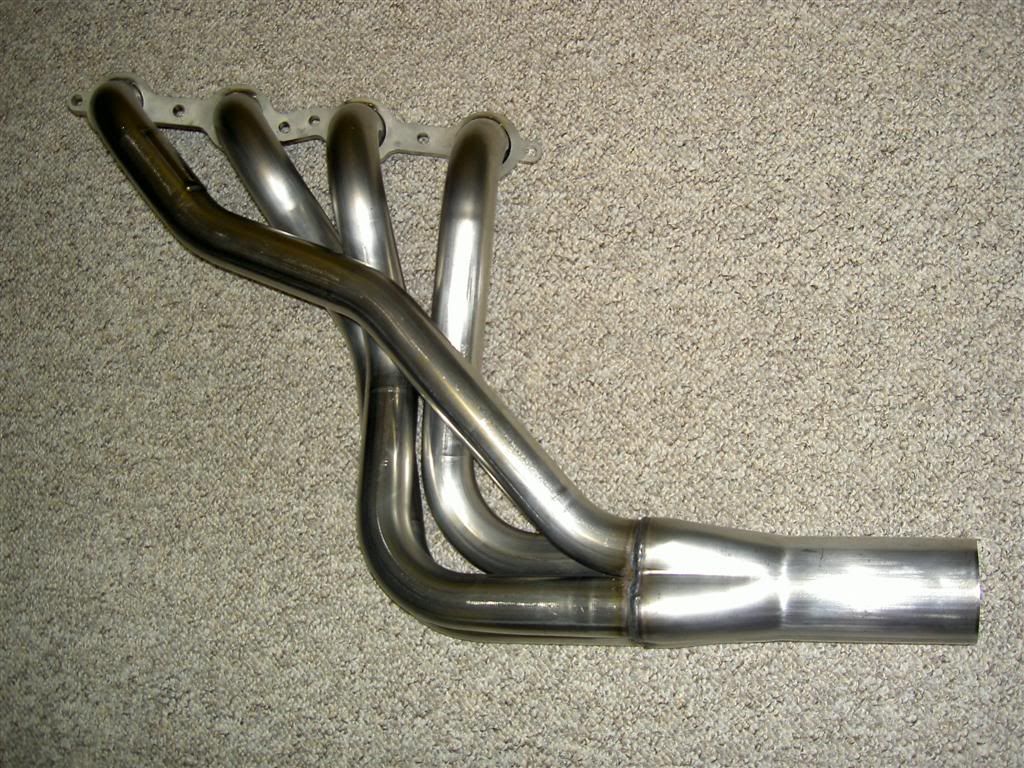
I thought all QTP headers these days were of the HVMC type (even the QTP website says so):

Just an observation.
One thing caught my eye when I saw your pics- particularly this one:
I thought all QTP headers these days were of the HVMC type (even the QTP website says so):
Just an observation.