
Homemade air tube block off plates
 01-03-2007, 03:36 PM
#1
TECH Addict
Thread Starter
iTrader: (75)
Join Date: Aug 2005
Location: South Jersey (15 miles from Atlantic City)
Posts: 2,167
Likes: 0
Received 1 Like
on
1 Post

Just hope this helps somebody out. Also I purchased my headers from LS1speed.com and I highly recommend them. If you don't want to waste the time order some pre-fabbed ones from LS1speed.com! They are great!
I have Pacesetter LT headers on my SS. I decided to remove my air pump only after the gasket that the headers came with broke and i started to hear a ticking noise and it pissed me off. I decided to make my own blockoff plates.
1.) Remove the air pump from the car.
2.) Once removed use a Hacksaw and cut the ends of the metal hoses off (The little piece where the bolts go thru)
3.) Then I got a stainless steel stove isle cover cost $1 at the dollar store
4.) Cut little pieces off of it and used JB weld you could prob use RTV sealant or anything to cover the hole.
5.) Bolted the ends back down
FInished result
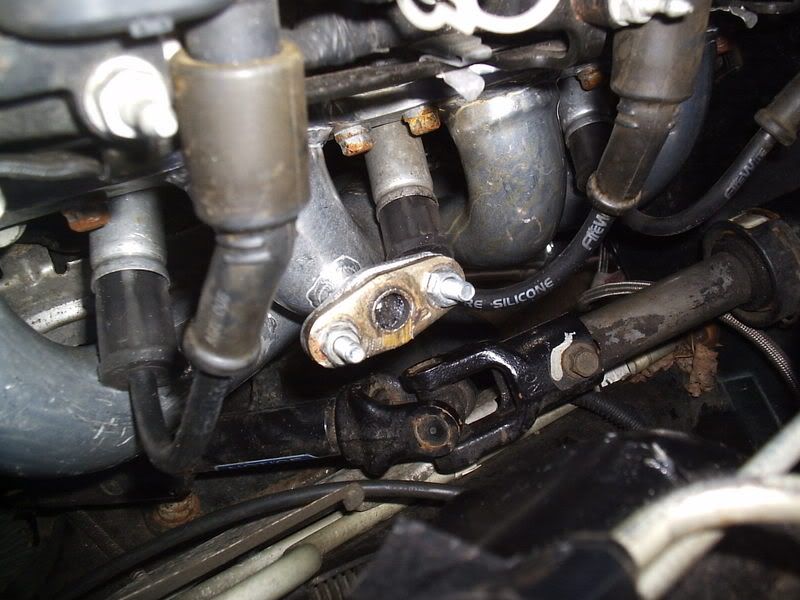
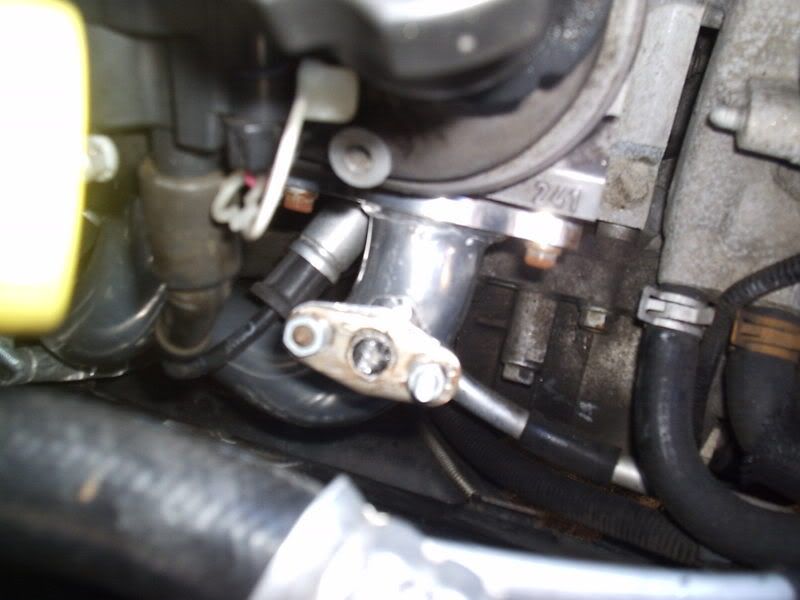
Cost me absolutely nothing but about 10 minutes of time. I had all the stuff here I'm sure others can chime in with other ways to make these. Hope this helps anyone out there that wants to remove their airpump or had the gasket beak and got stuck with hearing that annoying ticking noise that sounds like a header leak!
I have Pacesetter LT headers on my SS. I decided to remove my air pump only after the gasket that the headers came with broke and i started to hear a ticking noise and it pissed me off. I decided to make my own blockoff plates.
1.) Remove the air pump from the car.
2.) Once removed use a Hacksaw and cut the ends of the metal hoses off (The little piece where the bolts go thru)
3.) Then I got a stainless steel stove isle cover cost $1 at the dollar store
4.) Cut little pieces off of it and used JB weld you could prob use RTV sealant or anything to cover the hole.
5.) Bolted the ends back down
FInished result
Cost me absolutely nothing but about 10 minutes of time. I had all the stuff here
I'm sure others can chime in with other ways to make these. Hope this helps anyone out there that wants to remove their airpump or had the gasket beak and got stuck with hearing that annoying ticking noise that sounds like a header leak! 
 i'm sure this will help some people out
01-04-2007, 12:13 AM
i'm sure this will help some people out
01-04-2007, 12:13 AM
#3

Cool, I used some medium guage sheet metal cut down to size, drilled two holes, RTV'd one side of it and used a few washers to reinstall the stock bolts and hold it in place and distribute load as even as possible (large washers). Was ugly, but it was temporary til I got the Pacesetters installed 
01-04-2007, 08:56 AM
#5
09-22-2011, 07:42 PM
#6
TECH Apprentice
iTrader: (3)

Join Date: Dec 2003
Location: Johnsonville, SC; but orginally from GAINESVILLE, FL
Posts: 360
Likes: 0
Received 0 Likes
on
0 Posts
I have taken a penny, flattened it with a hammer and then added enough adhesive to just keep the penny in place and tightened it down and worked like a champ, until I got something cleaner and more visibly attractive to put in it's place.
Nice job!
Nice job!