

Write-Up needed! Trunion Upgrade
 08-25-2010, 11:21 PM
#1

I know lots of people are doing them as of lately, so lets see a Comp Cams trunion upgrade write-up/how-to with detailed pictures. First person to have a really legit document posted up will get a unique title change. "Trunion King"
DO WORK SON!
DO WORK SON!

 08-27-2010, 03:34 AM
#7
10 Second Club
iTrader: (1)
Join Date: Sep 2007
Location: In Uranus!
Posts: 1,500
Likes: 0
Received 0 Likes
on
0 Posts
I would also like to have such info available, as I'm sure this will be one of the next upgrades I do.
Also, a bit off topic, but a buddy of mine has "DO WORK" tatooed on the inside of his bottom lip (hey...I DID warn you if was off topic..). Pretty stupid and awesome, all at the same time.
Also, a bit off topic, but a buddy of mine has "DO WORK" tatooed on the inside of his bottom lip (hey...I DID warn you if was off topic..). Pretty stupid and awesome, all at the same time.
Trending Topics
08-27-2010, 05:44 AM
#8
Available online right here.


 08-27-2010, 09:42 AM
#11

One of the difficult aspects of doing a write up is that one cannot pass mechanical skills or apptitude through the internet or the telephone. I would suggest the comp directions along with practice as the way to go.
08-27-2010, 10:47 AM
#12
I just completed mine. I don't have a press nor the fancy tools that comp's recommend but I got it done without any mishaps and it's pretty safe the way I did it.
I'll try my best to do a write up for the avg joe to do it. Oh yes I'll include lotsa pictures. lol.
I'll try my best to do a write up for the avg joe to do it. Oh yes I'll include lotsa pictures. lol.
Last edited by bene; 08-27-2010 at 02:54 PM.
 08-27-2010, 05:42 PM
#15
DIY LS1 trunion upgrade
items needed:
Comp cam LS1 rocker bearing trunion upgrade kit
LS1 stock rocker arm x 16
tools needed:
any bolt that is similar to the LS1 used long head bolt or use a long LS1 head bolt
small metal mallet

16 mm socket x 2

Medium size vice
deep socket 24 mm
Snap C ring pliers
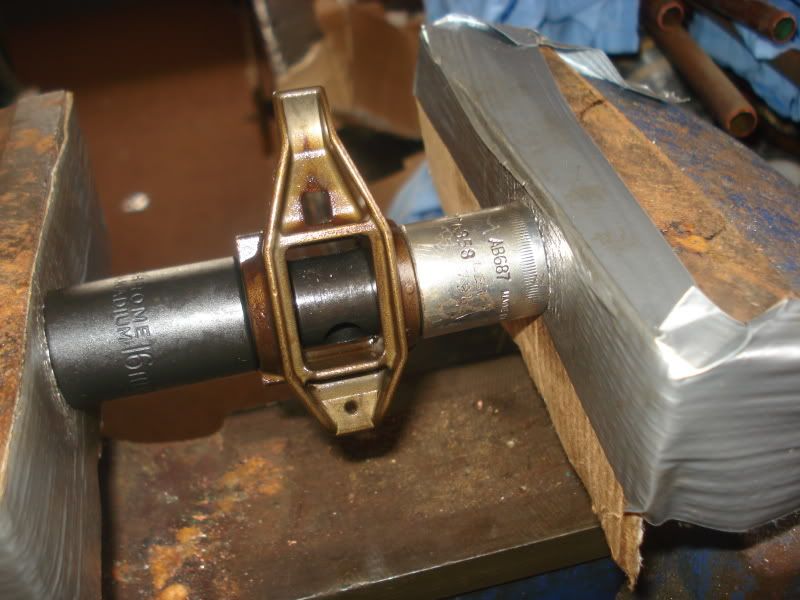
-Disassembling the LS1 rocker trunion
Place a deep socket 24mm on the floor or any stable flat surface and put the LS1 rocker arm sideways flat on the socket like so in the picture.

Now grab the head bolt like shown above and place the top of the bolt square on the rocker trunion and firmly hold it with your hand.
While securing the bolt, and the rocker on the deep socket, hit the bolt with the mallet four to
five times until the trunion falls out of the rocker arm into the deep socket.
You will do this 15 more times so take your time.
-Assembling the LS1 rocker arm with the Comp cam trunion
Get one disassembled rocker arm,two bearings and the shaft.
Pre-assemble them together make sure you have the letters on both of the
trunion bearing facing outwards and place them on the vice, press the bearings in
(make sure they are even) and the shaft into the rocker arm only halfway as the length of shaft wouldn't let you go all the way in.


Now grab the two 16 mm sockets and place them on each side of the rocker arm.
Make sure the sockets are centered on the bearings. Look at the picture for reference.
Place them on the vice and press them in until you see the bearings flush with the rocker arm.

Do this 15 more times and take your time.
-Snap rings installation:
Once you are done with assembling the rocker arms, its time to put the snap C rings on.
Grab one rocker arm, and one snap ring with the snap ring pliers. Place the snap ring on the notched area and do this again on the other side.


You have now completed one LS1 rocker arm with upgraded trunion, 15 more to go!
Once done, pat yourself on back for being cheap and doing a worthy mod for your rocker arms.
items needed:
Comp cam LS1 rocker bearing trunion upgrade kit
LS1 stock rocker arm x 16
tools needed:
any bolt that is similar to the LS1 used long head bolt or use a long LS1 head bolt
small metal mallet
16 mm socket x 2
Medium size vice
deep socket 24 mm
Snap C ring pliers
-Disassembling the LS1 rocker trunion
Place a deep socket 24mm on the floor or any stable flat surface and put the LS1 rocker arm sideways flat on the socket like so in the picture.
Now grab the head bolt like shown above and place the top of the bolt square on the rocker trunion and firmly hold it with your hand.
While securing the bolt, and the rocker on the deep socket, hit the bolt with the mallet four to
five times until the trunion falls out of the rocker arm into the deep socket.
You will do this 15 more times so take your time.
-Assembling the LS1 rocker arm with the Comp cam trunion
Get one disassembled rocker arm,two bearings and the shaft.
Pre-assemble them together make sure you have the letters on both of the
trunion bearing facing outwards and place them on the vice, press the bearings in
(make sure they are even) and the shaft into the rocker arm only halfway as the length of shaft wouldn't let you go all the way in.
Now grab the two 16 mm sockets and place them on each side of the rocker arm.
Make sure the sockets are centered on the bearings. Look at the picture for reference.
Place them on the vice and press them in until you see the bearings flush with the rocker arm.
Do this 15 more times and take your time.
-Snap rings installation:
Once you are done with assembling the rocker arms, its time to put the snap C rings on.
Grab one rocker arm, and one snap ring with the snap ring pliers. Place the snap ring on the notched area and do this again on the other side.
You have now completed one LS1 rocker arm with upgraded trunion, 15 more to go!
Once done, pat yourself on back for being cheap and doing a worthy mod for your rocker arms.
Last edited by bene; 09-25-2011 at 07:52 AM.
The following users liked this post:
TFA303 (06-10-2020)
08-28-2010, 10:06 PM
#17
Thanks! Another write-up for the archives 
Also, I found this link to be very informative w/ tons of pics too:
http://forums.corvetteforum.com/c5-t...n-install.html
Also, I found this link to be very informative w/ tons of pics too:
http://forums.corvetteforum.com/c5-t...n-install.html
Last edited by Squirts11; 08-29-2010 at 12:59 AM.
 08-29-2010, 11:38 PM
#20
The trunion upgrade is greared towards improving rocker longevity/reliability with continual upper rpm use. It replaces the uncaged needle bearings with caged bearings, thus reducing the likelihood of finding the dreaded needle bearings when the oil is changed.
Last edited by Squirts11; 08-29-2010 at 11:46 PM.