
Port and Polishing heads.
 02-08-2011, 07:36 AM
#41
12 Second Club
iTrader: (10)
Join Date: Jan 2009
Location: 5.0
Posts: 1,302
Likes: 0
Received 0 Likes
on
0 Posts
how much difference are you going to see just by doing what he did? doesnt cyl 7 and 8 flow more than the others bc of the intake? wheres the problem there?
 02-08-2011, 05:16 PM
#42
TECH Enthusiast
iTrader: (10)

Join Date: Jun 2010
Location: Boston
Posts: 728
Likes: 0
Received 0 Likes
on
0 Posts

I feel looks can be deceiving, i run my fingers over the ports and determine that way. That way it also helps me visualize the flow.
Those bits do take a while, but i rather take my time. Almost done with the first head and ill put money down that they would easily stack up to aftermarket heads if i got a galve job.
Those bits do take a while, but i rather take my time. Almost done with the first head and ill put money down that they would easily stack up to aftermarket heads if i got a galve job.
02-08-2011, 10:05 PM
#43
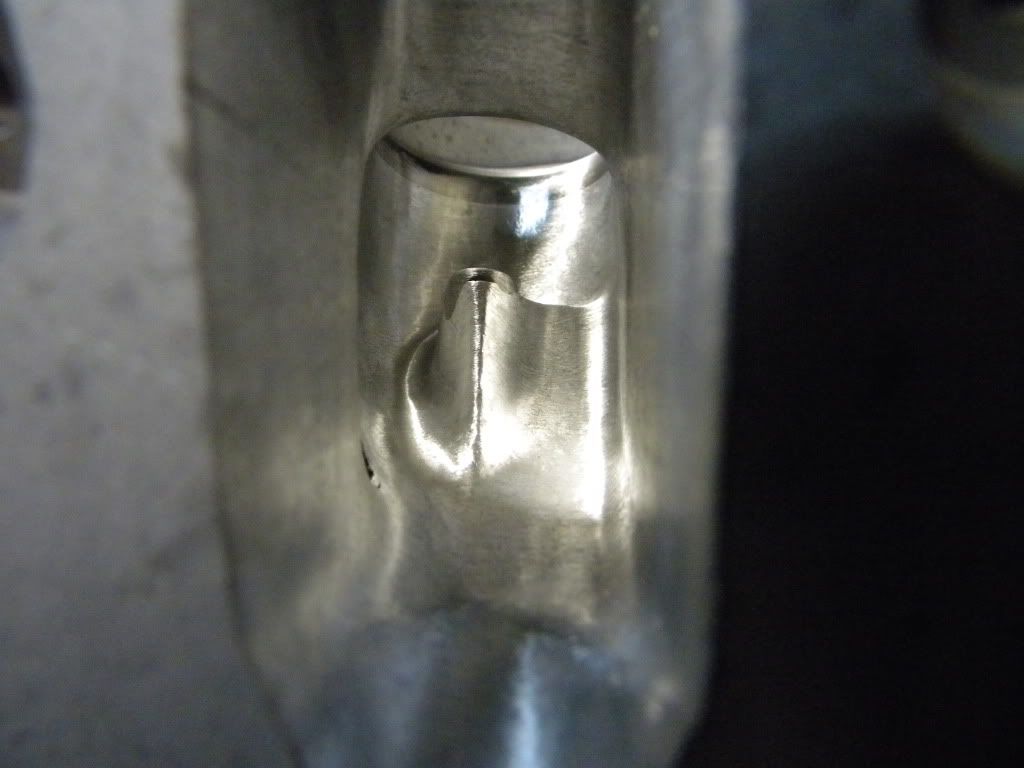
I use the bit as a gauge. The width of it is how much i went down around the bowl, exactly that, and then just smoothed it up and blended it. I didnt actually dig down, just down far enough where the bit touched the bottom, and doing so it opened the sides up enough.


Same with the exhaust, I didnt actually remove material to reshape the walls... you can see the factory casting line all the way around. I just smoothed the bowls and around the guides. Everything was then sand/polished with 80 grit after this to smooth it a little and thats it.
All mine i would say are very close to each other....VERY.
02-09-2011, 07:13 AM
#44
Launching!
iTrader: (6)

Join Date: Nov 2010
Location: northern indiana
Posts: 272
Likes: 0
Received 0 Likes
on
0 Posts
I feel looks can be deceiving, i run my fingers over the ports and determine that way. That way it also helps me visualize the flow.
Those bits do take a while, but i rather take my time. Almost done with the first head and ill put money down that they would easily stack up to aftermarket heads if i got a galve job.
Those bits do take a while, but i rather take my time. Almost done with the first head and ill put money down that they would easily stack up to aftermarket heads if i got a galve job.
02-09-2011, 07:18 AM
#45
TECH Enthusiast
iTrader: (10)
Join Date: Jun 2010
Location: Boston
Posts: 728
Likes: 0
Received 0 Likes
on
0 Posts
I took out a bit more material. Removed all the casting lines and evenly removed all the material around the elsewhere. Only thing i didnt touch was the short side, i just cleaned off the casting and blended the walls down to it. Im starting to prefer the bits removing material slowly. Its actually smooth to tje point i will barely need the sanding rolls.
02-09-2011, 08:07 AM
#46
12 Second Club
iTrader: (10)
Join Date: Jan 2009
Location: 5.0
Posts: 1,302
Likes: 0
Received 0 Likes
on
0 Posts
marcello those bits we used i feel get smooth enough not to require sanding rolls for the intake ports.
next time i will start by taking the big chunks out wit pwrtrps bits, then move to the slower carbide i used before, then for the exhaust polish with sanding rolls.
next time i will start by taking the big chunks out wit pwrtrps bits, then move to the slower carbide i used before, then for the exhaust polish with sanding rolls.
02-09-2011, 10:10 AM
#47
TECH Enthusiast
iTrader: (10)
Join Date: Jun 2010
Location: Boston
Posts: 728
Likes: 0
Received 0 Likes
on
0 Posts
I will since my plans changed as of yesterday. I decided to sell my lm7 and get a 6.0. I had planned a turbo 5.3, then drove it stock and lit up the tires too easily, so i dropped the turbo idea and go na. My goal was 400rwhp. Buy all the parts i accumulated were a little overkill. So either sell my parts or my motor, and i really rather have a 6.0. I decided to throw in these heads for an extra 100 for anyone that buys the motor. If i sell the motor w/o them they will be flow tested and sold.
Solid motor if anyone is interested, only 56k.
02-09-2011, 02:40 PM
#49
TECH Enthusiast
iTrader: (10)
Join Date: Jun 2010
Location: Boston
Posts: 728
Likes: 0
Received 0 Likes
on
0 Posts
marcello those bits we used i feel get smooth enough not to require sanding rolls for the intake ports.
next time i will start by taking the big chunks out wit pwrtrps bits, then move to the slower carbide i used before, then for the exhaust polish with sanding rolls.
next time i will start by taking the big chunks out wit pwrtrps bits, then move to the slower carbide i used before, then for the exhaust polish with sanding rolls.
are you gonna do this to the 6.0l heads?
The only reason im working on these now, is because my car is in a carport and its way too cold out to work on it and i need something to keep me busy.
To be completely honest i think its really relaxing. Im thinking its not something to bad to do on the side for some spare cash to throw at my hotrod. I expected to royally screw this set up, but its coming out great. Wish i could have done a before and after dyno just to see how i did. Flow numbers is one thing, you can just hog out tons of material and get high flow numbers, but to actually get an increase in power is another.
 02-09-2011, 04:21 PM
#51
12 Second Club
iTrader: (10)
Join Date: Jan 2009
Location: 5.0
Posts: 1,302
Likes: 0
Received 0 Likes
on
0 Posts
yeah thats what mine looked like and general cncd heads for the most part.
fwiw this is exact opposite of what the old pontiac guys do, they leave that area you thinned out to take the air around the valveguide very wide to send that stream to the valve. thats what i meant by that. im pretty sure none of the old stuff is relative anyway lol.
fwiw this is exact opposite of what the old pontiac guys do, they leave that area you thinned out to take the air around the valveguide very wide to send that stream to the valve. thats what i meant by that. im pretty sure none of the old stuff is relative anyway lol.
02-10-2011, 10:16 AM
#52
TECH Enthusiast
iTrader: (10)
Join Date: Jun 2010
Location: Boston
Posts: 728
Likes: 0
Received 0 Likes
on
0 Posts
yeah thats what mine looked like and general cncd heads for the most part.
fwiw this is exact opposite of what the old pontiac guys do, they leave that area you thinned out to take the air around the valveguide very wide to send that stream to the valve. thats what i meant by that. im pretty sure none of the old stuff is relative anyway lol.
fwiw this is exact opposite of what the old pontiac guys do, they leave that area you thinned out to take the air around the valveguide very wide to send that stream to the valve. thats what i meant by that. im pretty sure none of the old stuff is relative anyway lol.

 02-11-2011, 07:21 AM
#54
TECH Enthusiast
iTrader: (10)
Join Date: Jun 2010
Location: Boston
Posts: 728
Likes: 0
Received 0 Likes
on
0 Posts
I thought about junking a head just to see how much material is really there. But with a 5.3l head, the vj becomes the restriction, and even just removing a small amount of material is an improvement.
My next set my be either another 862, or a 243 if i can get my hands on a set for a fair price.
My next set my be either another 862, or a 243 if i can get my hands on a set for a fair price.


 03-29-2011, 09:40 PM
#59
article I read about Ken Sperling(sp) spiraling like a cyclone through round
shapes....That being said a wedge-design head's worst transition is the tight
bend @ the shortside. If you can picture why for years cylinder head gurus
have been raising the intake port roof AND epoxy filling the floor it is to
straighten the tight transition from a horizontal flow path to vertical past the
valve. Many kick *** heads even cant the floor as it approaches the short
side to promote swirl (again to simulate a smoother path @ the back of the
intake valve). Lastly as the intake valve opens in a wedge head the air
coming past the valve @ or near the short side happens to be positioned near
the middle of the cylinder(bore) which is ultimately what you're filling and we
know air flow like inertia flows faster in the middle(center)...or so I'm told