

DIY crank pulley installation tool?

 06-16-2012, 01:29 PM
#42

I bet a beer, GM did not install a bolt, tighten it, loosen it, and toss it to install another bolt for final assembly....
Absolutely not. The factory does not do that.
What i posted is how a service procedure is DUN. This is not BRAIN SURGERY!!! I have installed hundreds of dampers on just about every car line made. Pull it on with the tool and replace the tool with a NEW BOLT. SIMPLE. When it seats you can feel it. SIMPLE ENOUGH SAID. OH YES NEVER HEAT THE DAM THING!!!!
06-16-2012, 01:59 PM
#43
Teching In
iTrader: (3)

Join Date: Jun 2011
Location: Saint Paul, MN
Posts: 42
Likes: 0
Received 0 Likes
on
0 Posts
I bet a beer, GM did not install a bolt, tighten it, loosen it, and toss it to install another bolt for final assembly....
Absolutely not. The factory does not do that.
What i posted is how a service procedure is DUN. This is not BRAIN SURGERY!!! I have installed hundreds of dampers on just about every car line made. Pull it on with the tool and replace the tool with a NEW BOLT. SIMPLE. When it seats you can feel it. SIMPLE ENOUGH SAID. OH YES NEVER HEAT THE DAM THING!!!!
Absolutely not. The factory does not do that.
What i posted is how a service procedure is DUN. This is not BRAIN SURGERY!!! I have installed hundreds of dampers on just about every car line made. Pull it on with the tool and replace the tool with a NEW BOLT. SIMPLE. When it seats you can feel it. SIMPLE ENOUGH SAID. OH YES NEVER HEAT THE DAM THING!!!!
From the GM Service Manual, 2002 Helms Manual page 6-448.
The used crankshaft balancer bolt will be used only during the first pass on the balancer installation procedure. Install a NEW crankshaft balancer bolt and tighten as described in the second, third and fourth passes of the balancer bolt tightening procedure.
The crankshaft balancer installation and bolt tightening involves a four stage tightening process. The first pass ensures that the balancer is installed completely onto the crankshaft. The third, and fourth passes tighten the new bolt to the proper torque.
The crankshaft balancer installation and bolt tightening involves a four stage tightening process. The first pass ensures that the balancer is installed completely onto the crankshaft. The third, and fourth passes tighten the new bolt to the proper torque.
Step 1 is the 240lb-ft with the old bolt. Step 2 is to measure the snout depth, and repeat the J-Tool if not within spec. Step 3 is 37lb-ft on the new bolt, and Step 4 is 140 degrees past.
06-16-2012, 08:09 PM
#45
TECH Regular
iTrader: (6)
Join Date: Oct 2009
Location: Norton, Ohio
Posts: 429
Likes: 0
Received 0 Likes
on
0 Posts
I shaved the corners of a 4x4 until it fit inside the pulley, gave it a few whacks with a small sledge, drove it on the rest of the way with an old bolt, then put the new one in with red loctite. I've done it this way several times, on two different motors, always successful, even if it isn't the GM procedure. I don't heat it either, and it can be done with the rad in the car.
06-16-2012, 09:02 PM
#46
Teching In
iTrader: (3)
Join Date: Jun 2011
Location: Saint Paul, MN
Posts: 42
Likes: 0
Received 0 Likes
on
0 Posts
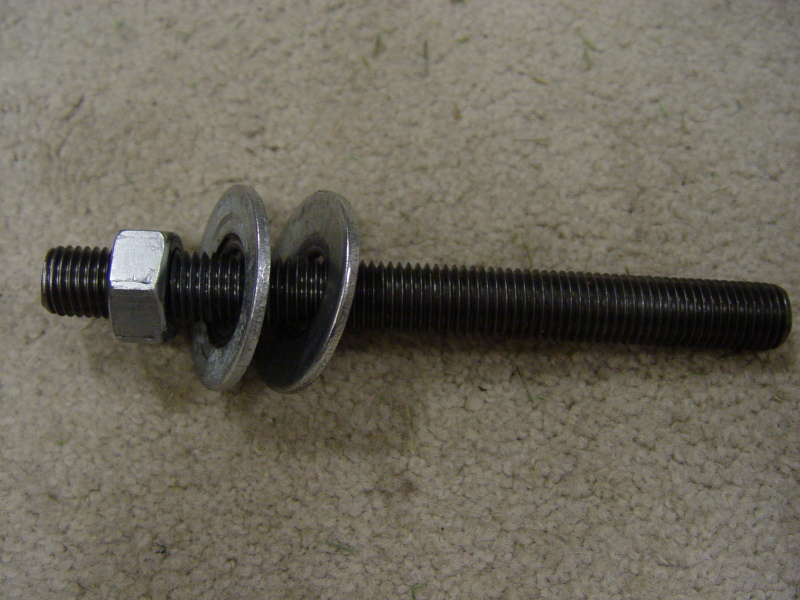
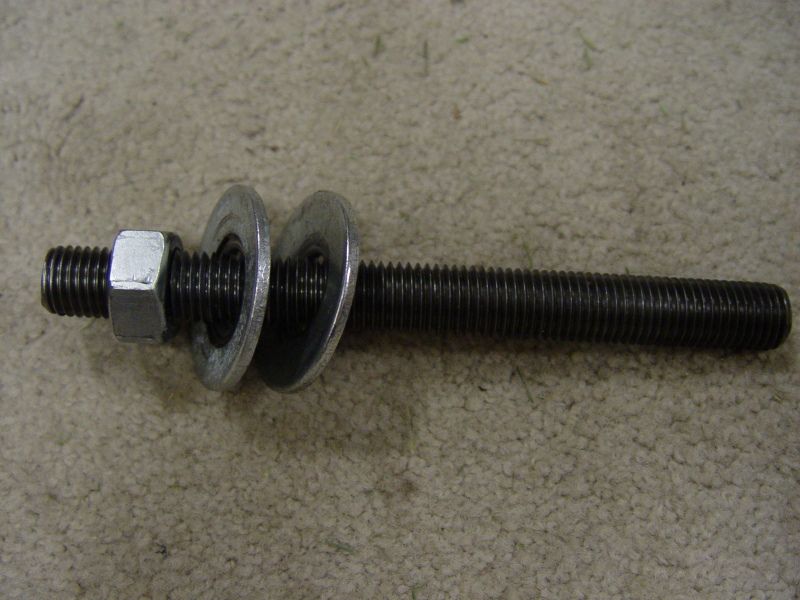
This is the tool I picked up from a forum member here, and it was more than adequate. Two washers, nut, and all-thread. No whacking, heating, or other creativeness required.
 06-16-2012, 09:17 PM
#47
Correct, not the GM procedure. Sledgehammers are not kind to bearings and bushings. The GM procedure is written by engineers for their dealers, which I'd rather follow than devising another approach.
This is the tool I picked up from a forum member here, and it was more than adequate. Two washers, nut, and all-thread. No whacking, heating, or other creativeness required.
This is the tool I picked up from a forum member here, and it was more than adequate. Two washers, nut, and all-thread. No whacking, heating, or other creativeness required.
A torington bearing installed between the washers is a PLUS. Coating the snout with some oil is also a plus. Anyone building BB CHEVYS know first hand about tough damper instillation's. We line hone them for the proper interference fit. Several outside venders that make dampers require a snout that is coated with a light film of oil. Their is no negative issues with coating the snout with lube!!
Last edited by tom falco; 06-16-2012 at 09:25 PM.
06-16-2012, 09:21 PM
#48
I shaved the corners of a 4x4 until it fit inside the pulley, gave it a few whacks with a small sledge, drove it on the rest of the way with an old bolt, then put the new one in with red loctite. I've done it this way several times, on two different motors, always successful, even if it isn't the GM procedure. I don't heat it either, and it can be done with the rad in the car.
ABSOLUTELY POSITIVELY THE WRONG WAY TO INSTALL A DAMPER BAR NONE. This is why people have engines that fail. I would highly recommend not listening to this procedure because it will destroy the DAMPER. It will most likely seperate and cause damage when the unit blows in to pieces. NEVER USE A HAMMER ON A DAMPER . This is how bad info is passed around car sites and people mess their stuff up. Absolutely the silliest thing i have ever read!!
 06-16-2012, 11:04 PM
#49

Correct, not the GM procedure. Sledgehammers are not kind to bearings and bushings. The GM procedure is written by engineers for their dealers, which I'd rather follow than devising another approach.
This is the tool I picked up from a forum member here, and it was more than adequate. Two washers, nut, and all-thread. No whacking, heating, or other creativeness required.
This is the tool I picked up from a forum member here, and it was more than adequate. Two washers, nut, and all-thread. No whacking, heating, or other creativeness required.
06-17-2012, 01:00 AM
#50
Teching In
iTrader: (3)
Join Date: Jun 2011
Location: Saint Paul, MN
Posts: 42
Likes: 0
Received 0 Likes
on
0 Posts
Use adequate lube on the exposed threads and between washers. As you tighten the nut, the washers slide on each other (torrington would be better), and it draws the pulley on. The thread-rod is removed by finger, as it never did rotate or get tight. The only threads at risk are on the threadrod as the nut passes by.
I am in full agreement that solutions involving the stock bolt or even a 1" longer-than-stock bolt that turn and pull the balancer all the way on are a risk to the crankshaft threads. A stationary rod is not, which is what the Colorado Speed, Kent-Moore, and thread-rod tools all accomplish.
Last edited by bartmanC5; 06-17-2012 at 01:08 AM.
06-17-2012, 11:55 AM
#52
TECH Regular
iTrader: (6)
Join Date: Oct 2009
Location: Norton, Ohio
Posts: 429
Likes: 0
Received 0 Likes
on
0 Posts
ABSOLUTELY POSITIVELY THE WRONG WAY TO INSTALL A DAMPER BAR NONE. This is why people have engines that fail. I would highly recommend not listening to this procedure because it will destroy the DAMPER. It will most likely seperate and cause damage when the unit blows in to pieces. NEVER USE A HAMMER ON A DAMPER . This is how bad info is passed around car sites and people mess their stuff up. Absolutely the silliest thing i have ever read!!
Instructions from my Summit Racing Underdrive Pulley:
13. If you are not using an installation tool, quickly, utilizing a block of aluminum which fits into the recess of the damper
to protect the machined hub face, drive the Damper hub onto the crankshaft. DO NOT drive the damper onto the
crankshaft by the outer ring!
As long as you don't contact the outer ring, the pulley won't separate. Like I said, I drove it on in the center of the hub.
I know it's not the "engineer's" way, but like I said, it has worked for me every time. Also, I have had a few bad experiences with All Thread and tend to be leery toward using it.
The rest of the instructions, if anyone would like to view them:
http://static.summitracing.com/globa...structions.pdf
06-17-2012, 04:01 PM
#53
First off to do the job correctly the inside and outside dimnsions should be measured for proper interference fit. This is something we old timers that did loads of BB CHEVYS learned first hand very very fast. Hitting a damper even on the inside is a no no period case closed. The blows can and in most cases will destroy or could destroy the adhesion between the enertia ring and the hub. Once again never use the stock bolt it is to short anyway. You need a longer threaded rod that facilitates all the threads in the crank. As explained above by 81Z28. He clearly understands the necessity of utilizing all the crank snout threads. By turning the nuts in stead of the bolt in the threaded portion of the snout. He would have gone one better with a torrington bearing as he agrees. Anyone telling anyone to hit a damper with a HAMMER SHOULD BE STOCKING SHELVES IN WALL-MART not working on cars.
06-17-2012, 04:03 PM
#54
06-17-2012, 09:56 PM
#55

Use something like this https://ls1tech.com/forums/album.php...pictureid=5971 or risk this being the title of your next thread "Broken bolt in crank snout during pulley install"
 06-17-2012, 11:23 PM
#56
TECH Fanatic
iTrader: (8)
Join Date: Sep 2007
Location: Hillsboro Kansas
Posts: 1,823
Likes: 0
Received 0 Likes
on
0 Posts

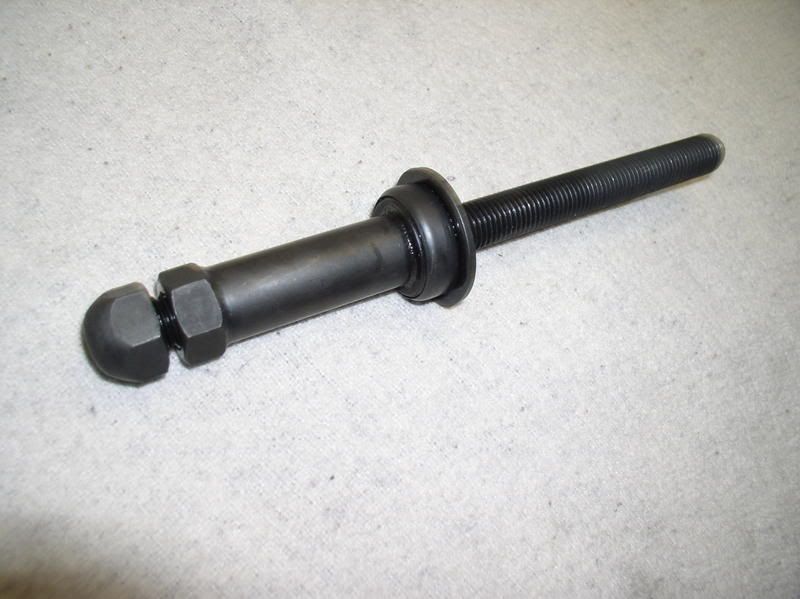
Took 30 seconds for me to make mine. And works the same way as the bought oneboth grade 8 bolts. Screws in tight to the crank then turn the nut and tighten the pulley
 06-18-2012, 08:21 PM
#58

FWIW heat will help, and unless way way over done (think entire thing cherry red) can't hurt anything....
The balancer will run within a couple degrees of oil temp, or hotter depending on engine compartment air flow.
If in a pinch you can throw it in the oven at a very low 250, let it bake for a half hour and slide it on with a pair of gloves
I'm not arguing against using the right tools, (should be able to rent one at the corner store for next to nothing) But this thread is out of hand LOL its far from brain surgery to install one of these things and there are a lot of posts in here that are over the top.
The only things you don't want to do us use a bolt that is both turning in the crankshaft, and pulling on the damper, it can destroy the threads in the crank. Or use a hammer to hit the inertia ring
06-19-2012, 09:47 PM
#59
12 Second Club
iTrader: (2)
Join Date: Oct 2010
Location: Gilbert, AZ
Posts: 92
Likes: 0
Received 0 Likes
on
0 Posts
Wow, making this much more complicated than it has to be. The balancer will only go on so far until it contacts the oil pump.
I bet a beer, GM did not install a bolt, tighten it, loosen it, and toss it to install another bolt for final assembly....
You will know when the balancer is all the way on.
I bet a beer, GM did not install a bolt, tighten it, loosen it, and toss it to install another bolt for final assembly....
You will know when the balancer is all the way on.