

Finally pulling the trigger on parts!
 09-16-2013 | 11:59 PM
#546
Thread Starter
Super Hulk Smash
iTrader: (7)
Joined: Aug 2004
Posts: 11,255
Likes: 141
From: Pace, FL
I paid about $2k and that included new 243s.
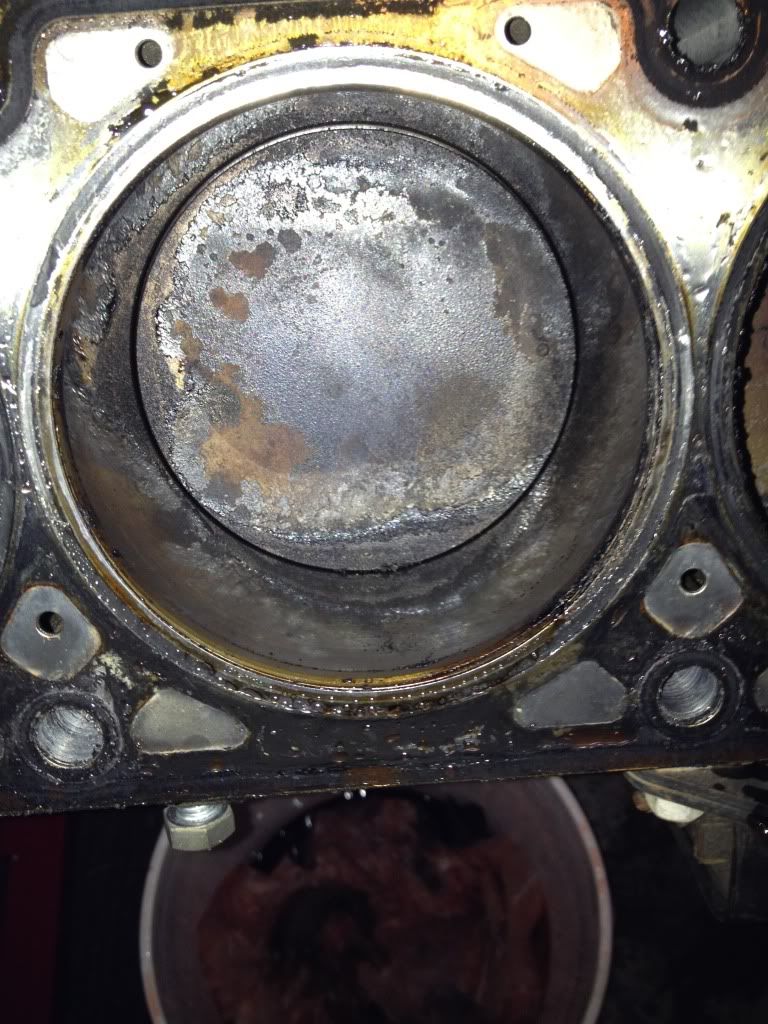
Also, I finally began work again on the motor tonight. I removed the rockers, pushrods, heads, lifters, lifter trays, and head gaskets. There's definitely some crude that fell in there and just a lot of gunky carbon buildup around the lifter bore and all over the pistons.
I plan to take tomorrow and thoroughly clean the motor, cylinders, and lifter bores, and then get down into the head bolt holes and chase those clean and then run some compressed air in there.
I'll make sure I take detailed pictures as I progress through the build process.
 09-20-2013 | 09:14 AM
#550
Thread Starter
Super Hulk Smash
iTrader: (7)
Joined: Aug 2004
Posts: 11,255
Likes: 141
From: Pace, FL
So here's my question since I started on the valve covers as a test. Wire brush and brake cleaner seems to do the trick there. Is that the best way to go after the pistons?
I know I've heard of 3M roloc discs as well, but if the brake cleaner and wire brush works, is there a downside to using brake (or carb cleaner) in the internal engine?
I know I've heard of 3M roloc discs as well, but if the brake cleaner and wire brush works, is there a downside to using brake (or carb cleaner) in the internal engine?
09-20-2013 | 10:32 AM
#552
So here's my question since I started on the valve covers as a test. Wire brush and brake cleaner seems to do the trick there. Is that the best way to go after the pistons?
I know I've heard of 3M roloc discs as well, but if the brake cleaner and wire brush works, is there a downside to using brake (or carb cleaner) in the internal engine?
I know I've heard of 3M roloc discs as well, but if the brake cleaner and wire brush works, is there a downside to using brake (or carb cleaner) in the internal engine?
09-20-2013 | 09:50 PM
#554
Thread Starter
Super Hulk Smash
iTrader: (7)
Joined: Aug 2004
Posts: 11,255
Likes: 141
From: Pace, FL
Excellent! I'll go with the Roloc. I just didn't want to spray brake cleaner directly into the pistons and have it there to mix with oil. And certainly don't want to make a bigger mess.
09-21-2013 | 07:41 AM
#555

Launching!
Joined: Jul 2009
Posts: 222
Likes: 0
From: Durham, NC
When I did my H&C swap I used Permatex Gasket Remover (foam) to remove the crud from the pistons. Just let it sit on there for a couple of hours, wipe it off, any remaining use a little bit of acetone on a Kimberly Clark Solvent Resistant Blue Shop Towell and a razor blade. Barely any mess to it.
09-24-2013 | 09:08 AM
#557
Thread Starter
Super Hulk Smash
iTrader: (7)
Joined: Aug 2004
Posts: 11,255
Likes: 141
From: Pace, FL
Time to get the Roloc. I wanted to avoid getting debris in the engine and into the bearings, but I can't get the pistons clean using carb cleaner/wire brush and even soaking the pistons with seafoam. The seafoam actually worked better than the carb cleaner.
Ugh.
I wouldn't worry with it, but since I'm measuring thousandths of an inch for flycutting, the carbon buildup is throwing off my measurements.
Ugh.
I wouldn't worry with it, but since I'm measuring thousandths of an inch for flycutting, the carbon buildup is throwing off my measurements.
09-24-2013 | 11:25 AM
#558

leave the valley on, tape up the lifter area and spin the deck surface down facing the floor, at least 90degrees if not further. Use the roloc edge so its spinning debris towards the floor.
Its not 100%, but helps with keeping stuff flying into your motor.
Its not 100%, but helps with keeping stuff flying into your motor.
09-27-2013 | 02:32 AM
#560
Thread Starter
Super Hulk Smash
iTrader: (7)
Joined: Aug 2004
Posts: 11,255
Likes: 141
From: Pace, FL
So, I'm busy with work these days and haven't really spent any time on the car (that's okay, it's f'ing hot).
But, I sat down this evening to plan out my weekends and some free time I have over the next few weeks to attack this build in a phased approach. And yes, I'm a project manager by trade, so this is how I tackle an undertaking of this magnitude:
Phase 1
Clean carbon buildup off of Pistons (still dealing with that)
Clear Cylinder Head Bolt Holes
Chase Threads Clean
Remove Harmonic Balancer (left it on - now I have to break it free on the engine stand)
Remove front cover and oil pump/timing chain
Remove old camshaft
Install new camshaft w/assembly lube
Install new oil pump/timing chain
Install New Cam plate torque to specs
Degree Camshaft w/degree wheel
Install front cover/new gasket
Disassemble Stock Heads
Tape off engine
Measure for Flycuts
Flycut .080" I and .060" E
Phase 2
Disassemble TEA Heads
Take TEA heads to machine shop for .020" mill for 58cc and my compression target
Remove one layer of stock head gasket (equiv .040")
Measure pushrod length with TEA heads + old gaskets
Order pushrods (all 16 may require different lengths with the short travel Johnsons)
Reassemble TEA heads
Install torque converter + fill with trans fluid
Remove stock flexplate
Install new flexplate
Install Temp Sender unit into Trans oil pan
Bolt Transmission to engine (outside of car - easier)
Phase 3
Install pushrods w/assembly lube
Install new Cometic gaskets w/copper spray
Install TEA heads
Install ARP Bolts + torque to spec w/Moly lube
Install Lunati Rockers w/assembly lube
Clean valve covers
Reinstall valve covers w/new GM gaskets
Install NGK spark plugs
Install ATI Balancer
Install new waterpump + 160 degree thermostat
Remove old engine mounts
Install new prothane engine mounts (outside of car still)
Install new LS6 PCV cover valley
Install new Engine Oil Sender (previous was destroyed)
Install new Knock Sensors (look rough)
Phase 4
Remove old catback exhaust (cut to remove if I can't get the axle to drop enough)
Remove LCAs and PHB
Remove gas tank
Remove old fuel pump
Install Racetronix fuel pump
Install Racetronix wiring harness upgrade
Reinstall gas tank
Install new LCAs and PHB and PHB Relo Kit
Phase 5
Install longblock + trans back into car
Reinstall trans dipstick and oil dipstick
Reinstall driveshaft
Reinstall Torque Arm and mount
Install fuel rails and injectors to FAST intake manifold
Install FAST intake manifold assembly
Install stock ignition coils + plug wires
Reinstall all electical connectors
Reinstall all vacuum lines inc brake booster
Reconnect fuel line
Reinstall starter
Install Kooks headers
Phase 6
Install Kooks True Dual Exhaust
Reinstall Alternator
Reinstall A/C compressor
Reinstall PS Pump + refill with fluid
Reinstall PS cooler
Reinstall TCS lines and throttle cable
Install new Goodyear belts
Install new BeCool radiator + top off with fluid
Reinstall GM radiator lines
Install new B&M trans cooler
Connect flex lines to transmission
Run Temp line from trans to inside of car
Install new FAST Throttle-Body
Install coolant TB bypass (yeah, never did - car was bone stock when I gutted it)
Install PCV Catch Can
Reinstall engine PCM
Phase 7
Doublecheck everything
Remove all tools from car
Put break in oil into the car w/new filter
Top off transmission fluid
Put on stock airbridge + MAF + cut inlet for 102 TB
(New lid + MAF will be installed after Geoff dynotunes)
Prime oil by disconnecting fuel/spark and turning over for several seconds
Reconnect fuel/spark
Start car
Top off Coolant
Add R134a to A/C
Drive around the block to get to operating temp
Check for vacuum leaks
Check for trouble codes
Call Geoff and schedule dyno tune
Hope to have done by November 1. And I will document each phase.