


My 347ci build
It's been a little while, figured a brief update was in order for anyone interested..
block is still at the second shop. i understand that lots of jobs come through this time of year and he is likely swamped but at the same time its been over a month. going to try to stay professional as I start to apply more pressure to get the block back so I can start assembly. Also patiently waiting on my goods from Mr. Mamo to arrive, lead times were pretty substantial there as well but its not a problem because I don't even have my shortblock together yet.
In the mean time, I've been ordering a few more parts and starting work on the chassis prep. I may start a build thread in the conversion forum but figured I'd share this with anyone following this thread in case you were interested in what the motor was going into, even though it isn't "internal engine" related material per se.
The car is a 95 325i that's been in the family for almost its entire life. It was my dad's car for quite a while until I took it over about 5 years ago. This is a picture from last fall in probably the cleanest state I was able to get it. It's a true 20-footer but I did the best I could.

So after letting my dad take it for one last glorious drive prior to tear down, I set to work removing the engine and driveline. Removing front clip:

Engine out. It's an absolute monstrosity for being just 2.5 liters, but its inline 6 configuration adds a lot of length to the block. The engine had 230k miles on it, didn't burn a drop of oil, and ran like a pissed off bull. Still really slow by most of your standards (~200 hp) and gutless down low, but it becomes fun when you wind it up and throw it into turns with the suspension work I did to the car. I changed the original clutch last year and put in a lightweight flywheel, which really livened everything up. Not sure what I'll be doing with it, for now it'll sit in the garage, but I'd eventually like to build a high compression stroker motor out of it. Kinda tempted to supercharge it once rebuilt too . Might want to finish this project first though lol.

Unfortunately, 20 pennsylvania winters took its toll on the chassis so I've also got a lot of rust to deal with. In it current state, about 99% of sane, rational thinkers would scrap the car and start fresh with a clean roller for a couple hundred bucks. But given the car's history, I think it'd be cool to try and save it from the scrap yard. It's just metal, after all. So with a mix of stubbornness, stupidity, and courage I proceed onward. Chassis stripped down to remove as much weight as possible to minimize unibody deflection once I start cutting:

Yours truly in the midst of disassembly

Rear end out. It's an independent rear which isn't ideal for laying power down necessarily but it's what I have to work with. Will probably be more of a road coarse / street car than a strip car anyway. It's got an M3 lsd that I swapped in 2 years ago that I plan on rebuilding for improved lock up along with a gear ratio change - putting in 3.91's for the swap. It's been proven into the 5-600 hp range for e36 turbo guys but then again they don't hit it with the torque that LS motors generate. At any rate, I'm hopefuly that it won't grenade itself once I get the car together. Also will be using a myriad of other M3 parts to beef things up - rebuilt 38mm half shafts and beefier rear trailing arms to match.

Most of the rust damage is centered in the rocker panels. Turns out the sunroof drained into the 4 corners of the car, so after the drains clogged with dirt and debris over the years, water just sat in there and ate it from the inside out. Needless to say, the sunroof is getting removed, skinned, and sealed up.
More engine stuff coming soon (hopefully). In the mean time I'll be working on the chassis.
block is still at the second shop. i understand that lots of jobs come through this time of year and he is likely swamped but at the same time its been over a month. going to try to stay professional as I start to apply more pressure to get the block back so I can start assembly. Also patiently waiting on my goods from Mr. Mamo to arrive, lead times were pretty substantial there as well but its not a problem because I don't even have my shortblock together yet.
In the mean time, I've been ordering a few more parts and starting work on the chassis prep. I may start a build thread in the conversion forum but figured I'd share this with anyone following this thread in case you were interested in what the motor was going into, even though it isn't "internal engine" related material per se.
The car is a 95 325i that's been in the family for almost its entire life. It was my dad's car for quite a while until I took it over about 5 years ago. This is a picture from last fall in probably the cleanest state I was able to get it. It's a true 20-footer but I did the best I could.
So after letting my dad take it for one last glorious drive prior to tear down, I set to work removing the engine and driveline. Removing front clip:
Engine out. It's an absolute monstrosity for being just 2.5 liters, but its inline 6 configuration adds a lot of length to the block. The engine had 230k miles on it, didn't burn a drop of oil, and ran like a pissed off bull. Still really slow by most of your standards (~200 hp) and gutless down low, but it becomes fun when you wind it up and throw it into turns with the suspension work I did to the car. I changed the original clutch last year and put in a lightweight flywheel, which really livened everything up. Not sure what I'll be doing with it, for now it'll sit in the garage, but I'd eventually like to build a high compression stroker motor out of it. Kinda tempted to supercharge it once rebuilt too
. Might want to finish this project first though lol.Unfortunately, 20 pennsylvania winters took its toll on the chassis so I've also got a lot of rust to deal with. In it current state, about 99% of sane, rational thinkers would scrap the car and start fresh with a clean roller for a couple hundred bucks. But given the car's history, I think it'd be cool to try and save it from the scrap yard. It's just metal, after all. So with a mix of stubbornness, stupidity, and courage I proceed onward. Chassis stripped down to remove as much weight as possible to minimize unibody deflection once I start cutting:
Yours truly in the midst of disassembly
Rear end out. It's an independent rear which isn't ideal for laying power down necessarily but it's what I have to work with. Will probably be more of a road coarse / street car than a strip car anyway. It's got an M3 lsd that I swapped in 2 years ago that I plan on rebuilding for improved lock up along with a gear ratio change - putting in 3.91's for the swap. It's been proven into the 5-600 hp range for e36 turbo guys but then again they don't hit it with the torque that LS motors generate. At any rate, I'm hopefuly that it won't grenade itself once I get the car together. Also will be using a myriad of other M3 parts to beef things up - rebuilt 38mm half shafts and beefier rear trailing arms to match.
Most of the rust damage is centered in the rocker panels. Turns out the sunroof drained into the 4 corners of the car, so after the drains clogged with dirt and debris over the years, water just sat in there and ate it from the inside out. Needless to say, the sunroof is getting removed, skinned, and sealed up.
More engine stuff coming soon (hopefully). In the mean time I'll be working on the chassis.
Last edited by ckpitt55; Apr 20, 2013 at 01:46 AM.
Awesome! I like those beamers!
Shoot my short block is pushing 5-6 weeks now... I'm ready to assemble but last few times I called I get the run around..
It better come out perfect with as much time as they've had it for!
Shoot my short block is pushing 5-6 weeks now... I'm ready to assemble but last few times I called I get the run around..
It better come out perfect with as much time as they've had it for!
A small update, also updated the build list in post #1
I should be getting the block back early this week. I stopped down at the shop on Saturday for a while talking to Lee (owner/machinist at LAW), he had finished up the line hone and had me bring the crank and bearings down to measure my clearances right there. Dial bore gauge set to my crank journal size and measured cold with the caps torqued down and stock size Clevite-P bearings, I was sitting at 0.0025"-0.0030". Too loose. I had him put on order a set of Clevite-H 0.001" undersize bearings. When those come in we'll check the clearances again, if all goes well I'll be starting shortblock cleaning / assembly shortly thereafter.
I should be getting the block back early this week. I stopped down at the shop on Saturday for a while talking to Lee (owner/machinist at LAW), he had finished up the line hone and had me bring the crank and bearings down to measure my clearances right there. Dial bore gauge set to my crank journal size and measured cold with the caps torqued down and stock size Clevite-P bearings, I was sitting at 0.0025"-0.0030". Too loose. I had him put on order a set of Clevite-H 0.001" undersize bearings. When those come in we'll check the clearances again, if all goes well I'll be starting shortblock cleaning / assembly shortly thereafter.
Last edited by ckpitt55; Apr 29, 2013 at 01:48 PM.

Block is back from the second shop. He made the cylinder bores more round and gave me about a half thou more ptw clearance, as the original hone job was on the tight side. He also line honed the main journals and measured my clearances. I ended up having to go with a Clevite-H 0.001" undersize main bearing to make my clearances tighter...cold they were at 0.0025-0.003" with the P's. In an aluminum block those would have grown to beyond 0.004" when it's up to temperature, which is terrible for oil pressure. Right now I'm sitting at ~0.001-0.0015" cold with the -H's, so should be in the mid 0.002"s when hot. Cherry. Rod's are sitting around 0.0025" cold, which should be alright considering that it won't expand as much in steel.
Anyone have any hesitations about running H main bearings and P rod bearings? This is a stock crank btw.
Cleaning and blueprinting / shortblock assembly to come in short order. I'll provide a review/info of the shop once I put numbers to the work they did for any local guys that may be in need of machine work.
Last edited by ckpitt55; May 5, 2013 at 03:07 AM.
TECH Fanatic

Joined: Jun 2011
Posts: 1,343
Likes: 8
From: Katy, TX
LS1 Tech Stories
The Best V8 Stories One Small Block at Time

Gas Monkey Built a 6-Wheel Ferrari Testarossa With a Corvette LT4 Engine
Verdad Gallardo
7 Most Reliable High-Performance Engines GM Has Ever Built
Verdad Gallardo
Amazing '71 Camaro Restomod Is Modern Muscle Car Under the Skin
Verdad Gallardo
6 Common C5 Corvette Failures and What's Involved In Repairing Them
Pouria Savadkouei
Retro Modern Bandit Pontiac Trans AM Comes With Burt Reynolds' Autograph
Verdad Gallardo
Top 10 Greatest Cadillac V Series Performance Models Ever, Ranked
Pouria Savadkouei
Top 10 Most Powerful Chevy Trucks Ever Made!

Hennessey's New Supercharged Silverado ZR2 Has 700 HP
Verdad Gallardo
Coachbuilt N2A Anteros Is an LS2-Powered C6 Corvette In Italian Clothes
Verdad Gallardo


^^ what KCS said
he had the clevite catalog right there that he was leafing through, the only alternate sizes for P bearings listed were -0.010" and -0.020". at that point my crank needs ground and I didn't want to touch it because the journals mic'd up pretty much perfect as is.
he had the clevite catalog right there that he was leafing through, the only alternate sizes for P bearings listed were -0.010" and -0.020". at that point my crank needs ground and I didn't want to touch it because the journals mic'd up pretty much perfect as is.
Your main clearance will force you to run a thinner weight oil.....5W-30 or so the thickest I would go which is what I typically run anyway but a .0025 clearance on all the rods with that light weight an oil will get alot of unnecessary oil on your cylinder walls etc (making more work for your rings) and keep your oil pump busy catching up.
I like to see the rods closer to .002.....0018 to .0022 being what I deem the perfect window (assuming round journals and round rod bores!).
.0025 isnt horrible assuming none of them are creeping towards .0027 if you hear what Im saying but IMO a half shell of a thou undersize rod bearing here would set you right in the sweet spot. If that means you go H bearing for the money invested I wouldnt hesitate personally.
Stock engines run alot less rod clearance that that btw so dont think for a minute that .002 is getting tight. Its a perfect clearance for a performance engine with lighter weight oil.
Back in the day the older school hot rods ran 10-40....20-50 etc. and a slightly larger clearance was more acceptable with the heavier weight thicker oil....in fact that was about perfect for an older school build (the .0025 figure).
Your heads are getting close and I appreciate all your patience.....Ive been slammed with porting/engine work lately and had a personal project that became a bit of a fire alarm jammed in my work schedule recently as well (every now and the I have to make the time to work on some of my stuff....LOL)
Anyway....take your time on the short....your heads and intake should be done shortly.
Regards,
Tony
I've been busy the past couple weeks with work related travel, but am finally getting back on the horse here. I'm currently in the process of deburring everything, re-cleaning, and re-checking everything. Waiting on more bearings and a few other parts to come in but pretty much everything else for the shortblock is here ready to go. I'll post more details about the deburring stuff later when I get more time.
But got this in the mail today, courtesy of Mr. Mamo. Well worth the wait.


Wanted to see what it looked like with one of my valve covers...I shaved the coil mounting bosses and will be remote mounting them. It's not an exact match with the intake but I think it'll look ok when the engine is assembled.

Last edited by ckpitt55; May 20, 2013 at 09:25 PM.
a shot of the porting in the intake, really nicely done and extremely consistent port to port. unfortunately it's kind of difficult to photograph

more parts rolling in

more bearings. my preliminary oil clearance measurements told me that I'd need to mix and match standard size with -0.001" bearings to achieve ideal clearances. this meant going to H bearings for both crank and rods since the -0.001"s are not available in P's. probably unnecessary but given the amount invested, it's not that much more to get my clearances right.

heads are due to arrive tomorrow. fuel rail, lifters, injectors, rocker arms, and gaskets will also be coming soon. also took advantage of tick's memorial day sale on monster clutch kits and got myself a stage 2 with the 18 lb flywheel.
got through cleaning my block, making clearance for my ls6 pcv and breaking all the edges. also got rid of all the casting flash in the areas between the lifter bores.


torqued the main caps and measured the bores to verify the machine work. here's where I'm sitting currently:
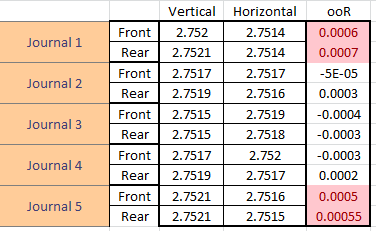
In general not bad. 2, 3, and 4 were definitely closed and honed. After talking with the machinist today he explained that he didn't really touch 1 and 5 since they were already oversized and didn't want to make them worse - keeping the tool centered on the end journals is more difficult since it doesn't have journals on either side to keep it aligned. Currently trying to decide what to do. Bore spec is 2.750 - 2.751 for LS1's, I'm obviously above that in some locations which takes away from bearing crush. Might end up lightly lapping the 1/5 caps on some glass to gain me back a few tenths in the vertical direction.
more parts rolling in
more bearings. my preliminary oil clearance measurements told me that I'd need to mix and match standard size with -0.001" bearings to achieve ideal clearances. this meant going to H bearings for both crank and rods since the -0.001"s are not available in P's. probably unnecessary but given the amount invested, it's not that much more to get my clearances right.
heads are due to arrive tomorrow. fuel rail, lifters, injectors, rocker arms, and gaskets will also be coming soon. also took advantage of tick's memorial day sale on monster clutch kits and got myself a stage 2 with the 18 lb flywheel.
got through cleaning my block, making clearance for my ls6 pcv and breaking all the edges. also got rid of all the casting flash in the areas between the lifter bores.
torqued the main caps and measured the bores to verify the machine work. here's where I'm sitting currently:
In general not bad. 2, 3, and 4 were definitely closed and honed. After talking with the machinist today he explained that he didn't really touch 1 and 5 since they were already oversized and didn't want to make them worse - keeping the tool centered on the end journals is more difficult since it doesn't have journals on either side to keep it aligned. Currently trying to decide what to do. Bore spec is 2.750 - 2.751 for LS1's, I'm obviously above that in some locations which takes away from bearing crush. Might end up lightly lapping the 1/5 caps on some glass to gain me back a few tenths in the vertical direction.

Nice thread! I hope it turns out well given all the time and $ you've put into this car! There aren't too many max effort 347's these days, and I'm very curious to see if you break 500rwhp.
With all your details and pics, it makes me want learn how to do engine work myself and get good enough to do some of it on the side for LSX's. Too bad I don't have anywhere near the time or place to get into this; guess I'll just have to be content being something of an internet engine builder...
Jason
I started this build almost a year ago now having never torn into an engine before, let alone an LS motor - it's one hell of a journey and if you ever get the opportunity to dig into something I'd highly encourage it. Definitely the harder way to go doing it all yourself but if you value the learning experience then it's definitely worthwhile. Hopefully the stuff in this thread and elsewhere on this tremendous forum will be of use to you.
-Chuck
Last edited by ckpitt55; May 28, 2013 at 11:09 PM.

I am about to buy a lq4 whenever I can get to the guys house to pick it up. I was planning on doing a 370/408 build (undecided) and doing the bottom end myself. This will be my first time on the bottom end but I've done the top end in mine a couple times. After reading this thread, it scares the hell out of me! The thing that is so intimidating is the tools being used as I've never even seen half of them.. Wondering now if after spending the money on the lower end if it wouldn't just be worth having the short block done.
Great job OP, I'm learning! Just not quick enough..
Great job OP, I'm learning! Just not quick enough..
Honestly the best exercise for me in terms of getting to know the shortblock was deriving my own compression calculator. I didn't reinvent the wheel, but it helped me really grasp how all the dimensions stacked up and played together to affect engine performance. Look at the smaller things as well - volume above the top ring land, gasket bore volume, etc. Really pretty eye opening. If you're doing an N/A build, that is a great tool for narrowing down your component selection to make for an explosive package. If you're doing a high compression N/A motor like me, there's really only so many combinations that will work together to give you the balance you're looking for. This goes for cams as well - DCR is even more important than SCR in terms of picking something that will work well with your package and the fuel you're looking to run. The more you think of it like a system rather than individual parts the better off you'll be.
The shortblock is where I'd say 95% of the work in an engine is....ensuring you have properly sized cylinder bores, round mains, round cam journals, good clearances everywhere, etc. To achieve that you also need to make friends with a good machinist who you communicate well with and who shares an interest in doing the job right. I had to take my block to two shops before I found one I was comfortable working with. Don't be afraid to ask questions and/or ask for explanations - it's good to let them know that they won't be able to slide one past you.
As far as tools go - what I have isn't the best in the world but they suit my needs fine. Most of it with the exception of the indicator I bought from Jegs or Powerhouse racing. I can't emphasize enough - you need a quality indicator with 0.0001" graduations. Most of the ones that come with the Jegs tools are simply not accurate or repeatable enough to base decisions off of (bore measurements, bearing clearances) where tenths here and tenths there make a difference. here's my list, give or take a couple things:
-2-3" micrometer w/ calibrating standard - measuring crank journals
-3-4" micrometer w/ calibrating standard - measuring pistons
-dial calipers
-dial bore gauge
-a quality drop dial indicator with 0.0001" increments (mine is a mitutoyo 2358S-10)
-a quality torque wrench
-bearing scraper
-rod bolt stretch gauge
-ring compressor for your bore size
-ring squaring tool
-feeler gauges
-ring grinder
-engine cleaning brushes
-misc fixtures for measuring thrust clearances, deck height, tdc, valvetrain position
-cam bearing installation tool
-degree wheel of some sort
I think that's about it, here's a pic of what my pile of junk looks like. If you (or anyone else for that matter) have any more questions along the way chime in or PM me, I'm not an expert by any means but I'm down to help any way I can. It's a hell of a lot of work but in the end you have something you can say you built - and you also don't have to worry about your motor being put together by the guy trying to get home early on a Friday lol.

ANYWAY, back to the build...
My cylinder heads arrived today. Specs are Mamofied 215s, 8019 dual springs, hollow 2.05" intake valves, 58.5 cc chambers. The "Mamofication" process involves some hand porting on selected areas, valve spring setup / shimming, blueprinting of all the clearances, combustion chamber sizing, and probably a handful of other things I'm not even aware of that Tony does.

Hand porting work near the exhaust valve seat

Massaged chambers

Intake valve seat / ramp area porting work:

The ceiling and short turn of the intake port seem to be slightly touched as well, but not much.

The man's work is extremely consistent port to port / chamber to chamber. It's almost unnatural. Thanks Tony
 One step closer..
Last edited by ckpitt55; May 29, 2013 at 10:11 PM.
 Out of curiosity, are all of these tools necessary for the bottom end or are you just one of those guys that likes acing a few extra tools around?
 More to come this weekend hopefully, haven't had much in the way of free time this week.
-Chuck
Last edited by ckpitt55; May 30, 2013 at 10:53 PM.
gave the block some paint today

also fixed my main caps. I was having issues with my #1 and #5 - the bores were oversize by almost a thou in the vertical direction, so I sanded them slightly to modify my bore shape, bring down the size, and hopefully the o-o-R. Basically trying to manually correct what a line hone can't because that machining operation is not stiff enough. My buddy let me borrow his surface plate - basically a really really flat hunk of granite used as a reference surface for metrology, measuring, etc. Better than glass because it's flatter and it doesn't deflect. He told me it was lab grade, which means its precision ground to a flatness of +/- 0.000025" per 6" of length. it's 4" thick and weighs north of 100 lbs lol.

i taped a sheet of 320 wet/dry down and used wd40 as a lubricant to keep the paper clear, sanding the cap with minimal pressure as shown. i basically just pushed it back and forth under its own weight because i had no idea how quickly this was going to remove material. I'd sand it a bit, throw it back in the block, torque it up and measure. I repeated this as necessary until I got the numbers I was after. You can really only take advantage of doing this when the vertical measurement of the bore is greater than the horizontal.

before and afters

About as good as I can get I think. From my measurements it seemed as though for every 2 tenths you took off in the vertical direction, you gained roughly a tenth at the parting line. So there's certainly a "crossover" region you don't want to go beyond. Ideally you bring your o-o-R to 0 but at some point before then you bury yourself in the resolution of your measuring tool, which is basically what happened to me.
Hope to start laying out the main bearings tomorrow.
also fixed my main caps. I was having issues with my #1 and #5 - the bores were oversize by almost a thou in the vertical direction, so I sanded them slightly to modify my bore shape, bring down the size, and hopefully the o-o-R. Basically trying to manually correct what a line hone can't because that machining operation is not stiff enough. My buddy let me borrow his surface plate - basically a really really flat hunk of granite used as a reference surface for metrology, measuring, etc. Better than glass because it's flatter and it doesn't deflect. He told me it was lab grade, which means its precision ground to a flatness of +/- 0.000025" per 6" of length. it's 4" thick and weighs north of 100 lbs lol.
i taped a sheet of 320 wet/dry down and used wd40 as a lubricant to keep the paper clear, sanding the cap with minimal pressure as shown. i basically just pushed it back and forth under its own weight because i had no idea how quickly this was going to remove material. I'd sand it a bit, throw it back in the block, torque it up and measure. I repeated this as necessary until I got the numbers I was after. You can really only take advantage of doing this when the vertical measurement of the bore is greater than the horizontal.
before and afters
About as good as I can get I think. From my measurements it seemed as though for every 2 tenths you took off in the vertical direction, you gained roughly a tenth at the parting line. So there's certainly a "crossover" region you don't want to go beyond. Ideally you bring your o-o-R to 0 but at some point before then you bury yourself in the resolution of your measuring tool, which is basically what happened to me.
Hope to start laying out the main bearings tomorrow.
Last edited by ckpitt55; Jun 2, 2013 at 12:59 AM.