


ls1 engine noise (collapsed lifter or more serious?)

Thread Starter
Teching In
Joined: Mar 2014
Posts: 36
Likes: 0
From: Melbourne,FL
I have an ls1 swapped e30. I bought an 88k miles 02 camaro ls1, put 799 heads, new cams, springs, retainers and pushrods. I did not change the lifters or the lifter guides when I changed the heads. The engine was in great shapes, with the cross hatching marks still visible on the cylinder bores and great compression.
Now 6 months down the line I drove to school and this is the noise I was welcomed with when I arrived.
I want to kick myself for not having replaced the lifters, but I am worried this noise is something much worse.
The noise does not go away if I pull the serpentine belt
Now 6 months down the line I drove to school and this is the noise I was welcomed with when I arrived.
I want to kick myself for not having replaced the lifters, but I am worried this noise is something much worse.
The noise does not go away if I pull the serpentine belt
should have revved the engine a little in the video.
You might try unplugging the coils one at a time to see if the noise is isolated to a specific cylinder combustion event. You might also check the valve lash (check the space under each rocker tip to make sure there isn't excessive play which might indicate a lobe failure), I know already ruled out the accessories, but remember the crank pulley, and flywheel still spin, although in the video it almost sounds like a squeak to me. Like something spinning and rubbing.
You might try unplugging the coils one at a time to see if the noise is isolated to a specific cylinder combustion event. You might also check the valve lash (check the space under each rocker tip to make sure there isn't excessive play which might indicate a lobe failure), I know already ruled out the accessories, but remember the crank pulley, and flywheel still spin, although in the video it almost sounds like a squeak to me. Like something spinning and rubbing.
Thread Starter
Teching In
Joined: Mar 2014
Posts: 36
Likes: 0
From: Melbourne,FL
I unplugged the coils and found the noise to be a more bit fainted from cylinder 6 and 8, then I did the same and took the rockers off for those two cylinders. I then decided to take the heads off and found this.
Cam is coming out tomorrow but I think it will be damaged too, this is how some of the lifters look.
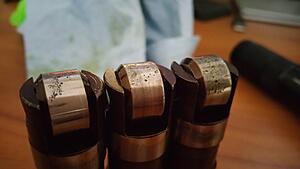
Cam is coming out tomorrow but I think it will be damaged too, this is how some of the lifters look.


12 Second Club
Joined: Sep 2005
Posts: 4,273
Likes: 0
From: Bucks County, Pa.
I am sure that mine look MUCH worse than that, with some even missing part (or all) of their rollers/bearings, but then my noise is also about 3 times as loud, and 'clacky' as yours sounded. 
I just wish that I had the facilities/skillz/tools, and coin to just rip the heads off, and pull/replace a cam, like it seems EVERYONE else on this site has the ability to do so easily.
I just wish that I had the facilities/skillz/tools, and coin to just rip the heads off, and pull/replace a cam, like it seems EVERYONE else on this site has the ability to do so easily.
I am sure that mine look MUCH worse than that, with some even missing part (or all) of their rollers/bearings, but then my noise is also about 3 times as loud, and 'clacky' as yours sounded.
I just wish that I had the facilities/skillz/tools, and coin to just rip the heads off, and pull/replace a cam, like it seems EVERYONE else on this site has the ability to do so easily.
I just wish that I had the facilities/skillz/tools, and coin to just rip the heads off, and pull/replace a cam, like it seems EVERYONE else on this site has the ability to do so easily.
12 Second Club
Joined: Sep 2005
Posts: 4,273
Likes: 0
From: Bucks County, Pa.
Trending Topics
The worst part for me was removing the trans dipstick mount and wires from the back of the heads.
LS1 Tech Stories
The Best V8 Stories One Small Block at Time

Gas Monkey Built a 6-Wheel Ferrari Testarossa With a Corvette LT4 Engine
Verdad Gallardo
7 Most Reliable High-Performance Engines GM Has Ever Built
Verdad Gallardo
Amazing '71 Camaro Restomod Is Modern Muscle Car Under the Skin
Verdad Gallardo
6 Common C5 Corvette Failures and What's Involved In Repairing Them
Pouria Savadkouei
Retro Modern Bandit Pontiac Trans AM Comes With Burt Reynolds' Autograph
Verdad Gallardo
Top 10 Greatest Cadillac V Series Performance Models Ever, Ranked
Pouria Savadkouei
Top 10 Most Powerful Chevy Trucks Ever Made!

Hennessey's New Supercharged Silverado ZR2 Has 700 HP
Verdad Gallardo
Coachbuilt N2A Anteros Is an LS2-Powered C6 Corvette In Italian Clothes
Verdad Gallardo Just be clean about it and label stuff and it'll be fine. I have all cylinder bores greased up to prevent rust and the entire block is covered with trash bags just in case rain finds its way under the hood.
12 Second Club
Joined: Sep 2005
Posts: 4,273
Likes: 0
From: Bucks County, Pa.
It's putting everything back together again properly, with all of the needed sterile tread holes, correct/accurate torque settings, TDC crank turning/cam & timing set timing, correct pushrod length factoring, and correct rocker arm torquing with the valves in the proper positions that scares the **** outta me.
1. if the job is going to take more than a few hours, (inside an engine) we typically find a way to oil and protect (bag, tape, wrap, cover) the exposed engine surfaces like the cylinder walls from atmospheric oxygen while we are waiting. To minimize the influence of "air rusting" you can plan ahead so that a complicated job can be completed quickly, have all right tools handy and a plan for each object, where to put it, how to clean it, how you will handle and so forth. Having to stop halfway because you lack a tool or part is big trouble for exposed surfaces.
2. Because the air is really filthy, what with pollen, fungus, animal skin, feathers, bacteria of course, water droplets suspended in the air full of who knows what... It really is best to do this kind of internals work in a "clean room". With some planning, this is not too hard to achieve. You start by cleaning the room where the engine build or trans build will take place, until it really is spotless. Then, you can drape tarps around the entrances/exits for air, and use a box-fan with an A/C filter to pull air in/out. This will more or less filter the air inside the room, over time, and then once a some time has passed you can start your build in the "clean room".
3. speed cannot be emphasized enough. the faster you can get the engine open, parts done, and closed up, the better luck you will have with keeping it clean. Even in a "clean room" something will still settle out on objects, because even your body is constantly shedding flakes of dead skin, and along with it, bacteria from the surface of your body and in the water droplets leaving your mouth and nose also. You really can't fight them, just clean the best you can beforehand, have a plan for everything to go smoothly and quickly, and finish as fast as you can safely manage.
4. the first 3 deal with atmospheric air, meaning the air we live and breath from. Keep in mind that closed windows/doors, only give the illusion of being closed, while air continuously filters in and out of the tiny spaces (even spaces you think are air tight) because air molecules are very tiny. The same goes for water, it can absorb into objects and be carried around and then leave them later. A great defense against water in the "clean room" is CaCl2 (aka "damp rid") you can always use a little box of this in the corner to keep the area dry.
Now that we hit on the atmospheric air, lets talk about practices
A: Use gloves, throw them away and get a new pair as necessary to keep fingers and hands clean all the time, which translates into clean parts.
B: Keep the tools as clean as your hands.
C: have a plan. Cannot stress this enough. Plan where you will place each part as you remove it, plan how you intend to clean it, and how you will install it. Do not start the first step until you've planned through to the end.
D: Torque specs, lubricants, silicone, install procedure, may take experience. Be aware in advance that your efforts to torque your very first head may go awry due to inexperience. If you have never used a torque wrench, and are unfamiliar with how lubricants interact with threads/torque, you might want to start with something simpler first. Be sure to read the instructions as some threads call for engine oil, others thread sealer, and others still a moly based lubricant or otherwise. Not leaving excess silicone squeezed out between parts is also experience based, like not having a glop of silicone clog up the oil pickup for example.
E: a set of picks, paper towels, brake cleaner, will remove and de-grease almost anything. Just make sure anything you de-grease, gets a coat of fresh clean oil, if it is the kind of material which will rust. Like engine cylinder walls for example. Its great to clean them up, but when done, oil them.
F: I see you struggle with the rotating parts. My advice here is, study the FSM, and get a test "dummy" engine, an engine with which you can take apart and examine, because its already broken. Soon you will know exactly which piston is up and which valves are open without thinking.
The gloves, towels, and plan will go a long way to keeping your engine clean.
TECH Senior Member


Joined: Apr 2002
Posts: 6,080
Likes: 17
From: So.Cal.
12 Second Club
Joined: Sep 2005
Posts: 4,273
Likes: 0
From: Bucks County, Pa.
Thanks for all of the tips above, but as you've stated the SPEED of doing the job is critical, and due to; my total lack of skills/experience in engine building techniques and procedures, lack of ALL of the necessary tools, and having absolutely NOWHERE that could even closely resemble (or be made into) a said 'clean room' leaves me S.O.L. when it comes to doing this job myself.
I would be lucky to be able to get it done in a week's time at best (remember, I have NOT done this type of work hundreds of times before, like it seems mostly everyone on here have).
I guess I either park the car, lower the insurance down to the minimum legal requirement, and take a loan out on an econobox until I can save up enough to be able to afford to pay a ripoff shop the $2500+ (labor only) they want for this job, or just sell the car as a 'running, clacking, roller', and put that pittance down on said econobox.
On an LS motor you should be able to R&R the heads in a weekend EASY.
Pull the exhaust manifold bolts and let them hang, pull the spark plugs to keep from breaking them, remove electrical connectors and pull intake manifold, pull the coil packs, pull valve covers, remove rocker arms and set them and push rods aside, then the heads are right there. Loosen the head bolts and remove, then pull the heads off. Clean surfaces with a razor blade and very fine sand paper. You'll need new head bolts. You'll need a die grinder or dremel tool with a cutting wheel to make a couple slots down the length of the threads in one of the long head bolts so you can run it in and out of every bolt hole to clean out any old gunk, then blow the holes out with a small air compressor and blow gun, you'll need to borrow or buy a small one.
It isn't near as hard as you think, LS motors are about the easiest engine on the planet to work on. Everything is scary with engines until you get out there and just do it. That's a lesson I learned early on, I was always worried until I just got in there and did it.
I've been a tech now for almost 20 years, I worked on cars in the shop by day and driveways by night and weekend. It's really not any cleaner in a shop, wind still blows through and blows up dust etc.
You don't need a clean room or area, just clean the parts as you put them on, the intake manifold and valve covers can be placed in the back of the car, the heads too, put them all in a box and take them inside, whatever it's all good enough. Just don't throw the **** down in the dirt is all you need to avoid. Or as you pull off each part wrap it in a trash bag and put it inside the car. That would be an excellent way to keep them clean/free of dirt etc.
Last edited by 00pooterSS; Apr 20, 2016 at 02:23 PM.
Thanks for all of the tips above, but as you've stated the SPEED of doing the job is critical, and due to; my total lack of skills/experience in engine building techniques and procedures, lack of ALL of the necessary tools, and having absolutely NOWHERE that could even closely resemble (or be made into) a said 'clean room' leaves me S.O.L. when it comes to doing this job myself.
I would be lucky to be able to get it done in a week's time at best (remember, I have NOT done this type of work hundreds of times before, like it seems mostly everyone on here have).
I guess I either park the car, lower the insurance down to the minimum legal requirement, and take a loan out on an econobox until I can save up enough to be able to afford to pay a ripoff shop the $2500+ (labor only) they want for this job, or just sell the car as a 'running, clacking, roller', and put that pittance down on said econobox.
I would be lucky to be able to get it done in a week's time at best (remember, I have NOT done this type of work hundreds of times before, like it seems mostly everyone on here have).
I guess I either park the car, lower the insurance down to the minimum legal requirement, and take a loan out on an econobox until I can save up enough to be able to afford to pay a ripoff shop the $2500+ (labor only) they want for this job, or just sell the car as a 'running, clacking, roller', and put that pittance down on said econobox.
Whoa, buddy easy there. You are two steps ahead of where you ought to start.
Novices with one single vehicle and ultra-budgets do not start with building engines. (unwise)- my advice is directed towards a novice who already has experience with engine and mechanics/machines, and wishes to further that experience by undertaking a rebuild, with the understanding of how likely failure is (not good if that is your only car/engine).
Instead, examine my original, authentic, unaltered doctrine of novice mechanics (shown elsewhere on the forum): Don't open the engine if it is your "only car" aka "novice seeks reliable transportation". Instead, we use a mostly stock, unopened engine to get what we want. There are many OEM longblock LSx engines producing well over 500bhp. Using a mostly stock engine eliminates much of the confusion/error associated with machine shops, parts clearances, torque specs, cleanliness, etc... and leaves you simply "parts changing" aka novice territory. If the engine is mostly original and unopened, you stand a good chance of getting 5-10 years out of it and learning much in the process. For first timer tuning/boost applications, you cant beat a pair of unopened $800 120k~ LSx engines on the floor, one for the car today and one for when you blow the first one up learning on it.
I've been a tech now for almost 20 years, I worked on cars in the shop by day and driveways by night and weekend. It's really not any cleaner in a shop, wind still blows through and blows up dust etc.
You don't need a clean room or area, just clean the parts as you put them on, the intake manifold and valve covers can be placed in the back of the car, the heads too, put them all in a box and take them inside, whatever it's all good enough. Just don't throw the **** down in the dirt is all you need to avoid. Or as you pull off each part wrap it in a trash bag and put it inside the car. That would be an excellent way to keep them clean/free of dirt etc.
At first. The question is, for how long? Just because you do not see the invisible particulate, does not mean it isn't getting caught in the lifters, stuffed into the wrist pin, caught between the ring and cylinder wall, hiding in a dark corner of the block somewhere. It builds up. It takes more than a day of running without an air filter to "see" the damage, but one day without an air filter is still a really nasty thing to do to an engine. traditional mechanics usually skips the portions of chemistry and atomic size scale of objects I find so essential when you step up from being a "parts changer" to a "lubricative surfaces designer/fabricator/care taker". When a high dollar "race car" engine is built, like the GT-R motor or similar, it is done in a truly clean-room, as I am sure all of the $$ Ferrari engines are built as well, as the engineers whos educations allow them to design parts also entails a certain understand of atomic size relationships, which leads to realization that "hey, the air we breath, is filthy!"
FWIW You do the best you can. We don't all have clean rooms. We often also lack the money to do a build over twice, so think hard before you start, while making your plan ask yourself, "what will I do if this engine spins a bearing after 500 miles?" Get practice, get speed, get a plan, and wrap it up tight when you are stepping away for a minute.
Last edited by kingtal0n; Apr 20, 2016 at 02:58 PM.
It is true you can take something apart, in the wind and dust, and put it back together again. And it will be fine. You can also run an engine without an air filter, and it too, will be fine.
At first. The question is, for how long? Just because you do not see the invisible particulate, does not mean it isn't getting caught in the lifters, stuffed into the wrist pin, caught between the ring and cylinder wall, hiding in a dark corner of the block somewhere. It builds up. It takes more than a day of running without an air filter to "see" the damage, but one day without an air filter is still a really nasty thing to do to an engine. traditional mechanics usually skips the portions of chemistry and atomic size scale of objects I find so essential when you step up from being a "parts changer" to a "lubricative surfaces designer/fabricator/care taker". When a high dollar "race car" engine is built, like the GT-R motor or similar, it is done in a truly clean-room, as I am sure all of the $$ Ferrari engines are built as well, as the engineers whos educations allow them to design parts also entails a certain understand of atomic size relationships, which leads to realization that "hey, the air we breath, is filthy!"
FWIW You do the best you can. We don't all have clean rooms. We often also lack the money to do a build over twice, so think hard before you start, while making your plan ask yourself, "what will I do if this engine spins a bearing after 500 miles?" Get practice, get speed, get a plan, and wrap it up tight when you are stepping away for a minute.
How many years have you been repairing engines? How many have failed due to the ability to have or lack of having a clean room?
I am posting advice based on nearly 20 years experience doing this without a single failure.
If you R&R heads outside you take each component off and stick it in a bag or a closed area and continue working, when you are done cleaning all the gasket material off the engine there is dirt and grime and gasket material and **** everywhere from all the things that have collected on the engine over time. A CLEAN ROOM WILL NOT CHANGE THAT. So you clean like crazy before you assemble it. You clean the block really well with paper towels and brake cleaner, not with rags that will leave things behind. You blow out all the dust and crap first and then wipe down surfaces thoroughly. Assemble and clean as you go. All these auto shops all over the nation are repairing engines in shops, not clean rooms, if it was so necessary how would all these cars be going down the road for many years after repairs?
I watched guys do piston recalls inside a large shop at Sewell Lexus, one guy could do two a day, the dealership had 100 technicians and so they were doing many many of these each day and had no problems.. Again, I say what I say from experience, not from theoretical thinking. If you aren't comfortable building your engine outside of a clean room that's fine, but don't scare others away from it. If you haven't been doing this a long time I understand why you would be concerned and why you posted all the things you did, I used to think that way myself. Theories and real life applications don't always match up.
I will give you this though, dirt inside an engine will harm it, but it doesn't just jump in the engine when you start pulling the heads off. Also your advice to not take apart a car without a back up plan is good, just don't let fear of all the possibilities cause you to actually do nothing.
12 Second Club
Joined: Sep 2005
Posts: 4,273
Likes: 0
From: Bucks County, Pa.
Thanks to all above, and IF I can gather the confidence to do the actual cam/timing set/oil pump swap, I may just attempt the whole deal.
Yes, on the topic of just how NASA (the aerospace people, not the road racing org.) sterile an LS1 build must be; dosen't almost as much dirt/grit/grime get past even the absolute BEST, and most efficient air and oil filters we could possibly use??
Also, what about what gets washed down, and blown by the rings during the combustion process, NOT just the fuel and gasses, but the dirt, grit, carbon particles and filth as well?
Add to this the grimey, dirty oil dumped into the intake ports from the PCV system, even with double catch cans/air-oil separators.
I understand how and why $125K+ supercar engines are built in a finely filtered, almost sterile clean room, but I just need this thing to run on 4000 mile, synthetic oil and filter changes (and the first few after this would be at 500 and 1500 miles anyway).
You are the reason people are scared to work on their own cars.
How many years have you been repairing engines? How many have failed due to the ability to have or lack of having a clean room?
I am posting advice based on nearly 20 years experience doing this without a single failure.
How many years have you been repairing engines? How many have failed due to the ability to have or lack of having a clean room?
I am posting advice based on nearly 20 years experience doing this without a single failure.
I have been at it (camshaft/head/bottom end/gaskets/fab/welding/wiring/tuning) for 15 years myself. I have done most of it outside, or in a shed, without any "clean room" (I did the best I could, quickly) and never had a direct failure because of it. Of course it can be done with good results. However this sample is very small, a couple engines "lucky individuals", does not equate to total satisfaction for a large group, I am just one out of thousands with varying results.
I do see many failures in other engines, especially in the small displacement crowd, where a grain of sand can lodge in an oil delivery passage for a camshaft lobe.
If you R&R heads outside you take each component off and stick it in a bag or a closed area and continue working, when you are done cleaning all the gasket material off the engine there is dirt and grime and gasket material and **** everywhere from all the things that have collected on the engine over time. A CLEAN ROOM WILL NOT CHANGE THAT.
I will give you this though, dirt inside an engine will harm it, but it doesn't just jump in the engine when you start pulling the heads off. Also your advice to not take apart a car without a back up plan is good, just don't let fear of all the possibilities cause you to actually do nothing.

Last edited by kingtal0n; Apr 21, 2016 at 06:09 PM.
Also, what about what gets washed down, and blown by the rings during the combustion process, NOT just the fuel and gasses, but the dirt, grit, carbon particles and filth as well?
Add to this the grimey, dirty oil dumped into the intake ports from the PCV system, even with double catch cans/air-oil separators.
Add to this the grimey, dirty oil dumped into the intake ports from the PCV system, even with double catch cans/air-oil separators.
if the engine is sealed up well, like a new factory engine, with an OEM style paper/dry filter element (high quality air filter), then so called "dirt, grit, and filth", should not have easy access to those locations. You cannot use the term "carbon particles" interchangebly with "filth, grime, dirt". Carbon fragments are produced as by-products of combustion, they are intended to be caught in the oil, and changed with the oil. Having an active PCV suction to pull the out of the crankcase before/during their transition into oil helps with their removal, as they are sucked up into the pcv ducting they create a slight film on every passage they encounter, and deposit there (change your pcv hoses every so many years for this reason) hopefully stopping in/around the oil separate/baffle unit, which is often less well designed than it should be for our performance desires. Carbon fragments recycle back to the combustion chamber if the pcv system is using manifold vacuum; this is a highly discussed topic you can research elsewhere for. My main point in this post is that carbon combustion byproduct fragments are NOT considered dirt, grime, or filth, unless allowed to accumulate significantly (lack of oil changes), and are usually absorbed by the oil (that is one thing oil is good at doing: holding on to other lipid-like hydrophobic carbon/hydrogen fragments) and cycled out of the engine. This, as opposed to what I would call true dirt, grime, and filth, which come from outside sources (not a product of the properly running engine as with carbon fragments) they may lodge in an oil passage causing catastrophic failure, they are not easily dissolved in oil, may not break down easily in oil, and in extreme examples where engines are run without air filters, they will form pits/grooves in all of the plumbing/manifolds/deck/piston/valves, little imprints of where they once were permanently deforming or eroding the metal materials, making the engine a useless table monument.
Whereas, with carbon deposits/combustion byproduct, which often form hard, brittle coatings on parts like pistons, may look similar to the "dirt, grime, and filth" but can be easily removed via water injection on a running engine over time, or physically with a tool by hand, and leave behind no trace of their markings, leaving us perfectly re-usable parts most of the time.
Last edited by kingtal0n; Apr 21, 2016 at 06:13 PM.