


TSP 408 Alternator Bracket
Thread Starter
On The Tree
iTrader: (2)
Joined: Jul 2007
Posts: 197
Likes: 0
From: breaux bridge,louisiana
I have a TSP 408 block and I am using the acessories off my LS1 but the alternator doesn't seem to bolt up. Do i have to use a different bracket system or another alternator? Or does the alternator get relocated? Thanks for any help.
How deep should you tap it and what is the pitch size? You figure this would be done since they are a machine shop and know that this is a common problem, plus they ask what its going in. Anyone here tap the block for the 2nd hole? Any advice or info on how to do it?
Let's clarify the mystical iron block alternator situation, because I feel like most who preach about it on the internet have never seen the block in person.
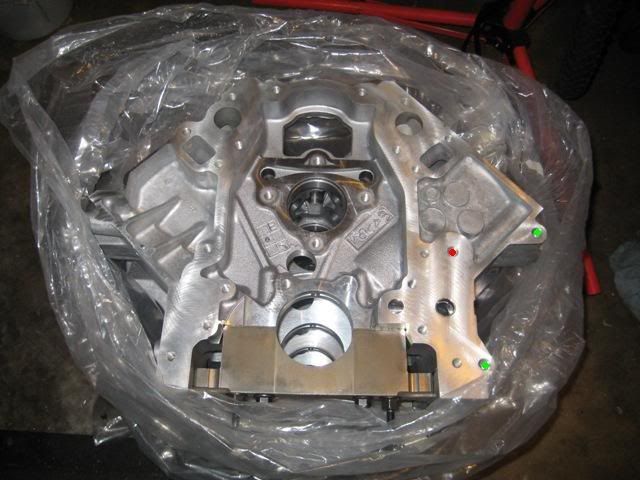
Here's a picture of the aluminum block bolt holes. The green holes can be used on the new iron block you have, the red will disappear and not be used, period.
Here's the iron block, with the bolt locations highlighted for easy comprehension.
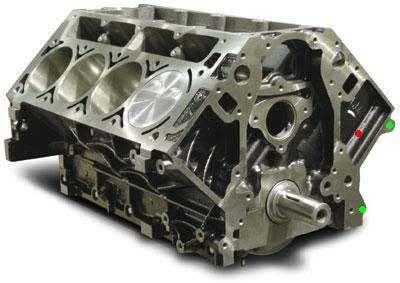
So you have the bottom green hole already. The red bolt hole location cannot be used on the iron block without catastrophic failure. The upper green bolt hole is the one that can be drilled/tapped for use. There is plenty of meet there for you to drill and tap so that you will have two bolts holding the bracket on the front side, and then of course you have the one bolt holding the bracket on the back side of the alternator.
Can you use just the lower hole and the rear bolt? Of course! people have been doing so for years! Would I drill and tap it and run three bolts total?? Absolutely!
Hope that helps clarify what you're dealing with!
Here's a picture of the aluminum block bolt holes. The green holes can be used on the new iron block you have, the red will disappear and not be used, period.
Here's the iron block, with the bolt locations highlighted for easy comprehension.
So you have the bottom green hole already. The red bolt hole location cannot be used on the iron block without catastrophic failure. The upper green bolt hole is the one that can be drilled/tapped for use. There is plenty of meet there for you to drill and tap so that you will have two bolts holding the bracket on the front side, and then of course you have the one bolt holding the bracket on the back side of the alternator.
Can you use just the lower hole and the rear bolt? Of course! people have been doing so for years! Would I drill and tap it and run three bolts total?? Absolutely!
Hope that helps clarify what you're dealing with!
__________________

Largest Stocking Distributor of LS-x Engines / CHECK OUT OUR NEW WEBSITE!
COMP - FAST - PACESETTER - DIAMOND RACING - EAGLE SPECIALTY PRODUCTS - CALLIES - COMETIC GASKETS
RAM CLUTCHES - MOSER ENGINEERING - KOOK'S HEADERS - ARP - GM BOLTS AND GASKETS - MSD - NGK
POWERBOND - ASP - AND MORE!
Largest Stocking Distributor of LS-x Engines / CHECK OUT OUR NEW WEBSITE!
COMP - FAST - PACESETTER - DIAMOND RACING - EAGLE SPECIALTY PRODUCTS - CALLIES - COMETIC GASKETS
RAM CLUTCHES - MOSER ENGINEERING - KOOK'S HEADERS - ARP - GM BOLTS AND GASKETS - MSD - NGK
POWERBOND - ASP - AND MORE!
Trending Topics
LS1 Tech Stories
The Best V8 Stories One Small Block at Time

6 Common C5 Corvette Failures and What's Involved In Repairing Them
Pouria Savadkouei
Retro Modern Bandit Pontiac Trans AM Comes With Burt Reynolds' Autograph
Verdad Gallardo
Top 10 Greatest Cadillac V Series Performance Models Ever, Ranked
Pouria Savadkouei
Top 10 Most Powerful Chevy Trucks Ever Made!

Hennessey's New Supercharged Silverado ZR2 Has 700 HP
Verdad Gallardo
Coachbuilt N2A Anteros Is an LS2-Powered C6 Corvette In Italian Clothes
Verdad Gallardo
Awesome K5 Blazer Restomod Comes With C7 Corvette Power
Verdad Gallardo
10 Camaros You Should Never Buy

10 LS Engine Myths That Refuse to Die
Verdad Gallardo That is what I show as well. I show from the factory it has 2X of those bolts at 125mm long, and one of them at 90mm long. My book does not say which that top hole was though, unfortunately. You could likely tell by looking at the bracket and seeing which two are the same thickness, and the other will likely be thinner (on the bracket where the bolt passes through).
__________________
Largest Stocking Distributor of LS-x Engines / CHECK OUT OUR NEW WEBSITE!
COMP - FAST - PACESETTER - DIAMOND RACING - EAGLE SPECIALTY PRODUCTS - CALLIES - COMETIC GASKETS
RAM CLUTCHES - MOSER ENGINEERING - KOOK'S HEADERS - ARP - GM BOLTS AND GASKETS - MSD - NGK
POWERBOND - ASP - AND MORE!
Largest Stocking Distributor of LS-x Engines / CHECK OUT OUR NEW WEBSITE!
COMP - FAST - PACESETTER - DIAMOND RACING - EAGLE SPECIALTY PRODUCTS - CALLIES - COMETIC GASKETS
RAM CLUTCHES - MOSER ENGINEERING - KOOK'S HEADERS - ARP - GM BOLTS AND GASKETS - MSD - NGK
POWERBOND - ASP - AND MORE!
Going to have my cousins machine shop do this while she mills my timing cover down for me. So I just need her to use a 10X1.5 thread tap. Drill 30mm where the top green dot shows and then tap it 17mm deep. Is this all correct?
We typically use the bracket for a jig to ensure we drill it in the right location!
__________________
Largest Stocking Distributor of LS-x Engines / CHECK OUT OUR NEW WEBSITE!
COMP - FAST - PACESETTER - DIAMOND RACING - EAGLE SPECIALTY PRODUCTS - CALLIES - COMETIC GASKETS
RAM CLUTCHES - MOSER ENGINEERING - KOOK'S HEADERS - ARP - GM BOLTS AND GASKETS - MSD - NGK
POWERBOND - ASP - AND MORE!
Largest Stocking Distributor of LS-x Engines / CHECK OUT OUR NEW WEBSITE!
COMP - FAST - PACESETTER - DIAMOND RACING - EAGLE SPECIALTY PRODUCTS - CALLIES - COMETIC GASKETS
RAM CLUTCHES - MOSER ENGINEERING - KOOK'S HEADERS - ARP - GM BOLTS AND GASKETS - MSD - NGK
POWERBOND - ASP - AND MORE!
Ya I planned on that, want to make sure its perfect so nothing can come back on me. I asked for you guys to do that to mine but it was never done. Same thing with my timing cover. Are you the one dealing with the UPS mess up, think Aaron said he was waiting to hear back from Matt about that situation.
Last edited by Canada; Sep 24, 2012 at 05:27 PM.
Sending you a PM!
__________________
Largest Stocking Distributor of LS-x Engines / CHECK OUT OUR NEW WEBSITE!
COMP - FAST - PACESETTER - DIAMOND RACING - EAGLE SPECIALTY PRODUCTS - CALLIES - COMETIC GASKETS
RAM CLUTCHES - MOSER ENGINEERING - KOOK'S HEADERS - ARP - GM BOLTS AND GASKETS - MSD - NGK
POWERBOND - ASP - AND MORE!
Largest Stocking Distributor of LS-x Engines / CHECK OUT OUR NEW WEBSITE!
COMP - FAST - PACESETTER - DIAMOND RACING - EAGLE SPECIALTY PRODUCTS - CALLIES - COMETIC GASKETS
RAM CLUTCHES - MOSER ENGINEERING - KOOK'S HEADERS - ARP - GM BOLTS AND GASKETS - MSD - NGK
POWERBOND - ASP - AND MORE!
Got it and sent one back with all the info I was told from UPS. Thanks for the drawing and the tapping info. My cousin will be doing that this weekend for me. She is still milling down the timing cover. So far I've got a weeks worth of an hour here and there into it each day and then she has two days in it working on problem areas. That elderbrock 2 piece cover sure does take a lot of work to work with a double roller. Still not sure if I'll have to have her make a spacer for that sensor as it might hit on the raised part of the timing chain sproket where it has that raised up groove half way around it on the inside. If it does hit and I have a spacer made for it, will that effect the way the sensor on the timing cover reads?
Got it and sent one back with all the info I was told from UPS. Thanks for the drawing and the tapping info. My cousin will be doing that this weekend for me. She is still milling down the timing cover. So far I've got a weeks worth of an hour here and there into it each day and then she has two days in it working on problem areas. That elderbrock 2 piece cover sure does take a lot of work to work with a double roller. Still not sure if I'll have to have her make a spacer for that sensor as it might hit on the raised part of the timing chain sproket where it has that raised up groove half way around it on the inside. If it does hit and I have a spacer made for it, will that effect the way the sensor on the timing cover reads?
__________________
Largest Stocking Distributor of LS-x Engines / CHECK OUT OUR NEW WEBSITE!
COMP - FAST - PACESETTER - DIAMOND RACING - EAGLE SPECIALTY PRODUCTS - CALLIES - COMETIC GASKETS
RAM CLUTCHES - MOSER ENGINEERING - KOOK'S HEADERS - ARP - GM BOLTS AND GASKETS - MSD - NGK
POWERBOND - ASP - AND MORE!
Largest Stocking Distributor of LS-x Engines / CHECK OUT OUR NEW WEBSITE!
COMP - FAST - PACESETTER - DIAMOND RACING - EAGLE SPECIALTY PRODUCTS - CALLIES - COMETIC GASKETS
RAM CLUTCHES - MOSER ENGINEERING - KOOK'S HEADERS - ARP - GM BOLTS AND GASKETS - MSD - NGK
POWERBOND - ASP - AND MORE!
If you can find that for me I'd appreciate it. I finally got that cover clearances to fit and ready another place that someone mentioned it wouldn't work. If I can get the specs and measure it, I can then have a spacer made if needed to fix the problem. Those Edelbrock timing covers are a joke being called bolt on. Thanks for all the help with the specs. Got the block drilled for the alternator bracket so I can now have two bolts up front and one in the back to support it. Fell better only missing one spot to attach it to than missing two spots.