
Generation IV External Engine LS2 | LS3 | LS7 | L92 | Bolt-Ons | Intakes | Exhaust | Ignition | Accessories
Sponsored by:
Sponsored by:

Stripped threads on block for bell housing...

Thread Tools
 
Search this Thread
 
Old Feb 13, 2021 | 02:42 PM
  #21  
RonSSNova's Avatar
8 Second Club
10 Year Member
Photogenic
Photoriffic
Top Answer: 1
iTrader: (3)
 
Joined: Aug 2011
Posts: 4,731
Likes: 815
From: Portland, OR
Default

Those long bolts torque to 106 inch pounds. Equal to less than 9 ft/lbs
The rest to 18 ft/lbs.

Did you install the pan?
Reply
Old Feb 13, 2021 | 06:18 PM
  #22  
roguegeek's Avatar
Thread Starter
Staging Lane
 
Joined: Dec 2020
Posts: 60
Likes: 6
Default

Originally Posted by RonSSNova
Those long bolts torque to 106 inch pounds. Equal to less than 9 ft/lbs
The rest to 18 ft/lbs.
Interesting. I called Holly/QuickTime this morning to get torque specs for their bell housing fasteners. They told me 35 ft/lbs on both bell housing to block and bell housing to trans. They did not distinguish between block or pan on the block side. Is that not right?

Originally Posted by RonSSNova
Did you install the pan?
The pan was factory installed. The only thing I've done with this crate engine so far is removed the factory clutch/flywheel and placed the new flywheel and bell housing on for bell housing alignment.
Reply
Old Feb 13, 2021 | 07:08 PM
  #23  
jlangley's Avatar
12 Second Club
5 Year Member
iTrader: (8)
 
Joined: Jul 2016
Posts: 333
Likes: 72
From: Langley BC
Default

Originally Posted by roguegeek
Interesting. I called Holly/QuickTime this morning to get torque specs for their bell housing fasteners. They told me 35 ft/lbs on both bell housing to block and bell housing to trans. They did not distinguish between block or pan on the block side. Is that not right?.
Factory service manual calls for 37 ft. lbs. for all bellhousing to block/oil pan bolts.
Reply
Old Feb 15, 2021 | 09:02 AM
  #24  
lazerlemonta's Avatar
9 Second Club
20 Year Member
Liked
Loved
Community Favorite
 
Joined: Feb 2004
Posts: 818
Likes: 215
From: VA
Default

Before you throw the transmission in, put the correct pilot bearing in or life is gonna suck. That is a pilot bearing for TR6060.......
Reply
Old Feb 15, 2021 | 11:35 AM
  #25  
roguegeek's Avatar
Thread Starter
Staging Lane
 
Joined: Dec 2020
Posts: 60
Likes: 6
Question

Originally Posted by lazerlemonta
Before you throw the transmission in, put the correct pilot bearing in or life is gonna suck. That is a pilot bearing for TR6060.......
That’s interesting. They come factory installed with the wrong bearing? Luckily I bought an extra thinking one wasn’t installed. Is GM part #14061685 the correct one?
Reply
Old Feb 15, 2021 | 12:13 PM
  #26  
lazerlemonta's Avatar
9 Second Club
20 Year Member
Liked
Loved
Community Favorite
 
Joined: Feb 2004
Posts: 818
Likes: 215
From: VA
Default


Will look like this and sit further inside the crank. If you try to use the one that is installed with a T56 you will not be able to get the transmission home by about a 1/2"
Reply
Old Feb 16, 2021 | 02:19 PM
  #27  
grinder11's Avatar
TECH Junkie
20 Year Member
Liked
Loved
Community Favorite
iTrader: (1)
 
Joined: Sep 2004
Posts: 3,212
Likes: 1,612
From: Michigan & Florida
Default

Originally Posted by gnx7
Timesert is strongest and just buy a kit as you will use it again some time in the future. That hole down there isn't super critical and that has happened to cars I've worked on before... someone simply overtightened it

Print out a couple copies of this torque spec sheet and put them in your tool box and give to your buddies that have LS projects: http://ls1howto.com/index.php?category=1
I am not familiar with a timesert. As a Tool & Diemaker for over 40 years, you need to look at the strength of the material that's being repaired, and how much material surrounds the area to be repaired. In this situation, aluminum isn't the strongest material. If it were me, I would go with whatever repair that disturbs/reduces the wall thickness the least amount. In my experience, a threaded insert usually means removing more stock from the I.D. (internal diameter) than a Helicoil would. Helicoils are a great way to repair stripped threads. As for this hole not being that important, IDK. Maybe it's not at this time, but may become more important at a later time. It looks to me like the time to repair it is now, while access to it is free and clear. Maybe that's just me. Anyway, I'd call a good hardware, Grainger, or Mid States Bolt, etc., and order the helicoil kit required to fix it. Just take the bolt in with you, and they'll match you up with the proper kit, which comes with the right size drill bit, a special tap, a 'tang driver', and a few helicoils. IDK how deep this hole is, so that's something you'll have to measure yourself, because helicoils come in different lengths. Good luck with this.......
Reply
Old Feb 16, 2021 | 02:32 PM
  #28  
StorminMatt's Avatar
Launching!
5 Year Member
Photogenic
Photoriffic
Liked
 
Joined: Jun 2016
Posts: 288
Likes: 57
Default

Originally Posted by grinder11
I am not familiar with a timesert. As a Tool & Diemaker for over 40 years, you need to look at the strength of the material that's being repaired, and how much material surrounds the area to be repaired. In this situation, aluminum isn't the strongest material. If it were me, I would go with whatever repair that disturbs/reduces the wall thickness the least amount. In my experience, a threaded insert usually means removing more stock from the I.D. (internal diameter) than a Helicoil would. Helicoils are a great way to repair stripped threads. As for this hole not being that important, IDK. Maybe it's not at this time, but may become more important at a later time. It looks to me like the time to repair it is now, while access to it is free and clear. Maybe that's just me. Anyway, I'd call a good hardware, Grainger, or Mid States Bolt, etc., and order the helicoil kit required to fix it. Just take the bolt in with you, and they'll match you up with the proper kit, which comes with the right size drill bit, a special tap, a 'tang driver', and a few helicoils. IDK how deep this hole is, so that's something you'll have to measure yourself, because helicoils come in different lengths. Good luck with this.......
I believe both Helicoil and Timesert use an 11mm tap for the M10 size. This is about the minimum you can increase the thread size if you consider the ‘worst case’ of pulling all the threads out of the hole. Unless you go with Time Sert’s Big Sert (which is used to repair thread repairs that failed), they both remove the same amount of material
Reply
LS1 Tech Stories

The Best V8 Stories One Small Block at Time

story-0

Topdon ONE vs. Artidiag 800 BT2: Which is the Diagnostic Tablet For You?

 Pouria Savadkouei
story-1

Gas Monkey Built a 6-Wheel Ferrari Testarossa With a Corvette LT4 Engine

 Verdad Gallardo

story-2

7 Most Reliable High-Performance Engines GM Has Ever Built

 Verdad Gallardo

story-3

Amazing '71 Camaro Restomod Is Modern Muscle Car Under the Skin

 Verdad Gallardo

story-4

6 Common C5 Corvette Failures and What's Involved In Repairing Them

 Pouria Savadkouei

story-5

Retro Modern Bandit Pontiac Trans AM Comes With Burt Reynolds' Autograph

 Verdad Gallardo

story-6

Top 10 Greatest Cadillac V Series Performance Models Ever, Ranked

 Pouria Savadkouei

story-7

Top 10 Most Powerful Chevy Trucks Ever Made!

 
story-8

Hennessey's New Supercharged Silverado ZR2 Has 700 HP

 Verdad Gallardo

story-9

Coachbuilt N2A Anteros Is an LS2-Powered C6 Corvette In Italian Clothes

 Verdad Gallardo
Old Feb 16, 2021 | 03:16 PM
  #29  
grinder11's Avatar
TECH Junkie
20 Year Member
Liked
Loved
Community Favorite
iTrader: (1)
 
Joined: Sep 2004
Posts: 3,212
Likes: 1,612
From: Michigan & Florida
Default

Originally Posted by StorminMatt
I believe both Helicoil and Timesert use an 11mm tap for the M10 size. This is about the minimum you can increase the thread size if you consider the ‘worst case’ of pulling all the threads out of the hole. Unless you go with Time Sert’s Big Sert (which is used to repair thread repairs that failed), they both remove the same amount of material
Reply
Old Feb 20, 2021 | 03:32 PM
  #30  
roguegeek's Avatar
Thread Starter
Staging Lane
 
Joined: Dec 2020
Posts: 60
Likes: 6
Default

Originally Posted by lazerlemonta

Will look like this and sit further inside the crank. If you try to use the one that is installed with a T56 you will not be able to get the transmission home by about a 1/2"
Off the main topic, but I wanted to circle back to it. So I grabbed the correct pilot bearing. I'm having problems seeing how this will replace the one currently installed. Those don't appear to be the same diameter. Pics for reference. What's going on here? What am I not seeing?


Reply
Old Feb 20, 2021 | 03:35 PM
  #31  
StorminMatt's Avatar
Launching!
5 Year Member
Photogenic
Photoriffic
Liked
 
Joined: Jun 2016
Posts: 288
Likes: 57
Default

The pilot bearing currently installed is for a TR6060. It won’t work for a T56, as the pilot shaft of the T56 is too long. You must remove it and install the needle bearing in the crank. The new bearing fits in a bore that is under the bearing currently installed in the crank. Remember that, when installing this bearing, the rubber oil seal must face out toward the clutch.

Last edited by StorminMatt; Feb 20, 2021 at 03:41 PM.
Reply
Old Feb 20, 2021 | 03:41 PM
  #32  
roguegeek's Avatar
Thread Starter
Staging Lane
 
Joined: Dec 2020
Posts: 60
Likes: 6
Default

Originally Posted by StorminMatt
The pilot bearing currently installed is for a TR6060. It won’t work for a T56, as the pilot shaft of the T56 is too long. You must remove it and install the needle bearing in the crank. The new bearing fits in a bore that is under the bearing currently installed in the crank. Remember that, when installing this bearing, the rubber oil seal must face out toward the clutch.
Thanks. Now I just need to figure out how to remove the current one.
Reply
Old Feb 20, 2021 | 03:44 PM
  #33  
StorminMatt's Avatar
Launching!
5 Year Member
Photogenic
Photoriffic
Liked
 
Joined: Jun 2016
Posts: 288
Likes: 57
Default

Originally Posted by roguegeek
Thanks. Now I just need to figure out how to remove the current one.
You need to get a pilot bearing puller of some sort. Just don’t use bread, grease, or TP and pound in the hole of the bearing, as there is an oil galley plug inside that bore. Doing so could push in the galley plug, causing you a heap of trouble.
Reply
Old Feb 20, 2021 | 03:46 PM
  #34  
roguegeek's Avatar
Thread Starter
Staging Lane
 
Joined: Dec 2020
Posts: 60
Likes: 6
Default

Originally Posted by StorminMatt
You need to get a pilot bearing puller of some sort. Just don’t use bread, grease, or TP and pound in the hole of the bearing, as there is an oil galley plug inside that bore. Doing so could push in the galley plug, causing you a heap of trouble.
I saw those videos. I'm not doing that. I'll go grab a pilot bearing puller. Thanks again.
Reply
Old Feb 20, 2021 | 05:43 PM
  #35  
roguegeek's Avatar
Thread Starter
Staging Lane
 
Joined: Dec 2020
Posts: 60
Likes: 6
Default

Originally Posted by StorminMatt
You need to get a pilot bearing puller of some sort. Just don’t use bread, grease, or TP and pound in the hole of the bearing, as there is an oil galley plug inside that bore. Doing so could push in the galley plug, causing you a heap of trouble.
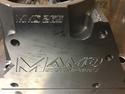
Got it off using a puller. I see where the new bearing goes, but it looks like the length of the bore is longer than the length of the new bearing, but not by much. Do I seat the bearing all the way back or keep it flushed with the lip?
Reply
Old Feb 20, 2021 | 06:17 PM
  #36  
Che70velle's Avatar
ModSquad
10 Year Member
Community Builder
Liked
Loved
iTrader: (6)
 
Joined: Jan 2012
Posts: 7,848
Likes: 5,197
From: Dawsonville Ga.
Default

Originally Posted by roguegeek
Got it off using a puller. I see where the new bearing goes, but it looks like the length of the bore is longer than the length of the new bearing, but not by much. Do I seat the bearing all the way back or keep it flushed with the lip?
Tap it in until it’s flush. Done.

Reply
Old Feb 21, 2021 | 12:10 PM
  #37  
RB04Av's Avatar
TECH Addict
5 Year Member
Photogenic
Liked
Top Answer: 1
 
Joined: Dec 2017
Posts: 2,190
Likes: 977
Default

Yup; flush or just barely under flush.

Different kind of motor but same principle.


Reply
Old Feb 22, 2021 | 07:58 AM
  #38  
lazerlemonta's Avatar
9 Second Club
20 Year Member
Liked
Loved
Community Favorite
 
Joined: Feb 2004
Posts: 818
Likes: 215
From: VA
Default

Glad you got that sorted out. I have been at the wrong end of this situation once myself.
Reply
Old Feb 24, 2021 | 10:04 PM
  #39  
big hammer's Avatar
10 Second Club
15 Year Member
Top Answer: 1
 
Joined: May 2009
Posts: 3,427
Likes: 226
From: over dere
Default

Oil pan bolt.. put a slightly longer bolt in to grab some virgin threads and G2G
Reply
Old Feb 25, 2021 | 03:11 AM
  #40  
StorminMatt's Avatar
Launching!
5 Year Member
Photogenic
Photoriffic
Liked
 
Joined: Jun 2016
Posts: 288
Likes: 57
Default

Originally Posted by big hammer
Oil pan bolt.. put a slightly longer bolt in to grab some virgin threads and G2G
These rear bolt holes are also usually through holes, which means you could use a longer bolt with a nut.
Reply


All times are GMT -5. The time now is 07:43 PM.

story-0
Topdon ONE vs. Artidiag 800 BT2: Which is the Diagnostic Tablet For You?

Slideshow: We take a close look at the ONE and Artidiag 800BT2 diagnostic tools from Topdon and the reasons to buy one over the other.

By Pouria Savadkouei | 2026-05-28 11:05:11


VIEW MORE
story-1
Gas Monkey Built a 6-Wheel Ferrari Testarossa With a Corvette LT4 Engine

Slideshow: The controversial Ferrari F6 swaps its original flat-12 for a Corvette Z06-derived LT4 V8 and sends power to four rear wheels through a custom-built drivetrain.

By Verdad Gallardo | 2026-05-26 18:23:54


VIEW MORE
story-2
7 Most Reliable High-Performance Engines GM Has Ever Built

Slideshow:These GM engines didn't just make huge power, they survived abuse, boost, track days, and six-digit mileage with a reputation for refusing to quit.

By Verdad Gallardo | 2026-05-21 16:45:27


VIEW MORE
story-3
Amazing '71 Camaro Restomod Is Modern Muscle Car Under the Skin

Slideshow: This heavily modified 1971 Camaro mixes classic muscle car styling with a fifth-generation Camaro interior and modern LS3 power.

By Verdad Gallardo | 2026-05-12 18:06:42


VIEW MORE
story-4
6 Common C5 Corvette Failures and What's Involved In Repairing Them

Slideshow: From wobbling harmonic balancers to failed EBCMs, these are the issues that define long-term C5 ownership and what repairs typically involve.

By Pouria Savadkouei | 2026-05-07 18:44:57


VIEW MORE
story-5
Retro Modern Bandit Pontiac Trans AM Comes With Burt Reynolds' Autograph

Slideshow: A modern Camaro transformed into a retro icon, this limited-run "Bandit" build blends nostalgia with brute force in a way few revivals manage.

By Verdad Gallardo | 2026-04-21 13:57:02


VIEW MORE
story-6
Top 10 Greatest Cadillac V Series Performance Models Ever, Ranked

Slideshow: Cadillac didn't just crash the high-performance luxury vehicle party, it showed up loud, supercharged, and occasionally a little unhinged...

By Pouria Savadkouei | 2026-04-16 10:05:15


VIEW MORE
story-7
Top 10 Most Powerful Chevy Trucks Ever Made!

Slideshow: Top ten most powerful Chevy trucks ever made

By | 2026-03-25 09:22:26


VIEW MORE
story-8
Hennessey's New Supercharged Silverado ZR2 Has 700 HP

Slideshow: Hennessey has turned the Silverado ZR2 into a 700-hp off-road monster with supercharged V8 power and a limited production run.

By Verdad Gallardo | 2026-03-24 18:57:52


VIEW MORE
story-9
Coachbuilt N2A Anteros Is an LS2-Powered C6 Corvette In Italian Clothes

Slideshow: A one-off sports car that looks like a vintage Italian exotic-but hides a C6 Corvette underneath-just sold for the price of a new mid-engine Corvette.

By Verdad Gallardo | 2026-03-23 18:53:41


VIEW MORE