427ci LS2 Sleeved, 4 barrel TB, port FI, NA, dry sump, engine build.

 12-16-2012, 08:18 PM
#62
Staging Lane
Thread Starter
Join Date: Apr 2012
Location: Pacific NW
Posts: 94
Likes: 0
Received 0 Likes
on
0 Posts
Later this week I'll post the installation of the dry sump oil tank in the trunk of the car.... and all the plumbing. I went through several variations on venting the tank before I found out what worked the best.
Please chime in anytime on this thread... I am open for discussion, comments, different ideas, or what ever is related. Thanks.
I know when I first decided to put the oil tank in the trunk I could not find too many similar threads... most people were relocating the battery to the trunk and putting the dry sump tank in the engine compartment. Putting the tank in the trunk cleans up the engine compartment. So far the trunk set up has worked great.... the plumbing was a huge job though.
12-22-2012, 12:51 AM
#63
Staging Lane
Thread Starter
Join Date: Apr 2012
Location: Pacific NW
Posts: 94
Likes: 0
Received 0 Likes
on
0 Posts
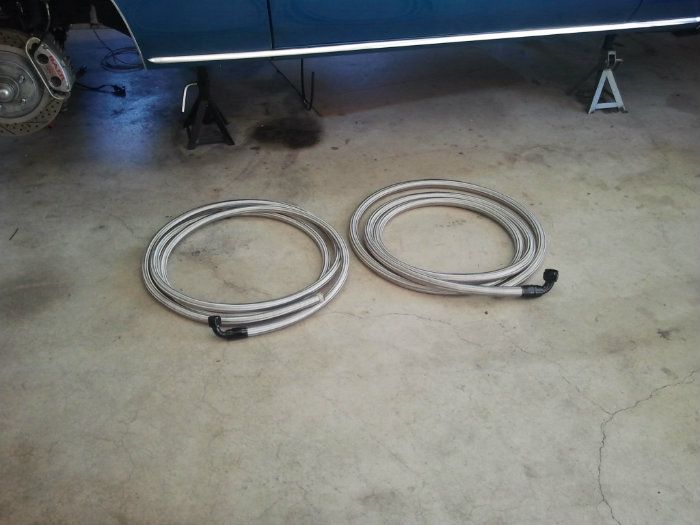
Next up... plumbing from the 4 stage oil pump to the oil supply tank.
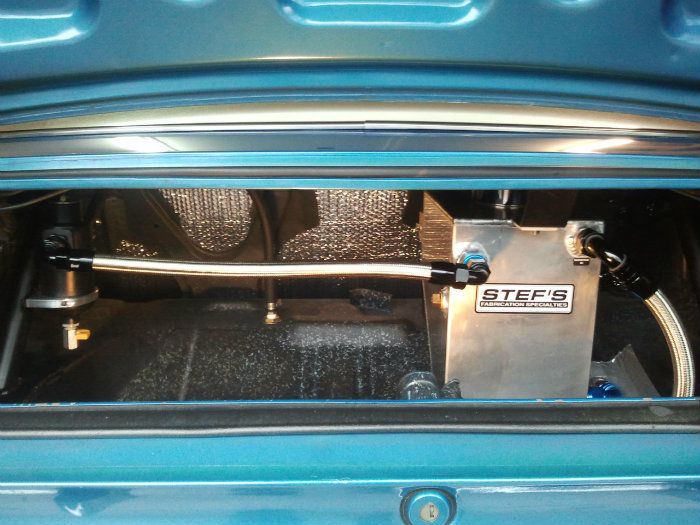
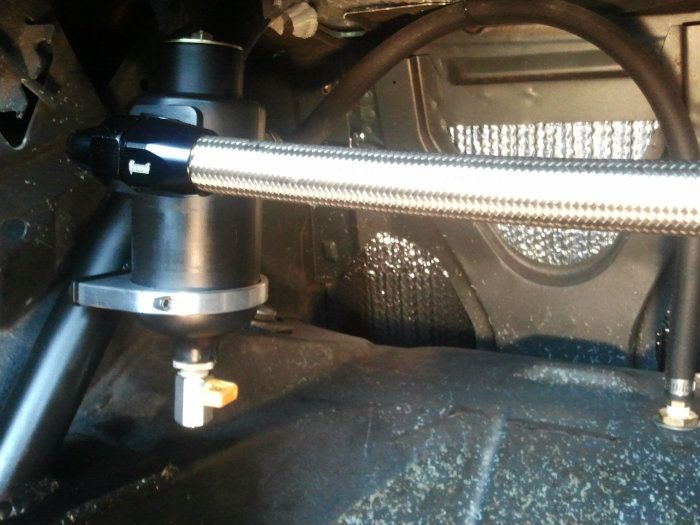
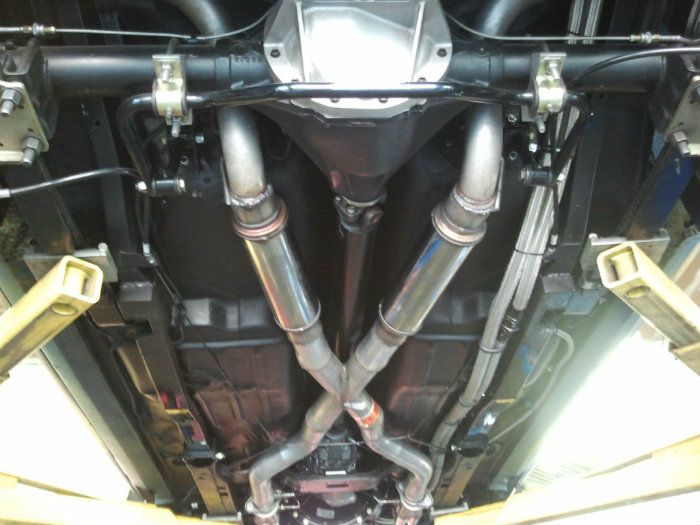
This picture shows the two oil lines... 16AN to 12AN pressure line.... and 16AN return line that run the length of the car. I ran the lines next to the frame rails and anchored the lines every couple of feet. The lines are flexible braided stainless.
The lines go up through the floor of the trunk to the oil tank
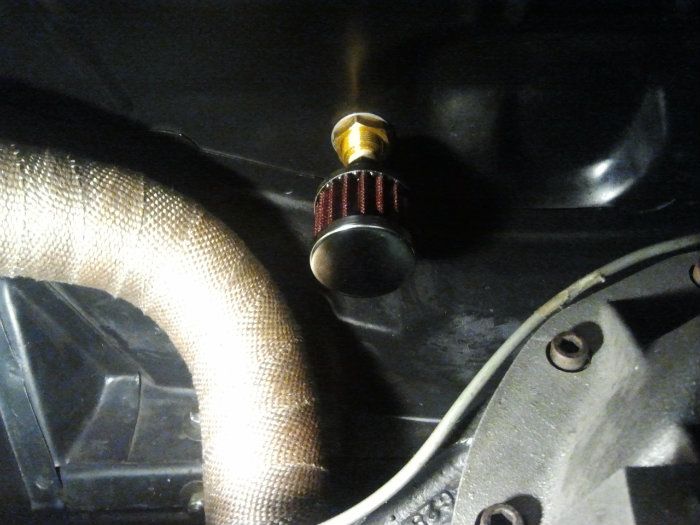
The line on the upper right is the oil return line (oil from engine). This line has a screen filter plumbed in that keeps any debris from getting into the tank. The pressure line is on the bottom right of the tank. This line feeds the dry sump pump. The line on the upper left is the tank vent. This line goes into a reservoir that has a drain petcock on the bottom.

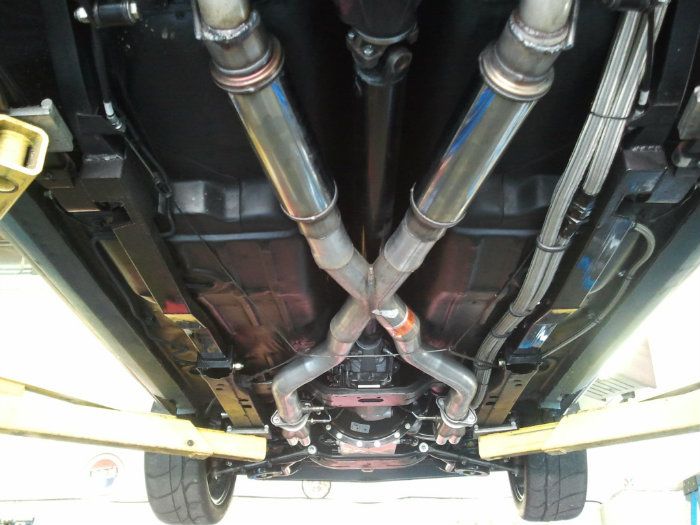
The vent reservoir has a line on the back that loops up and then goes to a bulkhead fitting on the trunk floor... to a breather.
Here is a shot that shows the breather from underneath the car. This set up works great... no fumes in the car.
I bought the dry sump tank from Stef's. They were easy to work with and built the tank to match my specs. The tank holds 14 quarts of oil when half full. The tank is engineered with special baffles to de-aerate the oil before it is pumped back into the engine. It's a good quality well designed tank.
Going to a dry sump oil system for this build was a lot of extra work! The benefit is that the engine will always have a good oil supply... even under hard cornering conditions on the track. I can drive the car hard on the track with no worries about oiling. I use 14 quarts of 5-30 wt synthetic oil in the tank. When the engine is up to temperature the oil pressure runs @ 60 psi while driving and 40 psi @ idle.
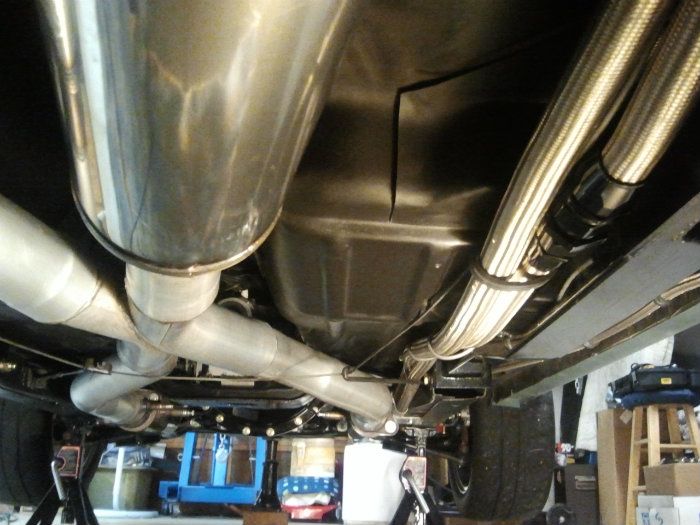
Question about the exhaust..... I went with 1-7/8" headers to a 3-1/2" collector... to 3" exhaust... to a 3" X-pipe... to 4" round Magnaflow mufflers to 2-1/2" tail pipes. The tailpipes are leftover from my last build. Would there be a benefit to switch to 3" tailpipes...or should I leave it alone?
Next up, I'll show some pictures of the instrument layout... some safety stuff (4 pt roll bar, 5 pt belts, seats). After that I will do a start up and idle video... and then a driving video
This picture shows the two oil lines... 16AN to 12AN pressure line.... and 16AN return line that run the length of the car. I ran the lines next to the frame rails and anchored the lines every couple of feet. The lines are flexible braided stainless.
The lines go up through the floor of the trunk to the oil tank
The line on the upper right is the oil return line (oil from engine). This line has a screen filter plumbed in that keeps any debris from getting into the tank. The pressure line is on the bottom right of the tank. This line feeds the dry sump pump. The line on the upper left is the tank vent. This line goes into a reservoir that has a drain petcock on the bottom.
The vent reservoir has a line on the back that loops up and then goes to a bulkhead fitting on the trunk floor... to a breather.
Here is a shot that shows the breather from underneath the car. This set up works great... no fumes in the car.
I bought the dry sump tank from Stef's. They were easy to work with and built the tank to match my specs. The tank holds 14 quarts of oil when half full. The tank is engineered with special baffles to de-aerate the oil before it is pumped back into the engine. It's a good quality well designed tank.
Going to a dry sump oil system for this build was a lot of extra work! The benefit is that the engine will always have a good oil supply... even under hard cornering conditions on the track. I can drive the car hard on the track with no worries about oiling. I use 14 quarts of 5-30 wt synthetic oil in the tank. When the engine is up to temperature the oil pressure runs @ 60 psi while driving and 40 psi @ idle.
Question about the exhaust..... I went with 1-7/8" headers to a 3-1/2" collector... to 3" exhaust... to a 3" X-pipe... to 4" round Magnaflow mufflers to 2-1/2" tail pipes. The tailpipes are leftover from my last build. Would there be a benefit to switch to 3" tailpipes...or should I leave it alone?
Next up, I'll show some pictures of the instrument layout... some safety stuff (4 pt roll bar, 5 pt belts, seats). After that I will do a start up and idle video... and then a driving video
12-23-2012, 08:54 PM
#64
Staging Lane
Thread Starter
Join Date: Apr 2012
Location: Pacific NW
Posts: 94
Likes: 0
Received 0 Likes
on
0 Posts
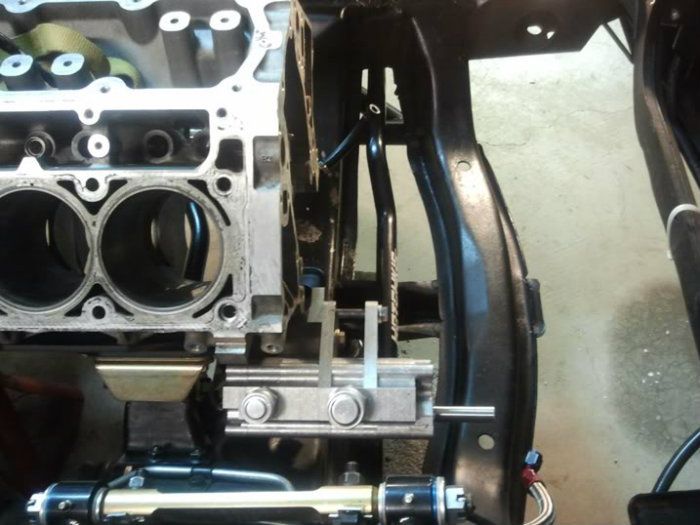
For anyone following this build that is thinking about doing a dry sump oiling system for their engine and they have a newer car with a gen III or IV engine� I have a bit more information to add. For my gen I Camaro I had to mount the cogged pulley that runs the dry sump pump in front of the crank damper so the dry sump pump would clear the engine mounts on the frame.
If you have a newer car�. you have the option to mount the cogged pulley behind the crank damper since the engine mounts are further back. If this is the case then you may not need a crank with an extended nose (I'm not sure). I know you can buy kits to mount the cogged pulley on the back of the damper for newer Camaros, GTO's, and Corvettes. Also... if you don�t have a lot of room you could get a three stage pump (shorter than a 4 stage) and this would be easier to fit in the car and easier to do the plumbing.
A four stage pump has one pressure section and three scavenge, a three stage pump has one pressure section and two scavenge. If I had it to do over I may have used the three stage pump. The three stage pump is more compact and there would have been less plumbing. The three stage pump would have provided adequate oiling. The advantage of the 4 stage pump though�. is that it creates a higher vacuum level in the engine and gives you a little more power potential.
This is a mock up I did before installing the engine in my car to check the oil pump fit. This shows how much further forward the engines mounts are on a 69 Camaro. This is why I had to mount the cog drive for the pump on the outside of the damper.
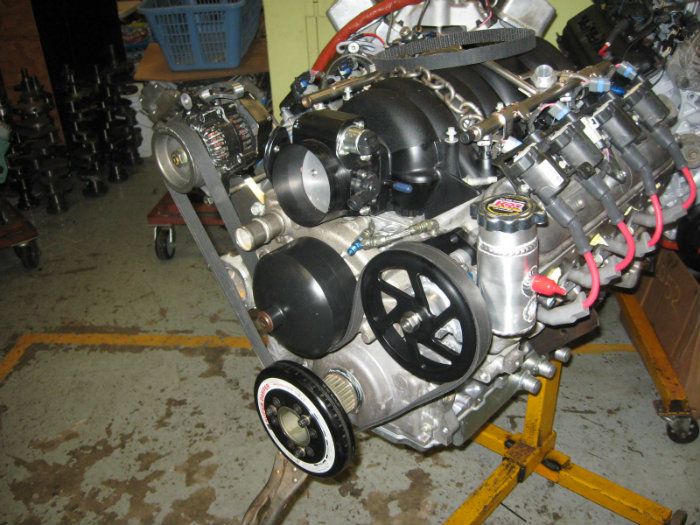
Here is a shot showing the cog gear mounted on the back of the damper. This is a 427 LS engine ready to go into a race car. This guy used a 4 stage pump also. The cogged pulley is mounted behind the damper.
Here is a shot of my engine showing the cog pulley mounted in front of the damper.
One more thing on the plumbing... It was pretty overwhelming after I got the engine in the car to figure how to do all the plumbing. For this project I converted all the plumbing from rubber hose to braided stainless hose with AN fittings. All the hoses had to be made.
I broke the plumbing down in smaller chunks. Oil pump to engine; pump to oil tank; PS pump to steering box; radiator to engine; steam vents to radiator� then I finished plumbing each section before moving on to the next. This worked well and I was able to get the job done without making a lot of mistakes. There are so many different hose sizes and fitting types it would have been difficult to try to figure it all out up front.
I came up with a system� I determined each hose size required and hose end type� then worked with a local company to build the hose with a fitting on one end and some extra hose length. Then I would mount the hose in the car� route the hose� and then mark a cut line for the hose final length. Then I would bring the hose back to the vendor and have the second end put on the hose. I slowly worked through all of the plumbing sections and after about three weeks in my spare time I finished the plumbing.
I had a professional cut and assemble the hoses because I didn�t know how to do it myself. If I did this again I would probably make my own hoses now that I have a better understanding.
If you have a newer car�. you have the option to mount the cogged pulley behind the crank damper since the engine mounts are further back. If this is the case then you may not need a crank with an extended nose (I'm not sure). I know you can buy kits to mount the cogged pulley on the back of the damper for newer Camaros, GTO's, and Corvettes. Also... if you don�t have a lot of room you could get a three stage pump (shorter than a 4 stage) and this would be easier to fit in the car and easier to do the plumbing.
A four stage pump has one pressure section and three scavenge, a three stage pump has one pressure section and two scavenge. If I had it to do over I may have used the three stage pump. The three stage pump is more compact and there would have been less plumbing. The three stage pump would have provided adequate oiling. The advantage of the 4 stage pump though�. is that it creates a higher vacuum level in the engine and gives you a little more power potential.
This is a mock up I did before installing the engine in my car to check the oil pump fit. This shows how much further forward the engines mounts are on a 69 Camaro. This is why I had to mount the cog drive for the pump on the outside of the damper.
Here is a shot showing the cog gear mounted on the back of the damper. This is a 427 LS engine ready to go into a race car. This guy used a 4 stage pump also. The cogged pulley is mounted behind the damper.
Here is a shot of my engine showing the cog pulley mounted in front of the damper.
One more thing on the plumbing... It was pretty overwhelming after I got the engine in the car to figure how to do all the plumbing. For this project I converted all the plumbing from rubber hose to braided stainless hose with AN fittings. All the hoses had to be made.
I broke the plumbing down in smaller chunks. Oil pump to engine; pump to oil tank; PS pump to steering box; radiator to engine; steam vents to radiator� then I finished plumbing each section before moving on to the next. This worked well and I was able to get the job done without making a lot of mistakes. There are so many different hose sizes and fitting types it would have been difficult to try to figure it all out up front.
I came up with a system� I determined each hose size required and hose end type� then worked with a local company to build the hose with a fitting on one end and some extra hose length. Then I would mount the hose in the car� route the hose� and then mark a cut line for the hose final length. Then I would bring the hose back to the vendor and have the second end put on the hose. I slowly worked through all of the plumbing sections and after about three weeks in my spare time I finished the plumbing.
I had a professional cut and assemble the hoses because I didn�t know how to do it myself. If I did this again I would probably make my own hoses now that I have a better understanding.
Last edited by DaleTx; 12-25-2012 at 11:25 PM. Reason: fixed picture link
12-24-2012, 02:53 PM
#65
Staging Lane
Thread Starter
Join Date: Apr 2012
Location: Pacific NW
Posts: 94
Likes: 0
Received 0 Likes
on
0 Posts
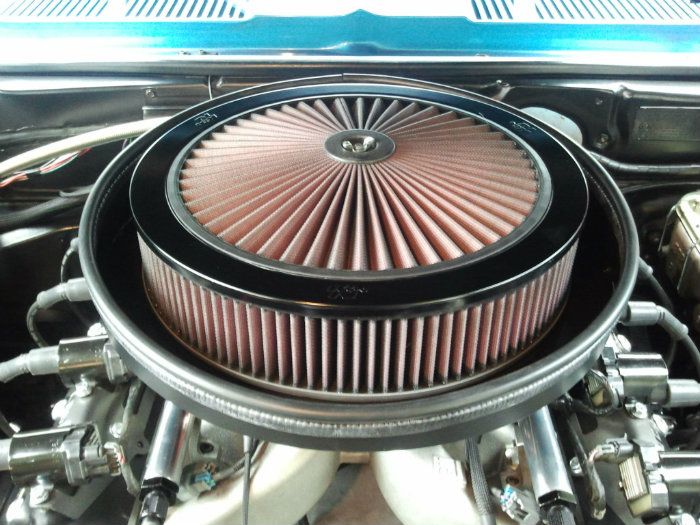
Previously in this thread I tested different cold air intake set ups while the engine was on the dyno to see how different designs affected performance. I wanted to test and tune the engine on the dyno exactly the same as it would be in the car. I didn�t want to go with the single plane intake and 4 barrel TB if I couldn�t get good airflow when the engine was in the car.
I put together three different cold air intakes for testing. Here is a recap of the results and then some pictures of the cold air intake set up I ended up using.
Set ups that were tested:
A. Extreme Velocity Pro Series 4150 elbow� into 4� O.D. tube x 15� long� result: 672HP dropped to 598HP
B. Home-made velocity stack on a drop base with Spectre shroud� into 4� O.D. tube x 15� long� result: 672HP dropped to 637HP
C. 4� tall x 14� diameter K&N air filter on a drop base� result: 672HP dropped to 662HP
I ended up using a 3" tall x 14" round K&N, with the open filter top. This setup works good. I built the shroud from thin mild steel..... this winter I will make a new one from aluminum.
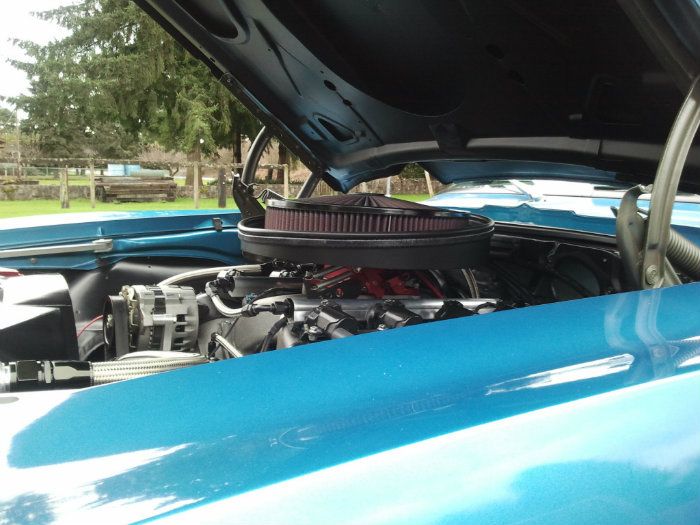
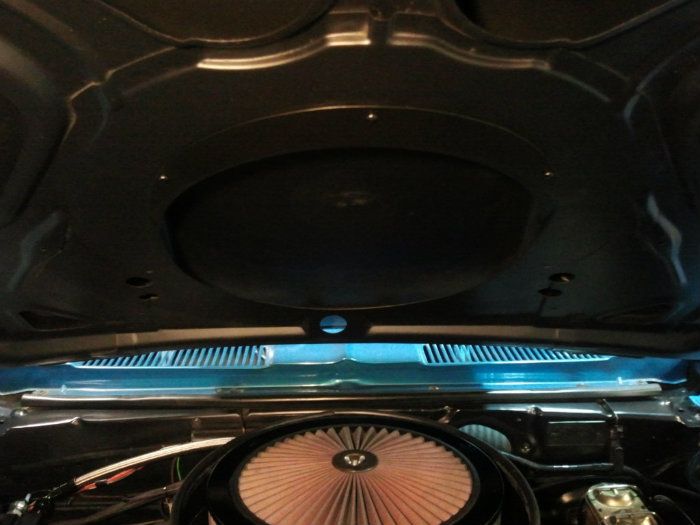
Draws cold air in at the base of the front window
Have a great Christmas
I put together three different cold air intakes for testing. Here is a recap of the results and then some pictures of the cold air intake set up I ended up using.
Set ups that were tested:
A. Extreme Velocity Pro Series 4150 elbow� into 4� O.D. tube x 15� long� result: 672HP dropped to 598HP
B. Home-made velocity stack on a drop base with Spectre shroud� into 4� O.D. tube x 15� long� result: 672HP dropped to 637HP
C. 4� tall x 14� diameter K&N air filter on a drop base� result: 672HP dropped to 662HP
I ended up using a 3" tall x 14" round K&N, with the open filter top. This setup works good. I built the shroud from thin mild steel..... this winter I will make a new one from aluminum.
Draws cold air in at the base of the front window
Have a great Christmas

 12-26-2012, 01:08 AM
#67
Staging Lane
Thread Starter
Join Date: Apr 2012
Location: Pacific NW
Posts: 94
Likes: 0
Received 0 Likes
on
0 Posts
 12-26-2012, 02:56 PM
#69
Staging Lane
Thread Starter
Join Date: Apr 2012
Location: Pacific NW
Posts: 94
Likes: 0
Received 0 Likes
on
0 Posts
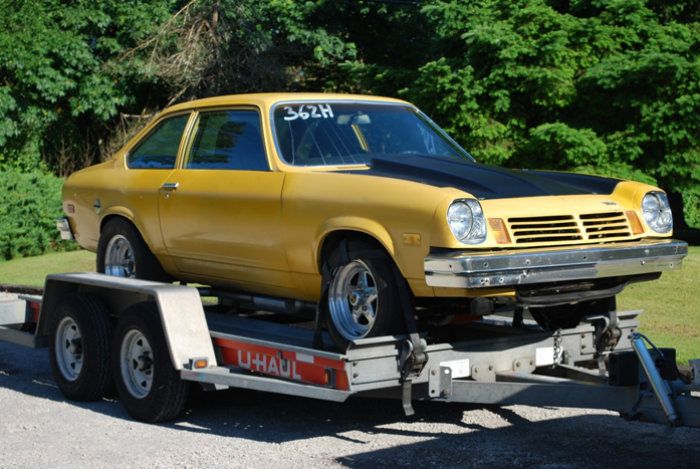
My next project car (drag only car)... swap out the iron 355 carburated sb for aluminum LS1 port FI. This car has a full cage and spool axle, all it needs is more power.
 12-27-2012, 09:16 AM
#70
Last year I had this head/cam setup and a LS1 intake on a stock bottom end, It was great I highly recommend it. Made around 440whp but the switch to the super victor never happened, which would have easily put it well over 500whp IMHO
The TB is a 1200cfm billet unit from Accel, was $325 shipped on sale
Look at race-mart.com for your next build, its by far the best pricing you will find. I think I have saved about $500 over what it would cost at summit on this build
BTW im assuming that vega will end up around 2800# with driver and LS1, with my motor from last year even with the LS1 intake it would probably run a 9.9x or 10.0x
 12-27-2012, 01:03 PM
#72
I have ordered a bunch of stuff and it all shows up just like its supposed to. No Blem's either. The Accel TB for instance showed up in the factory sealed Accel labeled box.
Just the hose and fittings to go from the stock feed line to edelbrock rails I ordered last week I saved $52 on vs summit. The black-friday to christmas coupon was 5% off your entire order so I spent over $500 this month
Just the hose and fittings to go from the stock feed line to edelbrock rails I ordered last week I saved $52 on vs summit. The black-friday to christmas coupon was 5% off your entire order so I spent over $500 this month
12-27-2012, 09:26 PM
#74
Staging Lane
Thread Starter
Join Date: Apr 2012
Location: Pacific NW
Posts: 94
Likes: 0
Received 0 Likes
on
0 Posts
Last year I had this head/cam setup and a LS1 intake on a stock bottom end, It was great I highly recommend it. Made around 440whp but the switch to the super victor never happened, which would have easily put it well over 500whp IMHO
The TB is a 1200cfm billet unit from Accel, was $325 shipped on sale
Look at race-mart.com for your next build, its by far the best pricing you will find. I think I have saved about $500 over what it would cost at summit on this build
BTW im assuming that vega will end up around 2800# with driver and LS1, with my motor from last year even with the LS1 intake it would probably run a 9.9x or 10.0x
The TB is a 1200cfm billet unit from Accel, was $325 shipped on sale
Look at race-mart.com for your next build, its by far the best pricing you will find. I think I have saved about $500 over what it would cost at summit on this build
BTW im assuming that vega will end up around 2800# with driver and LS1, with my motor from last year even with the LS1 intake it would probably run a 9.9x or 10.0x
A previous owner of the Vega ran in the 10's with a 350 CI small block with nitrous. Your right in there with your time estimates with the 440whp LS engine. The car is super light (says 2,189 LBS on the title). The Vega project will be on the back burner until next winter.
12-27-2012, 10:48 PM
#75
Staging Lane
Thread Starter
Join Date: Apr 2012
Location: Pacific NW
Posts: 94
Likes: 0
Received 0 Likes
on
0 Posts
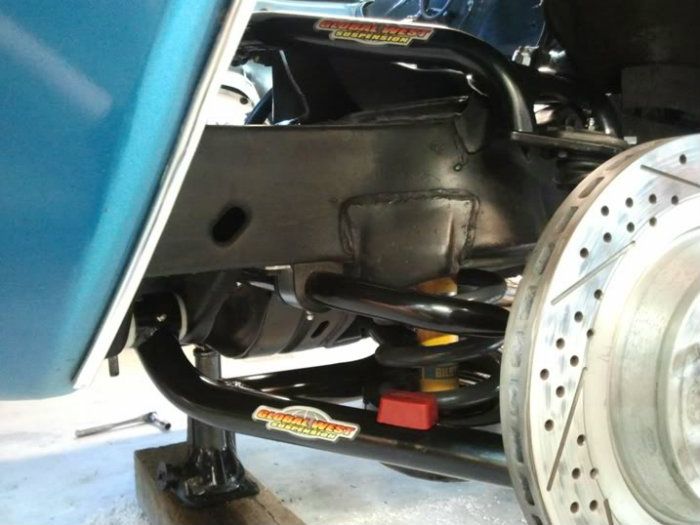
Since I have increased the power level in the Camaro beyond what it was originally designed for, I modified the chassis, suspension, and brakes to handle the extra HP and improve the stability. The chassis has significant modifications to increase stiffness and improve handling. The brakes have been upgraded to larger diameter 4-wheel disc brakes. I went to larger diameter wheels with high performance tires. With the improvements� the car is stable under acceleration/braking and feels solid at all speeds. With a 4 speed (no overdrive) I have run the car well into the 130 MPH range on the road course with no issues and no fears...
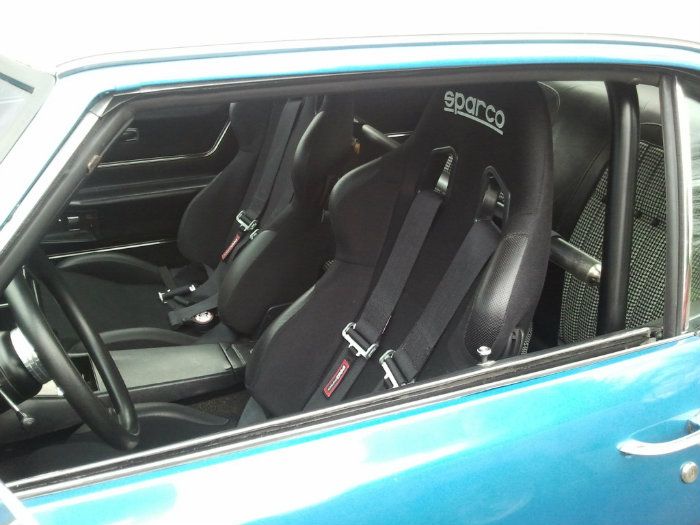
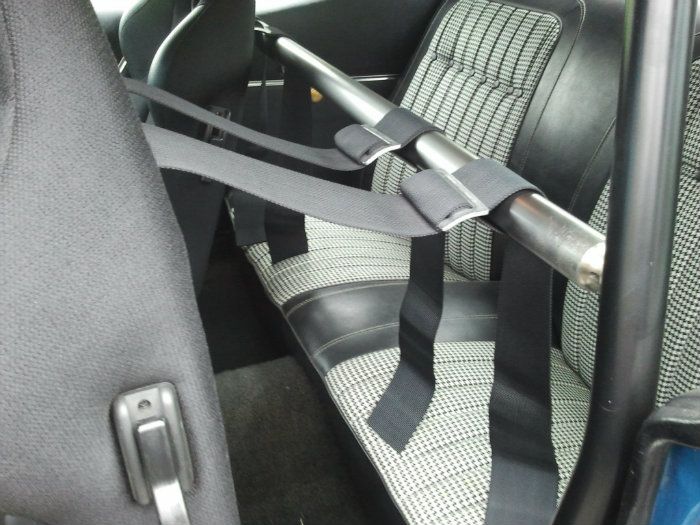
I added a 4-point roll bar with a cross bar...5-point seat belts for driver and passenger, and performance seats with side support (seats make a big difference over stock).
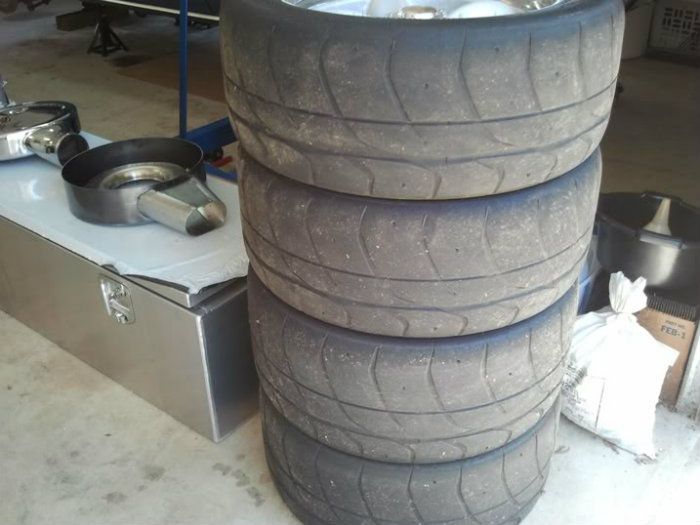
Nitto NT01 track tires (street legal, 100 tread wear)
"Baer Track" brakes, 13" diameter x 1-1/8" wide, vented, four corners
For anyone thinking about getting their car out on a road course�. I highly recommend it. There is no better way to find out what your car will do in terms of acceleration, speed, and cornering� legally. I started doing the High Performance Driver Events (HPDE) at my local track about four years ago. This is a perfect outlet for anyone who wants to learn how to drive, and get their high performance street car out on the track.
There's nothing like getting strapped tight in the car, and going around the road course full on with big HP and great handling... it is intense! To me this is what it�s all about. Building the engine, modifying the car, and then going out on the track pushing everything to the limit�. That first time out on the track makes all the hard work worthwhile.
Tomorrow I'll do the engine start up & idle video... I also plan to do a video at the track this spring with the engine peaked out.
I added a 4-point roll bar with a cross bar...5-point seat belts for driver and passenger, and performance seats with side support (seats make a big difference over stock).
Nitto NT01 track tires (street legal, 100 tread wear)
"Baer Track" brakes, 13" diameter x 1-1/8" wide, vented, four corners
For anyone thinking about getting their car out on a road course�. I highly recommend it. There is no better way to find out what your car will do in terms of acceleration, speed, and cornering� legally
. I started doing the High Performance Driver Events (HPDE) at my local track about four years ago. This is a perfect outlet for anyone who wants to learn how to drive, and get their high performance street car out on the track.There's nothing like getting strapped tight in the car, and going around the road course full on with big HP and great handling... it is intense! To me this is what it�s all about. Building the engine, modifying the car, and then going out on the track pushing everything to the limit�. That first time out on the track makes all the hard work worthwhile.
Tomorrow I'll do the engine start up & idle video... I also plan to do a video at the track this spring with the engine peaked out.
12-28-2012, 03:31 PM
#77
Staging Lane
Thread Starter
Join Date: Apr 2012
Location: Pacific NW
Posts: 94
Likes: 0
Received 0 Likes
on
0 Posts
Yeah, I put the oil tank in the trunk because I wanted to keep things clean and simple under the hood� and I wanted to mount the ECM and the fuel pump Digital Controller up front behind the battery for easy access (hate working under the dash). Most of the time when guys put the oil tank up front the battery gets relocated to the trunk to make room. Having the battery in the stock location, and having easy access to the ECM & DC is nice. Also, the cool air coming in from the front of the car keeps the ECM & DC cool. Keeping the electronics cool is good.
The dry sump pump pressure section on my pump is designed for the same output whether the oil tank is under the hood, or in the trunk. The advantage of putting the tank in the trunk is that you are not limited on the size of the tank. De-aerating the oil in a dry sump system is important�. the larger the tank is the more time available to de-aerate the oil. The dry sump pump manufacturer (NRC) recommended a 3-4 gallon tank minimum for the trunk set up since I had the room.
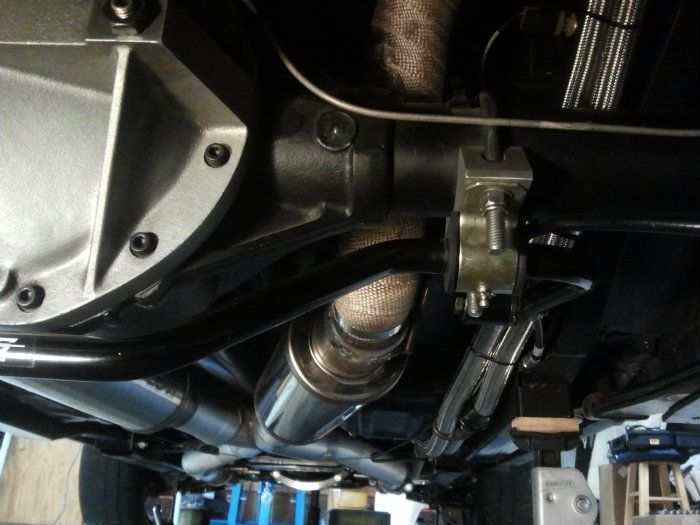
The pump kit came with a schematic for the plumbing of the dry sump system. The schematic called for the �Scavenge out� line 12AN - 16AN (from pump to tank) and the �Pressure in� line 12AN minimum (from tank to pump). I went with 16AN on the "Scavenge out" to the oil tank, and 16AN from oil tank to the halfway point on car� then reduced to 12AN to the dry sump pump inlet at the engine.
I ran the car on the street or several thousand miles this summer and I ran one HPDE event on the track. No problems� the dry sump system maintained pressure and worked perfectly.
You can see here where the 16AN line from tank to pump is reduced to 12AN about half way down.
 12-29-2012, 01:04 AM
#78
Staging Lane
Thread Starter
Join Date: Apr 2012
Location: Pacific NW
Posts: 94
Likes: 0
Received 0 Likes
on
0 Posts
Here is a cold start up & engine idle video from today:
https://www.youtube.com/watch?v=RtK18KQ4ZN4
https://www.youtube.com/watch?v=RtK18KQ4ZN4
Last edited by DaleTx; 01-06-2013 at 04:52 PM. Reason: updated video
12-29-2012, 11:25 PM
#79
Staging Lane
Thread Starter
Join Date: Apr 2012
Location: Pacific NW
Posts: 94
Likes: 0
Received 0 Likes
on
0 Posts
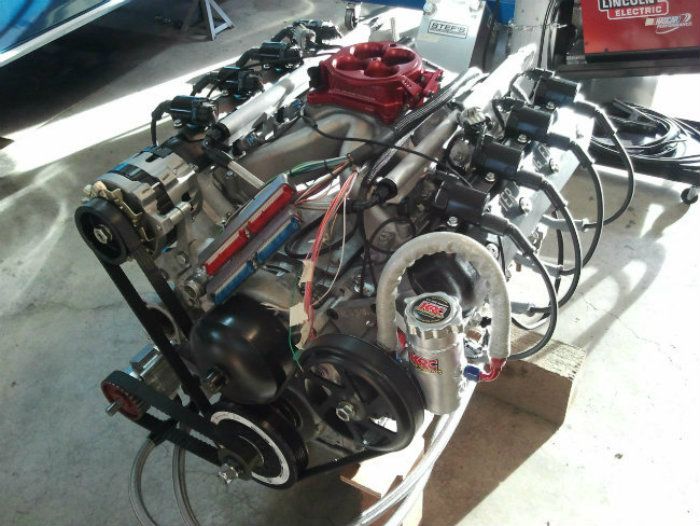
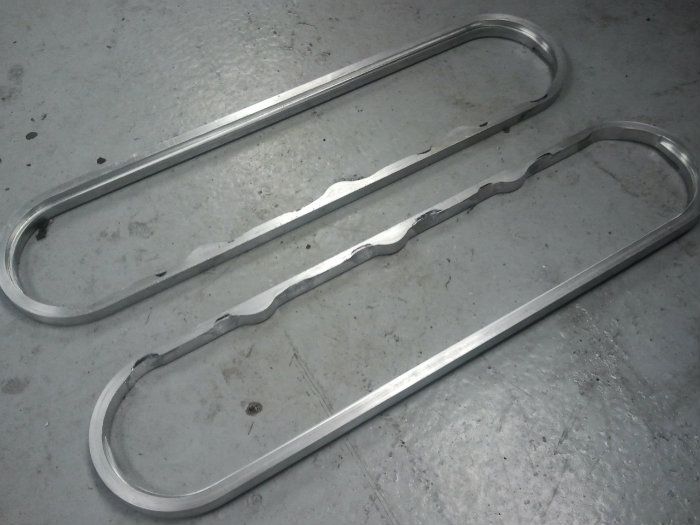
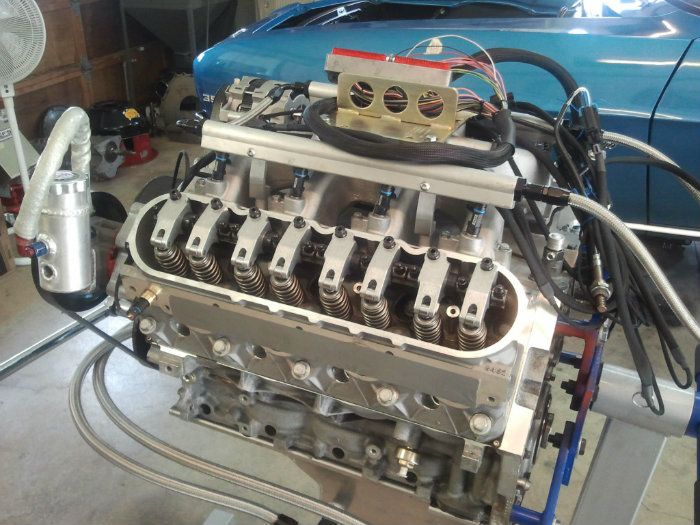
On this build I went with T&D shaft rockers (1.8 ratio). The rockers worked out great, nice stuff. The problem was trying to find valve covers that cleared the rocker arms. The stock LS valve covers would not clear.
I bought some 1/2" spacers thinking this would solve the problem. The engine builder tried to make the spacers fit... but there was so much interference we just decided to try something else.
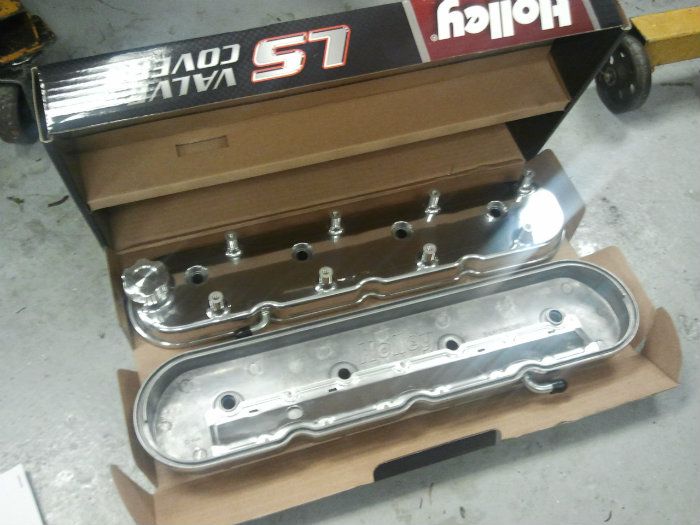
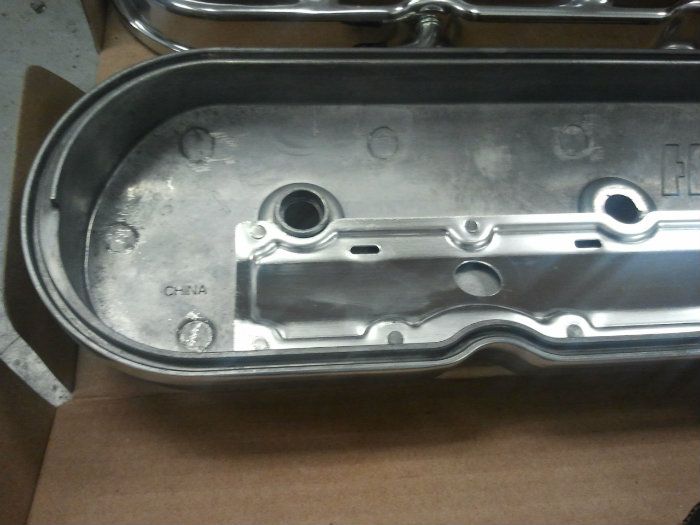
Next I bought a set of the new Holley LS valve covers. These looked great and had some extra depth but there were baffles inside that interfered with the rocker arms.
Finally I found some cast aluminum valve covers on the Katech website that had extra depth. These proved to be a good design and cleared the rockers with no modifications.
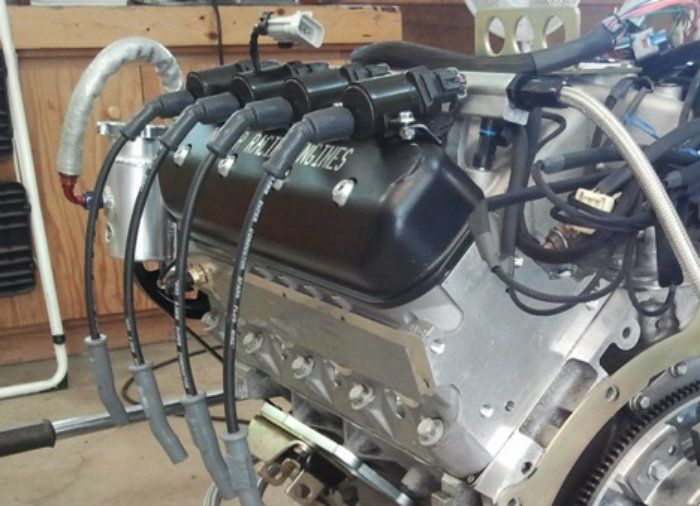
The rockers arms were very close to the o-ring sealing surface on the high side of the head. The Katech valve covers were offset slightly to allow for clearance on the rockers while still sealing.
I want to do an in car driving video. Does anyone have a recommendation for a camera that works good? My Cannon powershot does not pick up the engine sounds very well (not a very good mic). I saw one video that displayed g-forces on the screen while recording, not sure who makes that one.
I bought some 1/2" spacers thinking this would solve the problem. The engine builder tried to make the spacers fit... but there was so much interference we just decided to try something else.
Next I bought a set of the new Holley LS valve covers. These looked great and had some extra depth but there were baffles inside that interfered with the rocker arms.
Finally I found some cast aluminum valve covers on the Katech website that had extra depth. These proved to be a good design and cleared the rockers with no modifications.
The rockers arms were very close to the o-ring sealing surface on the high side of the head. The Katech valve covers were offset slightly to allow for clearance on the rockers while still sealing.
I want to do an in car driving video. Does anyone have a recommendation for a camera that works good? My Cannon powershot does not pick up the engine sounds very well (not a very good mic). I saw one video that displayed g-forces on the screen while recording, not sure who makes that one.
Last edited by DaleTx; 12-30-2012 at 12:29 AM.
12-30-2012, 05:07 PM
#80
Staging Lane
Thread Starter
Join Date: Apr 2012
Location: Pacific NW
Posts: 94
Likes: 0
Received 0 Likes
on
0 Posts
Last edited by DaleTx; 12-31-2012 at 01:16 AM.