Flipped Motor Mount
 02-12-2007, 02:30 PM
#21
TECH Addict
iTrader: (3)
Join Date: May 2006
Location: Buffalo, NY
Posts: 2,421
Likes: 0
Received 0 Likes
on
0 Posts
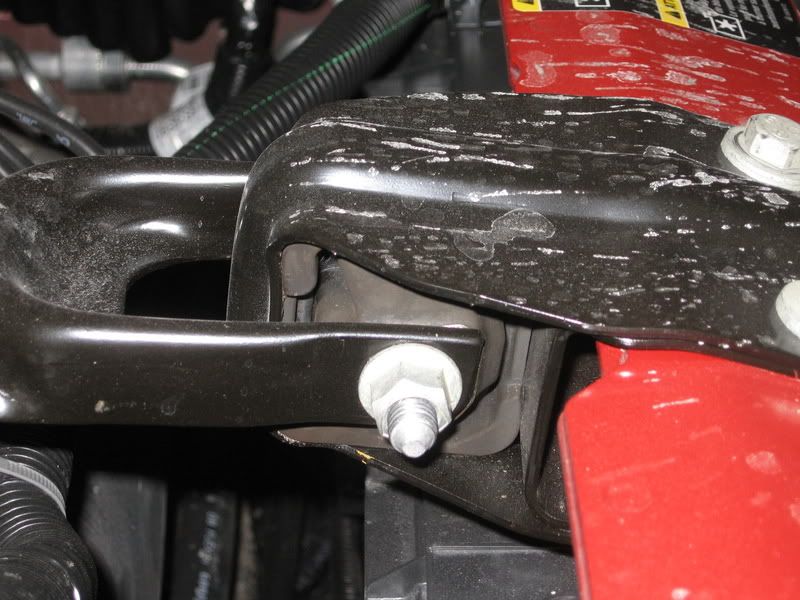
Nope...they only fit one way and that's the way they need to be. I made sure of that. I'm wondering if the motor mount on the earlier w-bodies was a little different? That little "jog" you see at the "TY" is the same on the top in that picture.
Last edited by Richiec77; 02-13-2007 at 11:07 PM.
 02-12-2007, 03:18 PM
#23
TECH Addict
iTrader: (3)
Join Date: May 2006
Location: Buffalo, NY
Posts: 2,421
Likes: 0
Received 0 Likes
on
0 Posts
Well, these are designed for the previous gen W-bodies, and i'm guessing their mount doesn't have the angles that our 1 does. Trimming about 1" of the raised material from the top of the mount would make install easier.
I'll be purchasing a stock mount anyway, just in case this gets too annoying. We're going on a 4-hour trip this weekend...more than enough time to tell if the poly will stay or go.
I'll be purchasing a stock mount anyway, just in case this gets too annoying. We're going on a 4-hour trip this weekend...more than enough time to tell if the poly will stay or go.
02-12-2007, 07:09 PM
#24
TECH Fanatic
Join Date: Oct 2006
Posts: 1,190
Likes: 0
Received 0 Likes
on
0 Posts
Lemme know if you need a pic of the '07 V-6 mounts, I can get you one.
Edit: here you go -
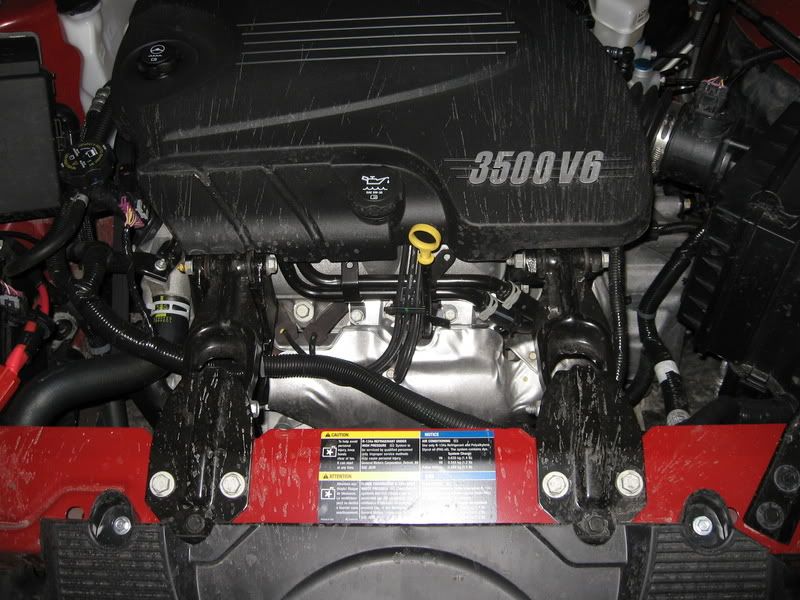
'06 V-8 Mounts:

These pics are a good illustration of the "flipped" motor mount
Edit: here you go -
'06 V-8 Mounts:
These pics are a good illustration of the "flipped" motor mount
Last edited by Kazmaniac; 02-12-2007 at 09:08 PM.
 03-24-2007, 08:26 AM
#26
TECH Fanatic

Join Date: Jan 2007
Location: LITH, IL.
Posts: 1,029
Likes: 0
Received 0 Likes
on
0 Posts
Originally Posted by Nikon02
Would a custom cut ( all harder rubber cut to fit that area) work better then the stock? would it be possible to get it in there?
 04-24-2009, 09:30 AM
#30
Teching In

Join Date: Jan 2009
Location: Wyoming, MI
Posts: 28
Likes: 0
Received 0 Likes
on
0 Posts
Pretty sure it's the exact same mount as the 97-03 GP's. I used the zzp poly in my 97 gtp and it fit exactly like that, with the two tabs kind of being in the way, but it IS the correct way to install it. On my older GP all I used to cut the rubber one out was a decent steak knife and kept spraying wd40 where I was cutting to let the knife slide easier... pretty easy actually, and then just kind of pried the outer rubber housing out with a screwdriver.
Just noticed ZZP is selling LSx 1.9's now, too.
Just noticed ZZP is selling LSx 1.9's now, too.
 04-24-2009, 01:19 PM
#32
TECH Addict
iTrader: (3)
Join Date: May 2006
Location: Buffalo, NY
Posts: 2,421
Likes: 0
Received 0 Likes
on
0 Posts
I know the pics are old, but they're also a good illustration of how NOT to take care of your engine bay...something I have failed at times as well.  If they were taken during the winter, you get a free pass...but if not, you FAIL!
If they were taken during the winter, you get a free pass...but if not, you FAIL!  03-07-2010, 02:16 PM
#35
TECH Fanatic
iTrader: (3)
Join Date: Aug 2009
Location: Orlando, FL
Posts: 1,392
Likes: 0
Received 0 Likes
on
0 Posts
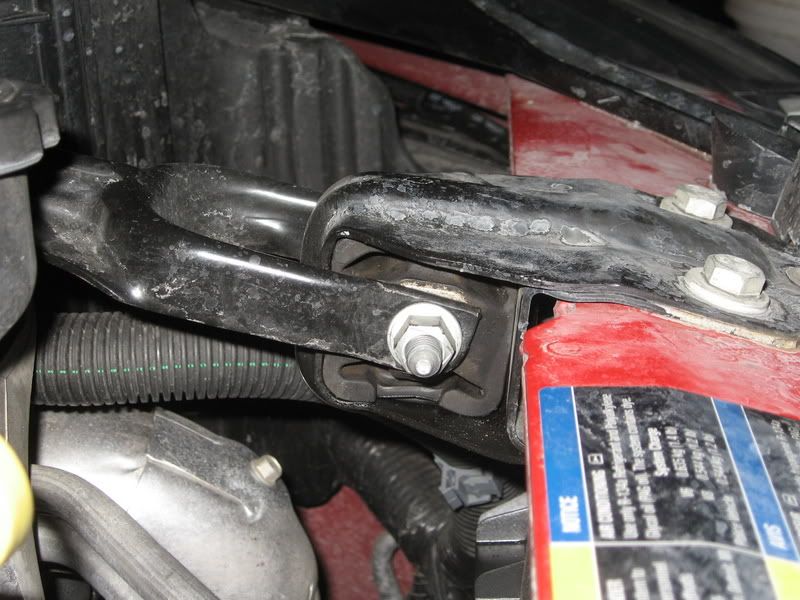
The two arrows point tothe two mount bolts that need to come out completley. Then once the dog bone is out of the way take one bolt and nut and tighten it inside of that rubber mount thats in the bracket on the red radiator support and tighten it well!
Now spray some WD 40 around the whole diameter and both sides of the that rubber bushing on the bracket still on the car then take your ratchet and 15mm wrench and rotate both at the same ttime twoards the engine till that mount spins inside the bracket and the solid rubber section is facing front and rear and the open windows up and down. Reassemble and test it out.

Now spray some WD 40 around the whole diameter and both sides of the that rubber bushing on the bracket still on the car then take your ratchet and 15mm wrench and rotate both at the same ttime twoards the engine till that mount spins inside the bracket and the solid rubber section is facing front and rear and the open windows up and down. Reassemble and test it out.
I doubt that you will feel a vibration with the OE mount flipped (actually, turned 90*)...I didn't. It's still very pliable rubber, so it still flexes...just not as much.
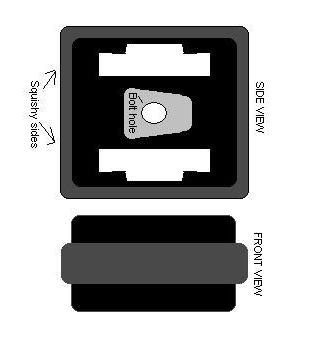
Here's a diagram of the MM turned 90*. Notice that the holes in the rubber are now top & bottom, vs. front & back. The solid piece of rubber that is horizontal helps to keep the bolt in the middle from moving so much, when before the bolt could be pulled into the hollow areas.
Regarding the job itself...have plenty of lube available, a large screwdriver, breaker bar, 15mm (?) deep socket, and another 15mm wrench or ratchet & socket.
Remove the dogbone by taking out the nuts & bolts from the engine mount & front motor mount. Reinstall one bolt inside the motor mount, tightening as much as you can. Install second nut on same bolt.
Lube up the edges of the rubber bushing, using the screwdriver to pry apart the edges to allow it to seep in between the rubber & metal housing. As with all tight situations, add lube as necessary to achieve final goal.
Take deep socket & breaker on 2-nut side of bolt, and wrench/short socket on bolt side, and push towards engine. Add lube if necessary while torquing on bushing. The inside edges of the bushing may be fused to the metal from the engine heat, so it needs to be lubricated.
Remove 2 nuts & bolt & reinstall dogbone.
Last edited by GXP25; 03-07-2010 at 04:37 PM. Reason: Typo.
03-07-2010, 04:33 PM
#36
TECH Fanatic
iTrader: (3)
Join Date: Aug 2009
Location: Orlando, FL
Posts: 1,392
Likes: 0
Received 0 Likes
on
0 Posts
Took about 45 minutes. Like most things, had I had to do it again, it'd probably take a lot less, lol. Warm outside temps helped quite a bit (69�F at 4 PM).
One small caveat: having it flipped forward by 90� made it rather difficult to replace the bolts. As always, lube generously.
WARNING: It is best not to perform the mod on a hot/warm car! That "piece" of metal that holds the upper mount is quite the heat sink!
Overall, I can't say much about the results (yet). I might have noticed something, but then again I guess I'm rather biased. I'll let a few days pass for the WD-40 to dry up and the rubber to "harden."
03-07-2010, 07:15 PM
#37
TECH Junkie
iTrader: (4)
Join Date: Feb 2007
Location: 805-818
Posts: 3,561
Likes: 0
Received 0 Likes
on
0 Posts

Took about 45 minutes. Like most things, had I had to do it again, it'd probably take a lot less, lol. Warm outside temps helped quite a bit (69�F at 4 PM).
One small caveat: having it flipped forward by 90� made it rather difficult to replace the bolts. As always, lube generously.
WARNING: It is best not to perform the mod on a hot/warm car! That "piece" of metal that holds the upper mount is quite the heat sink!
Overall, I can't say much about the results (yet). I might have noticed something, but then again I guess I'm rather biased. I'll let a few days pass for the WD-40 to dry up and the rubber to "harden."
One small caveat: having it flipped forward by 90� made it rather difficult to replace the bolts. As always, lube generously.
WARNING: It is best not to perform the mod on a hot/warm car! That "piece" of metal that holds the upper mount is quite the heat sink!
Overall, I can't say much about the results (yet). I might have noticed something, but then again I guess I'm rather biased. I'll let a few days pass for the WD-40 to dry up and the rubber to "harden."
03-09-2010, 07:37 PM
#38
Been there done that, that metal piece indeed burned the **** out of me. I put in a poly mount and I'm on the fence about the whole front mount mod. Now if I am in DoD and coasting to a stop in D, I get a nasty vibration from the engine switching from 8cyl to 4cyl mode.
08-12-2011, 03:50 PM
#39
On The Tree
Join Date: Jun 2011
Location: Origionally-Winnipeg Manitoba, Currently-Fort McMurray Alberta
Posts: 122
Likes: 0
Received 0 Likes
on
0 Posts
So I have a question about this motor mount flip...
Has it affected anyone's catalytic converter rubber mounting hangers?
When I put my exhaust on there was no issue getting the rings off/on with a little stretch they popped off and back on easily.
Since the exhaust I've flipped the motor mount, and noticed my tail pipes were off.. figured it was a loose clamp so I looked and saw that one of the cat's rubber hangers had come off.
I looked and found the ring broken, now when I flipped the motor mount I think I may have pushed the exhaust back and broken that ring. As of now the ring is very tight.
anyone else notice this issue?

