LT1-LT4 Modifications 1993-97 Gen II Small Block V8

95 LT1 AI Cam-only Motor Build Pics

Thread Tools
 
Search this Thread
 
Old 12-30-2008, 10:26 PM
  #21  
TECH Junkie
iTrader: (34)
 
SoxXpupPeT's Avatar
 
Join Date: May 2008
Location: Yonkers, NY
Posts: 3,432
Received 1 Like on 1 Post

Default

thats an awesome build. i plan on doing the Exact same thing in afew months. how hard was it to pull the heads off the car ?
Old 12-30-2008, 10:30 PM
  #22  
TECH Senior Member
iTrader: (36)
 
ss.slp.ls1's Avatar
 
Join Date: Jan 2008
Location: Orange County, CA
Posts: 8,188
Received 26 Likes on 24 Posts

Default

Subscribed.
Old 12-31-2008, 12:14 AM
  #23  
TECH Fanatic
Thread Starter
iTrader: (4)
 
2XR95Z28's Avatar
 
Join Date: Jul 2007
Location: Davenport, IA
Posts: 1,351
Likes: 0
Received 0 Likes on 0 Posts

Default

Originally Posted by TABBED 5.3
can you pm or post here an approximate price the machine shop charged to do the head work? thanks
Sure thing, for the cleaning, milling, "competition valve job", and install the springs the total is right around $225. The shop is Auto-Ron's in Davenport, Iowa. They do alot of performance motors locally here, always heard good things.

Originally Posted by Elliott's94Z
So when you gonna ship me those Mickey T's

Looks good man!
Whenever you send me that money! ahaha

Originally Posted by SoxXpupPeT
thats an awesome build. i plan on doing the Exact same thing in afew months. how hard was it to pull the heads off the car ?
Heads weren't too tough to take off, just a little tight in there and i couldnt get the coolant lines off the back of the heads so we lifted both off together then took the line off once the heads were out of the car.

Pickin the heads up in the morning, will get pics then!
Old 12-31-2008, 12:16 AM
  #24  
TECH Fanatic
Thread Starter
iTrader: (4)
 
2XR95Z28's Avatar
 
Join Date: Jul 2007
Location: Davenport, IA
Posts: 1,351
Likes: 0
Received 0 Likes on 0 Posts

Default

Anyone have any tips of cleaning the carbon build up off the top of the heads? any special secrets?
Old 12-31-2008, 10:33 AM
  #25  
TECH Regular
iTrader: (11)
 
BlackLT1Z's Avatar
 
Join Date: Oct 2006
Location: Euless, TX
Posts: 407
Likes: 0
Received 1 Like on 1 Post
Default

The machine shop didn't do that as part of the cleaning? Brake clean works pretty well but be sure to get it off before installing them.
Old 12-31-2008, 10:34 AM
  #26  
TECH Fanatic
Thread Starter
iTrader: (4)
 
2XR95Z28's Avatar
 
Join Date: Jul 2007
Location: Davenport, IA
Posts: 1,351
Likes: 0
Received 0 Likes on 0 Posts

Default

Whoops mean't top of the pistons. haha
Old 12-31-2008, 10:41 AM
  #27  
TECH Regular
iTrader: (11)
 
BlackLT1Z's Avatar
 
Join Date: Oct 2006
Location: Euless, TX
Posts: 407
Likes: 0
Received 1 Like on 1 Post
Default

I used a rag and pb blaster. Take each piston to TDC and use a little kitchen scrubber.
Old 12-31-2008, 10:43 AM
  #28  
TECH Fanatic
Thread Starter
iTrader: (4)
 
2XR95Z28's Avatar
 
Join Date: Jul 2007
Location: Davenport, IA
Posts: 1,351
Likes: 0
Received 0 Likes on 0 Posts

Default

Alright i'll try that today, Thanks!
Old 12-31-2008, 10:48 AM
  #29  
TECH Regular
iTrader: (11)
 
BlackLT1Z's Avatar
 
Join Date: Oct 2006
Location: Euless, TX
Posts: 407
Likes: 0
Received 1 Like on 1 Post
Default

Make sure you switch spots on that green scrubber. I had an issue with the green pad peeling a little. You don't want to get that stuff in the water jackets.
Old 12-31-2008, 11:39 AM
  #30  
12 Second Club
iTrader: (26)
 
Jditlfm's Avatar
 
Join Date: Apr 2005
Location: Brockport NY
Posts: 1,456
Likes: 0
Received 0 Likes on 0 Posts

Default

Nitrous worked real well getting any carbon i had on my pistons there was next to none on my pistons at 154,000 miles. LOL
Old 12-31-2008, 12:06 PM
  #31  
TECH Fanatic
Thread Starter
iTrader: (4)
 
2XR95Z28's Avatar
 
Join Date: Jul 2007
Location: Davenport, IA
Posts: 1,351
Likes: 0
Received 0 Likes on 0 Posts

Default

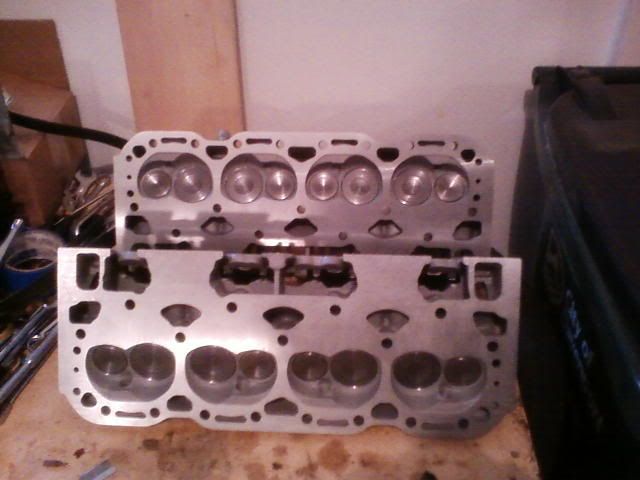
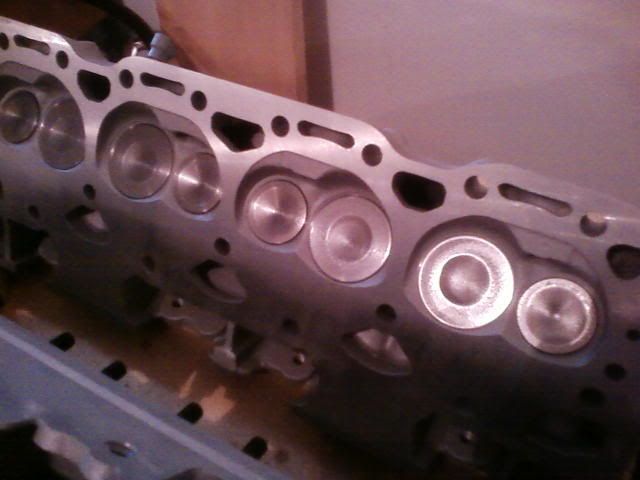
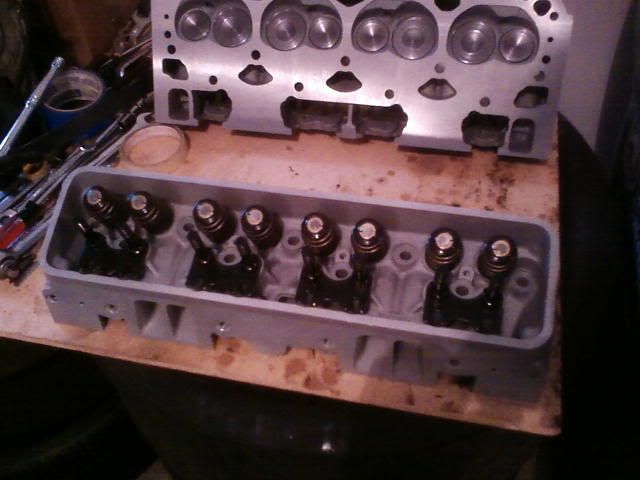
Alright the heads are back, and looking brand spankin new. Valve job looks awesome and I'm very happy with how they turned out! Here is a few pics i took with my phone...


Gonna work on gettin those on the car today along with the timing chain cover, crank hub, opti- and crank pulley. Will get pics of the progression today.
Old 12-31-2008, 03:11 PM
  #32  
TECH Fanatic
Thread Starter
iTrader: (4)
 
2XR95Z28's Avatar
 
Join Date: Jul 2007
Location: Davenport, IA
Posts: 1,351
Likes: 0
Received 0 Likes on 0 Posts

Default

here is a pic of the intake all done and painted


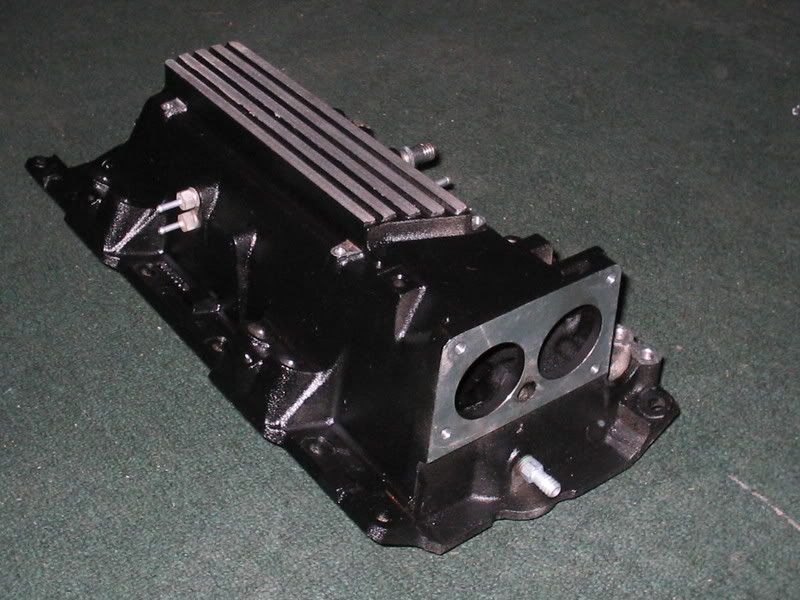
QUESTION- Well, as you know i'm putting in an EWP, so i heard i have to plug the hole on the block with a freeze plug and RTV, but what about the hole on the timing chain cover? do i have to plug that? and if so with what? THANKS!
Old 12-31-2008, 03:22 PM
  #33  
Banned
iTrader: (22)
 
LS1 SPEED's Avatar
 
Join Date: Jan 2004
Location: Schaumburg,IL
Posts: 4,957
Likes: 0
Received 0 Likes on 0 Posts
Default

looks good

block doesn't have to be plugged

the cover we normally weld up, but a freeze plug can be used

I would use a fine wire wheel on a drill for deck surfaces and tops of pistons. The last thing you want in contamination from the scrub pad in the motor.
Old 12-31-2008, 03:34 PM
  #34  
TECH Fanatic
Thread Starter
iTrader: (4)
 
2XR95Z28's Avatar
 
Join Date: Jul 2007
Location: Davenport, IA
Posts: 1,351
Likes: 0
Received 0 Likes on 0 Posts

Default

Originally Posted by LS1 SPEED
looks good

block doesn't have to be plugged

the cover we normally weld up, but a freeze plug can be used

I would use a fine wire wheel on a drill for deck surfaces and tops of pistons. The last thing you want in contamination from the scrub pad in the motor.
So just leave the block hole open but weld up the cover?

for the pistons i took each to TDC and spray a little brake clean and pb blaster then used a decently soft brush and scrubed a little bit then wiped off with a towel. There not perfectly clean but better than before.
Old 12-31-2008, 05:28 PM
  #35  
TECH Enthusiast
iTrader: (2)
 
JoeliusZ28's Avatar
 
Join Date: Dec 2005
Location: MI
Posts: 740
Received 1 Like on 1 Post

Default

awesome dude!! youre setup is rediculously close to mine haha.
Old 01-01-2009, 11:40 AM
  #36  
TECH Fanatic
Thread Starter
iTrader: (4)
 
2XR95Z28's Avatar
 
Join Date: Jul 2007
Location: Davenport, IA
Posts: 1,351
Likes: 0
Received 0 Likes on 0 Posts

Default

Ya now let's just hope they both run like raped apes hahah.
Old 01-01-2009, 01:01 PM
  #37  
TECH Fanatic
iTrader: (6)
 
Z-RATED94's Avatar
 
Join Date: Nov 2007
Location: Carol Stream Il.
Posts: 1,524
Likes: 0
Received 0 Likes on 0 Posts
Default

Look'n good. You should send your computer off to Ion for a mail order tune though. I'm sure he'll work something out for you price wise, since you will be getting a dyno tune from him.
Old 01-01-2009, 01:08 PM
  #38  
TECH Fanatic
Thread Starter
iTrader: (4)
 
2XR95Z28's Avatar
 
Join Date: Jul 2007
Location: Davenport, IA
Posts: 1,351
Likes: 0
Received 0 Likes on 0 Posts

Default

yeah i already talked to him and thats what im going to do.
Old 01-01-2009, 03:00 PM
  #39  
On The Tree
iTrader: (3)
 
daves94formula's Avatar
 
Join Date: Sep 2007
Location: Ames, IA
Posts: 177
Likes: 0
Received 0 Likes on 0 Posts
Default

Looks like its should be running pretty good once everything is said and done!
Old 01-01-2009, 03:27 PM
  #40  
TECH Junkie
iTrader: (34)
 
SoxXpupPeT's Avatar
 
Join Date: May 2008
Location: Yonkers, NY
Posts: 3,432
Received 1 Like on 1 Post

Default

any update on the build ? im curious to how its turning out. partly because i want to do that myself!


Quick Reply: 95 LT1 AI Cam-only Motor Build Pics


All times are GMT -5. The time now is 05:00 AM.