2 yrs coming: my turbo LT1 build


 08-07-2010, 03:21 PM
#82
TECH Enthusiast
Thread Starter
iTrader: (-1)

Join Date: Nov 2008
Posts: 510
Likes: 0
Received 0 Likes
on
0 Posts
took the carpet down to the local car wash and cleaned it up. looks 5x better. got it trimmed for the cage and all back in the car. got the rocker panels back in and some other misc panels. waiting on the center console and seats to go back in cause im putting a differnt shifter in the car. and dont want them to be in the way. ill post some more pics soon
 08-15-2010, 03:00 PM
#84
TECH Enthusiast
Thread Starter
iTrader: (-1)
Join Date: Nov 2008
Posts: 510
Likes: 0
Received 0 Likes
on
0 Posts
got the old built 4l60 out and had a Extreme Automatics Th400 built. should be picking it up monday.
Manual Reverse Shift Pattern
Griner G-10 Pro Transbrake
Media Blast Case Prep for Racing
Hytuff Input Shaft
CNC Forward Drum for Exclusive Shaft Retaining System
Intermediate Snap Ring Case Support
Clutch Hub Rollerised
2.48 Rollerised Gear Set
Rear Case Torrington Thrust Bearing
Torsional Mains Shaft
Harden Stator Support
H.D. 34 Element Sprag
Tube Shaft Modification (Keeps Direct Drum Parallel Extends HP Capacity of Sprag)
Low Drag Option
Tensioned Sealing Rings
High Energy Expanded Capacity Cutch Packs
ARP Stainless Fasteners
Deep Pan
Hi Flow Filter Assembly
1 Year Warranty
opted for the Safe Neutral option also.

denny's nitrous ready CM driveshaft
Precision Industries spragless 9.5'' converter
ordering my B&M pro ratchet stealth on monday
got the carpet all back in and most the plastic besides the console. along with my corbeaus
Also used a generic pinto manual rack and made my own mounts on the k-member as well as custom machined te rod sleeves, 5/8 rod ends and custom aluminum spacers for a home made bumpsteer kit. waiting to final weld everything till my racecraft steering shaft kit gets here.
should work out better than the stock power rack looped and a less than optimal steering shaft setup
All thats left on the car is to wire the fans, Install the new Th400, bleed the brakes, and install the single plane. basically a weekend of work
08-19-2010, 11:53 AM
#88
Registered User

Join Date: Jul 2010
Posts: 18
Likes: 0
Received 0 Likes
on
0 Posts
very nice... love the wheel/tire combo. contemplating on painting my ss black.. cause black looks soo mean..
nice work. just curious on the abs delete.. what portioning valves are you running. i see those all the time on here. arent they adjustable portioning valves? what would you adjust them to?
nice work. just curious on the abs delete.. what portioning valves are you running. i see those all the time on here. arent they adjustable portioning valves? what would you adjust them to?
08-19-2010, 07:09 PM
#89
TECH Enthusiast
Thread Starter
iTrader: (-1)
Join Date: Nov 2008
Posts: 510
Likes: 0
Received 0 Likes
on
0 Posts
im running the sjm manufacturing kit with wilwood proportioning valve. the valve adjusts front to rear braking bias. if your running big meaty slicks and little skinnies up front you can adjust some of the braking toward the rear to the tires that are gonna grip to keep the front from clamping so hard and potentially skidding
 hubba hubba!
08-22-2010, 06:16 PM
hubba hubba!
08-22-2010, 06:16 PM
#92
TECH Enthusiast
Thread Starter
iTrader: (-1)
Join Date: Nov 2008
Posts: 510
Likes: 0
Received 0 Likes
on
0 Posts
the pics above were from last nights dry fit. I got the single plane completely on and sealed up for good distributor in, valve cover back on all the lines and sensors plugged back in and started changing the cold side a little today to fit the new setup
08-28-2010, 11:59 AM
#93
TECH Enthusiast
Thread Starter
iTrader: (-1)
Join Date: Nov 2008
Posts: 510
Likes: 0
Received 0 Likes
on
0 Posts
got my tunnel mount adjustable torque arm on.


big thanks to OldBlu and his buddy for a killer deal on a brand new never even bolted up TA
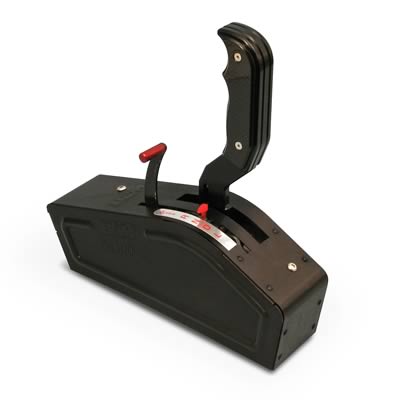
Got my shifter installed finnally along with the linkage and cable all set up properly. This was probably the biggest pain in my *** on the whole car due to shitty instructions from B&M and a shifter thats made to fit like 10 different transmissions with pulling a pin here, adding a pin there, this bracket for this, spacers for this no spacers if its this. Finnaly got it all figured out with enough trial and error.

got the piping all changed up to fit the new setup, fuel rails and lines all bolted up. just need to mount the map sensor somehwere now and run a vaccuum line to it as there is no longer a provision in the manifold itself.


whats left: relocate coil and extend wires, install oil pressure sensor, and start t00ning!
big thanks to OldBlu and his buddy for a killer deal on a brand new never even bolted up TA
Got my shifter installed finnally along with the linkage and cable all set up properly. This was probably the biggest pain in my *** on the whole car due to shitty instructions from B&M and a shifter thats made to fit like 10 different transmissions with pulling a pin here, adding a pin there, this bracket for this, spacers for this no spacers if its this. Finnaly got it all figured out with enough trial and error.
got the piping all changed up to fit the new setup, fuel rails and lines all bolted up. just need to mount the map sensor somehwere now and run a vaccuum line to it as there is no longer a provision in the manifold itself.
whats left: relocate coil and extend wires, install oil pressure sensor, and start t00ning!
08-28-2010, 01:10 PM
#95
TECH Enthusiast
Thread Starter
iTrader: (-1)
Join Date: Nov 2008
Posts: 510
Likes: 0
Received 0 Likes
on
0 Posts
haha I know but ive got a going away party to go to so im about done working on it for today.
It already runs how it is. has a startup and idle tune on it. I just want to move my coil away from the FAST just to be safe. and add a oil pressure sensor nto my digital dash as it reads info from the FAST and the FAST doesnt monitor that.
It already runs how it is. has a startup and idle tune on it. I just want to move my coil away from the FAST just to be safe. and add a oil pressure sensor nto my digital dash as it reads info from the FAST and the FAST doesnt monitor that.
 09-24-2010, 07:03 AM
#99
On The Tree
Join Date: Mar 2007
Location: Tacoma, WA
Posts: 198
Likes: 0
Received 0 Likes
on
0 Posts