


MSD cap and rotor problem ... photos

Thread Starter
Staging Lane
Joined: Jan 2011
Posts: 96
Likes: 0
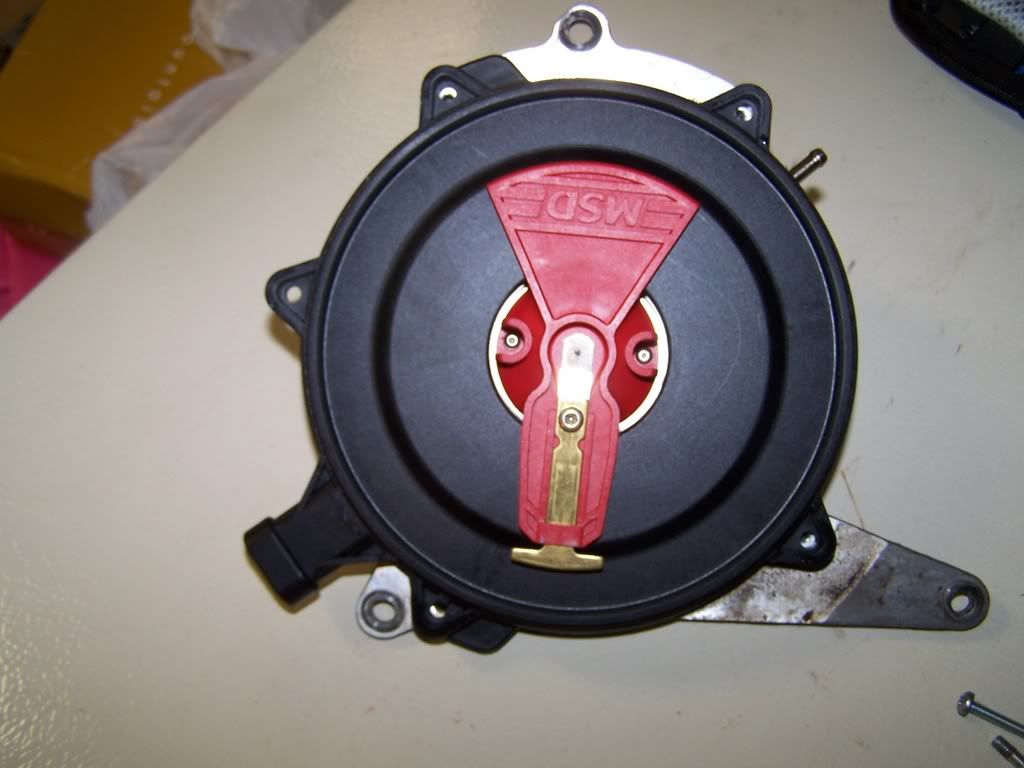
What would cause the rotor to chew up the inside of the cap, this has happened twice. First I have the MSD Pro-Billet opti and the two screws that hold down the rotor were put in using soft (blue) thread lock and they were fully seated and tight.
The first time the car started running terrible and when I pulled off the cap there was plastic shavings inside and a melted plastic glob from the plastic scrapped off the inside of the cap on the screw head that holds the flexible metal pickup onto the rotor and that screw was completely seated and tight as well. There was no debris of any other kind inside the distributor but the square cap gasket had been twisted and when I talked to MSD they felt that was the probable cause.


I had the shop that had done the work order me a replacement MSD cap and rotor and this time I put it on myself. Just to be sure I put the cap on before I installed the distributor and spun the shaft to see if there was anything scraping in the slightest and everything felt fine. I took the cap back off to align the distributor shaft to the cam and installed the distributor.
This time the car was running fine but I had a slight oil leak from the water pump shaft seal so while I had it torn down I pulled the cap and found the same thing. There were small hard clumps of plastic along with plastic powder and there was a glob of melted plastic on the screw head again. I meticulously inspected the square gasket that I had installed using a very thin coating of Ultra Blue gasket sealant to help hold it in place and everything was straight and properly seated and there were no signs of deformation from over tightening the cap. I found no signs of any other debris in the distributor that could have started it and the two screws that hold down the rotor were still perfectly tight and the rotor was properly seated.


MSD agreed to send me a replacement but said they had not heard of the rotor hitting the inside of the cap only hitting the seperator/isolater under the rotor and had no idea as to why it happened.
The timing cover was changed to the newer style by the shop that initially did the work in order to accomodate the new cam. This wasn't a thought out plan as I later found when going through my box of old parts I got back from them. Apparently they first ordered the MSD billit otpispark for the 93 lt1 (which my car is) and tried to put the engine back together with the original timing cover.
 Clearly they even forced turning over the crank several times before they found the problem as indicated by the deep groove carved into the inside of the old timing cover by the aligning pin on the cam.
 I had thought that maybe the pin had been damaged and was somehow pushing on the distributor and causing the issue but close inspection showed no such damage and the tech support guy at MSD didn't feel that could cause the problem as the shaft doesn't have any play in that direction (pushing the rotor in and out). Also when I put everything back together everything went together easily and nothing felt tight or needed to be forced. Even so, before I installed the distributor, I tried applying force to the end of the shaft by hand while turning the shaft to see if I could make the rotor scrape the inside of the cap at all and nothing.
As you can see in these photos there is absolutely no damage to the isolator from the back of the rotor that might have caused this by chipping off some plastic that later got wedged between the screw on the top of the rotor and the inside of the cap.
These are small photos but you can see much greater detail on the full size photos in my photobucket album
http://s2.photobucket.com/albums/y9/...0Camaro%20Z28/
and there are more photos to show more details. Just make sure that the photo number doesn't have a -1 or -2 behind it to make sure you are seeing the full size version. Example "camaro080.jpg" vs. "camaro080-1.jpg"
Not sure if it is important for this issue but just in case it is I have the MSD Pro-Billet Optispark distributor 95-97 F-Body PN 83811, the first cap and rotor came with it and the replacement was the MSD Cap and Rotor kit PN 84811, I have the MSD Blaster coil and MSD 8.5mm super conductor wires and it's controlled with the MSD 6AL.
The first time the car started running terrible and when I pulled off the cap there was plastic shavings inside and a melted plastic glob from the plastic scrapped off the inside of the cap on the screw head that holds the flexible metal pickup onto the rotor and that screw was completely seated and tight as well. There was no debris of any other kind inside the distributor but the square cap gasket had been twisted and when I talked to MSD they felt that was the probable cause.
I had the shop that had done the work order me a replacement MSD cap and rotor and this time I put it on myself. Just to be sure I put the cap on before I installed the distributor and spun the shaft to see if there was anything scraping in the slightest and everything felt fine. I took the cap back off to align the distributor shaft to the cam and installed the distributor.
This time the car was running fine but I had a slight oil leak from the water pump shaft seal so while I had it torn down I pulled the cap and found the same thing. There were small hard clumps of plastic along with plastic powder and there was a glob of melted plastic on the screw head again. I meticulously inspected the square gasket that I had installed using a very thin coating of Ultra Blue gasket sealant to help hold it in place and everything was straight and properly seated and there were no signs of deformation from over tightening the cap. I found no signs of any other debris in the distributor that could have started it and the two screws that hold down the rotor were still perfectly tight and the rotor was properly seated.
MSD agreed to send me a replacement but said they had not heard of the rotor hitting the inside of the cap only hitting the seperator/isolater under the rotor and had no idea as to why it happened.
The timing cover was changed to the newer style by the shop that initially did the work in order to accomodate the new cam.
This wasn't a thought out plan as I later found when going through my box of old parts I got back from them. Apparently they first ordered the MSD billit otpispark for the 93 lt1 (which my car is) and tried to put the engine back together with the original timing cover. Clearly they even forced turning over the crank several times before they found the problem as indicated by the deep groove carved into the inside of the old timing cover by the aligning pin on the cam. I had thought that maybe the pin had been damaged and was somehow pushing on the distributor and causing the issue but close inspection showed no such damage and the tech support guy at MSD didn't feel that could cause the problem as the shaft doesn't have any play in that direction (pushing the rotor in and out). Also when I put everything back together everything went together easily and nothing felt tight or needed to be forced. Even so, before I installed the distributor, I tried applying force to the end of the shaft by hand while turning the shaft to see if I could make the rotor scrape the inside of the cap at all and nothing. As you can see in these photos there is absolutely no damage to the isolator from the back of the rotor that might have caused this by chipping off some plastic that later got wedged between the screw on the top of the rotor and the inside of the cap.
These are small photos but you can see much greater detail on the full size photos in my photobucket album
http://s2.photobucket.com/albums/y9/...0Camaro%20Z28/
and there are more photos to show more details. Just make sure that the photo number doesn't have a -1 or -2 behind it to make sure you are seeing the full size version. Example "camaro080.jpg" vs. "camaro080-1.jpg"
Not sure if it is important for this issue but just in case it is I have the MSD Pro-Billet Optispark distributor 95-97 F-Body PN 83811, the first cap and rotor came with it and the replacement was the MSD Cap and Rotor kit PN 84811, I have the MSD Blaster coil and MSD 8.5mm super conductor wires and it's controlled with the MSD 6AL.
Thread Starter
Staging Lane
Joined: Jan 2011
Posts: 96
Likes: 0
I didn't realize just how little detail you can see in these small photos so to see the damage please refer to my photo bucket album with the link and ignore the first 23 photos as they are the small ones I resized for this post. Thanks alot for any and all help I just want to try and make sure it doesn't happen again when I receive and install the new cap and rotor. Also if you look at both of the rotors you can see the grooves carved in them from the rings on the inside surface of the cap and the large groove in the cap made by the screw on the top of the rotor. I did chip away the hard melted glob of plastic from the screw on the rotor to make sure the screw was fully seated and tight but you can see some of the melted plastic on the white MSD cardboard box.
Thread Starter
Staging Lane
Joined: Jan 2011
Posts: 96
Likes: 0
Well yes one would think the obvious cause for something like that would be that the rotor is loose, which was why I made it a point to include that both times the rotor was still firmly seated and the screws tight and both times they were installed using thread lock. If you take a look at the large photos in my photobucket album and zoom in you can clearly see that the grooves carved into the rotor from the inside of the cap are perfectly uniform from near the center out to about 2/3 of the distance to the end of the rotor which is not what you would see with a loose, rocking rotor. Since the screws do not bottom out allowing any movement of the rotor, they were installed with thread lock to prevent loosening and they were still fully seated and tight when the distributor was taken apart, the screws were already ruled out as the possible cause but thank you for your input.
Thread Starter
Staging Lane
Joined: Jan 2011
Posts: 96
Likes: 0
As far as using the MSD opti versus the GM one that was not my call the car was originally worked on by a shop who made that choice. I had replaced my opti at about 93k miles when it died, long before the performance work was done to the car and the replacement I used was the GM Opti. When the performance work was done the car was at 123k and the shop made the decision to go with the MSD. Being a disabled vet it is difficult now for me to do the work myself, it's very slow going, so for the first and definately last time I put my car into the hands of someone else.
Trending Topics
Well yes one would think the obvious cause for something like that would be that the rotor is loose, which was why I made it a point to include that both times the rotor was still firmly seated and the screws tight and both times they were installed using thread lock. If you take a look at the large photos in my photobucket album and zoom in you can clearly see that the grooves carved into the rotor from the inside of the cap are perfectly uniform from near the center out to about 2/3 of the distance to the end of the rotor which is not what you would see with a loose, rocking rotor. Since the screws do not bottom out allowing any movement of the rotor, they were installed with thread lock to prevent loosening and they were still fully seated and tight when the distributor was taken apart, the screws were already ruled out as the possible cause but thank you for your input.
Pic of rotor with no washers. You can see the tip of the rotor was just touching the cap.
The result
Those tiney screws can't keep the rotor seated without washers.
LS1 Tech Stories
The Best V8 Stories One Small Block at Time

6 Common C5 Corvette Failures and What's Involved In Repairing Them
Pouria Savadkouei
Retro Modern Bandit Pontiac Trans AM Comes With Burt Reynolds' Autograph
Verdad Gallardo
Top 10 Greatest Cadillac V Series Performance Models Ever, Ranked
Pouria Savadkouei
Top 10 Most Powerful Chevy Trucks Ever Made!

Hennessey's New Supercharged Silverado ZR2 Has 700 HP
Verdad Gallardo
Coachbuilt N2A Anteros Is an LS2-Powered C6 Corvette In Italian Clothes
Verdad Gallardo
Awesome K5 Blazer Restomod Comes With C7 Corvette Power
Verdad Gallardo
10 Camaros You Should Never Buy

10 LS Engine Myths That Refuse to Die
Verdad Gallardo

Msd also includes a couple orings with it. One time I didnt get the oring seated down right and the cap would touch, took it apart used another one it came with and it didnt. It was odd.
Thread Starter
Staging Lane
Joined: Jan 2011
Posts: 96
Likes: 0
Speed demon are you talking about the tip of the rotor touching the black plastic seperator underneath it in your photo there and if you put washers between the rotor and the ditributor you raise the rotor slightly and eliminate contact with the black plastic piece underneath it?
Thread Starter
Staging Lane
Joined: Jan 2011
Posts: 96
Likes: 0
Also as far as the o-ring gaskets go, the kit for the cap and rotor include a round o-ring type and a square flat type gasket (at least the newer ones do). They added the square flat type gasket because the o-ring type tended to roll up under the edge of the cap and push against the seperator and cause the rotor to hit the seperator and the square flat type eliminates or at least greatly reduces the chance of that happening. They still include the o-ring because the cap and rotor kit comes with two different type seperators and they can be used on other manufacturers opti distributors and the o-ring is still used in some applications.
Speed demon are you talking about the tip of the rotor touching the black plastic seperator underneath it in your photo there and if you put washers between the rotor and the ditributor you raise the rotor slightly and eliminate contact with the black plastic piece underneath it?
Thread Starter
Staging Lane
Joined: Jan 2011
Posts: 96
Likes: 0
Ok, regardless of the location of the washer what I am trying to figure out is you say
"Pic of rotor with no washers. You can see the tip of the rotor was just touching the cap."
then in the photo I am trying to see where you are talking about. Do you mean the tip of the rotor is touching the black plastic area underneath the rotor because you aren't showing a photo of the cap to show any scrapeing or evidence of touching.
Thread Starter
Staging Lane
Joined: Jan 2011
Posts: 96
Likes: 0
ok and please don't get me wrong, I am grateful for your help, I am just trying to understand. The seperator you have is different than the one I have in my distributor and the screws you have on the rotor look like the old star bit screws and since they had small heads I can definately see your point. The screws I have are the newer phillips head screws and the heads are litteraly the same size as the space available, if I were to put a washer on the screw that was wider than the head it wouldn't fit down into the area available on the rotor.

So I don't see where a washer could help in my situation and the biggest fact glaring me in the face is both screws were still fully seated and tight. How could they loosen up and allow the rotor to scrape against the inside of the cap while the engine is running and then tighten back up with the thread lock still intact when I take off the cap to inspect it. Believe me I am posting this here becasue I do NOT want to put this thing back together only to find the same problem a third time. If the surface area of the holding force cannot be increased by a washer in my case the only other way a washer could make a difference is if the screws were bottoming out and allowing play on the rotor but they are not. Since you stated the last time you had your cap off was three years ago that would make sense that you have the old small headed screws and would need to use washers.
So I don't see where a washer could help in my situation and the biggest fact glaring me in the face is both screws were still fully seated and tight. How could they loosen up and allow the rotor to scrape against the inside of the cap while the engine is running and then tighten back up with the thread lock still intact when I take off the cap to inspect it. Believe me I am posting this here becasue I do NOT want to put this thing back together only to find the same problem a third time. If the surface area of the holding force cannot be increased by a washer in my case the only other way a washer could make a difference is if the screws were bottoming out and allowing play on the rotor but they are not. Since you stated the last time you had your cap off was three years ago that would make sense that you have the old small headed screws and would need to use washers.
ok and please don't get me wrong, I am grateful for your help, I am just trying to understand. The seperator you have is different than the one I have in my distributor and the screws you have on the rotor look like the old star bit screws and since they had small heads I can definately see your point. The screws I have are the newer phillips head screws and the heads are litteraly the same size as the space available, if I were to put a washer on the screw that was wider than the head it wouldn't fit down into the area available on the rotor.
So I don't see where a washer could help in my situation and the biggest fact glaring me in the face is both screws were still fully seated and tight. How could they loosen up and allow the rotor to scrape against the inside of the cap while the engine is running and then tighten back up with the thread lock still intact when I take off the cap to inspect it. Believe me I am posting this here becasue I do NOT want to put this thing back together only to find the same problem a third time. If the surface area of the holding force cannot be increased by a washer in my case the only other way a washer could make a difference is if the screws were bottoming out and allowing play on the rotor but they are not. Since you stated the last time you had your cap off was three years ago that would make sense that you have the old small headed screws and would need to use washers.
So I don't see where a washer could help in my situation and the biggest fact glaring me in the face is both screws were still fully seated and tight. How could they loosen up and allow the rotor to scrape against the inside of the cap while the engine is running and then tighten back up with the thread lock still intact when I take off the cap to inspect it. Believe me I am posting this here becasue I do NOT want to put this thing back together only to find the same problem a third time. If the surface area of the holding force cannot be increased by a washer in my case the only other way a washer could make a difference is if the screws were bottoming out and allowing play on the rotor but they are not. Since you stated the last time you had your cap off was three years ago that would make sense that you have the old small headed screws and would need to use washers.

TECH Apprentice
Joined: May 2009
Posts: 323
Likes: 2
From: NW AR
ok and please don't get me wrong, I am grateful for your help, I am just trying to understand. The seperator you have is different than the one I have in my distributor and the screws you have on the rotor look like the old star bit screws and since they had small heads I can definately see your point. The screws I have are the newer phillips head screws and the heads are litteraly the same size as the space available, if I were to put a washer on the screw that was wider than the head it wouldn't fit down into the area available on the rotor.
So I don't see where a washer could help in my situation and the biggest fact glaring me in the face is both screws were still fully seated and tight. How could they loosen up and allow the rotor to scrape against the inside of the cap while the engine is running and then tighten back up with the thread lock still intact when I take off the cap to inspect it. Believe me I am posting this here becasue I do NOT want to put this thing back together only to find the same problem a third time. If the surface area of the holding force cannot be increased by a washer in my case the only other way a washer could make a difference is if the screws were bottoming out and allowing play on the rotor but they are not. Since you stated the last time you had your cap off was three years ago that would make sense that you have the old small headed screws and would need to use washers.
So I don't see where a washer could help in my situation and the biggest fact glaring me in the face is both screws were still fully seated and tight. How could they loosen up and allow the rotor to scrape against the inside of the cap while the engine is running and then tighten back up with the thread lock still intact when I take off the cap to inspect it. Believe me I am posting this here becasue I do NOT want to put this thing back together only to find the same problem a third time. If the surface area of the holding force cannot be increased by a washer in my case the only other way a washer could make a difference is if the screws were bottoming out and allowing play on the rotor but they are not. Since you stated the last time you had your cap off was three years ago that would make sense that you have the old small headed screws and would need to use washers.
You have a couple options,
A. Sent it back to MSD ($114 non-warranty repair) cheaper than a cap and rotor, they will make it right.
B. Temporary fix, shave the back of the cap with a sharp razor blade so that the ridges are gone, I'm sure that the ones around the contacts are for shrouding the arc but they shouldn't be rubbing anyways.
C. Put stock rotor in, with the shorter screws and wait until it explodes. I hate the cheap construction stock rotors, I turned one into a baby rattle, they work though.


Do you have your old rotor? Measure the thickness of it it, then measure the thickness of the MSD one. The MSD one is thicker. Also MSD must make two different types of Caps, probably guessing one is for their distributor and one is for their universal cap and rotor kit. I ran into the same problem that you did, the cap chewed those rings into the rotor, it was because of all the mixing and matching I was doing during an engine swap.
Thread Starter
Staging Lane
Joined: Jan 2011
Posts: 96
Likes: 0
Sorry I have been away from this post for the past few days, but as I am a disabled vet I tend to get laid up alot and that is what has happened. I really do appreciate your help and responses. I am glad to finally make a little headway on this issue. I am really glad I was finally able to get some decent photos to come out nice and clear and load up large enough to clear up what I was trying to say about the screws. I really did understand your point Speed_Demon I just wasn't finding the right way to explain and show what I meant about my screws.
Even though the cap and rotor kit I got was supposed to be specifically for my MSD distributor it came with two different type black plastic insulators, two or three different gaskets, and a bunch of different screws and washers which seems far more like a universal kit to me than a direct application fit for their distributor. Unfortunately I do not think I still have the old original rotor but as soon as I am feeling better and back to working on the car I will search through my shelves of old parts to try and find it. I suspect the same thing as Noice and it is a fittment issue between the MSD Opti and the cap and rotor. Luckily MSD is willing to replace the cap and rotor free of charge if I **** the damaged one to them, now I just need to figure out how to properly find and fix the underlying issues that keep causing it to happen. If that means another call to MSD to see if there is another cap and rotor that will better fit my MSD Opti and engine, great. If it means finding a way to shorten the rotor as Noice suggests (which by the way was the same thing I was thinking but wanted to make sure it wasn't something that there was already a known fix for) that's fine too. Hopefully I can find a good reliable long lasting way to do that. I think if I shave the back of the rotor like Noice suggested and slightly grind down the hight of the screw head that holds the center contact to the rotor body it might just work, I just hope I don't end up weakening the rotor body to the point it frags inside my opti. I have considered finding or making a slightly thicker gasket to increase the distance between the cap and distributor making the needed room for the rotor and that may be the safest way to go as long as the cap doest stick out too far and interfere with the back of the crank hub.
I would still like to keep this thread alive if anyone has any thoughts or ideas and to get any feedback about the ideas I have suggested for fixing the issue. Just a reminder, I had mentioned it in my original post but many times these things get long and info gets missed, the other two items that have been changed from stock are the timing cover and cam style. By cam style I mean the type of end on it that drives the distribtor, which was apparently what caused the changing of the timing cover by the shop that initially did the work. Re-read my first post in this thread for more info on that If anyone has any more info on this or even just had this happen and what if anything they tried to fix it I would love to hear from you.
Thanks again guys for all your help and I should be checking back on this maybe tonight or tomorrow and hopefully back to working on it a few days.