When you click on links to various merchants on this site and make a purchase, this can result in this site earning a commission. Affiliate programs and affiliations include, but are not limited to, the eBay Partner Network.
Today, I Replaced JUST the Optical Sensor - Optispark
This thread is a how-to/review of tearing down an Optispark and replacing just the optical sensor and then bringing it all back together and running it.
Linked thread gives some context of where I got the idea and will to try this.
Parts Needed:
Optical Sensor + all gaskets required for the usual Optispark service (water pump, timing cover seals, etc.)
4 wire Optispark Extension Cable (optional, but cheap insurance to replace)
Procedure:
1) Disassemble the car, drain coolant, and get the Optispark out of the car (plenty of write ups around here on this).
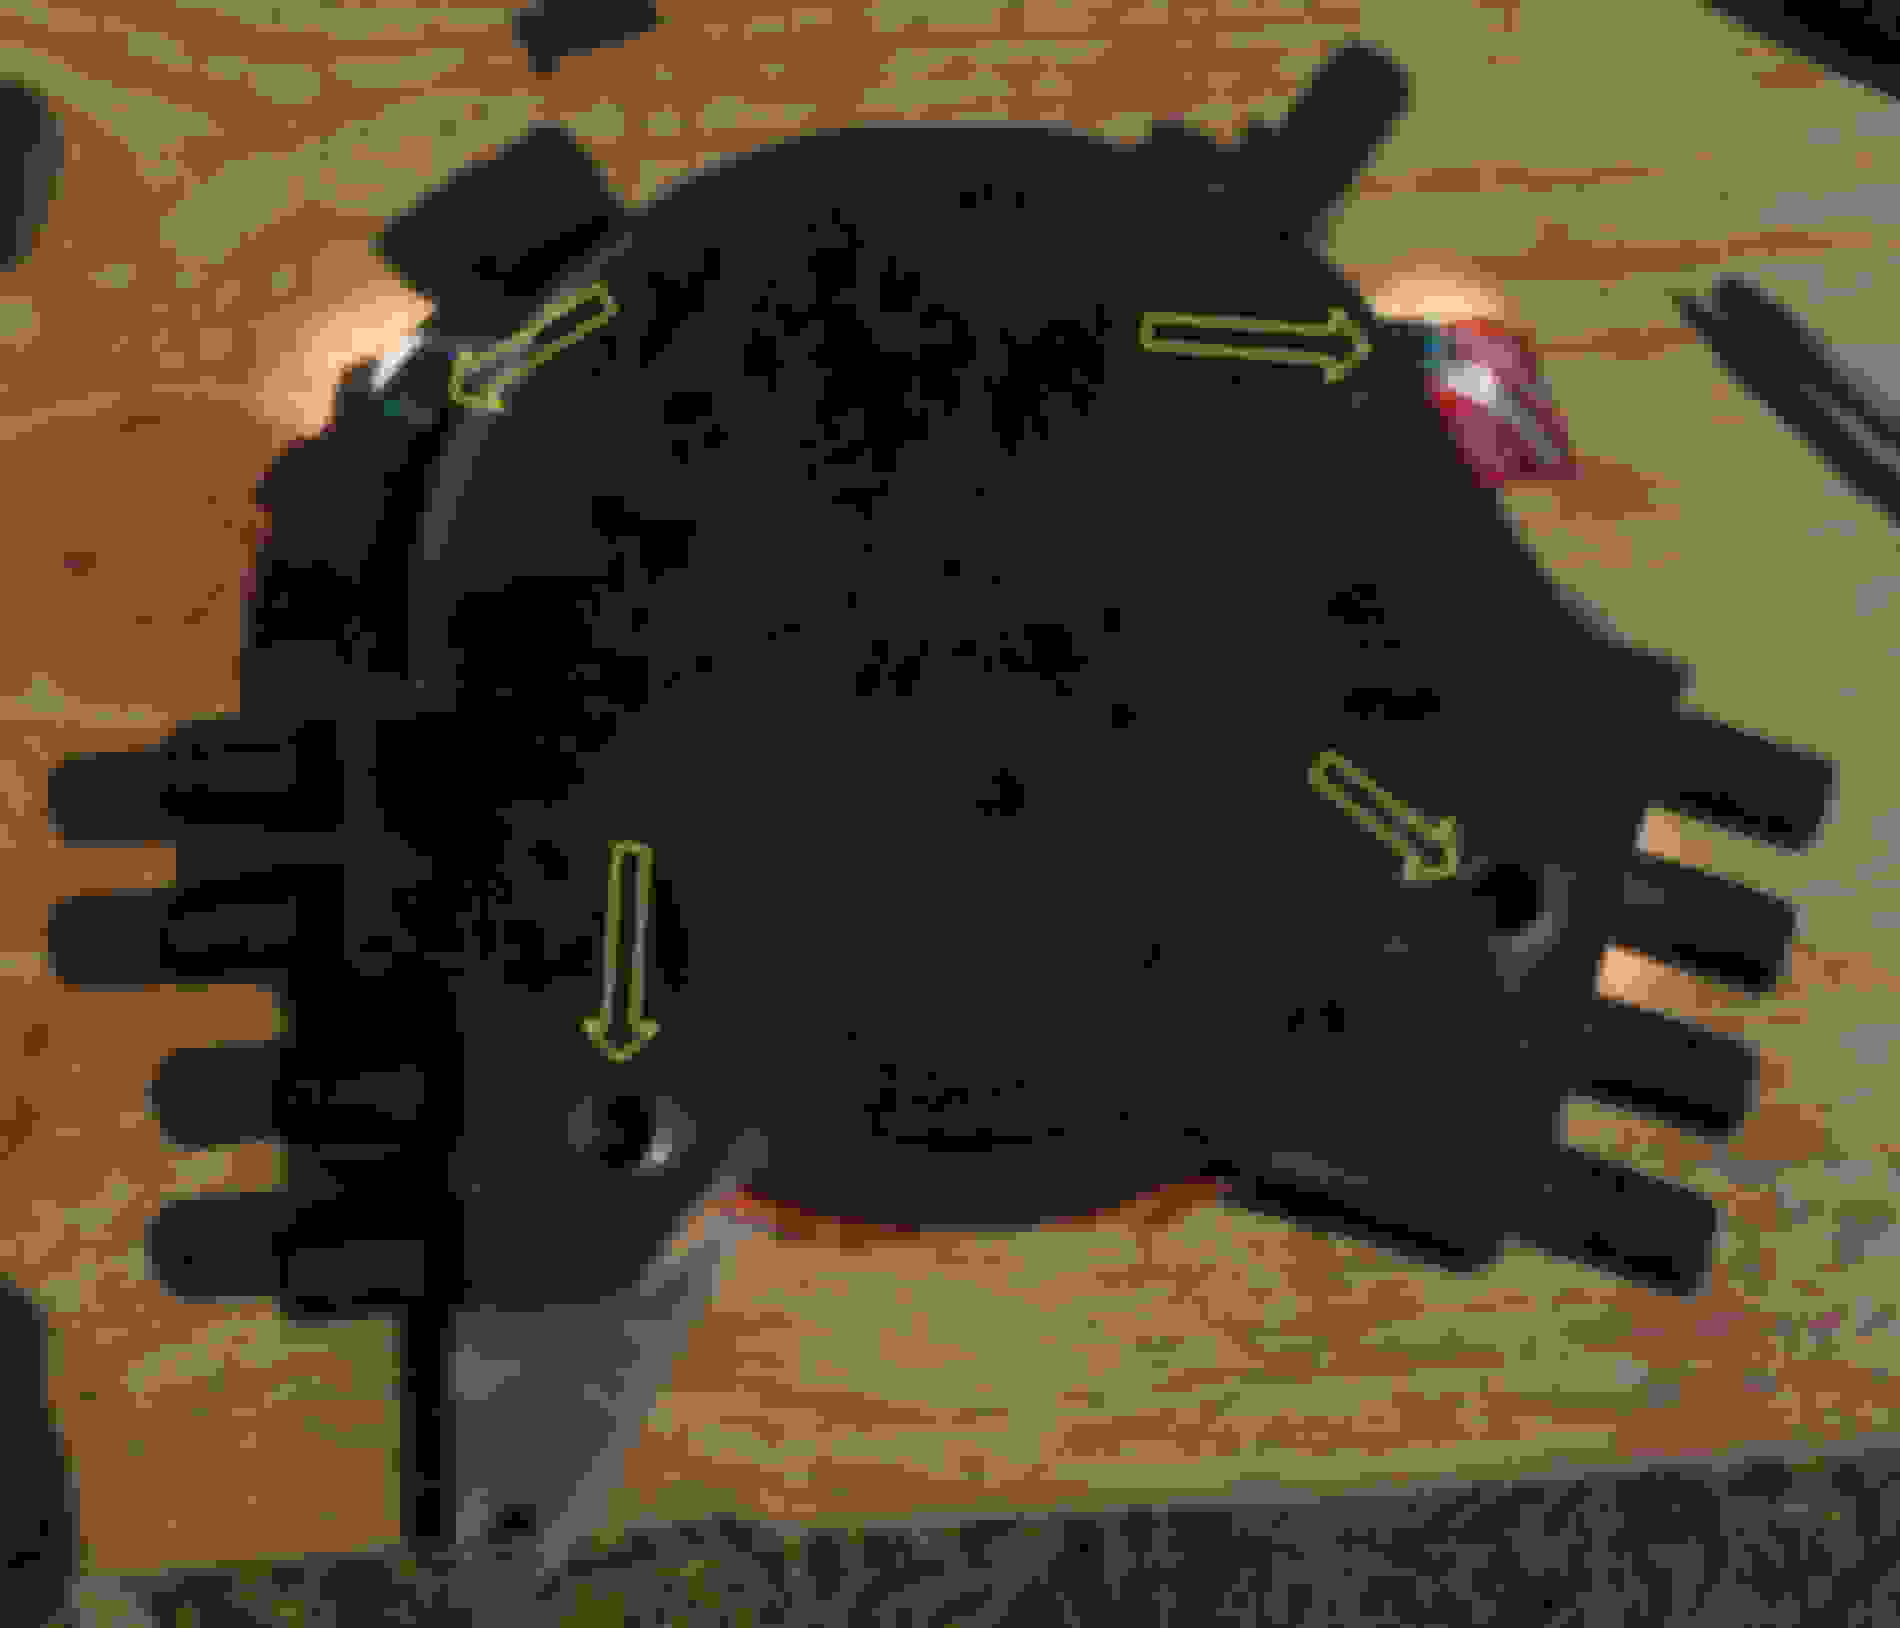
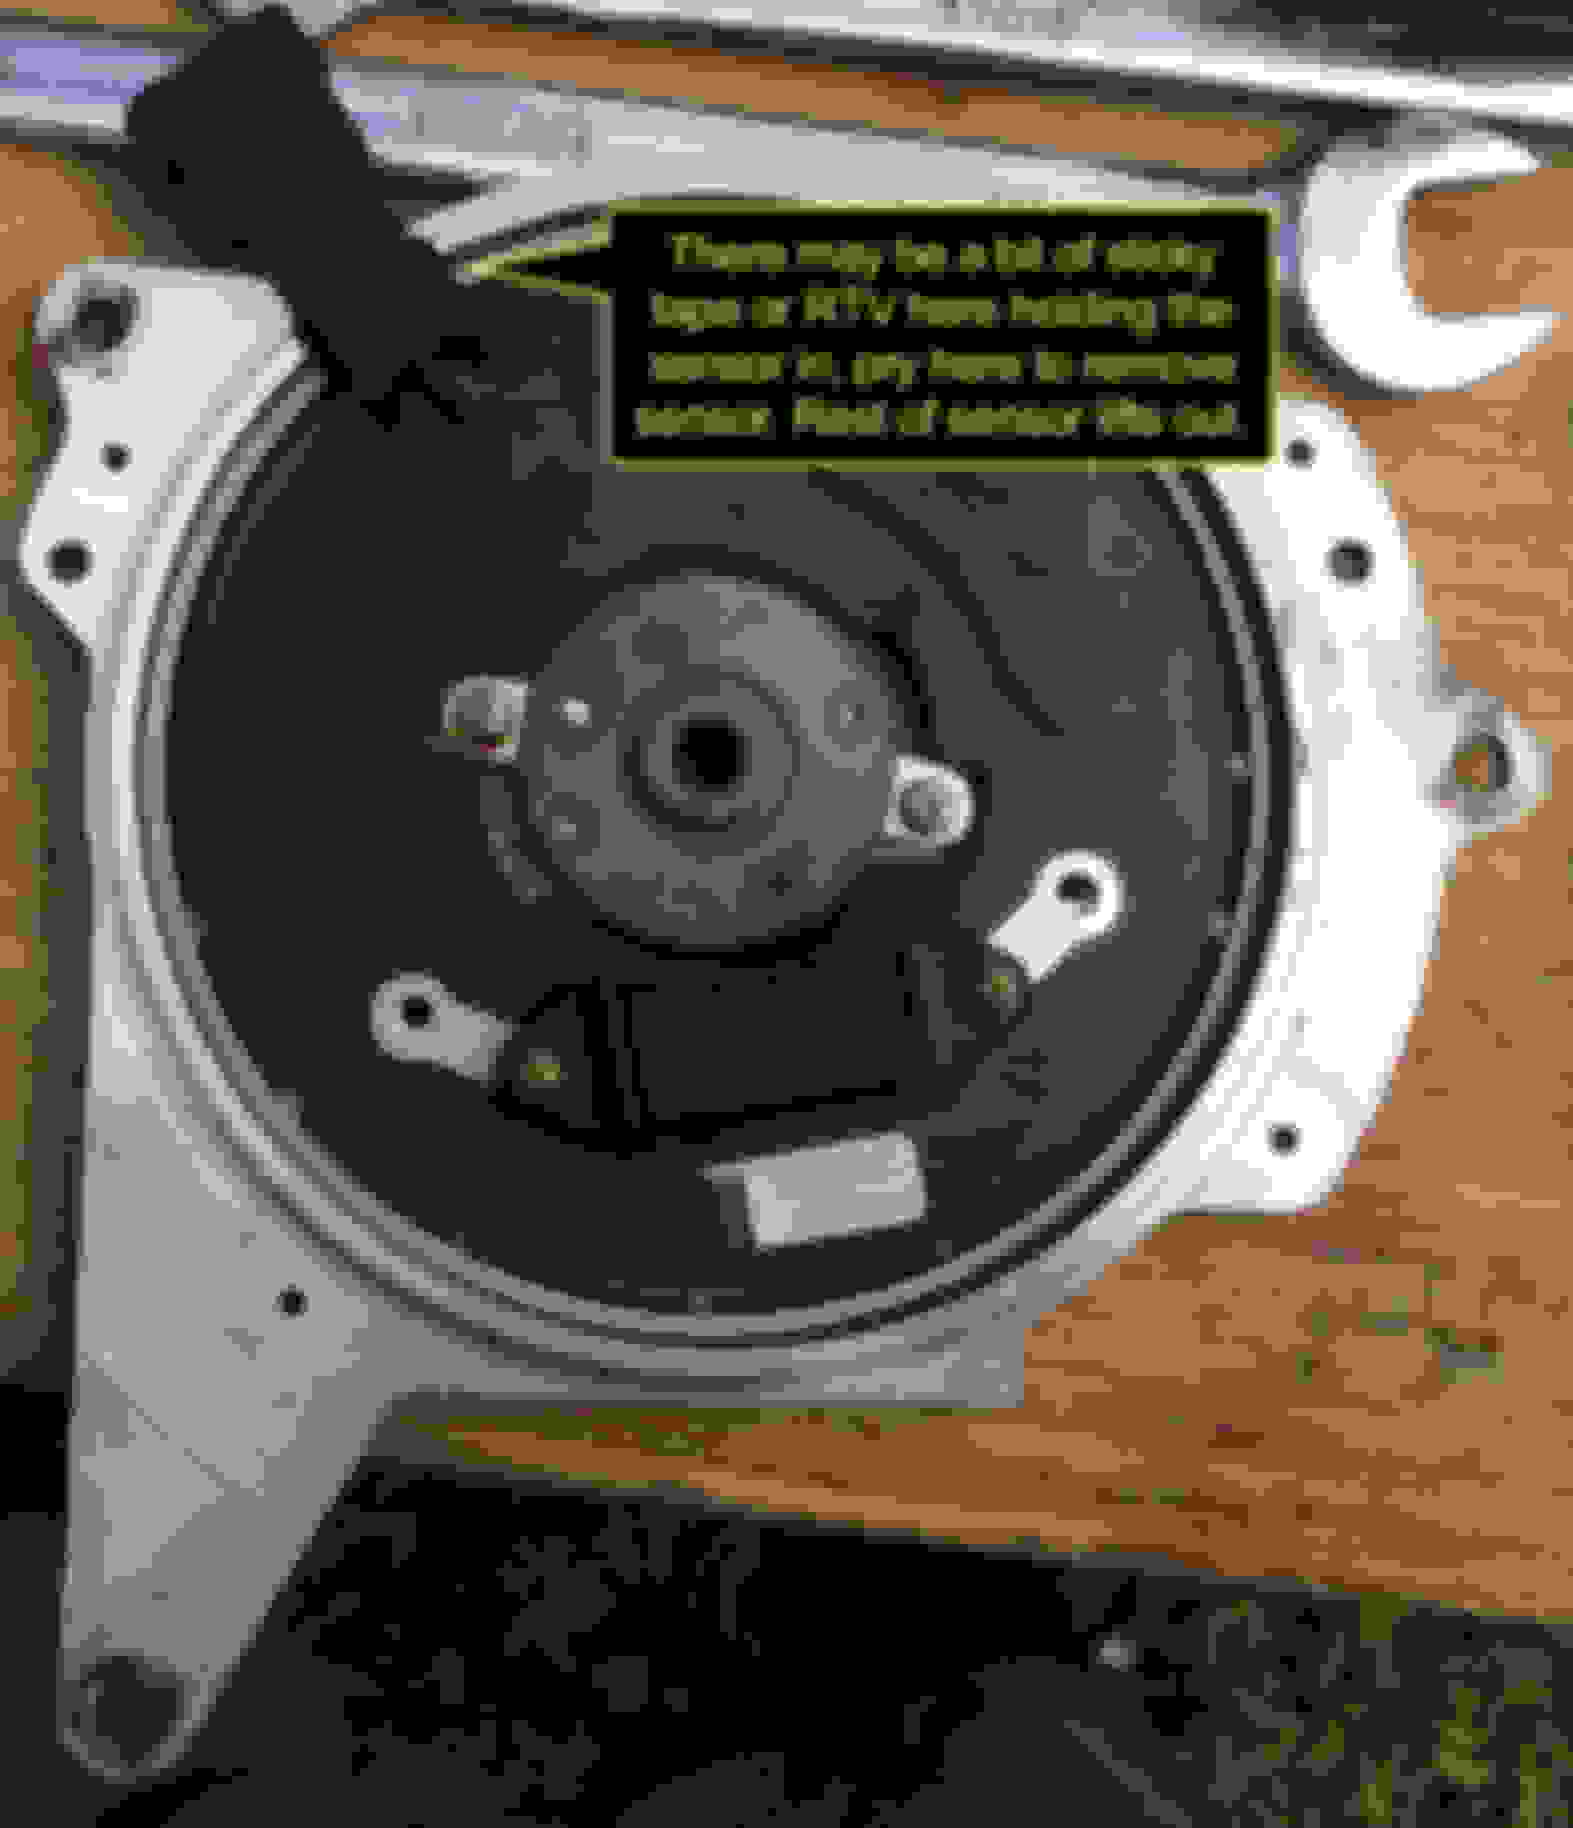
2) Remove the four (4) inverted Torx screws shown in the picture, the only four that are exposed when the Optispark is face up. Size of bit is E-4.
3) Once the cap is off, you'll see the rotor. There is small rubber gasket between the cap and body. Mine stayed in tact. Remove the two T-9 Torx holding the rotor on and remove the rotor. (I did remove the cap on an old ACDelco unit that I had laying around and noticed the Torx holding that rotor on may have been slightly larger.)
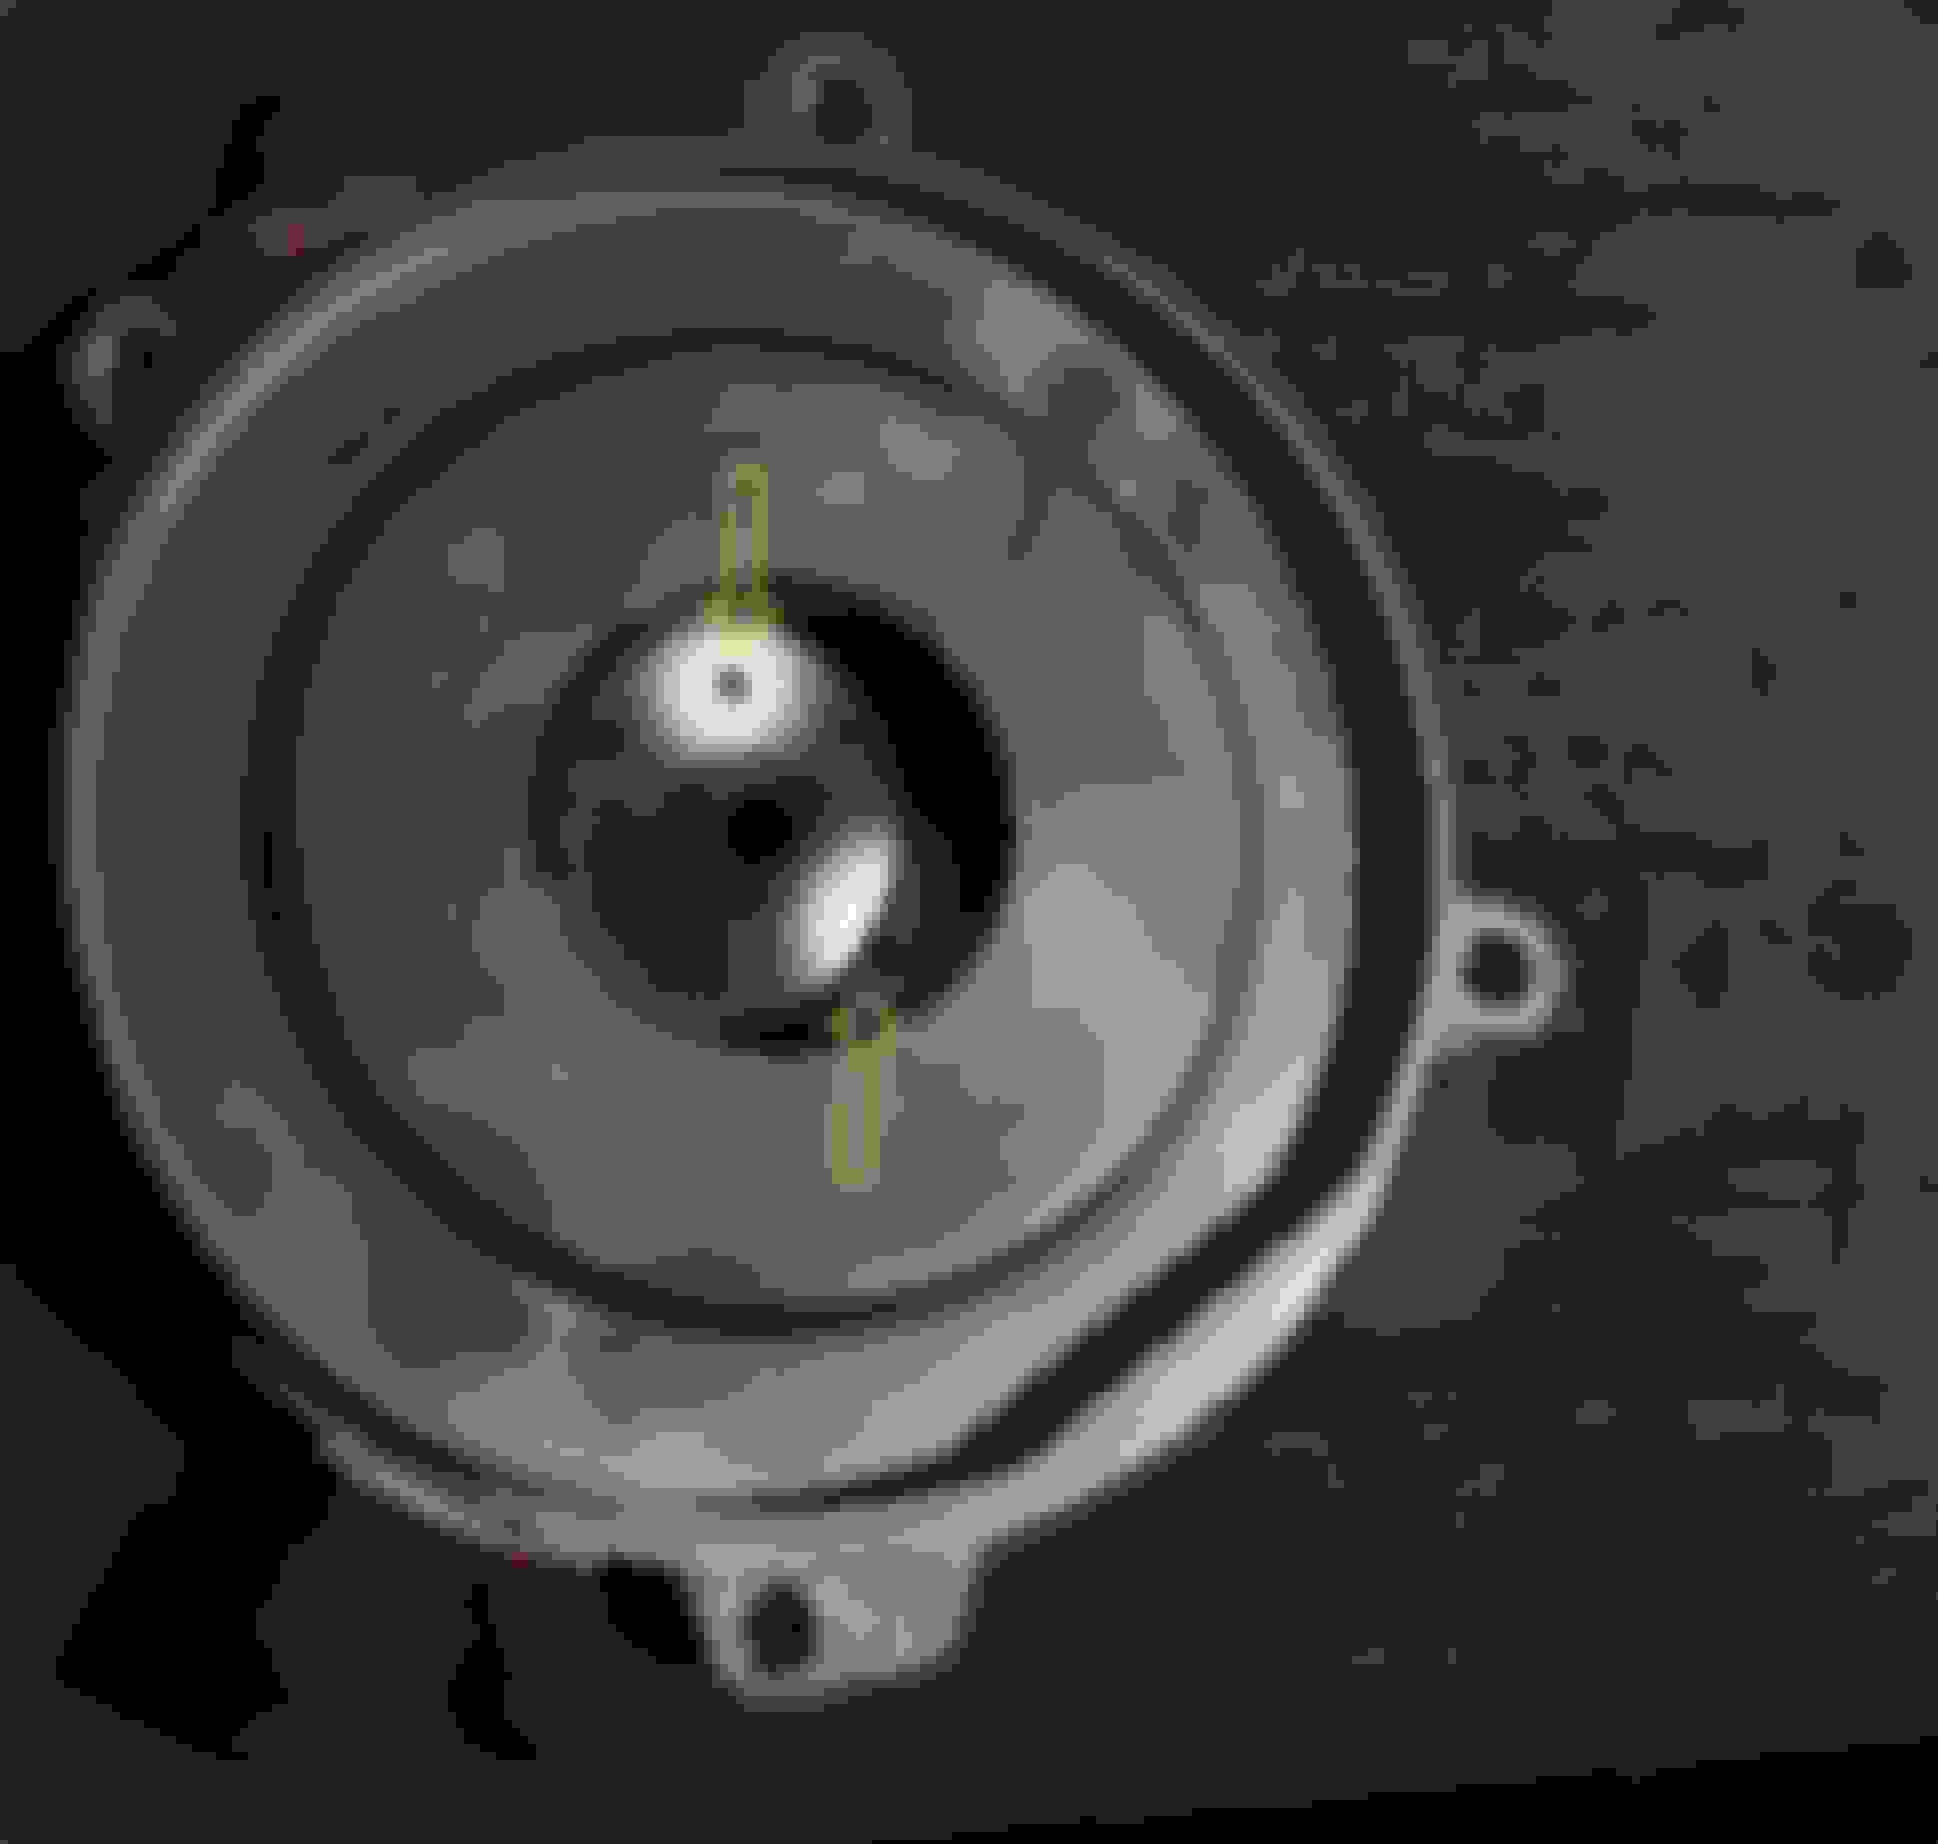
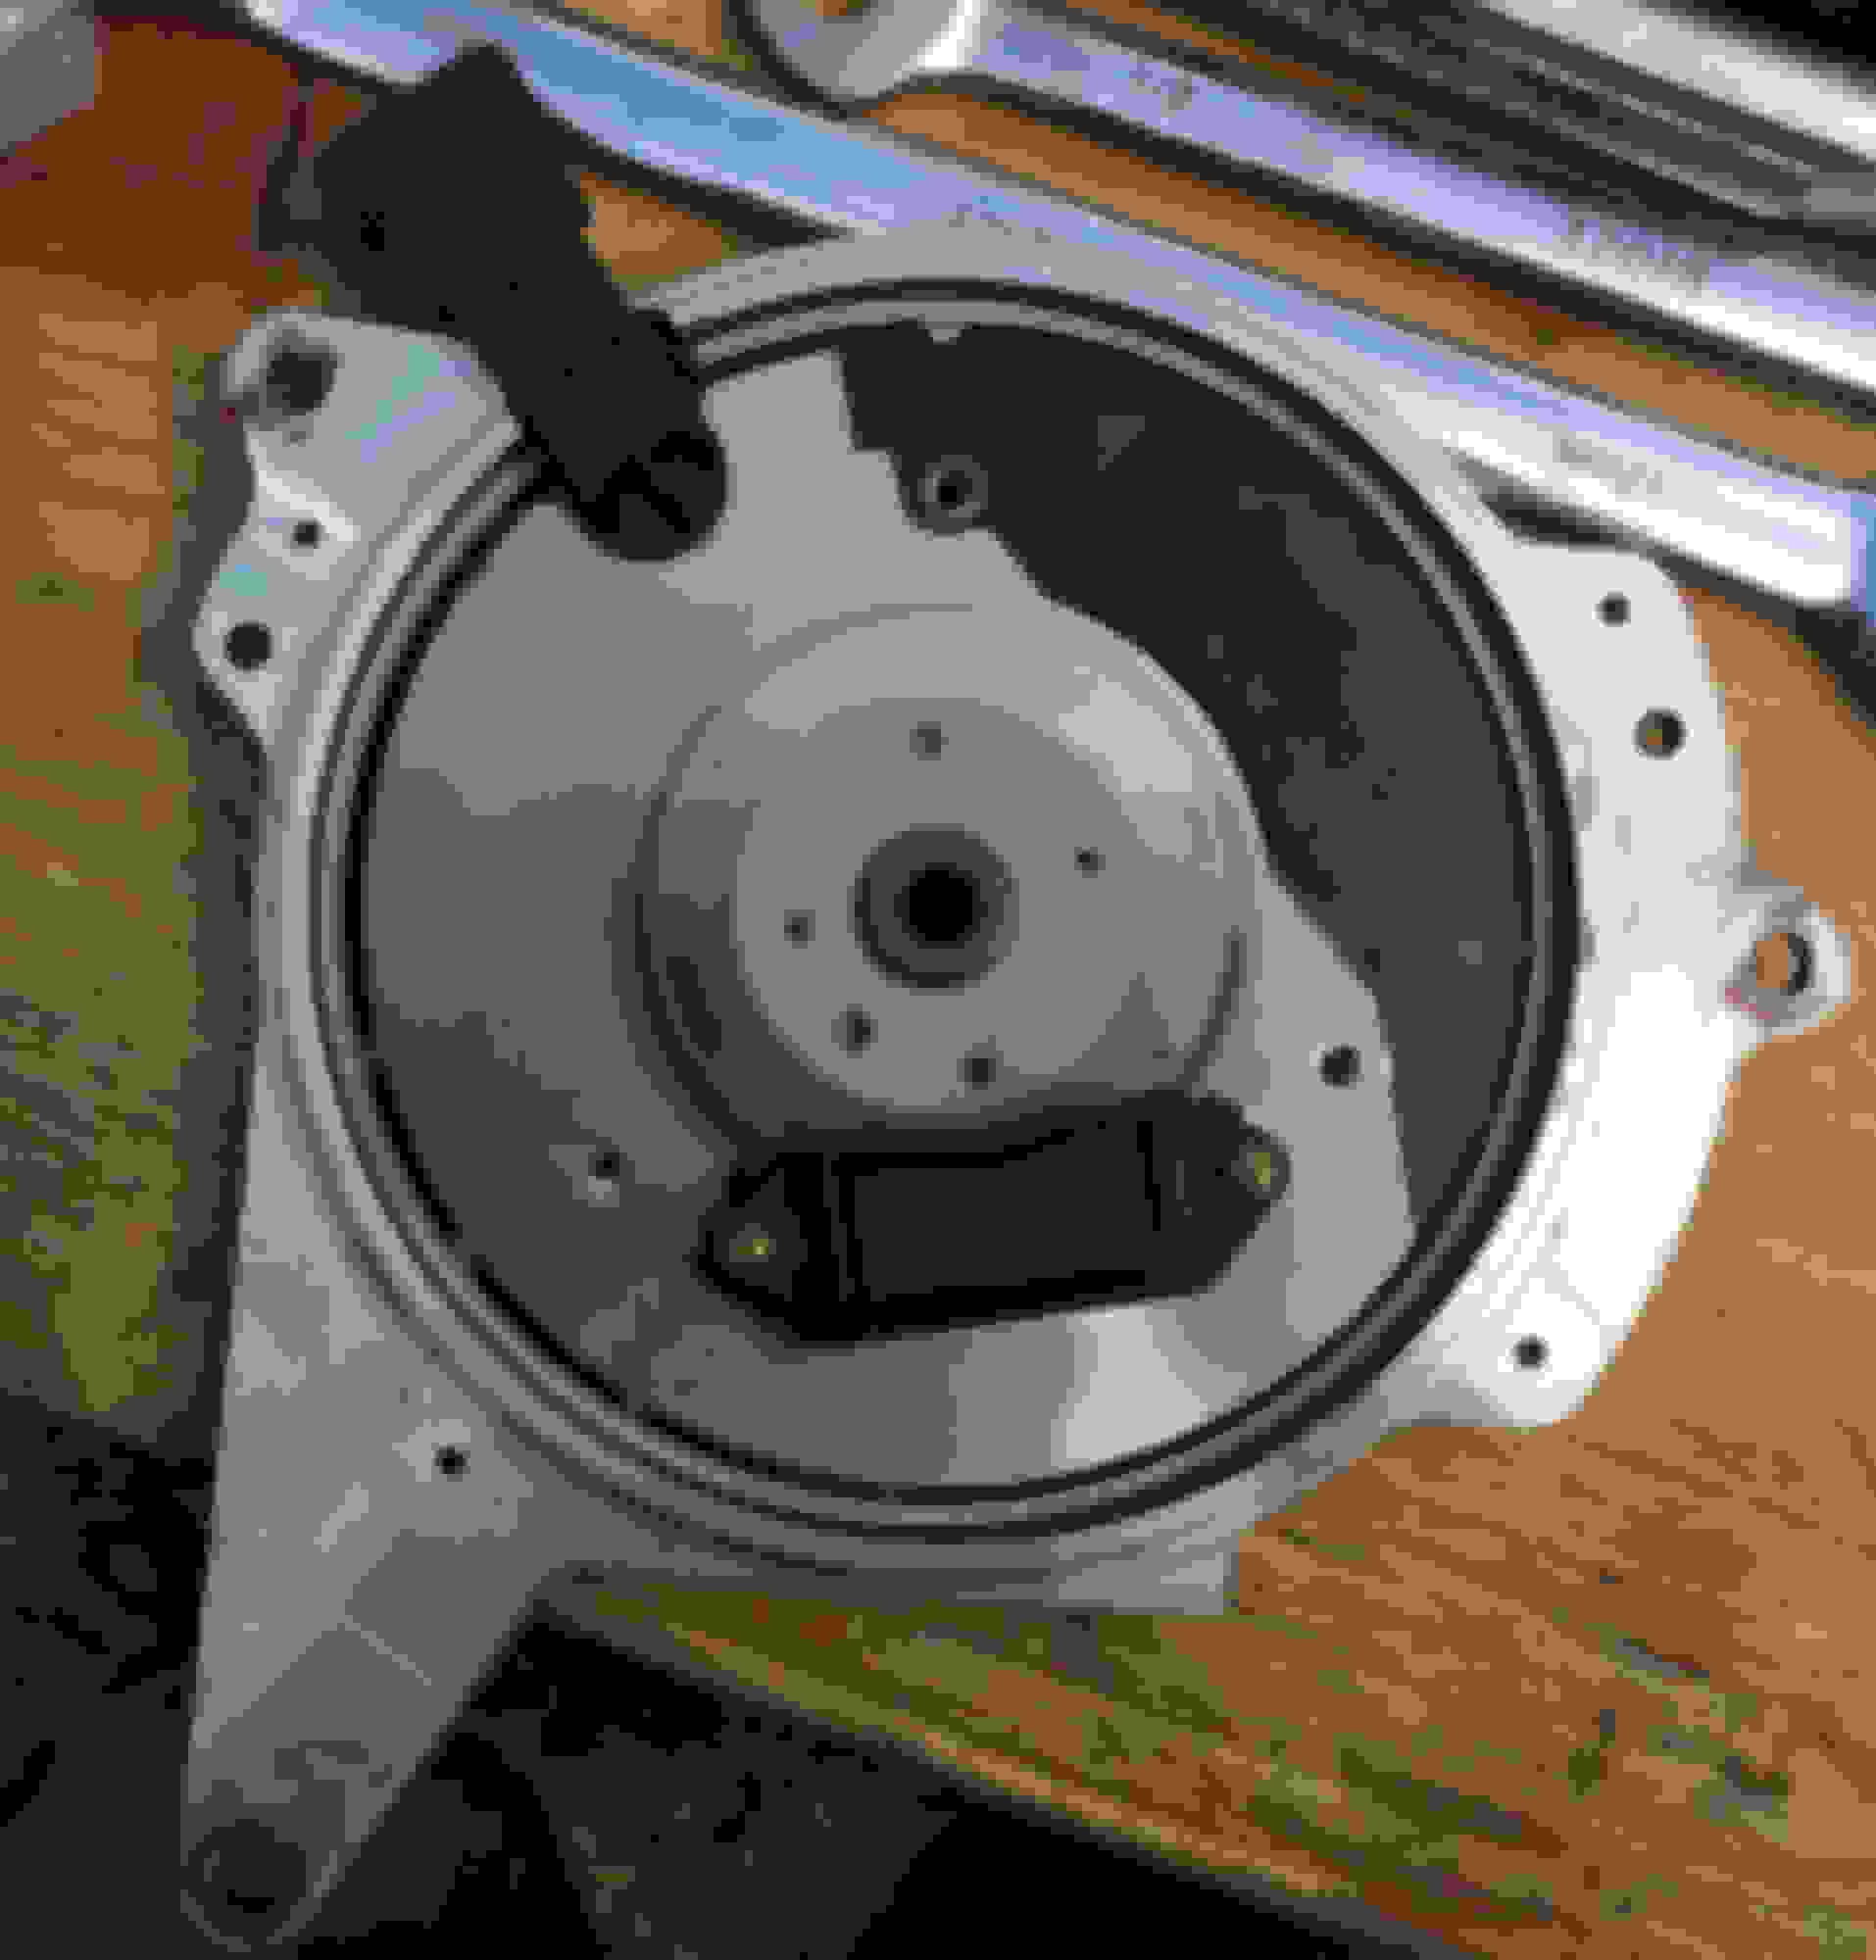
4) Now, there is a large plastic piece that makes up part of the body of the Optispark unit. You'll have to use a slotted screwdriver to pry this off the metal body of the Optispark. It won't take much effort. If you have to apply any more effort than taking a plastic cap off a Pringles can, something is wrong, make sure you got all the fasteners off. You are left with this.
5) Now things get a little sensitive, remove the large metal disc, its laid in place with no retention. Exposed now is the reluctor wheel with both the cylinder ID slots and the 360 timing slots (High Resolution Signal). There are two shrouds around the reluctor. A smaller one that covers part of the optical sensor circuitry and a larger one that circumscribes the balance of the reluctor and actual optical sensor.
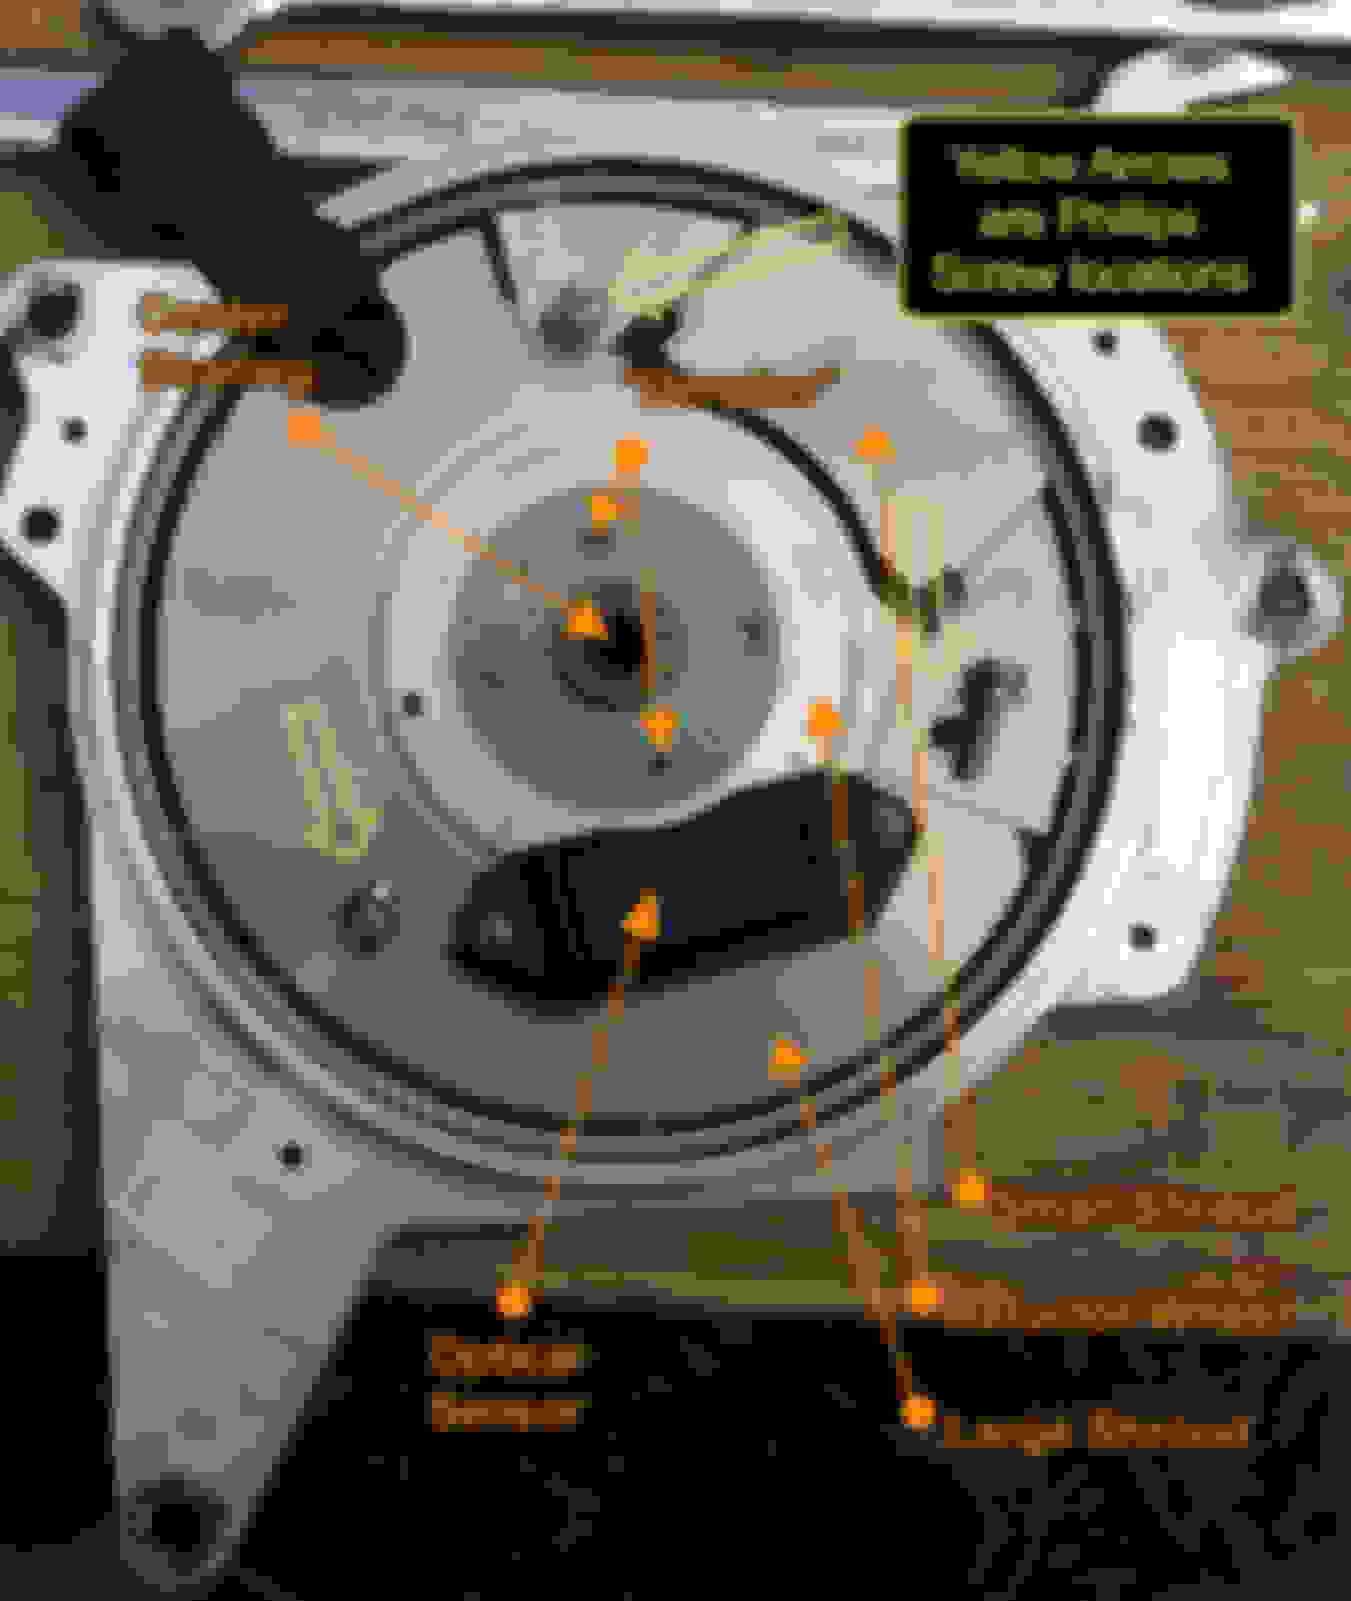
6) Remove the three Phillips head machine screws that hold the shrouds in place. The small one lifts right off.
7) DO THIS STEP CAREFULLY AND SLOWLY. Lift up slightly on the reluctor wheel on the end opposite the optical sensor. Slide out and away from optical sensor while clearing the two dimples that retain the reluctor wheel in place.
8) Once the reluctor wheel is out, the larger shroud comes out by lifting up slightly at a point opposite the optical sensor and away (same as reluctor wheel).
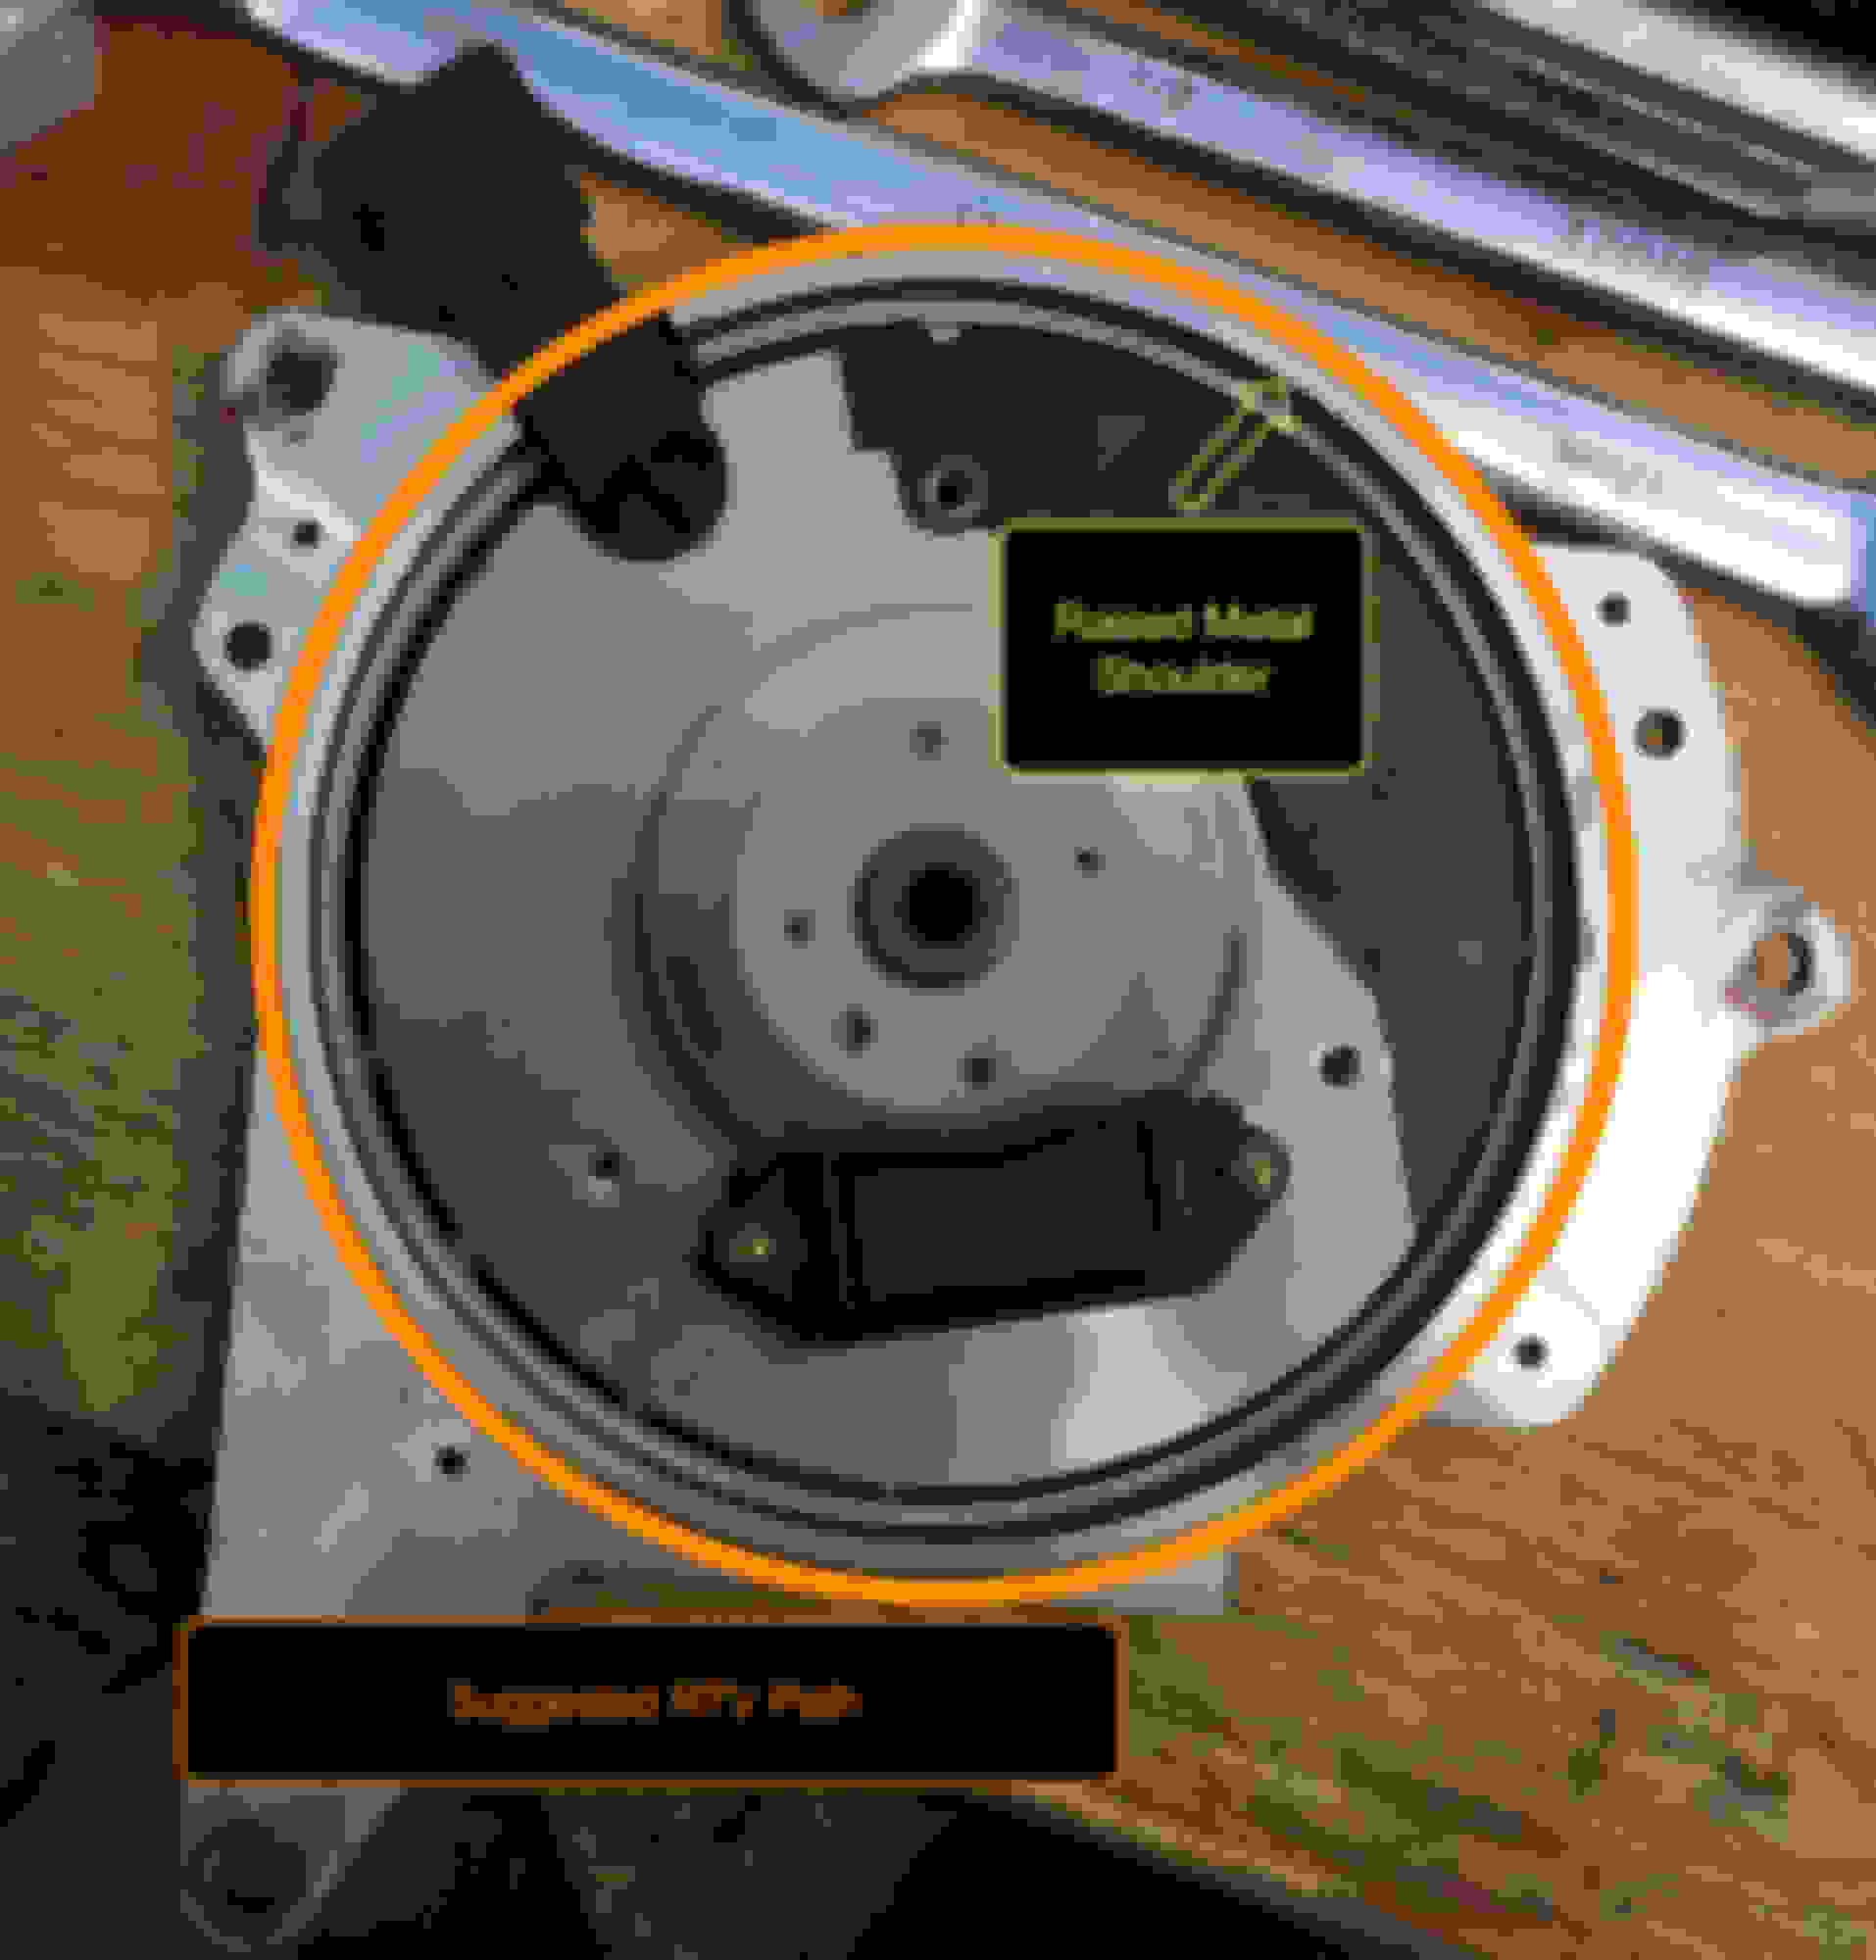
9) At this point, the Optispark is simply fit loosely in the metal body. There may be some gasket material or RTV that is holding the connector portion of the sensor to the metal body, peel the sensor away slowly. It may require you to slide the whole sensor down as there is some interference with the center bearing.
10) Prep the new sensor by applying a SMALL bead of RTV (I used sensor safe copper gasket maker) to where the connector body of the optical sensor meets the metal body of the distributor.
11) RTV the sides of the sensor connector where it protrudes from the metal body.
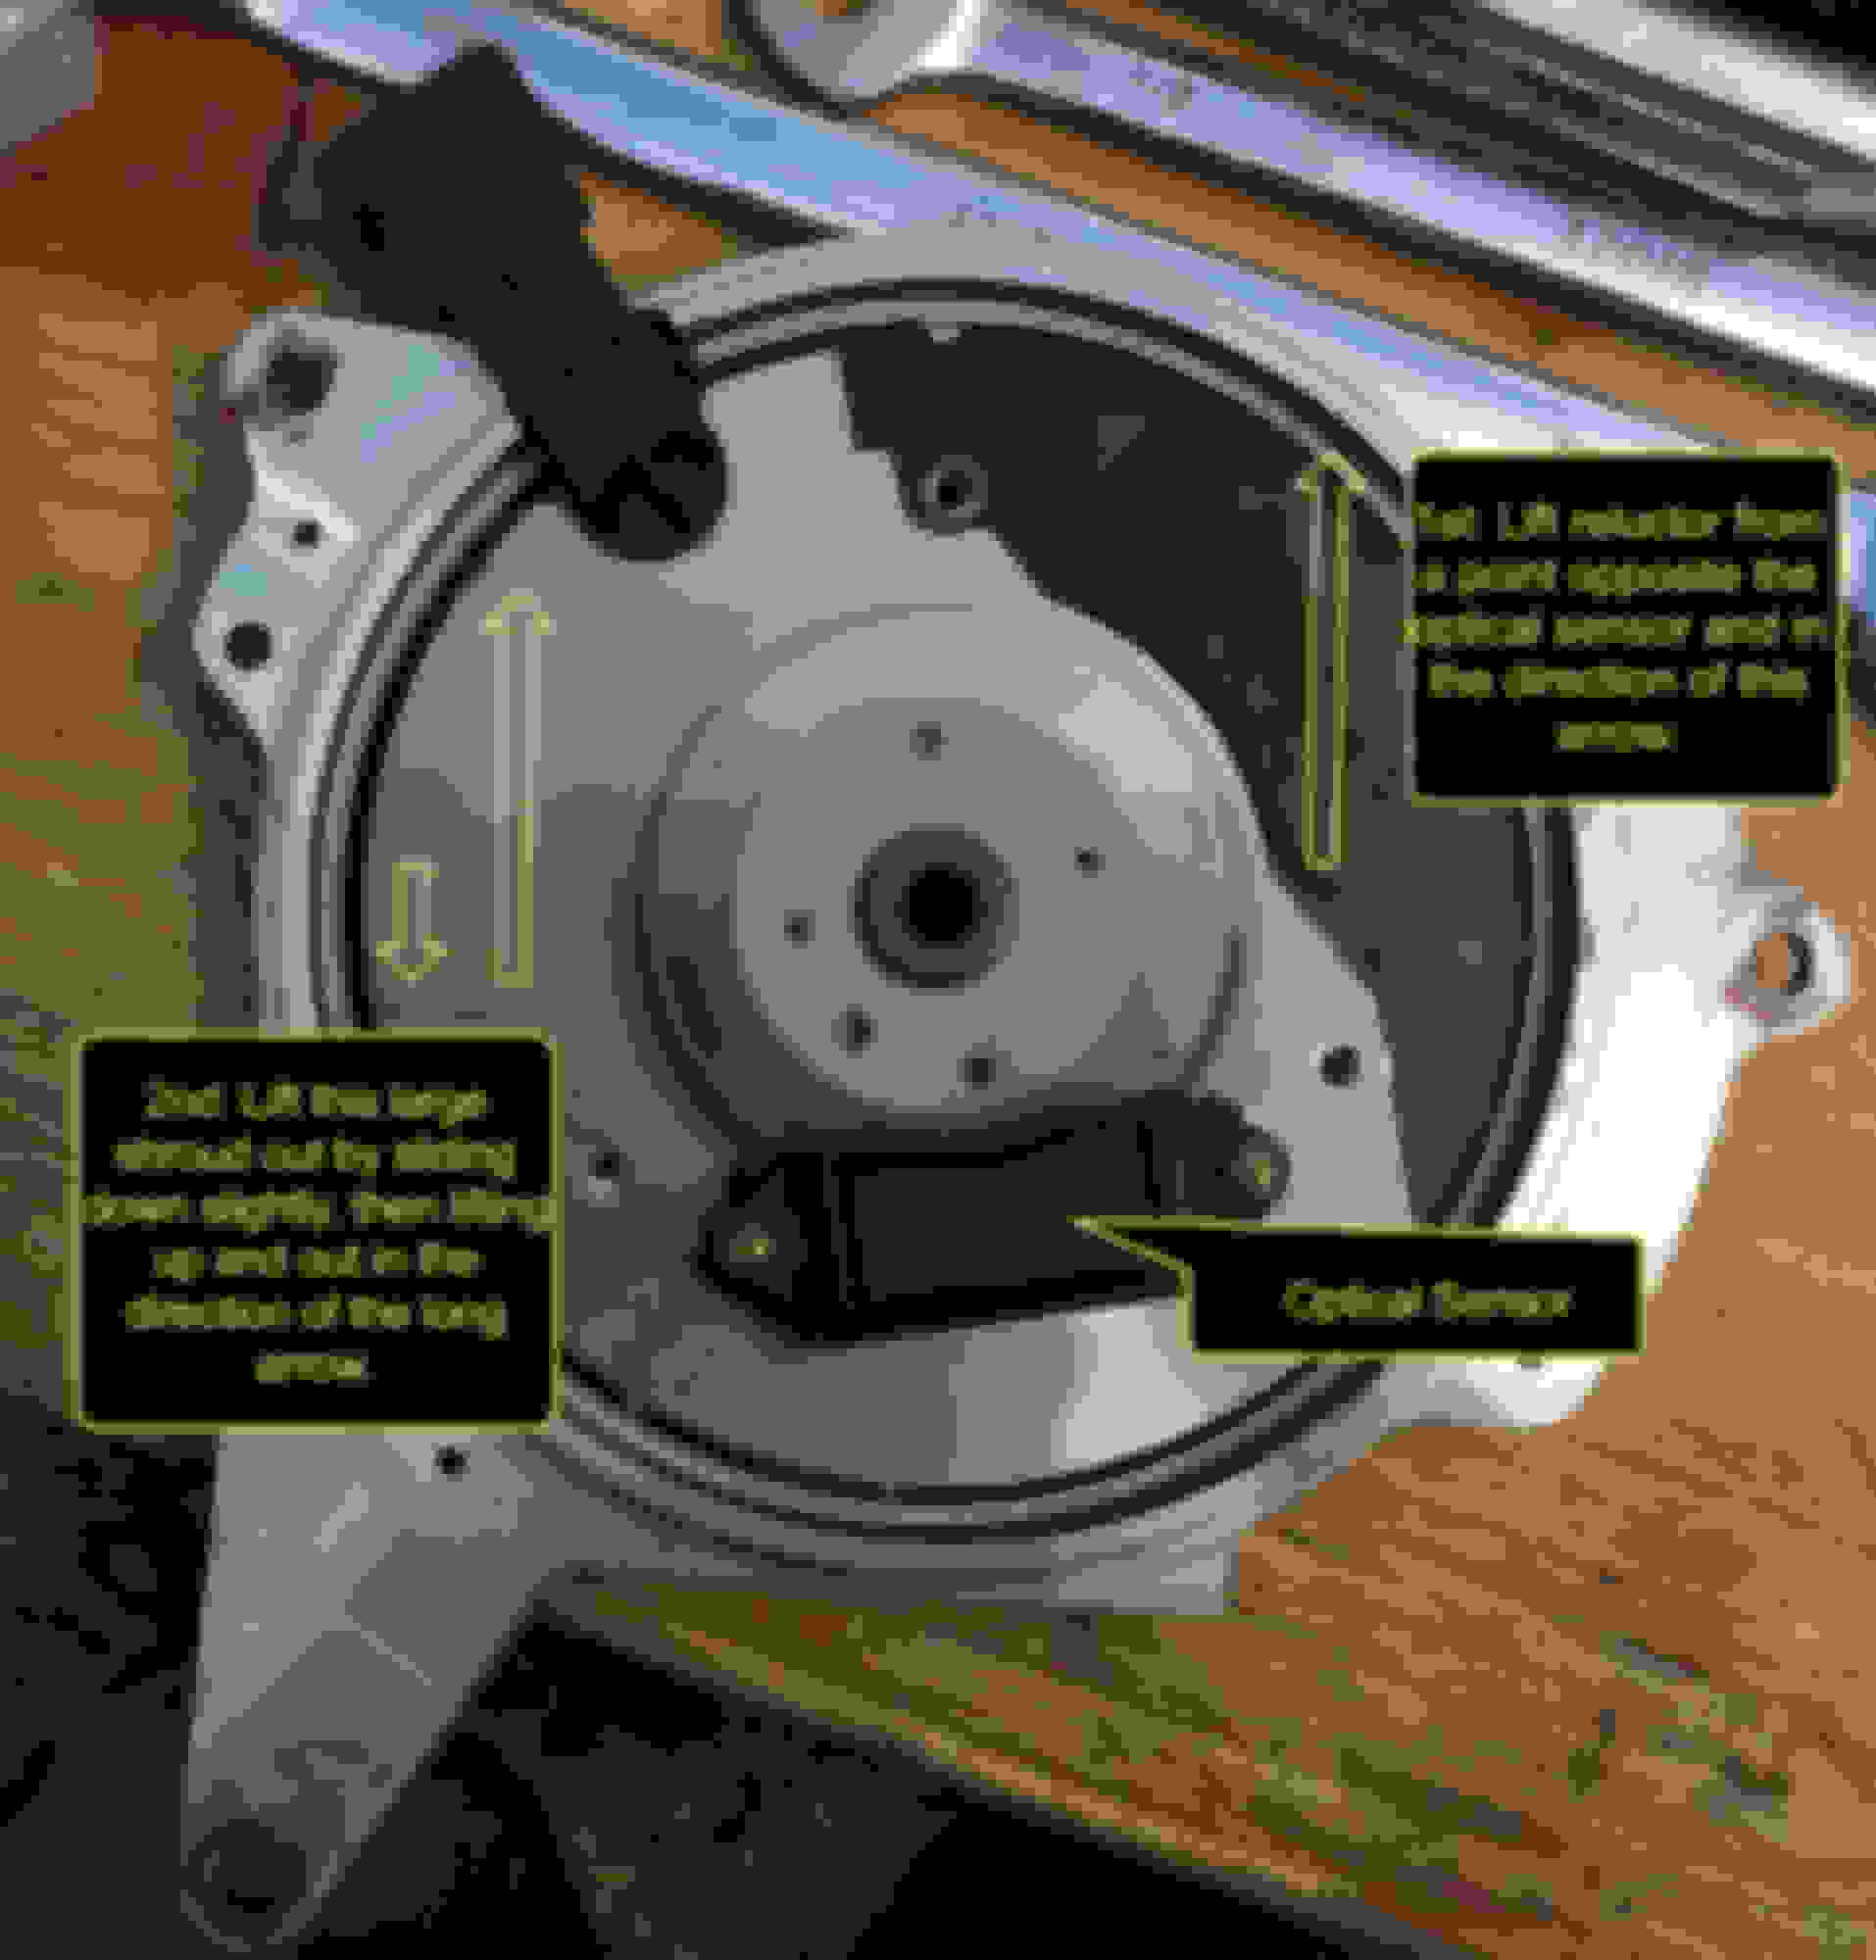
12) Install the large metal shroud that circumscribes the optical sensor and most of the center bearing.
13) CAREFULLY, install the reluctor wheel paying careful attention to make sure it seats properly on the dimples of the center bearing.
14) Install small metal shroud that covers part of the optical sensor circuitry. Replace the 3 Phillips screws.
15) Install the large metal cover that circumscribes the whole center bearing.
16) Lay a small bead of RTV around the entire perimeter of the metal body past the shoulder. The idea is that when you install the plastic body, excess RTV will squeeze out, not in. Install the large plastic body onto the metal body.
17) Install rotor. It only goes on one way, there is a little nub that is keyed to the reluctor and center bearing. Once that is on, replace the 2 (two) T-9 Torx. NOTE: Do not over tighten. Doing so will cause the distributor to get stuck. If you over tighten and the rotor doesn't turn or it "rubs", loosen them slightly until it moves freely. This might take some fine adjusting to get "just right".
18) Replace cap (don't forget the rubber gasket) and replace the four (4) inverted E-4 torx.
19) Reinstall Optispark in car. If you install optispark, hook up coil wire, 8 (eight) cylinder wires, 4 (four) wire Optispark signal connector and tighten the 3 (three) bolts that hold the Optispark in place, you can test fire the installation. You'll get all sorts of codes but you'll at least know if you there is an issue before you reassemble the whole car.
20) If all works, reinstall everything you took off to get to the Optispark. Clear codes and enjoy!
Background and Conclusion:
I started looking for just the optical sensor that is commonly blamed for the faults of the Optispark. For the longest time, you couldn't find them. That left many of us hunting for the elusive and expensive AC Delco units with the famed Mitsubishi sensors. I've spent 500 bucks give or take too many times to replace the whole distributor.
Last year, I had a code 16, again and knew straight off the Optispark was failing. The car would die randomly while cruising down the highway or at times, simply wouldn't start. When in doubt, Optispark.
I found this manufacturer by the name of AIP Electronics on Amazon of all places. They sold the optical sensor for 92-94, 1st generation Optispark. The model number is MOD92LT. Here is the link to the part: http://www.aipelectronics.com/index....nitac-lt1.html.
Worst case scenario: It doesn't work, I waste a few hours essentially replacing and installing the Optispark and I return it via Amazon hassle-free.
Well, my experience has been so far so good. It went in without issue. It fired on the first turn of the key. Codes cleared and haven't come back and I have been driving the car so far, without issue. Got about 50 miles on the new setup.
Is it sketchy as frig? Yea. But does it beat spending even 150 for a cheapo distributor and way more more for a high end unit? Yea.
Overall, I'm really happy with the cost involved, and amount of work required to get here. Is the optimal resolution to remove the Optispark altogether? Of course, but I am still not sold on the 24x kit (air gap and sensor issues) or the Torqhead kit (proprietary PCM). Until I am convinced one or the other will be worth the sizable investment, I'll happily change out a 50 dollar part every so often as required.
I'll keep updates going on this setup but just wanted to share my experience so if anyone was on the fence about trying, they would have a little bit more confidence.
Hi LT1, I manufacture OPIT's (both) for the WorldPac division of Advanced Auto Parts.
I sell the sensor (NOT AIP) separately AND MY price for an "OPTI" to your door is $185.00 (USA)
YOUR WORK is the best I have seen here on LS-1 Tech, a good write !
I fit a 24xe TW, a 58x TW OR the ORIGINAL style inside, with little interest here at LS-1 Tech.
The largest fault of the OE design is really that high resolution signal being generated by an optical sensor. If someone really figured out how to make that signal via a magnetic type sensor, that would be a hell of a break through. I know sensor design has come a long way in 23 years so I would definitely like to hear more.
Car still runs great, even a previous rough idle/stalling issue has been eliminated. IACs pegged at zero though, guessing it's a tune issue, not sure.
Thus I did this in 1984, inventor team member of the 60-2 TW (GM58x)
The Opti 360 count absolute encoder is a LOW RES method.
I fit, to MY ECU-882, a LM1815M to convert a VR (mag) signal to a Hall/Opti style signal.
Lance
Duplicating the 360 ppm sounds easy enough with a converter. How do you replicate the low res signal of different lengths with a mag pick up? Is it as simple as a tone ring with different length stand offs?
The largest fault of the OE design is really that high resolution signal being generated by an optical sensor. If someone really figured out how to make that signal via a magnetic type sensor, that would be a hell of a break through. I know sensor design has come a long way in 23 years so I would definitely like to hear more.
Car still runs great, even a previous rough idle/stalling issue has been eliminated. IACs pegged at zero though, guessing it's a tune issue, not sure.
Wicked94Z made one but hasn't been active in a very long time. Check out the thread he made called: Opti Eliminator preview.
I've replaced a total of four (4) Opit's on my car, and ....... they were ALL due to failed optical sensors. Nice knowing I can now re-build the Opti by just replacing the optical sensor.
Hi LT1, I manufacture OPIT's (both) for the WorldPac division of Advanced Auto Parts. I sell the sensor (NOT AIP) separately AND MY price for an "OPTI" to your door is $185.00 (USA)
Lance
Lance:
What do you charge for just the optical sensor to fit a later model pin drive (i.e. '96-'97 LT1) Optispark?
Have gone through my first full tank of fuel and put about 200 miles on the setup. One small issue resulted in a stall and no fire which I have chalked up to an ICM. Put a new one in, along with a new AC Delco coil for good measure and haven't had an issue since. But no codes were ever thrown so the optical sensor gets a pass. Also makes me wonder if replacing the optical sensor the first time around (the replacement which prompted this writeup) was the logical choice. I'll have to test the old sensor to see if it even failed or if it is actually still good. Time to buy an oscilloscope.
Side note: The IAC counts were pegged because of an improperly connected pigtail blue/white was soldered to green/white and vice versa. So the PCM was commanding the IAC to go lower, and since the pins were essentially swapped, the IAC wasn't moving. The connector was cut off by accident when I got it and 20 years of oil/grease/grime makes the two colors nearly impossible to tell. Ended up testing continuity from each pin in the 4-wire connector to each terminal on the connector at the PCM to figure it out. Talk about needle in a haystack.
Great write up! just a Quick heads up My car used to throw random code 16s. After MANY opti swaps, Opti Harness swaps I changed the opti harness to a Caspers Electronics one and I'm going on 3 years without that code.
those 94 spline drive sure look different inside than the pin drive optis
I took mine apart to clean oil from it and replaced C&R (96)
I agree!!
I had my '96 Opti apart once, like you, to clean it out and replace the C&R. Although it was quite some time ago, at least 10 years ago, I knew that my memory couldn't have been THAT bad, as not a lot of the pictured Opti looked all that familiar to me.....
those 94 spline drive sure look different inside than the pin drive optis
I took mine apart to clean oil from it and replaced C&R (96)
Did you use any type of alcohol or cleaner to clean your sensor itself, if it needed it? I am in the process of "de-oiling" the inside of mine while doing C&R. I am not sure any oil got on it but before reassembly I'd like to cover all the bases.
Thank you.
Gas Monkey Built a 6-Wheel Ferrari Testarossa With a Corvette LT4 Engine
Slideshow: The controversial Ferrari F6 swaps its original flat-12 for a Corvette Z06-derived LT4 V8 and sends power to four rear wheels through a custom-built drivetrain.
7 Most Reliable High-Performance Engines GM Has Ever Built
Slideshow:These GM engines didn't just make huge power, they survived abuse, boost, track days, and six-digit mileage with a reputation for refusing to quit.
6 Common C5 Corvette Failures and What's Involved In Repairing Them
Slideshow: From wobbling harmonic balancers to failed EBCMs, these are the issues that define long-term C5 ownership and what repairs typically involve.
Retro Modern Bandit Pontiac Trans AM Comes With Burt Reynolds' Autograph
Slideshow: A modern Camaro transformed into a retro icon, this limited-run "Bandit" build blends nostalgia with brute force in a way few revivals manage.
Top 10 Greatest Cadillac V Series Performance Models Ever, Ranked
Slideshow: Cadillac didn't just crash the high-performance luxury vehicle party, it showed up loud, supercharged, and occasionally a little unhinged...