
B-body: Proform 141-845 valve cover - DIY
 04-07-2018, 01:52 PM
#1
TECH Regular
Thread Starter


This how-to is specific to the b-body cars. It may work on the FireChicken and Camaro, I do not know.
Here are the covers:

They're cast aluminum, and very nice pieces. They're also expensive.
The upshot is that they are taller, so rollers have no issues. Nor does the heater hoses and trans dipstick tube. They are also baffled, which is nice and will keep a good amount of oil out of your intake. The alternator does NOT CLEAR. Fear not, though. This is how you get everything to work. Now, I ran some slightly thicker CORK Mr. Gasket valve cover gaskets. You may not have to go as far into the case as I did if you use the rubber FelPro VCG's.
Required:
- Dremel
- Cutting wheel
- 5/16 socket and ratchet
- 10 minutes
First, remove the 4 bolts that hold the alternator case together. Then, looking at the back of the alternator, rotate it 45 degrees clockwise. Run the bolts back in and tighten.
No, it still won't clear, but this step is 100% necessary. It moves the positive battery terminal away from the cover. Without doing this, you won't clear the terminal.
It should be stated that everything from this point on will totally and completely void your warranty.
Time to break out the Dremel. What you are going to cut off is the empty screw-hole and boss in the back of the case. In this image, it is the empty hole on the center/left.

First, mask everything to keep the potmetal dust from getting inside the alternator. Grab your safety glasses, and your Dremel and cut it. I first cut the screw boss directly down the center to the desired depth, and then came in from the side. This was because the cutting wheel is not wide enough to cut all the way through in one swipe.
Cut to a depth that is equal to the cast-in support ridge to the left of the hole. Following the slight factory-cut of the center hub housing, carry this downwards to the correct depth, and then cut inwards through the screw boss. The other cut into the center hub housing is where I tried to fit it without clocking the case. It didn't work. Anyway, once you're done, this is an image of what you should be looking at:

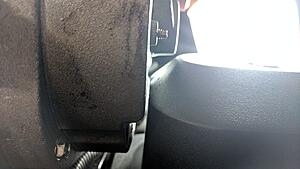
Lastly, you're going to buzz-off the end of a screw that's poking through the case. This dude that the zip tie is pointing at:

Just zip that thing off flush with the case.
When you are done, this is the clearance you're going to have:
Ta-da! Yes, I know my headers are in need of a re-coat.

Here are the covers:
They're cast aluminum, and very nice pieces. They're also expensive.
The upshot is that they are taller, so rollers have no issues. Nor does the heater hoses and trans dipstick tube. They are also baffled, which is nice and will keep a good amount of oil out of your intake. The alternator does NOT CLEAR. Fear not, though. This is how you get everything to work. Now, I ran some slightly thicker CORK Mr. Gasket valve cover gaskets. You may not have to go as far into the case as I did if you use the rubber FelPro VCG's.
Required:
- Dremel
- Cutting wheel
- 5/16 socket and ratchet
- 10 minutes
First, remove the 4 bolts that hold the alternator case together. Then, looking at the back of the alternator, rotate it 45 degrees clockwise. Run the bolts back in and tighten.
No, it still won't clear, but this step is 100% necessary. It moves the positive battery terminal away from the cover. Without doing this, you won't clear the terminal.
It should be stated that everything from this point on will totally and completely void your warranty.
Time to break out the Dremel. What you are going to cut off is the empty screw-hole and boss in the back of the case. In this image, it is the empty hole on the center/left.

First, mask everything to keep the potmetal dust from getting inside the alternator. Grab your safety glasses, and your Dremel and cut it. I first cut the screw boss directly down the center to the desired depth, and then came in from the side. This was because the cutting wheel is not wide enough to cut all the way through in one swipe.
Cut to a depth that is equal to the cast-in support ridge to the left of the hole. Following the slight factory-cut of the center hub housing, carry this downwards to the correct depth, and then cut inwards through the screw boss. The other cut into the center hub housing is where I tried to fit it without clocking the case. It didn't work. Anyway, once you're done, this is an image of what you should be looking at:

Lastly, you're going to buzz-off the end of a screw that's poking through the case. This dude that the zip tie is pointing at:

Just zip that thing off flush with the case.
When you are done, this is the clearance you're going to have:

Ta-da! Yes, I know my headers are in need of a re-coat.

 04-07-2018, 02:45 PM
#2

Cool fabrifornication on the alt Dan
VC look good
I would suggest you fab up a rear alt brace going from lower PS alt bolt to #4 header bolt (will need a longer header bolt). You may be able to "alter" the stock one. You have both rear braces missing now (the threaded hole you ground down was where the short one went). People have, and I have seen, accessory bracket crack/break, especially on built motors not running one or both rear braces.
Pic of my rear brace. Since I still have the stock VC I also use the 2nd short one also
04-07-2018, 05:39 PM
#3
TECH Regular
Thread Starter
Honestly, those brackets have never been on this car. They were not there when I got it, so I've never known anything was missing. I will fab something up. Thanks for the head's up.
End of day 1.

Tomorrow I'll turn the key. Until then, I keep calling it Schrodinger's Engine.
End of day 1.

Tomorrow I'll turn the key. Until then, I keep calling it Schrodinger's Engine.
04-07-2018, 08:57 PM
#4

Great writeup as these are the same valve covers I want to run on my new build and I was trying to figure out how i could make them fit with the alternator.
But now problem solved, thanks!!!!!
But now problem solved, thanks!!!!!
04-08-2018, 01:25 PM
#5
Honestly, those brackets have never been on this car. They were not there when I got it, so I've never known anything was missing. I will fab something up. Thanks for the head's up.
End of day 1.

Tomorrow I'll turn the key. Until then, I keep calling it Schrodinger's Engine.
End of day 1.
Tomorrow I'll turn the key. Until then, I keep calling it Schrodinger's Engine.
The stock one that goes to the #4 header bolt "may" be able to modify to work with headers. Just "cut" the header end from a eye hole to slot maybe. Whatever, it is not rocket science so fabing something up should not be hard especially if you have a welder
04-08-2018, 09:39 PM
#6
11 Second Club
Nice setup!! I haven�t used that rear alternator bracket in years.. No problems here..