
a4to m6 swap parts HELP.
 04-04-2014, 11:52 AM
#1
On The Tree
Thread Starter
Well i finally have 90 percent of all the parts for my trans sway to a t56, found a built with everything i needed. I am going off of a swap kit from hawks and i have every part that their kit would need except these parts. i have looked on plenty of forums and didnt find much.
* All necessary connectors and pigtails (Used, exp. nuetral safety switch, brake switch, etc...)
* All necessary hardware need to complete the install
When it sats etc... what is the rest of the parts needed and what does it mean "all necessary hardware". What is all of that? I need a list of these parts to be able to purchase to finish my swap. Thanks.
 04-04-2014, 03:37 PM
#2
TECH Apprentice
iTrader: (16)
Join Date: Jan 2011
Location: Central Ohio
Posts: 349
Likes: 0
Received 0 Likes
on
0 Posts

Read this: https://ls1tech.com/forums/manual-tr...requested.html
You'll find everything you need, plus tips on how it's been done that will save you time and money. It may take a while to look through all the info, but it will be worth your while.
You'll find everything you need, plus tips on how it's been done that will save you time and money. It may take a while to look through all the info, but it will be worth your while.
04-04-2014, 09:06 PM
#3
Intro
Do I need a t56 engine harness?
no, in fact nearly 99% of the swaps on this site are done by adding plugs to the a4 harness. I did the harness swap and honestly it was a waste of time
Will a 1998 m6 harness or computer work in my 99-02 car or vice cersa?
no 1998 cars had completely different interior harnesses and a much more complicated wiring for the gauge clutster. Sensors have different resistance and are not compatible
Do I need a tune after my swap?
yes and no. Your ECM will need to be flashed to m6 setting. A local shop with hp tuners can flash this for you and your car will run like it did when it was auto. If your car needed a tune before the swap it does now too. You can drive the car without a tune however the speedometer will only read half speed
Does anyone sell a t56 conversion kit?
nope. A t56 transmission is hard to find expect to pay $1200 plus for one in good shape
Can I trade my a4 setup for some ones t56?
the value of your used 4l60 is about $400, if you find some one jump on the deal
Parts needed:
Manual pedal assembly with sensors. V6 will work
Master cylinder assembly with resevior and line $275 at dealer
T56 vss sensor available on ebay (or get a pig tail maker from auto zone)
Shifter assembly
T56 with ls1 bell housing
Factory torque arm bracket for t56 car (a4 torque can be re used)
Pilot bearing
Slave cylinder
Clutch/flywheel/pressure plate
Manual transmission center console
Body to boot trans cover
Bolts for the shifter to trans
U bolt to hold master to the firewall, part is discontinued from gm will have to use junkyard for part
Misc:
New flywheel bolts from gm.
Clutch pressure plate bolts
Slave cylinder bolts to bolt slave to trans
Swivel socket fitting or wobble joint fitting
3 feet worth of extensions to reach trans to bell housing bolts
Tools:
15mm socket or wrench for bell housing to engine bolts
13mm socket for literally everything else
13mm ratcheting wrench (kit from Walmart is $20)
Power drill
Cutting blade attachment
2 3/4 hole saw to drill hole for the master cylinder
Can of anti rust spray paint
Misc
Red permatex gasket maker for the shifter.
4 quarts of dexron 3 atf
Lithium great to lube end of input shaft and pilot bearing
Dot 3 brake fluid, the big bottle of lucase is $4.59 at auto zone
Mightyvac vacuum bleeder
Floor jack
4 jack stands
Oil drain bucket for fluids
6 large pieces of cardboard to lay under your car to absorb any spills
Wiring
You will replace the reverse ligh pig tail with one from the manual car. The pig tail is on eBay
You will be tapping the plug which contains six wires and is connected to the shifter. 2 are for the reverse lights (harness on eBay) 2 are for keyless entry, 2 are for neutral safety switch)
Getting started.
You will want to do each part of the car in phases. Start with the interior
Remove the shift **** by placing the trans in d1 and loosen the staple with a screw driver to pull it out. Remove all bolts in the center console and the 2 up front. Unplug the cigarette lighter and bulbs and take out the consoles
Remove all sensors from the shifter assembly and ebrake. The cables on the transmission can be cut, one goes down through the body to the trans to change gears the other goes to the steering column to lock the ignition if the car is not in neutral or drive
pro tip, after removing the drivers seat use your floor mats to cover the bolts sticking out of the floor to mount the seat
Last edited by chrysler kid; 04-05-2014 at 12:14 AM.
04-04-2014, 09:51 PM
#4
Helpful links and reading
this link was PMed to me from "THE MERV". its his writeup from his lt1 car. it should be a sticky by itself. figured it might be helpfull to future lookers
https://ls1tech.com/forums/lt1-lt4-m...onversion.html
thanks again merv you are awsome!!!
https://ls1tech.com/forums/lt1-lt4-m...onversion.html
thanks again merv you are awsome!!!
this link may also help. it is about a guy that THOUGHT he messed up his wiring but come to find out his starter went bad. Anyways it a couple more pic of some swap wireing.
https://ls1tech.com/forums/manual-tr...ap-wiring.html
https://ls1tech.com/forums/manual-tr...ap-wiring.html
also got my pig tail off ebay.
copy paste this into the ebay seach:
T56 CONNECTOR SET (BACKUP LIGHTS, REV LOCKOUT & VSS)
they are the cheapest i have found.
also i found a plate that bolts to the firewall and gives extra support for you master cylinder. it also gives you a stencil to drill your firewall.
search e bay for :
LS1 T-56 Conversion Clutch Slave Cylinder Bracket
You can take the a4 pedals out without removing the column, however the 6 speed pedals need to have the column removed to put them in. The column was 15 minutes to remove. Just unplug everything and there are 4 bolts securing the column to the dash and the bolts on the firewall then the bolt under the hood. To be honest taking out the column should be step one will save you a lot of arm cramps and time
Bumping because I just finished my conversion using this thread
I did a full m6 harness swap and to be honest it was redundant and un necessary. Even with the t56 harness you still need to do all the interior wiring. Just get the 3 pig tails for the t56. The wiring was simple once i laid the t56 pedals pig tails out next to the factory a4 stuff. The only benefit to swapping to the m6 harness is you will have a working reverse lock out switch once you flash your tune to t56
The most helpful part for me was having a complete pedal assembly with sensors and the m6 pig tails. You will want to get the full pedal assembly with sensors and pig tails. I believe the v6 cars are the same. Careful the sensors and plastic pieces on your pedals will be prone to break.
The clutch depression switch is wired in line with the brake depression switch, the clutch sensor has 4 wires on it. 2 are pink and brown the other 2 are white and grey. The white and grey are relayed signals from the brake depression switch, so just cut the head off of the factory a4 2 pin plug and wire it onto the brake drepresion switch, it is the small plug above the big plug on the brake pedal assembly. This is to take cruise control off when you press the clutch. Again I just wired them with the brake sensor, so the brown and pink wires for the brake depressions switch I wired to the white and grey wires which plug into the clutch switch, come back out of the clutch depression switch as pink and brown.
The neutral safety switch is on the back side of the pedal assembly. You run your green \ purple wire to them. You can just connect them together and not run the wires but the cruise control will not work because the computer sees the clutch as being depressed.
The cable coming out of the column to the shifter can be cut or disconnected at the column. It's purpose was just to disable you from being able to start the car in anything other than neutral or park when you were an automatic.
I had solid motor mounts and a bad cam position sensor and knock sensors so I had to take off my intake manifold. It was easy to get the top bolts off from the trans, my advice is when you are putting the t56 bell housing on the transmission I suggest sliding in the top 3 bolts because in my engine bay with solid motor mounts I could not slide them in because of the firewall.
I did my swap in my garage on the top notch of the jack stands. I removed the factory auto trans myself using a floor jack with the lifting plate removed so the surface was flat. To get the trans out from under the car I went and jacked the car up a few inches by the k member. That way the top of the trans can slide out from under the car on a piece of card board.
For the t56 install I had my wife help me place the trans on my jack and balance it. Once I was sure it was balanced evenly I had her get out from under the car and lightly pump the jack while i stayed under the car and balanced the trans on the jack. Be extremely patient and move the jack forward and backward as necessary. Once it was high enough and I could feel the output shaft in the pilot I started threading the trans crossmember to support the back side of the trans. I then had my wife come back down and help me slide the transmission fully into the pilot bearing and clutch. Again I had solid motor mounts so my engine did not sag at all so your experience may differ. I was also strong enough to lift the trans myself so I was confident in my balancing technique and back up plan lol
The only confusing thing for me on wiring is the m6 pedals only had 2 wires going into the brake plug for the lights, and the a4 has 4 wires. I'm guessing the other 2 wires were to let the car know you had the brake pedal pressed to release the shifter to let you shift from park to drive.
If anyone has new questions pm me. I have been active on the board for 9 years and will own my fbody for at least another 20 years
You will have to tweak the Cruise Switches on the Pedals..basically add in a switch on the Clutch Pedal so the Cruise will dis-engage when you push in the Clutch.
Yea you will have to install a N/S Switch if you want it to be safe, that's not hard to do. I put a Relay on the wire that goes to the Starter, and the Switch controls it when the Key is in the start position.
The Reverse Lights are easy..find the 2 that are in the Harness, and take the 2 that are on the Auto Shifter and run them over to the Harness.
I don't know about the Hatch Release..I don't have that.
Take the Reverse Lockout Connector and lay it next to the VSS Connector(the wiring is about the same length). Take one of the wires from the Connector and connect it to PCM RED #42(1998 LS1 F-body). Take the other wire and connect it to 12v power. This will make the Reverse Lockout function like it's factory when the Car is tuned for it.
A4 to M6 swap below.
http://www.gmhightechperformance.com...wap/index.html
http://www.gmhightechperformance.com...wap/index.html
04-04-2014, 10:04 PM
#5
I will add my own pictures tomorrow as I put my interior back in the car
Interior continued
After the wiring and cables have been disconnected you will unbolt the shifter assembly from the body. Remember the plug going into the shifter mechanism is all the wiring you need to use for wiring in your t56 sensors
Pic of the plug from mervs thread. Also shows the bracket that needs to be removed

The shifter assembly is bolted to brackets on top of where you need to cut for the shifter. Use your cutting wheel attachment on your power drill to cut off the bracket in front of the airbag module. You should be able to see dimples in the bracket where it was tac welded onto the body, you will need to drill out the tac welds to remove the bracket.

Once the bracket is removed take Time to vacuum your metal shavings. Next place the body boot trans cover onto the body where you just removed the shifter assembly, trace an outline or start your bolts to hold the boot to the body. Once you have your bolt hole locations figured out for the boot you can drill out the hole with the cutting wheel.
Next remove your drivers seat, this is where you will need the 13mm ranching wrench to get the rear nuts off of the seat
Remove the kick panel below the steering column, then remove the plastic support behind it. Next remove the steering column, do not be afraid of it, disconnect the sensors attached to it and undo the 4 bolts holding it to the supports under the dash. Next unbolt the 3 bolts connecting it to the firewall and then the 1 bolt holding it to the steering rack by the headers on the drivers side. Spray wd40 or pbblaster into the sleeve where you unbolted the column to the steering shaft and then pull the steering wheel back towards you and it will slide out.
Next move on to the pedal assembly. Slide the throttle cable out of the top of the has pedal, unclip the brake pedal from the master assembly lever and disconnect the brake light and brake depression switch. Unbolt the 4 bolts holding the pedal assembly to the brake booster. Now there is 1 bolt holding the top of the pedal assembly to the dash. All of these bolts are 13 mm
Take note of the brake pedal plugs as the lower plug off of the brake pedal assembly will control the cruise control and be wired in line with your clutch depression switch. Remove the pedal assembly and line up your manual pedals. Use a sharpie to create an outline of the hole for the clutch bracket against the firewall. I've noticed it's best not to over think the position and have the hole sit flush with the u shape of the clutch master support bracket. Use the 2 3/4 hole bit to cut the hole and cut two holes for the support bracket on the master

Now your holes are drilled you want to install the clutch master. The unit comes pre bled from gm, the best method was to put a bright light inside the car and find the holes from inside the engine bay using the light to guide you. You want to guide the Ubolt in evenly, if your having trouble go inside the car to wiggle the masters lever into the car and onto the m6 pedal assembly. Clip it on the clutch pedal and go back to the engine bay to see if you can wiggle the ubolts better. Go back inside and try to lift the clutch pedal gently and it should naturally want to line up the Ubolt holes. Note patience required
Next is on to the automatic transmission removal
http://modernmusclecars.net/forums/a...p?do=tcinstall
I'm not going to go into detail but it's pretty straight forward. Unbolt the starter to get to the torque converter bolts
Drop the trans pan slowly one side at a time so that you can drain it into your oil change pan, left rear side first, let it drain, left middle, left from etc till you have them all loose and you can tilt the pan to pour everything out. Do note this is the fuckingmmessiest part of the swap. Trans fluid is never fully drained so expect to spill it regardless this is where you want all your cardboard under the car.
sorry trying to arrange and organize everything. Getting tired feel free to post links
Interior continued
After the wiring and cables have been disconnected you will unbolt the shifter assembly from the body. Remember the plug going into the shifter mechanism is all the wiring you need to use for wiring in your t56 sensors
Pic of the plug from mervs thread. Also shows the bracket that needs to be removed
The shifter assembly is bolted to brackets on top of where you need to cut for the shifter. Use your cutting wheel attachment on your power drill to cut off the bracket in front of the airbag module. You should be able to see dimples in the bracket where it was tac welded onto the body, you will need to drill out the tac welds to remove the bracket.
Once the bracket is removed take Time to vacuum your metal shavings. Next place the body boot trans cover onto the body where you just removed the shifter assembly, trace an outline or start your bolts to hold the boot to the body. Once you have your bolt hole locations figured out for the boot you can drill out the hole with the cutting wheel.
Next remove your drivers seat, this is where you will need the 13mm ranching wrench to get the rear nuts off of the seat
Remove the kick panel below the steering column, then remove the plastic support behind it. Next remove the steering column, do not be afraid of it, disconnect the sensors attached to it and undo the 4 bolts holding it to the supports under the dash. Next unbolt the 3 bolts connecting it to the firewall and then the 1 bolt holding it to the steering rack by the headers on the drivers side. Spray wd40 or pbblaster into the sleeve where you unbolted the column to the steering shaft and then pull the steering wheel back towards you and it will slide out.
Next move on to the pedal assembly. Slide the throttle cable out of the top of the has pedal, unclip the brake pedal from the master assembly lever and disconnect the brake light and brake depression switch. Unbolt the 4 bolts holding the pedal assembly to the brake booster. Now there is 1 bolt holding the top of the pedal assembly to the dash. All of these bolts are 13 mm
Take note of the brake pedal plugs as the lower plug off of the brake pedal assembly will control the cruise control and be wired in line with your clutch depression switch. Remove the pedal assembly and line up your manual pedals. Use a sharpie to create an outline of the hole for the clutch bracket against the firewall. I've noticed it's best not to over think the position and have the hole sit flush with the u shape of the clutch master support bracket. Use the 2 3/4 hole bit to cut the hole and cut two holes for the support bracket on the master
Now your holes are drilled you want to install the clutch master. The unit comes pre bled from gm, the best method was to put a bright light inside the car and find the holes from inside the engine bay using the light to guide you. You want to guide the Ubolt in evenly, if your having trouble go inside the car to wiggle the masters lever into the car and onto the m6 pedal assembly. Clip it on the clutch pedal and go back to the engine bay to see if you can wiggle the ubolts better. Go back inside and try to lift the clutch pedal gently and it should naturally want to line up the Ubolt holes. Note patience required
Next is on to the automatic transmission removal
http://modernmusclecars.net/forums/a...p?do=tcinstall
I'm not going to go into detail but it's pretty straight forward. Unbolt the starter to get to the torque converter bolts
Drop the trans pan slowly one side at a time so that you can drain it into your oil change pan, left rear side first, let it drain, left middle, left from etc till you have them all loose and you can tilt the pan to pour everything out. Do note this is the fuckingmmessiest part of the swap. Trans fluid is never fully drained so expect to spill it regardless this is where you want all your cardboard under the car.
sorry trying to arrange and organize everything. Getting tired feel free to post links
Last edited by chrysler kid; 04-05-2014 at 12:10 AM.
04-04-2014, 11:31 PM
#6
My tips for torquing flywheel and pressure plate bolts
Write numbers on the flywheel next to the bolt, and on the pressure plate. I got frustrated losing my place torquing stuff down.
Be sure the pilot bearing has the smooth edge facing into the hole in the crank shaft, the side with the un even edge which you can see the bearing will be the side the output shaft from the trans rests on. Mine was hell to get in there, use a socket and a mallet to get the pilot in flush in the back of the crank. Then put some lithium grease in there to help lube it
http://installuniversity.com/ls1/ins...tallation.html
NOTE:dum All effort has been made to make this as accurate as possible.dum Some intermediate steps have have been accidentally omitted.dum Please consult a Helms manual or a professional mechanic if a problem not covered in this install arises.
Tools Required: 7 mm socket 10 mm box-end wrench 11 mm socket 13 mm socket 15 mm socket 18 mm socket swivel socket adapter Flywheel holding tool Torque Wrench A lot of Extensions Brake Cleaner Dextron III ATF White Lithium Grease Clutch alignment tool
Install new flywheel and torque the 6 bolts progressively to 74 ft-lbs in a criss-cross pattern.dum Use a flywheel tool (or equivalent to hold the flywheel during torqing. (sorry no picture) Clean the surfaces the clutch will touch on the flywheel and pressure plate with brake cleaner. DO NOT touch these surfaces after cleaning.dum DO NOT touch the clutch lining!dum Oil/grease will reduce clutch life and hinder performance of the clutch! Use a clutch alignment tool to hold the clutch in position and then install the new pressure plate tightening the bolts to 52 ft-lbs in a criss-cross pattern.
dum Reinstall the bell housing using a 13 mm wrench and a swivel socket when necessary.dum (NOTE:dum from this point forward, I don't have any of the torque specs.dum Consult a Helms manual for these values.) dum
Place some white lithium grease on the input shaft of the transmission at the 2 locations marked. dum
Remove the TO bearing from the slave cylinder by twisting the plastic retainer until it stops and placing a small screwdriver behind the plastic and prying up.dum Place the appropriate shim (consult your McLeod instructions, we found that red works best for this particular car) over the shaft, then install the factory shim over the aluminum McLeod shim).dum We elected to leave the spring out. Snap the TO bearing back on the slave cylinder (see arrow). dum These are the shims, spring and TO bearing.dum The 4 shiny shims are the McLeod shims. the black disk is the factory shim.dum I marked the factory shim with an arrow below since there have been a lot of questions as to what it looked like posted on LS1.com
dum
Hoist the transmission back into position then slide the TO bearing back on the input shaft.dum Reinstall the 2 10mm bolts (see removal pic above)dum Install the transmission on the bell housing by shaking and height adjusting until the input shaft has slid into the clutch. DO NOT FORCE Until the shim choice is confirmed, install the transmission with 2-3 bolts (15mm).
dum
Note:dum Refer to relevant pictures above for these steps. Install the transmission mount finger tight and install the cross member with 2 13 mm bolts for shim testing.dum Also slide the drive shaft into the transmission and install the u-joint staps on the rear end with a 11mm socket.dum Install the shifter.dum Start the car in neutral.dum Try putting it in first gear.dum If it doesn't go into gear, install a thicker shim.dum If it goes into gear, test the engagement point by holding the brake and slowly releasing the clutch pedal.dum Ideally you want the clutch to start grabbing immediately off of the floor since once the clutch breaks in it will move towards the middle of pedal traveldumdumdum If it engages too high, install a thinner shim.dum Change shims (if necessary) by removing the shifter, cross member, transmission mount, the 2-3 transmission-to-bell housing bolts then pull back the transmission far enough to remove the slave cylinder.dum Change shims as noted above.dum Reinstall partially as described above And test again.dum Once the engagement point is correct, Remove the shifter, drive shaft and cross member and install the remaining 15mm transmission-bell housing bolts.dum Install the torque arm mounting bracket and y-pipe mount bracket reversing the steps noted above.dum Pull the torque arm into the mounting bracket and secure with the single 15 mm bolt.dum Install the cross member (4 15mm bolts and 1 18 mm nut).dum Install the 2 y-pipe support bolts (15 mm, see above).dum Make sure all of the electrical connections have been re-established. This is what everything should look like now. dum
Reinstall the drive shaft and double check all the connections and bolts.dum Lower the car. Any transmission fluid lost during install should be replaced through the shifter housing at this point in time.dum Place a little white-lithium grease on the shifter ball (the part that engages with the transmission)dum and reinstall the shifter, cover and console.
Here are some pictures showing the old clutch (notice the hotspots) on the old flywheel (marked by arrows).dum The second picture shows the old clutch and new clutch side-by-side.
Last edited by chrysler kid; 04-04-2014 at 11:59 PM.
04-04-2014, 11:43 PM
#7
Wiring
I connected the orange/black wires for the hatch release:
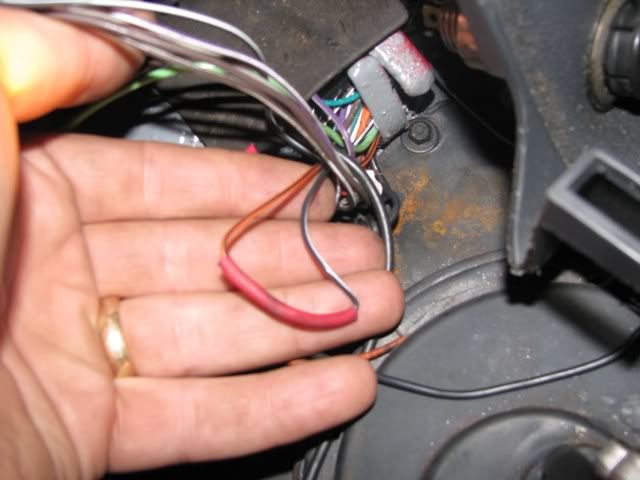
I ran the green/purple wires up to the clutch switch (pic showing which wires I cut and extended) :
this pic shows the plug that use to go into the automatic transmission shifter assembly. It now will be used for the m6
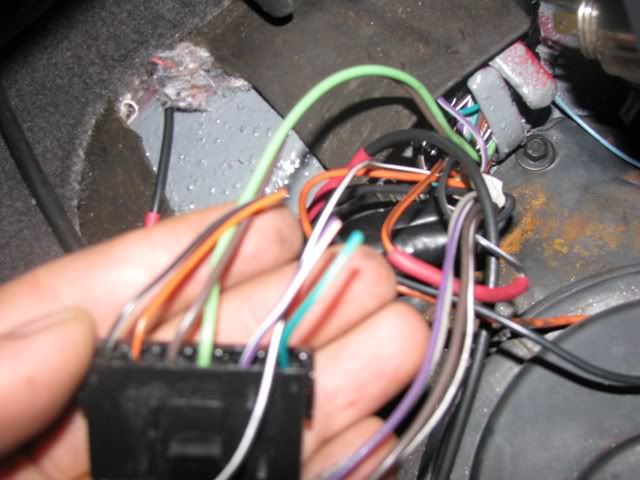
I extended the wire for the VSS on the side of the transmission, and I snipped out the brown and light green wires that used to be in the big plug on the 4L60E and attached them to a pigtail for the reverse lights.
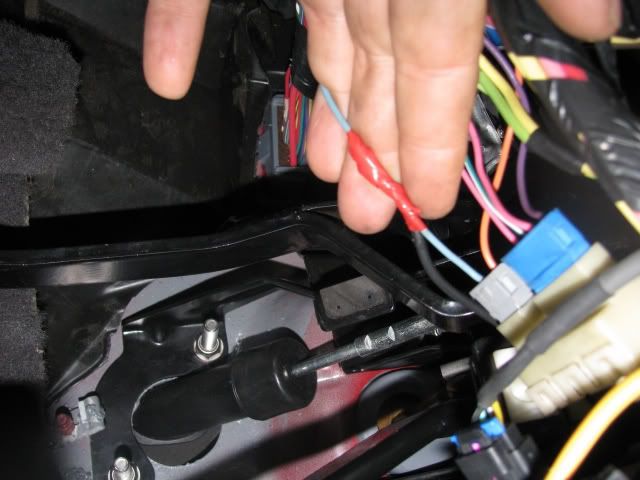
For the reverse lockout, I tapped into the blue wire on the brake light switch and ran it down to the connector, and then the other to ground.
the blue plug is the brake light switch. The white plug is the brake depression switch
eek2:
I connected the orange/black wires for the hatch release:
I ran the green/purple wires up to the clutch switch (pic showing which wires I cut and extended) :
this pic shows the plug that use to go into the automatic transmission shifter assembly. It now will be used for the m6
I extended the wire for the VSS on the side of the transmission, and I snipped out the brown and light green wires that used to be in the big plug on the 4L60E and attached them to a pigtail for the reverse lights.
For the reverse lockout, I tapped into the blue wire on the brake light switch and ran it down to the connector, and then the other to ground.
the blue plug is the brake light switch. The white plug is the brake depression switch
eek2:
Last edited by chrysler kid; 04-05-2014 at 12:21 AM.
Trending Topics
04-05-2014, 08:40 AM
#8
I will add my own pictures tomorrow as I put my interior back in the car
Interior continued
After the wiring and cables have been disconnected you will unbolt the shifter assembly from the body. Remember the plug going into the shifter mechanism is all the wiring you need to use for wiring in your t56 sensors
Pic of the plug from mervs thread. Also shows the bracket that needs to be removed
The shifter assembly is bolted to brackets on top of where you need to cut for the shifter. Use your cutting wheel attachment on your power drill to cut off the bracket in front of the airbag module. You should be able to see dimples in the bracket where it was tac welded onto the body, you will need to drill out the tac welds to remove the bracket.
Once the bracket is removed take Time to vacuum your metal shavings. Next place the body boot trans cover onto the body where you just removed the shifter assembly, trace an outline or start your bolts to hold the boot to the body. Once you have your bolt hole locations figured out for the boot you can drill out the hole with the cutting wheel.
Next remove your drivers seat, this is where you will need the 13mm ranching wrench to get the rear nuts off of the seat
Remove the kick panel below the steering column, then remove the plastic support behind it. Next remove the steering column, do not be afraid of it, disconnect the sensors attached to it and undo the 4 bolts holding it to the supports under the dash. Next unbolt the 3 bolts connecting it to the firewall and then the 1 bolt holding it to the steering rack by the headers on the drivers side. Spray wd40 or pbblaster into the sleeve where you unbolted the column to the steering shaft and then pull the steering wheel back towards you and it will slide out.
Next move on to the pedal assembly. Slide the throttle cable out of the top of the has pedal, unclip the brake pedal from the master assembly lever and disconnect the brake light and brake depression switch. Unbolt the 4 bolts holding the pedal assembly to the brake booster. Now there is 1 bolt holding the top of the pedal assembly to the dash. All of these bolts are 13 mm
Take note of the brake pedal plugs as the lower plug off of the brake pedal assembly will control the cruise control and be wired in line with your clutch depression switch. Remove the pedal assembly and line up your manual pedals. Use a sharpie to create an outline of the hole for the clutch bracket against the firewall. I've noticed it's best not to over think the position and have the hole sit flush with the u shape of the clutch master support bracket. Use the 2 3/4 hole bit to cut the hole and cut two holes for the support bracket on the master
Now your holes are drilled you want to install the clutch master. The unit comes pre bled from gm, the best method was to put a bright light inside the car and find the holes from inside the engine bay using the light to guide you. You want to guide the Ubolt in evenly, if your having trouble go inside the car to wiggle the masters lever into the car and onto the m6 pedal assembly. Clip it on the clutch pedal and go back to the engine bay to see if you can wiggle the ubolts better. Go back inside and try to lift the clutch pedal gently and it should naturally want to line up the Ubolt holes. Note patience required
Next is on to the automatic transmission removal
http://modernmusclecars.net/forums/a...p?do=tcinstall
I'm not going to go into detail but it's pretty straight forward. Unbolt the starter to get to the torque converter bolts
Drop the trans pan slowly one side at a time so that you can drain it into your oil change pan, left rear side first, let it drain, left middle, left from etc till you have them all loose and you can tilt the pan to pour everything out. Do note this is the fuckingmmessiest part of the swap. Trans fluid is never fully drained so expect to spill it regardless this is where you want all your cardboard under the car.
sorry trying to arrange and organize everything. Getting tired feel free to post links
Also the bolt that is just below the master hole is fine if you use a stock master but if using a tick mc many times it will not sit flush and must be chizzled out
Last edited by redbird555; 04-05-2014 at 08:49 AM.
04-05-2014, 12:23 PM
#9
[QUOTE=redbird555;18131108]Lookks like you guys have a nice writeup going on just to add though to anyone doing this. Youd DO NOT have to remove the column I had my pedals in and out multiple times and never touched it. Once you know how to swing the pedals up and over its not too bad. Oh and also not sure if you mentioned it and I missed it reading through but NEVER just bolt the master to the firewall like that and go on your way. M6 cars have a tack welded plate there to support the firewall. If you do not add a place of some sort the firewall will flex and eventually crack. I and some others learned this from experience.
Also the bolt that is just below the master hole is fine if you use a stock master but if using a tick mc many times it will not sit flush and must be chizzled out[/QUOTE
Man I had such hell using a brace for the firewall. Maybe the steel plate I used was too thick but I really can't see how it would flex the firewall if all the ubolts were tight as possible.
I left a few things out I'll edit more when I get home]
]
04-05-2014, 01:39 PM
#10
I used a 1/8" plate and got it to work. The stock one is even thinner however idr what thickness. The whole clutch pedal assembly pushes on the two tiny bolts with nothing bracing it on the opposite side except the small u bolt flange. Peer your head up under there and pump the clutch pedal and see lol
04-06-2014, 12:17 AM
#11
Oh trust me I was down there a long time getting everything right.
And no the u bolt puts pressure on the back side of the master cylinder not the firewall making the whole brace seem pointless. I'm still running one and I believe you about the stress, but with the u bolt holding the pedal bracket to the back side of the master it would just push a brace through the wall too
And no the u bolt puts pressure on the back side of the master cylinder not the firewall making the whole brace seem pointless. I'm still running one and I believe you about the stress, but with the u bolt holding the pedal bracket to the back side of the master it would just push a brace through the wall too
04-06-2014, 01:14 AM
#12
It does happen, my firewall cracked. It started at the MC hole. The MC flexes the firewall when you push the clutch in, and it puts more pressure on it with an aftermarket MC (I had a McLeod). The brace reinforces this area and reduces flex, reducing the chance for cracking.
I'm not sure why you're arguing, a search will show you that quite a few of us swappers have had this issue.
I'm not sure why you're arguing, a search will show you that quite a few of us swappers have had this issue.
04-06-2014, 07:31 AM
#13
exactly not to sound like a dick but the evidence is readily there with a search feature. the fact is that you are trying to push hydraulic fluid through a tiny cylinder and the MC is putting all the stress on 2 small bolt holes with a 1.5" hole right in the center it will eventually crack save yourself the headache and take care of it
04-06-2014, 03:46 PM
#16
TECH Apprentice
iTrader: (16)
Join Date: Jan 2011
Location: Central Ohio
Posts: 349
Likes: 0
Received 0 Likes
on
0 Posts
Interesting discussions about cracking. I too have heard stories about this and it seems that even some original M6 cars have this issue. On the other hand, I have also talked to 2 other fellow A4-->M6 swap guys on here that are not easy on their cars (one road races and the other drag races), and neither one reported problems with firewall cracking, and they have been swapped now for years.
I'm not saying it doesn't happen, or that you shouldn't reinforce the firewall--I'm just saying some have problems and some don't. It was interesting to me to hear about M6 cars even having this problem. I will probably check mine again and reinforce it to be safe.
redbird, do you have pics of your plate you made? Did you put it in the interior or in the engine compartment? Did you weld it or bolt it in?
04-06-2014, 04:21 PM
#17
I can take a pic when i get home no prob. m6 cars have a brace welded from the factory for a reason despite it being smallish. I traced mine out with cardboard then cut it out of a plate of aluminum and pop riveted it then just drilled the new holes for the mc bolts. Mine is inside the car just like the factory one is, I even installed it with the pedals still in because I opted not to do it until I actually saw the firewall flex
Here's a thread of exactly why you want to do this.
https://ls1tech.com/forums/manual-tr...swap-pics.html
Here's a thread of exactly why you want to do this.
https://ls1tech.com/forums/manual-tr...swap-pics.html
04-06-2014, 04:42 PM
#18
TECH Apprentice
iTrader: (16)
Join Date: Jan 2011
Location: Central Ohio
Posts: 349
Likes: 0
Received 0 Likes
on
0 Posts
I can take a pic when i get home no prob. m6 cars have a brace welded from the factory for a reason despite it being smallish. I traced mine out with cardboard then cut it out of a plate of aluminum and pop riveted it then just drilled the new holes for the mc bolts. Mine is inside the car just like the factory one is, I even installed it with the pedals still in because I opted not to do it until I actually saw the firewall flex
Here's a thread of exactly why you want to do this.
https://ls1tech.com/forums/manual-tr...swap-pics.html
Here's a thread of exactly why you want to do this.
https://ls1tech.com/forums/manual-tr...swap-pics.html
