


horrible fish-eye!?!? HELP!!
alright, so ive been trying to paint my ls1 front end conversion and ive got a big problem.
everything has been sanded correctly and cleaned and prepped correctly. ive painted several times b4 with no problem like this. the paint is not wanting to stick at all and has severe fish-eye.
my air lines are filtered and even have an extra water catcher at the gun.
i have prepped and re prepped several times and nothing changes, and im giving the cleaner plenty of time evaporate before trying to paint.
just confused cause ive never had a problem like this before
need help bad! thanks
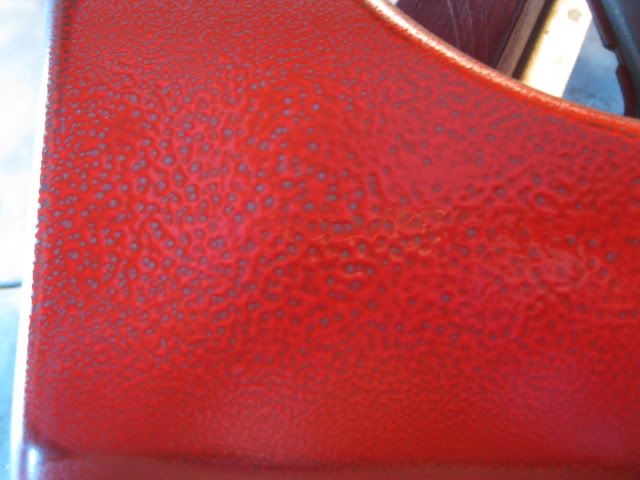
heres a pic...
everything has been sanded correctly and cleaned and prepped correctly. ive painted several times b4 with no problem like this. the paint is not wanting to stick at all and has severe fish-eye.
my air lines are filtered and even have an extra water catcher at the gun.
i have prepped and re prepped several times and nothing changes, and im giving the cleaner plenty of time evaporate before trying to paint.
just confused cause ive never had a problem like this before
need help bad! thanks
heres a pic...
What grit sandpaper did you use for the final sand?
What kind of primer are you attempting to paint over?
What kind of gun at what pressure?
What kind of red paint?
What kind of wax and grease remover and what technique did you use to apply it?
What kind of tack cloth and what technique?
Answer those in detail and I can probably help you.
What kind of primer are you attempting to paint over?
What kind of gun at what pressure?
What kind of red paint?
What kind of wax and grease remover and what technique did you use to apply it?
What kind of tack cloth and what technique?
Answer those in detail and I can probably help you.
I used 500 grit
Duplicolor high build primer
Gun is a copy of a devilbliss running at 40psi
I'm using dupont nason bc/cc, WA8774
Duplicolor wax/grease remover, applied wet with microfiber and wiped excess off with clean microfiber
Forgot brand of tack rag, just lightly drug across the surface, no pressure applied
I've used all these products the same way with great results
Duplicolor high build primer
Is this a 2 part or a rattlecan? If it's a rattlecan, it's a big no-no with real paint.
Gun is a copy of a devilbliss running at 40psi
I'm using dupont nason bc/cc, WA8774
Nason, Omni, and other low end paint lines can be finicky to apply. Try raising the pressure a little bit, spreading the fan out a little more, and pulling the gun back a little more. This can help by atomizing the basecoat finer, and help it stick.
Duplicolor wax/grease remover, applied wet with microfiber and wiped excess off with clean microfiber
I have never used Duplicolor wax and grease remover, I could tell you by smelling it if it were any good or not (scary), but don't use the microfiber. Try some cheap paper towels ,lint-free if you can get them (paint and body supply store) you don't know what kind of oils were used in the manufacturing of the microfibers.
Forgot brand of tack rag, just lightly drug across the surface, no pressure applied
Good. You can streak wax across the surface by pressing on it.
You can also do yourself a good favor by spraying a thin coat of epoxy down before you lay the basecoat. I like Trans-Star epoxy, you can get it in a multitude of colors and it is economical. It's a 1:1 ratio with the hardener, then thin it 20% with urethane reducer. I know it says 10% on the can, but trust me on the 20 it lays out smoother. Let it flash about 10-15 minutes and spray the base right on top.
The epoxy sticks to just about anything like glue, and the base sticks to the epoxy. I use this on every paint job, and especially on engine compartments where ArmorAll may have been used before.
I've used all these products the same way with great results[/QUOTE]
Trending Topics
...10psi???
im pretty sure 10psi is not the recomended hvlp pressure
edit: 10psi is measured at the tip of the gun...not the input pressure
its a 2 part primer ,im deff. not using rattle can primer.
yea the cheaper paints are more finicky, ill raise the pressure some and try spreading out the fan and everything to try to get it to atomize more
alright, ill ditch the microfibers. would 100% cotton lint free rags be okay?
the epoxy sounds like a really good idea, shouldve gone with that to begin with. should i try changing the pressure and the gun first to try and get it to stick first, or go ahead and get some epoxy?
first i was starting to paint in my homemade paint booth (car canopy wraped with plastic with positive pressure circulation) then i thought it could possibly be the conditions inside the booth some how. so i moved a couple pieces into my small garage and re-cleaned and everything and did the same thing
Last edited by joshprescotttttt5; Sep 7, 2009 at 11:42 PM.
LS1 Tech Stories
The Best V8 Stories One Small Block at Time

6 Common C5 Corvette Failures and What's Involved In Repairing Them
Pouria Savadkouei
Retro Modern Bandit Pontiac Trans AM Comes With Burt Reynolds' Autograph
Verdad Gallardo
Top 10 Greatest Cadillac V Series Performance Models Ever, Ranked
Pouria Savadkouei
Top 10 Most Powerful Chevy Trucks Ever Made!

Hennessey's New Supercharged Silverado ZR2 Has 700 HP
Verdad Gallardo
Coachbuilt N2A Anteros Is an LS2-Powered C6 Corvette In Italian Clothes
Verdad Gallardo
Awesome K5 Blazer Restomod Comes With C7 Corvette Power
Verdad Gallardo
10 Camaros You Should Never Buy

10 LS Engine Myths That Refuse to Die
Verdad Gallardo I think it is the way you are aplying the wax and grease remover or either its a bad one and it is leaving the residue behind. If it is a 2 part primer you can whipe it down with laquer thinner and you will have no kind of contaminant on there. If that does not do it you are getting something in your gun like oil contamination,through the air.
Also when you open a brand new tack rag spread it out and let it sit for a while so all the residue evaporates then roll it up like a fluffy ball and whipe gently.
Also when you open a brand new tack rag spread it out and let it sit for a while so all the residue evaporates then roll it up like a fluffy ball and whipe gently.


so if it is the grease remover messing everything up, can i just wash everthing with dawn to get rid of the residue and then clean with laquer thinner? ill be sure to wipe in the same direction, and shouldnt the rag be damp enof the make the surface wet/shiny, or am i putting to much on? or should it even matter as long as i give it the right amount of time to alow all the solvent to evaporate?
alright, ill be sure to do that with the tack cloth
alright, ill be sure to do that with the tack cloth
I hate using wax and grease remover, like you i wash with water and soap and i always just whipe with laquer thinner using regular blue towels like the ones you buy at autozone, using the wet one in one hand and a dry one on the other righ after it.
Good practice is to whipe dry whatever you put on.
I had similar problems with wax and grease remover when i first started painting, after that i stopped using it because i think laquer thinner does a better job when you can use it..
Good practice is to whipe dry whatever you put on.
I had similar problems with wax and grease remover when i first started painting, after that i stopped using it because i think laquer thinner does a better job when you can use it..
you sound like you know what your doing. you seem to be doing most of everything right. The problem is probably not what your doing. If your having the most problem with the plastic nose, the plastic probably has oils embedded in it. the best thing you can do is to bake it. take it to a body shop and ask if they can bake it in their booth for 20 mins. that will pull all the oils out of the plastic. good luck and keep at it.
ive already answered the question about where im painting.
yea im familiar with painting and have done a good bit of painting before. but its not the plastic. there wasnt a need to sand the bumper and everything down to the plastic.
that picture is of the bottom section of the fender. ive tried both fenders, and part of the hood and it is all doing the same thing. ive sanded the paint off of those sections and recleaned and everything and always does the exact some thing.
hopefully later this afternoon ill be able to try out some things mentioned and attempt to fix this
Hey man its interesting you have these issues cause i just finished my ls1 conversion and i painted the entire car in my garage but when i first started doing the driver side i was having the same issues on the door/ quarter panel.
Had no idea why it was doing that but i just let it be til the next day and sanded it with 400 again then tried one more time and the paint went on smooth without the fish eye. I have yet to figure out why but i think it might of been to hot/humid maybe. Anyways hope it works out for you!!!
Had no idea why it was doing that but i just let it be til the next day and sanded it with 400 again then tried one more time and the paint went on smooth without the fish eye. I have yet to figure out why but i think it might of been to hot/humid maybe. Anyways hope it works out for you!!!
Honestly, unless there's silicone in the atmosphere like a detail shop, the place you paint it will have very little effect on fisheying like that. You probably either wiped it with something oily, or like Phoenix said didn't wipe the wax and grease remover all off with a clean oilfree cloth/papertowel. I use 99c per roll generic brand paper towels even on 8-10K paint jobs.
Try wetsanding it smooth again with 400, using the above method to clean it, and lay down a thin coat of epoxy reduced like I told you above. You won't have any problems unless someone submerged those parts in ArmorAll at some point
Try wetsanding it smooth again with 400, using the above method to clean it, and lay down a thin coat of epoxy reduced like I told you above. You won't have any problems unless someone submerged those parts in ArmorAll at some point
Sounds like you got parts from a car that the owner used armorall, or the like. Big No No for any painters. Best luck would be to prep it down again, and clean with a good detergent like dawn. After that, prep as normal. When you go to apply the paint, keep your pressure up, and just lightly apply the material, will look like you are hardly putting any on. Allow each coat to flash normal. When you get a solid ground coat on, then you should be able to start applying a heavier coat until you have the desired coverage. Treat your clearcoat in a similar fashion. Start with a light, half coat. Then a nice solid coat. This should help to hold it all down.