


Do it your self paint job on Intake?
Originally Posted by 1sick'98WS6
Is there any way you can do this yourself and make it not look so bad, plus have it not come off from the heat?
I've done a few of them, here's my latest:
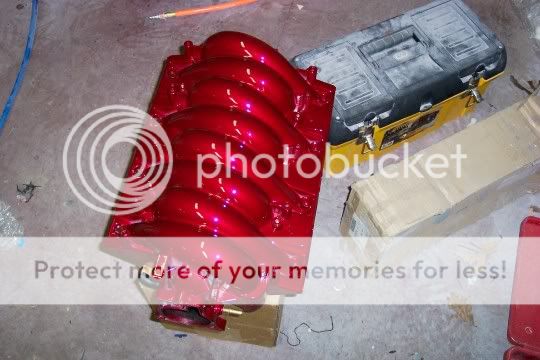
Bryan
parbreak
Originally Posted by DEMONBIRD
Looks great... I am assuming that is NOT rattle can though?!?!?
Trending Topics
Originally Posted by Y2K Pewter SS
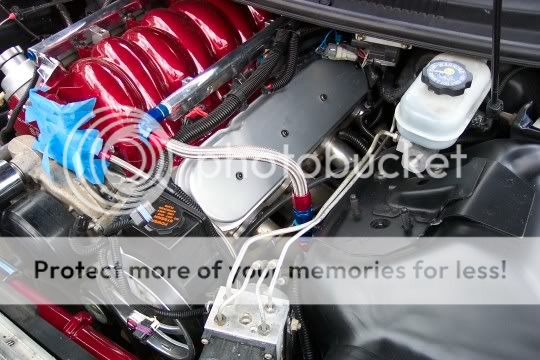
You got any better pictures of the painted power steering cooler Bryan? 

That one was Sebring Silver Metallic with black lettering.
LS1 Tech Stories
The Best V8 Stories One Small Block at Time

Gas Monkey Built a 6-Wheel Ferrari Testarossa With a Corvette LT4 Engine
Verdad Gallardo
7 Most Reliable High-Performance Engines GM Has Ever Built
Verdad Gallardo
Amazing '71 Camaro Restomod Is Modern Muscle Car Under the Skin
Verdad Gallardo
6 Common C5 Corvette Failures and What's Involved In Repairing Them
Pouria Savadkouei
Retro Modern Bandit Pontiac Trans AM Comes With Burt Reynolds' Autograph
Verdad Gallardo
Top 10 Greatest Cadillac V Series Performance Models Ever, Ranked
Pouria Savadkouei
Top 10 Most Powerful Chevy Trucks Ever Made!

Hennessey's New Supercharged Silverado ZR2 Has 700 HP
Verdad Gallardo
Coachbuilt N2A Anteros Is an LS2-Powered C6 Corvette In Italian Clothes
Verdad Gallardo Here's a little write up I did a while ago. This would apply to painting intakes, interior pieces, etc. Basically anything plastic:
I did a little write up since so many people were asking how I did it:
Here's how I did it and you can too. Only difference is I use professional paint guns and paints, but same results can be acheived with rattle cans.
1) Start with 120-180 grit sandpaper and sand off all the pebble-like finish.
2) Go to 320-400 grit to remove previous grits scratches.
3) Now here's where you can make a choice. You can either keep going up in grits to 600, 800, 1000 to make the plastic smooth or you can stop at 320/400 depending on what type of primer you use. I don't like sanding that much so I use a high build primer. One good rattle can brand is Duplicolor High Build Primer/Filler. Get the gray, not the red oxide.
4) If you can't get that and have to use regular primer then continue with the finer grit papers up to 1000.
5) Now you will need to use an adhesion promoter since these pieces are plastic. I use a product called Bulldog and it is available in rattle cans. Spray 2-3 light coats waiting 2-3 minutes between coats. After last coat wait 10- 15 minutes before applying primer or the primer will "wrinkle".
6) Now start applying primer and make SURE the first coat is very light and only a dusting. You just want a misting to adhere to the Bulldog.
7) If using Duplicolor wait 15 min. between coats. Otherwise follow directions on can.
8) Continue now with slightly heavier coats up to about 3 coats.
9) Light dry over night and sand with 400 grit. Check progress and if smooth sand with 1000 grit and you're ready for basecoat. If not satisfied lay down some more primer and dry overnight again, etc.
10) When ready for base coat again first coat is only a slight misting. You're not looking for full coverage. Some primer should actually show through. Follow instructions on time between coats. 2nd coat a little heavier and 3rd coat should be enough for full coverage. If you are using a solid color, that is not metallic, you can wetsand the base coat with 1000 grit if you want, but if it looks good leave it alone.
11) Wait at least 20-30 minutes and then start applying clearcoat. Again, for rattle can stuff Duplicolor is good. Light misting for 1st coat followed by slightly heavier coats.
12) 4-5 coats of clear. Let dry for 2-3 DAYS!!
13) Now if you are planning on wetsanding and polishing you can do that at this time. I usually do not wetsand and polish since my painting skills are fairly adept. The key to not having to do this is to lay on the clear very lightly. Go with multiple light coats holding the can about 12 inches from the surface. Also try to do it in as clean environment as possible so you don't get dust in the finish.
If you have any other questions or need help let me know.
Bryan
parbreak

Originally Posted by FireSilverLullaby
Thats a reall good write-up, but I dont think i could go that long without driving my camaro.
TECH Enthusiast
Joined: Feb 2003
Posts: 614
Likes: 0
From: Michigan (Holland/Grand Rapids)
I just Dupli-Color rattle canned mine after sanding smooth and topped with a little 600 deg F clear coat. Been on the car for 3 years and there are no signs of it commig off from the engine heat. So I say take your time and go for it!


Originally Posted by SS LS1
I just Dupli-Color rattle canned mine after sanding smooth and topped with a little 600 deg F clear coat. Been on the car for 3 years and there are no signs of it commig off from the engine heat. So I say take your time and go for it!

Guys, you can achieve great results out of rattle cans, they are severly underrated. I mean if you want a professional grade job, then a gun is best. But for all around ease, and cost effective, rattle can. I wish I had some pictures of the air box, and lid I painted. I know it's plastic but came out amazing
Originally Posted by stryker14
popped open a rattle can and wa laaa 
but yeah just take parbreaks advice with his how to and you cant really go wrong
but yeah just take parbreaks advice with his how to and you cant really go wrong
Can you shoot me a link to the "True Fire" rattle cans??