


 May 18, 2016, 01:47 PM
Last edit by: IB Advertising
See related guides and technical advice from our community experts:
Browse all: Exterior Guides
- Chevrolet Camaro 2010-2015: How to Paint Your Brake Calipers
Step by step instructions for do-it-yourself repairs
Browse all: Exterior Guides

How To: Paint your calipers
Dunno if it's been done here before, but here's my step-by-step process for how to paint your calipers...it's even 56K friendly with the optional links for pics
**DISCLAIMER**
If you **** up yourself and/or your car while following this walkthrough, tough cookies. I accept no responsibility for such stupidity. You're just painting your damn calipers
1. First thing you want to do is get the necessary supplies. I went to Wal-Mart and bought the following
Supplies you'll need
-Brake Cleaner
-A hard-thistle brush
-500-degree engine paint (I went w/ Red, pick w/e tickles your fancy)
-Plastic garbage bags
-A roll of blue painters tape
All of this cost me about $15
2. For this mod, I left my calipers mounted on the car, so the next step for me was to protect the areas near the car from rogue spray. I split the garbage bags along the seam and used the painter's tape to stick it to my car
Protecting the car
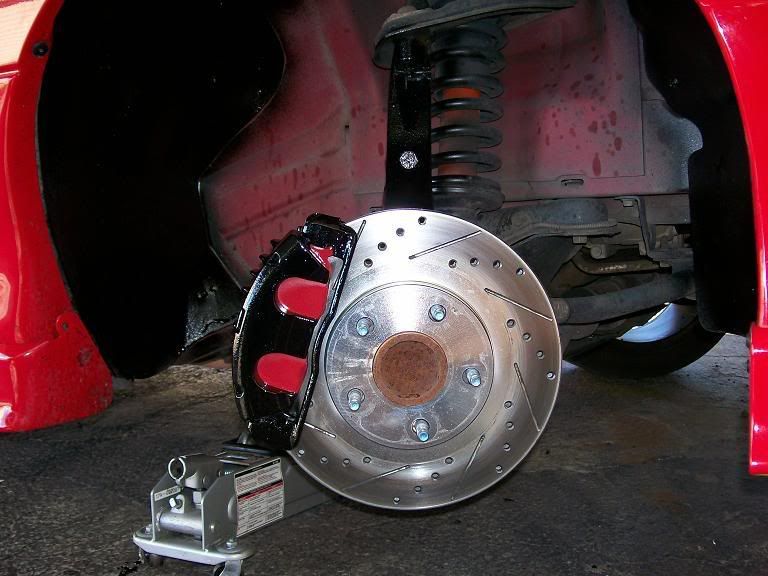
3. Now that that's done, follow the standard procedure for removing your tires, and lift the car up. Now we're ready to paint, right? WRONG!! My car had 62k miles of brake dust and dirt built up on the caliper, so I used the *gasp* brake cleaner and the brush to clean those suckers off
before
After
3.5. this step is optional, but i didn't want every piece of my caliper to be red. I used the blue painter's tape to tape off the back of the brake pad
optional taping
4. Next, I rolled up a piece of paper towel and shimmied it underneith the bracket to protect the rotor from the paint
like this
5. Now I took a plastic wal-mart bag and put it around the rotor and tucked as much of it underneith the bracket as i could. Then, I taped it around the axle to hold it in place
like so
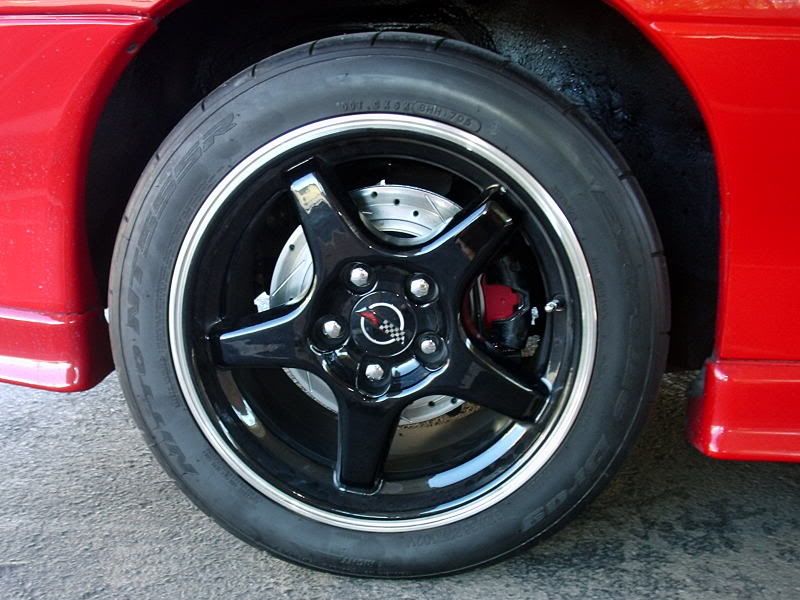
6. Now this is very important...when applying the paint, use LIGHT layers. It's better to have 80 light coats than 3 heavy ones, so don't worry if there's still part of the old caliper peeking thru the paint cuz you're gonna hit it a bunch more before the process is done. A watched pot never boils, and the same applies to painted calipers. While waiting for the paint to dry, you could clean your wheels to pass the time. After a few coats dry, you can remove all the protective stuff...chances are, some of the paint got on the rotor, so what you want to do is rotate the rotor and hit it with some more brake cleaner.
Finished product
**Now, as you can see in this pic, I didn't press the painters tape down hard enough to keep the paint from creeping in. You can go back over w/ a paint-brush and some high temp paint and touch it up if you want. I didn't...It was 1:28AM and 28 degrees out by the time I took this pic**
all put back together
For the time you put in and what you get out, this is an excellent appearance mod.
**DISCLAIMER**
If you **** up yourself and/or your car while following this walkthrough, tough cookies. I accept no responsibility for such stupidity. You're just painting your damn calipers
1. First thing you want to do is get the necessary supplies. I went to Wal-Mart and bought the following
Supplies you'll need
-Brake Cleaner
-A hard-thistle brush
-500-degree engine paint (I went w/ Red, pick w/e tickles your fancy)
-Plastic garbage bags
-A roll of blue painters tape
All of this cost me about $15
2. For this mod, I left my calipers mounted on the car, so the next step for me was to protect the areas near the car from rogue spray. I split the garbage bags along the seam and used the painter's tape to stick it to my car
Protecting the car
3. Now that that's done, follow the standard procedure for removing your tires, and lift the car up. Now we're ready to paint, right? WRONG!! My car had 62k miles of brake dust and dirt built up on the caliper, so I used the *gasp* brake cleaner and the brush to clean those suckers off
before
After
3.5. this step is optional, but i didn't want every piece of my caliper to be red. I used the blue painter's tape to tape off the back of the brake pad
optional taping
4. Next, I rolled up a piece of paper towel and shimmied it underneith the bracket to protect the rotor from the paint
like this
5. Now I took a plastic wal-mart bag and put it around the rotor and tucked as much of it underneith the bracket as i could. Then, I taped it around the axle to hold it in place
like so
6. Now this is very important...when applying the paint, use LIGHT layers. It's better to have 80 light coats than 3 heavy ones, so don't worry if there's still part of the old caliper peeking thru the paint cuz you're gonna hit it a bunch more before the process is done. A watched pot never boils, and the same applies to painted calipers. While waiting for the paint to dry, you could clean your wheels to pass the time. After a few coats dry, you can remove all the protective stuff...chances are, some of the paint got on the rotor, so what you want to do is rotate the rotor and hit it with some more brake cleaner.
Finished product
**Now, as you can see in this pic, I didn't press the painters tape down hard enough to keep the paint from creeping in. You can go back over w/ a paint-brush and some high temp paint and touch it up if you want. I didn't...It was 1:28AM and 28 degrees out by the time I took this pic**
all put back together
For the time you put in and what you get out, this is an excellent appearance mod.
Trending Topics
LS1 Tech Stories
The Best V8 Stories One Small Block at Time

6 Common C5 Corvette Failures and What's Involved In Repairing Them
Pouria Savadkouei
Retro Modern Bandit Pontiac Trans AM Comes With Burt Reynolds' Autograph
Verdad Gallardo
Top 10 Greatest Cadillac V Series Performance Models Ever, Ranked
Pouria Savadkouei
Top 10 Most Powerful Chevy Trucks Ever Made!

Hennessey's New Supercharged Silverado ZR2 Has 700 HP
Verdad Gallardo
Coachbuilt N2A Anteros Is an LS2-Powered C6 Corvette In Italian Clothes
Verdad Gallardo
Awesome K5 Blazer Restomod Comes With C7 Corvette Power
Verdad Gallardo
10 Camaros You Should Never Buy

10 LS Engine Myths That Refuse to Die
Verdad Gallardo
good write up....
here, i edited step 5 according to ls1techs sponsor policy
here, i edited step 5 according to ls1techs sponsor policy
Originally Posted by Smoke Panther
5. Now I took a plastic *non-sponsor* bag and put it around the rotor and tucked as much of it underneith the bracket as i could.

the only thing i would change is cover more of the surrounding areas, to make sure no over spray anywhere including the brakepad area and add camaro decals then hit with a couple layers of clear...
lol seems like a lot of work.. I just got a old t rag and slid it in between the pad and the caliper and painted it. I painted the pads before I put them in. Then I hit the fender wells with some 3M ruberized undercoating. Kinda quick and lazy but o well the results werent that bad.


looks good. I just picked up the dupli-color caliper paint kit for ~$16 bucks and results came out great. You brush it on but the paint levels nicely. I did take off the wheels since the 16's give me no damn room to work with. I painted mine black since I had no need to show off the horrendous LT1 stock brakes.
-Brian
-Brian
Common...do it right! Blow it ALL APART! I'm in the process of doing mine. I started out to just paint the caliper but the spindle was ugly so I blew it all apart and started painting. I still have to paint the actual caliper and put my decals on and put it back together.


