
Anyone paint an LS1 intake manifold??
 02-19-2008, 04:15 PM
#41
Staging Lane
Thread Starter
Join Date: Jan 2006
Location: Clever, MO
Posts: 53
Likes: 0
Received 0 Likes
on
0 Posts

I wouldn't mind getting another one to experiment some painting & porting. How much shipped? Does it have the EGR hole in the top of TB housing? That would be something I don't need on a vette. I've bought a couple of used LS1 manifolds from C5 owners before pretty cheap.
 02-29-2008, 11:10 AM
#43
Staging Lane
Thread Starter
Join Date: Jan 2006
Location: Clever, MO
Posts: 53
Likes: 0
Received 0 Likes
on
0 Posts

 02-29-2008, 12:41 PM
#44
 03-04-2008, 01:09 AM
#45
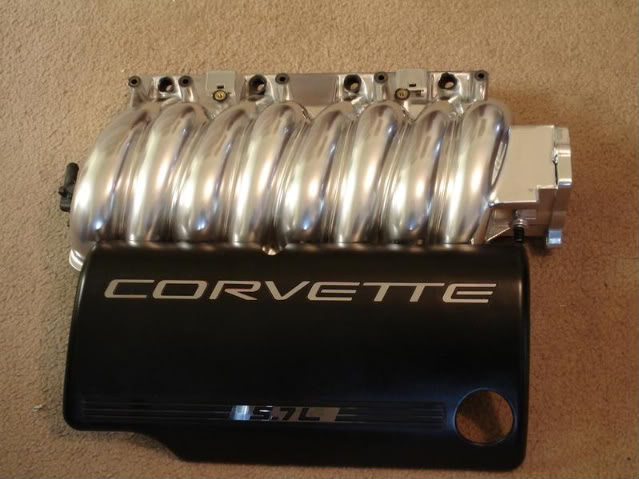
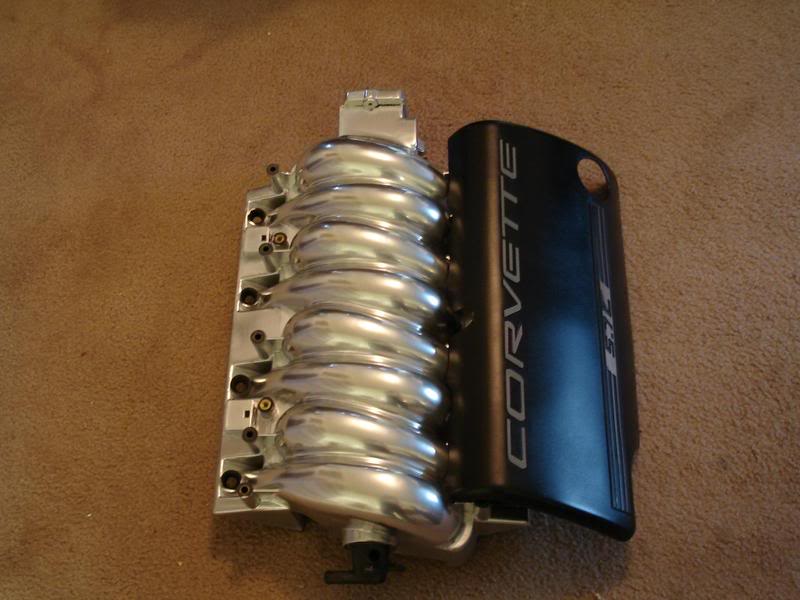
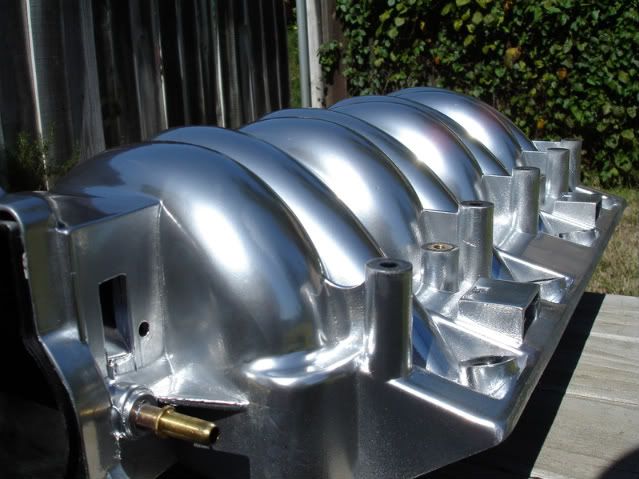
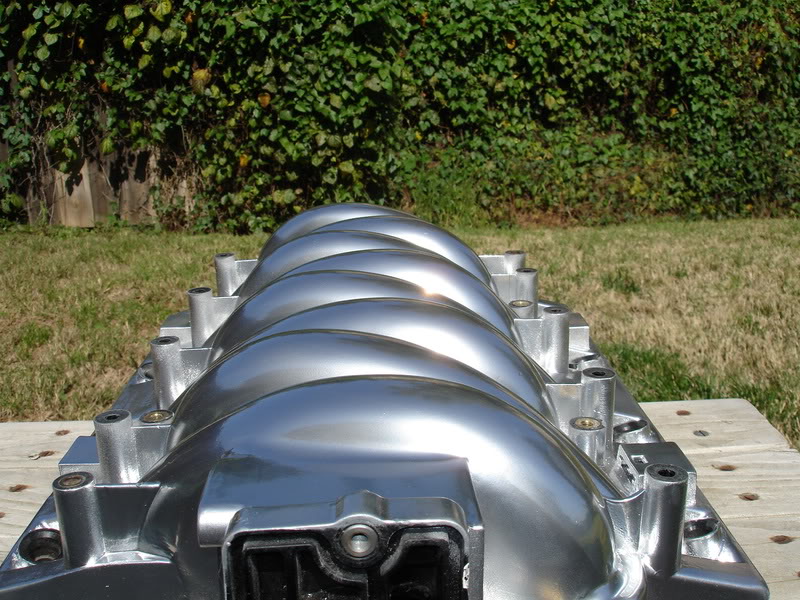
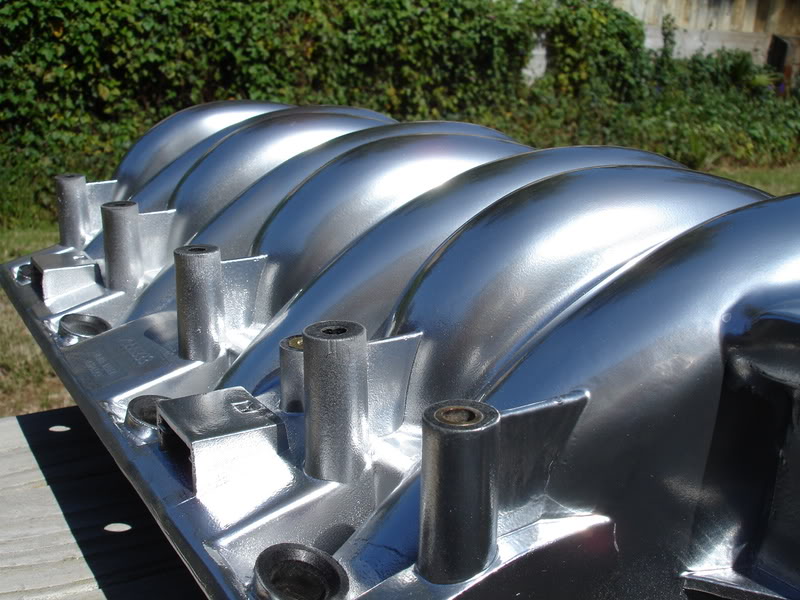
Fixvet, that intake looks really good. Glad things worked out. How about a couple shots in really good light, with a lower angle, looking front to back and then another one at a lower angle, looking across the it at an angle (front-left to rear right, etc). How did you fill the top section up front? Is that just a polished plate?

 03-04-2008, 11:20 AM
#47
Staging Lane
Thread Starter
Join Date: Jan 2006
Location: Clever, MO
Posts: 53
Likes: 0
Received 0 Likes
on
0 Posts
Fixvet, that intake looks really good. Glad things worked out. How about a couple shots in really good light, with a lower angle, looking front to back and then another one at a lower angle, looking across the it at an angle (front-left to rear right, etc). How did you fill the top section up front? Is that just a polished plate?
As for the filled TB mount....I shaped some 1/8" plexiglass pieces to sit inside that opening to fill up to the top, then I Dremel ground all the outside edges to fit flush across the whole opening. I then used a small amount of Bono to create the blend into the first intake runner. I thought it turned out pretty good. But, I'm not sure how good the Duplicolor chrome enamel is going to hold up. After I sprayed it last week, I called the Duplicolor help line and was told I can't clear coat chrome paint without changing the color. So now, I'm letting it cure for a couple of weeks to test the surface hardness. I may install it on my C5 and just see if it lasts. If not, I can always paint my original that's still on my car. I've definitely learned alot with this project, and that's why I did it. Next time it will be even better......maybe with aluminum wheel or engine enamel with a clear coat that Duplicolor suggested to me. It won't have the chrome luster I was looking for, but would definitely wear better. Fix

BTW.........I really like your white TA. I'd like to have one just like it to share the garage with my C5!
03-04-2008, 01:34 PM
#49
Staging Lane
Thread Starter
Join Date: Jan 2006
Location: Clever, MO
Posts: 53
Likes: 0
Received 0 Likes
on
0 Posts
03-04-2008, 04:16 PM
#51
Staging Lane
Thread Starter
Join Date: Jan 2006
Location: Clever, MO
Posts: 53
Likes: 0
Received 0 Likes
on
0 Posts
Fixvet, that intake looks really good. Glad things worked out. How about a couple shots in really good light, with a lower angle, looking front to back and then another one at a lower angle, looking across the it at an angle (front-left to rear right, etc). How did you fill the top section up front? Is that just a polished plate?
BTW....I also ported all the intake runners while I have it off the engine. Just cleaned up all the casting marks and flashing with my Dremel tools. Another good learning experience for anyone with an LS motor and easy to do on these Nylon-66 manifolds. 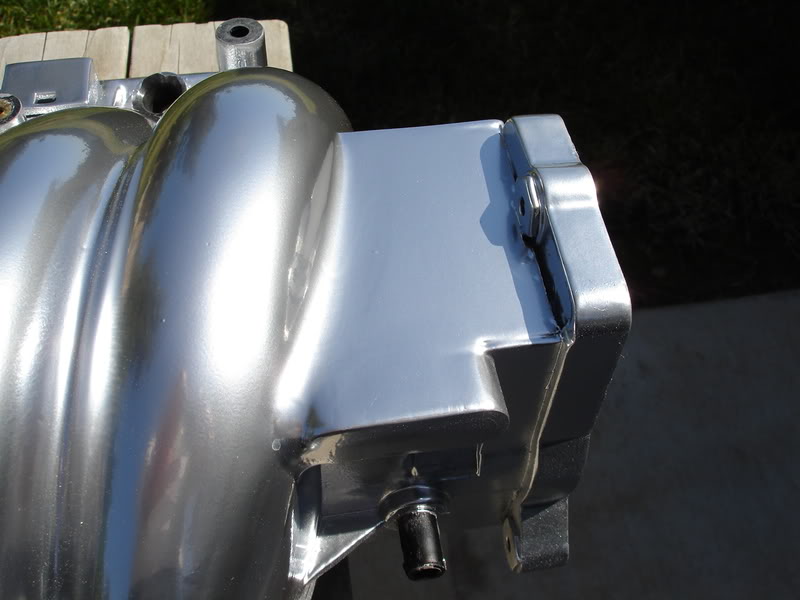

 03-04-2008, 05:54 PM
#52
You did a really nice job. These pics do a better job showing the quality of the prep. I know the prep is a PITA, but you have to do it to achieve this type of finish. The filled in area behind the TB opening is well done. After you get this installed and can look at the engine bay in good natural light, you are just going to stand there like an idiot with a big ole grin on your face. I know; I've been there.
Make sure you bump/update this thread in 6 months or so to let us know how this non-clearcoat finish lasts.
I know; I've been there.Make sure you bump/update this thread in 6 months or so to let us know how this non-clearcoat finish lasts.
03-05-2008, 12:42 AM
#53
Staging Lane
Thread Starter
Join Date: Jan 2006
Location: Clever, MO
Posts: 53
Likes: 0
Received 0 Likes
on
0 Posts
You did a really nice job. These pics do a better job showing the quality of the prep. I know the prep is a PITA, but you have to do it to achieve this type of finish. The filled in area behind the TB opening is well done. After you get this installed and can look at the engine bay in good natural light, you are just going to stand there like an idiot with a big ole grin on your face. I know; I've been there.
Make sure you bump/update this thread in 6 months or so to let us know how this non-clearcoat finish lasts.
I know; I've been there.Make sure you bump/update this thread in 6 months or so to let us know how this non-clearcoat finish lasts.
I've helped two of them change ported manifolds on their new Z06's, and I think my old LS1 will be easier. I've already done alot of research and have a folder full of mod stuff. Yeah, I sanded the hell out those intake runners from 80 grit on up, since they will show from under my frc's. I actually repainted it 3 times before I got what you see. I hope there's not too much product on this thing. I'll find out before long, I'm sure.
12-09-2014, 07:40 AM
#57
Registered User

Join Date: Dec 2014
Posts: 3
Likes: 0
Received 0 Likes
on
0 Posts
Bump...
I have a question..right now im prepping an ls1 manifold (my 1st time) but i was wondering do i only sand the runners or do i sand the whole thing and try to get everything detailed, Or would it be a waist of time?
I have a question..right now im prepping an ls1 manifold (my 1st time) but i was wondering do i only sand the runners or do i sand the whole thing and try to get everything detailed, Or would it be a waist of time?
12-09-2014, 07:56 AM
#58
Staging Lane
Thread Starter
Join Date: Jan 2006
Location: Clever, MO
Posts: 53
Likes: 0
Received 0 Likes
on
0 Posts
Scroll up to post #33 then start reading down to the present. On mine, I hand sanded everything on the top side that would potentially be seen when on my vette. I did not touch anything underneath.........if that's what you're asking. Prep takes time so do it right and the end result will be good. Good luck.....it's a fun project.
12-09-2014, 11:29 AM
#59
Registered User
Join Date: Dec 2014
Posts: 3
Likes: 0
Received 0 Likes
on
0 Posts
Thanks fixvet
And noob question how do i post pictures through mobile?
Ive been sanding with 180 for a while now next i should do 320 then some 400,600, and finish it with 1000. Its my first time doing this in high school so it should be fun lol
And noob question how do i post pictures through mobile?
Ive been sanding with 180 for a while now next i should do 320 then some 400,600, and finish it with 1000. Its my first time doing this in high school so it should be fun lol
12-09-2014, 04:44 PM
#60
Staging Lane
Thread Starter
Join Date: Jan 2006
Location: Clever, MO
Posts: 53
Likes: 0
Received 0 Likes
on
0 Posts
 Sanding up to 320 is fine to create the tooth for the Adh.Promo, a coat of primer, then final color. Just get rid of all the casting lines on the runners and you'll be fine.