Anyone paint an LS1 intake manifold??
 12-11-2007 | 12:46 PM
#1
Thread Starter
Staging Lane

Joined: Jan 2006
Posts: 53
Likes: 0
From: Clever, MO
Has anyone painted their nylon composite LS intake manifold? I have an extra intake that I plan to experiment with, and want to use Duplicolor products since I don't have reg. painting equipment. I'm interested in what prep needs to be done, what primer to use and what paint products would work. I'm leaning towards a "chrome" painted look.
Can't afford powdercoating that alot of guys are doing these days. I'm a DIY'er!
Thanks,
Dennis
Can't afford powdercoating that alot of guys are doing these days. I'm a DIY'er!
Thanks,
Dennis
12-11-2007 | 03:04 PM
#3
Thread Starter
Staging Lane
Joined: Jan 2006
Posts: 53
Likes: 0
From: Clever, MO
12-11-2007 | 09:59 PM
#4
12-12-2007 | 01:31 AM
#5
well your getting a great welcoming to LS!tech lol fear not man...people repost **** on here over and over and over again...thats the only reason they say use the search feature...Not everyone here is quick to flame everyone they see.
here is some helpful material that may guide you in the right direction.
https://ls1tech.com/forums/showthrea...ing+how+intake
much luck and welcome 2 LS1Tech.
oh and if you want to lay some fire graphix or somethin let me know.
here is some helpful material that may guide you in the right direction.
https://ls1tech.com/forums/showthrea...ing+how+intake
much luck and welcome 2 LS1Tech.
oh and if you want to lay some fire graphix or somethin let me know.
12-23-2007 | 10:19 PM
#6

Has anyone painted their nylon composite LS intake manifold? I have an extra intake that I plan to experiment with, and want to use Duplicolor products since I don't have reg. painting equipment. I'm interested in what prep needs to be done, what primer to use and what paint products would work. I'm leaning towards a "chrome" painted look.
Can't afford powdercoating that alot of guys are doing these days. I'm a DIY'er!
Thanks,
Dennis
Can't afford powdercoating that alot of guys are doing these days. I'm a DIY'er!
Thanks,
Dennis
12-23-2007 | 10:27 PM
#7
Thread Starter
Staging Lane
Joined: Jan 2006
Posts: 53
Likes: 0
From: Clever, MO
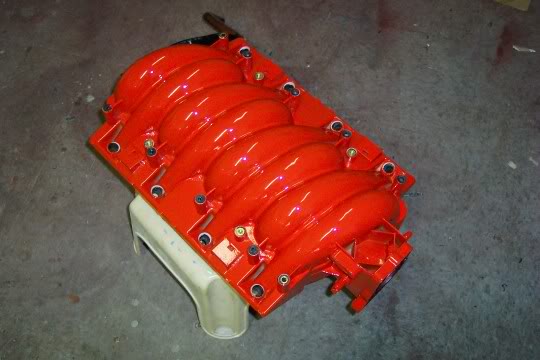
I went with an elementary way myself. I pulled off the intake, cleaned it real good and then plugged or covered the holes with tape. Then I put 3-4 layers of silver metallic engine spray paint followed by 2 clear coats. The result is the following pic. Very cheap to do and it seems to last. Not as good as a professional paint or powdercoating though.
Thanks man!
Trending Topics
12-23-2007 | 10:39 PM
#8
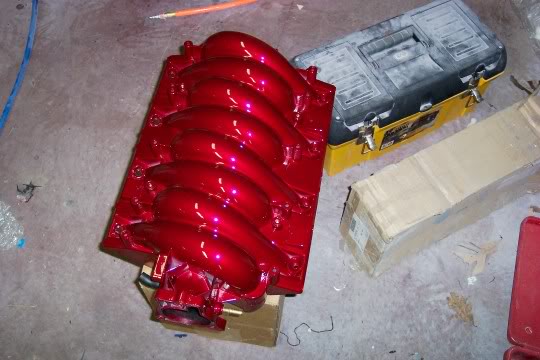
Yeah, I am pretty sure it was duplicolor high temp paint. Bought it at Autozone. I didn't use a primer. When the sun light hits it the metallic sparks really stand out and look good. Unfortunately, I sold the car that was on last year. Doesn't take long to do though. Best tip I can give you is make sure the base coats are dry before you apply more coats or clear coats. Patience is key with either a warm garage or warm outside weather. Here is another pics of it that looks a little better.
12-25-2007 | 11:48 PM
#9
I scrubed mine with a Dawn dishwashing solution and a fibered Brite pad.
It wasn't a priority to get every speck of dirt out, and it's not always possible.
After scrubbing, a spray hose was used at close range to obtain the highest pressure possible. It is important to make sure that residual soap solution and grease is completely removed.
I, also, prefer high temp spray paint. Humidity will affect how fast the paint will dry. A warm day in the shade is ideal. Don't work in direct sunlight. Make sure that the intake is standing on it's side so that the spray can will remain mostly level as you make each pass. Keeping the can level as it approaches empty limits paint sputter and dripping.
At this point, some people prefer to spray very light coats, then let dry in between. I've found that many light coats create a kind of finish, which, under changing light, shows streaks and lines. I prefer to use more paint initially. There is a judgement call as to too much paint. It does take a bit of practice, maybe to a sheet of cardboard first. The initial coat is allowed to almost completely dry. A little bit of leftover tackiness gives the second coat something to stick to. Repeat for third coat, or more. Let cure for a couple of days before remounting of intake.
12-26-2007 | 11:22 AM
#10
Just wanted to add...if you use my method, be really careful that each coat of paint is dry enough before adding subsequent coats, otherwise, the succeeding coat will penetrate, then lift off the preceeding coat!
You will not be happy if this happens.
You will not be happy if this happens.
12-26-2007 | 11:41 AM
#11
Thread Starter
Staging Lane
Joined: Jan 2006
Posts: 53
Likes: 0
From: Clever, MO
Thanks for all your good advice.
Fix


 12-26-2007 | 04:51 PM
#15
Make sure you CLEAN the intake VERY well..Use commet or ajacks and a green scotch brite pad.Get all the cracks and wash thuraly..I'm no painter but with some good prep. work me and a friend can put out some good paint..
Heres the engine bay we did in the driveway


Heres the engine bay we did in the driveway
 12-26-2007 | 11:13 PM
#17
You dont need hi temp on the intake or valve covers for that matter..