
Home made "retro" tail light write up
 05-12-2015, 11:06 PM
#1
Here is my full write up on how to make tail lights and 3rd brake light like this

I read this one thread that was years long about people wanting someone to make aftermarket lights for 93-02 firebirds / TAs. Some people posted photo shopped pics of "clear" lights and others of "retro" lights. And years later 6LiterEater designs now makes some lenses you could modify however you like. They are a sponsor so check them out. They have great products.
But in this case they didn't have exactly what I wanted. I liked the photo shopped pics of the "retro" style as they called it, which was 2nd gen tail lights edited onto our housings. 6LE makes something similar to those but the only problem is that they use the 98-02 round reverse light. I like the square reverse light in the edited pics.
To date the price of 6LiterEaters "retro" style lenses with the round reverse light is $375. This sounds expensive but if you factor in the price of 93-97 tail lights, plus the quality paint, quality clear coat, tape, sandpaper, wax and grease remover, buffing compound and wax, so on and so on, it comes out to about the same price. You can do this mod cheaper, but it wont be as high quality. Point is, check those guys out as another option.
So I thought I'd give it a shot at making some myself. Best part is you don't have to stick the lights in the oven to remove the lens. In fact you don't remove the lens at all (unless there is oxidation on the inside).
So the first thing I did was buy a set of 93-97 v6 firebird tail lights. If you're like me and didn't know, these come plain red, as in no black lines going through them like 93-97 TAs, or the honeycomb pattern like all 98-02 Firebirds and TAs. They don't have to be in perfect or even great condition because after sanding, paint, and clear they will look brand new. Only thing you don't want is cracks or chips.
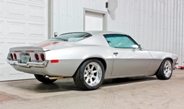
So here is the photo shopped picture that got me thinking. Keep in mind that you cant make lights look just like this. Reason being is simply because, these are actually 2nd gen tail lights. There is more of a gap between the center piece and the reverse lights. Also the 2nd gen lights are flat and ours wrap around, meaning, if you were to actually look at these lights from a side view there would be about 4-5 inches of black from the edge of the lights to where the red starts, and it just wouldn't look good in person from a side view.
The first step is to wash the tail lights. Get all the dirt off. You don't want that around when you're sanding or painting. After they're washed I wet sanded with 220 grit because mine had a few somewhat deep scratches. Then I wet sanded very well and evenly with 2000 grit then dried them. At this point there will be millions of scratches everywhere and the lens will look hazy and you'll probably think you just ruined them. Don't worry that's normal and I promise there wont be a single scratch when you're done.
TIP: There is a set of DOT numbers on the reverse light and another on the brake light part. I sanded these raised letters off completely. They sand off easily.
TIP: Before the next step of taping, wash the lens with soap or use wax and grease remover. This is so the black paint and clear coat will adhere perfectly to the lens.
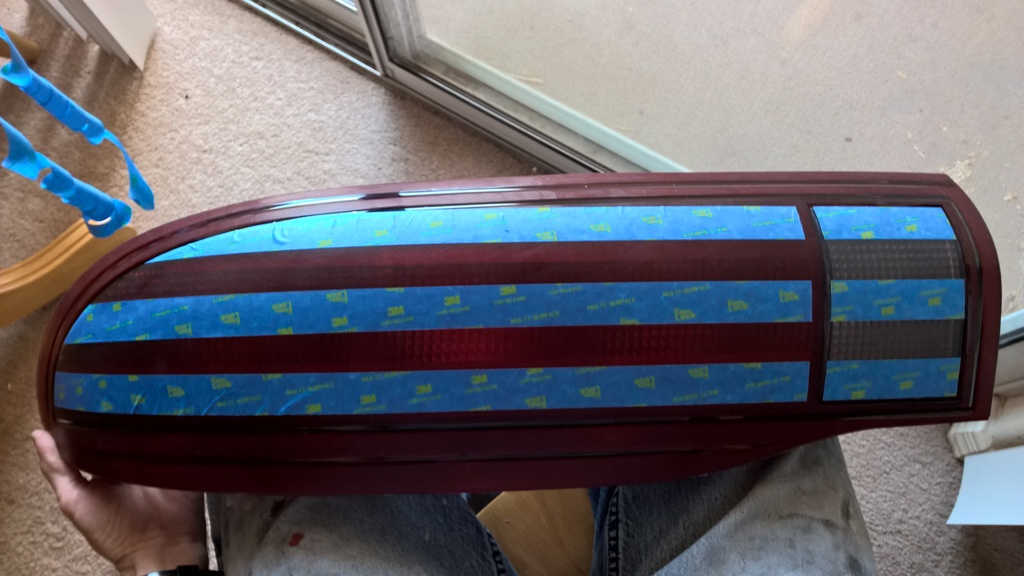
You're ready to tape them off now where you dont want paint. I used 1" wide painters tape from any hardware store because 1. you want the tape to come off easily and 2. you dont want any residue. The reverse light is a great way to get the right spacing so start there and at the bottom. Reason behind that is when you start going up the lens curves more so its much harder to get the tape in a straight line. So get a long piece, line it up at the bottom of the reverse light, and go straight across using the small square reflectors as somewhat of a guide. Towards the end of the tail light stop following the reflectors because they begin to angle off and will throw your straight line off. Eyeball it or use a ruler or whatever to ensure that this first piece of tape is straight. Its very important because this piece is going to be the guide for the following 4 pieces. Take another long piece and butt it up perfectly with the first piece. The reverse light is 5 inches long so you will have 5 pieces of tape. Once all 5 pieces are on, remove two of them that you wont be using as show in the following picture.
Once the two pieces of tape are removed take an exacto knife or a razor blade to cut off the tape on the outside of the reverse light and also on the end of the lens. I used the lines on the end of the lens as a guide, not only to get the lines straight but also to create an equal amount of black boarder going around the lens. Its up to you. Also, just another preference, I put down a strip of tape going up and down about 3/4" off the reverse light. This was my guide to cut the tape between the reverse light and where the brake lights will be. Again, up to you.
Once you are this far you should have something that looks similar to this.
TIP: The tape will wrinkle up because of the curves of the lens, that's normal. But before you paint be sure you press down on them to get them as flat as possible, otherwise when you paint it will go under the folds and the lines won't look nice and straight
Now you're ready for paint. I used a cheap airbrush kit that was $100 online that came with a compressor and everything. I've been using it for jobs like this and custom work. You could use a full sized paint gun (probably faster anyway), or you could probably even get away with using a spray can. I'm just letting you know that a airbrush did the work in these pics so I cant say what a spray can will look like or how permanent the paint will be.
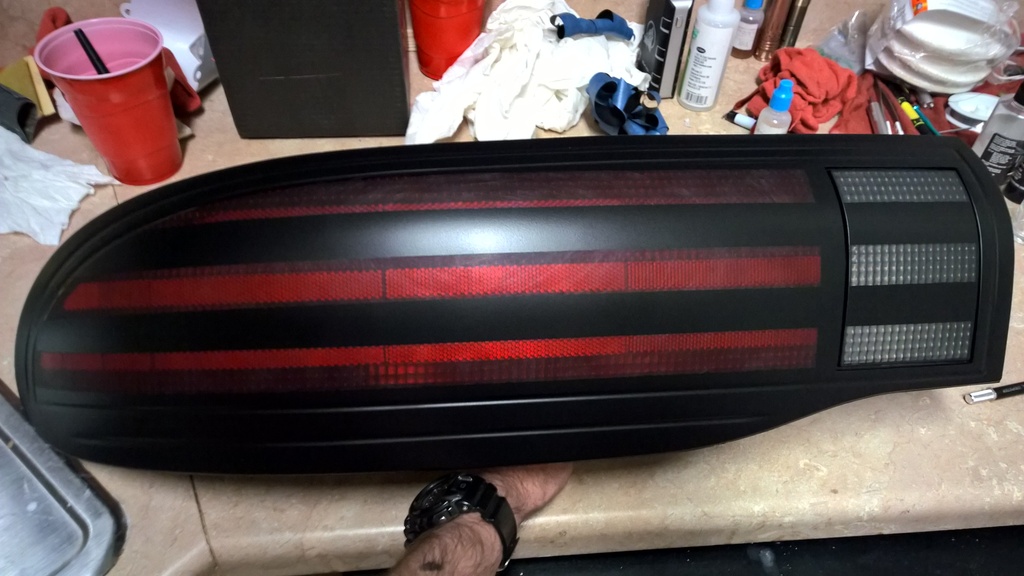
For paint I used Wicked Colors black. It has some fancy cool name, cant remember what it is exactly, but its just black. Just for caution I wiped the lens down AGAIN with automotive wax and grease remover to make sure no grease from my hands got on the lens while taping. TIP: Do NOT touch the lens. Spray the lens evenly with a lot of thin coats and allow the paint time to flash in between. Use LOTS of coats. Seriously. I practiced this on a cracked tail light and when I put it on the car the light still shown through. But here is a tip. When you think you have enough paint on it (leave the tape on still), go outside on a bright day and hold it up to the sun, and look through the holes where the bulbs go in. If you see light, the brake lights will shine through,so you need more paint. If you look in the holes and its pitch black (there might be a tiny amount of light coming through the tape, that's fine), then you're good. You can now remove all the tape.
TIP: Remove the tape VERY slowly and take your time or the paint WILL come off with the tape. Also you may notice that the paint looks raised, well it probably is. You may think you want to sand the edges down, DONT. I will get to that issue in a minute.
At this point your lens should look like this. Like I mentioned before, don't worry about the scratches and hazy lens from when you sanded them, and also don't worry about the paint being flat black. Everything will work out in time.
Now you're ready for clear coat. I used an automotive 2 part urethane clear coat, also with my air brush. Reason for that is because its proven to be long lasting, hard, buff and wax-able, and UV resistant. Also Wicked Colors approves using urethane clear over their products. The next best option if you don't have a airbrush or paint gun would be to use the same clear coat, but with a .99 cent foam brush from any hardware store. You don't have to worry about streaks that you will see right after brushing because the clear will self level over a few hours. And the third option would be to use a spray can clear.
Allow clear to dry overnight, or longer, before the next step
TIP: If you use a spray can clear be sure that it is compatible with the black paint you used. Not all spray can clears will work with spray can paint and will bubble, cause horrible fish eye, or orange peel. Don't have time to teach a chemistry class, just do your research or you'll be sanding and starting from scratch again.
Same as the black paint, use multiple thin coats and allow clear to flash in between coats. Or if you're using the foam brush technique just do one heavy coat (but not so heavy it runs) and call it a day. Allow clear to dry over night.
TIP: Do not mix 2 part clear in a plastic solo cup. It will eat through and go everywhere. Ask me how I know...

I read this one thread that was years long about people wanting someone to make aftermarket lights for 93-02 firebirds / TAs. Some people posted photo shopped pics of "clear" lights and others of "retro" lights. And years later 6LiterEater designs now makes some lenses you could modify however you like. They are a sponsor so check them out. They have great products.
But in this case they didn't have exactly what I wanted. I liked the photo shopped pics of the "retro" style as they called it, which was 2nd gen tail lights edited onto our housings. 6LE makes something similar to those but the only problem is that they use the 98-02 round reverse light. I like the square reverse light in the edited pics.
To date the price of 6LiterEaters "retro" style lenses with the round reverse light is $375. This sounds expensive but if you factor in the price of 93-97 tail lights, plus the quality paint, quality clear coat, tape, sandpaper, wax and grease remover, buffing compound and wax, so on and so on, it comes out to about the same price. You can do this mod cheaper, but it wont be as high quality. Point is, check those guys out as another option.
So I thought I'd give it a shot at making some myself. Best part is you don't have to stick the lights in the oven to remove the lens. In fact you don't remove the lens at all (unless there is oxidation on the inside).
So the first thing I did was buy a set of 93-97 v6 firebird tail lights. If you're like me and didn't know, these come plain red, as in no black lines going through them like 93-97 TAs, or the honeycomb pattern like all 98-02 Firebirds and TAs. They don't have to be in perfect or even great condition because after sanding, paint, and clear they will look brand new. Only thing you don't want is cracks or chips.
So here is the photo shopped picture that got me thinking. Keep in mind that you cant make lights look just like this. Reason being is simply because, these are actually 2nd gen tail lights. There is more of a gap between the center piece and the reverse lights. Also the 2nd gen lights are flat and ours wrap around, meaning, if you were to actually look at these lights from a side view there would be about 4-5 inches of black from the edge of the lights to where the red starts, and it just wouldn't look good in person from a side view.

The first step is to wash the tail lights. Get all the dirt off. You don't want that around when you're sanding or painting. After they're washed I wet sanded with 220 grit because mine had a few somewhat deep scratches. Then I wet sanded very well and evenly with 2000 grit then dried them. At this point there will be millions of scratches everywhere and the lens will look hazy and you'll probably think you just ruined them. Don't worry that's normal and I promise there wont be a single scratch when you're done.
TIP: There is a set of DOT numbers on the reverse light and another on the brake light part. I sanded these raised letters off completely. They sand off easily.
TIP: Before the next step of taping, wash the lens with soap or use wax and grease remover. This is so the black paint and clear coat will adhere perfectly to the lens.
You're ready to tape them off now where you dont want paint. I used 1" wide painters tape from any hardware store because 1. you want the tape to come off easily and 2. you dont want any residue. The reverse light is a great way to get the right spacing so start there and at the bottom. Reason behind that is when you start going up the lens curves more so its much harder to get the tape in a straight line. So get a long piece, line it up at the bottom of the reverse light, and go straight across using the small square reflectors as somewhat of a guide. Towards the end of the tail light stop following the reflectors because they begin to angle off and will throw your straight line off. Eyeball it or use a ruler or whatever to ensure that this first piece of tape is straight. Its very important because this piece is going to be the guide for the following 4 pieces. Take another long piece and butt it up perfectly with the first piece. The reverse light is 5 inches long so you will have 5 pieces of tape. Once all 5 pieces are on, remove two of them that you wont be using as show in the following picture.
Once the two pieces of tape are removed take an exacto knife or a razor blade to cut off the tape on the outside of the reverse light and also on the end of the lens. I used the lines on the end of the lens as a guide, not only to get the lines straight but also to create an equal amount of black boarder going around the lens. Its up to you. Also, just another preference, I put down a strip of tape going up and down about 3/4" off the reverse light. This was my guide to cut the tape between the reverse light and where the brake lights will be. Again, up to you.
Once you are this far you should have something that looks similar to this.
TIP: The tape will wrinkle up because of the curves of the lens, that's normal. But before you paint be sure you press down on them to get them as flat as possible, otherwise when you paint it will go under the folds and the lines won't look nice and straight

Now you're ready for paint. I used a cheap airbrush kit that was $100 online that came with a compressor and everything. I've been using it for jobs like this and custom work. You could use a full sized paint gun (probably faster anyway), or you could probably even get away with using a spray can. I'm just letting you know that a airbrush did the work in these pics so I cant say what a spray can will look like or how permanent the paint will be.
For paint I used Wicked Colors black. It has some fancy cool name, cant remember what it is exactly, but its just black. Just for caution I wiped the lens down AGAIN with automotive wax and grease remover to make sure no grease from my hands got on the lens while taping. TIP: Do NOT touch the lens. Spray the lens evenly with a lot of thin coats and allow the paint time to flash in between. Use LOTS of coats. Seriously. I practiced this on a cracked tail light and when I put it on the car the light still shown through. But here is a tip. When you think you have enough paint on it (leave the tape on still), go outside on a bright day and hold it up to the sun, and look through the holes where the bulbs go in. If you see light, the brake lights will shine through,so you need more paint. If you look in the holes and its pitch black (there might be a tiny amount of light coming through the tape, that's fine), then you're good. You can now remove all the tape.
TIP: Remove the tape VERY slowly and take your time or the paint WILL come off with the tape. Also you may notice that the paint looks raised, well it probably is. You may think you want to sand the edges down, DONT. I will get to that issue in a minute.
At this point your lens should look like this. Like I mentioned before, don't worry about the scratches and hazy lens from when you sanded them, and also don't worry about the paint being flat black. Everything will work out in time.

Now you're ready for clear coat. I used an automotive 2 part urethane clear coat, also with my air brush. Reason for that is because its proven to be long lasting, hard, buff and wax-able, and UV resistant. Also Wicked Colors approves using urethane clear over their products. The next best option if you don't have a airbrush or paint gun would be to use the same clear coat, but with a .99 cent foam brush from any hardware store. You don't have to worry about streaks that you will see right after brushing because the clear will self level over a few hours. And the third option would be to use a spray can clear.
Allow clear to dry overnight, or longer, before the next step
TIP: If you use a spray can clear be sure that it is compatible with the black paint you used. Not all spray can clears will work with spray can paint and will bubble, cause horrible fish eye, or orange peel. Don't have time to teach a chemistry class, just do your research or you'll be sanding and starting from scratch again.
Same as the black paint, use multiple thin coats and allow clear to flash in between coats. Or if you're using the foam brush technique just do one heavy coat (but not so heavy it runs) and call it a day. Allow clear to dry over night.
TIP: Do not mix 2 part clear in a plastic solo cup. It will eat through and go everywhere. Ask me how I know...
Last edited by Jc803; 11-04-2015 at 03:51 AM.
 05-12-2015, 11:06 PM
#2
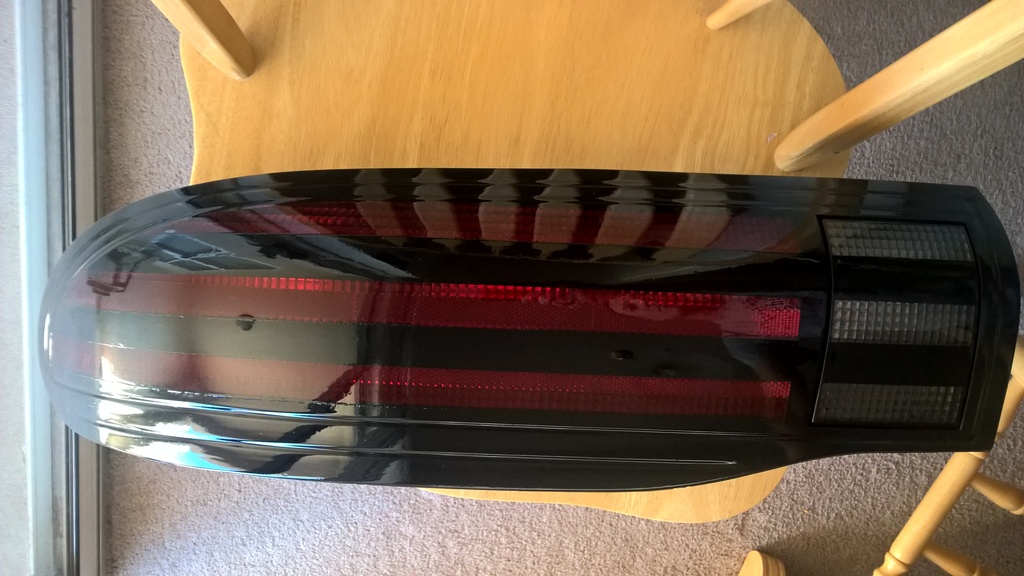
This is what yours should look like now. Notice how you can see where the black paint is raised under the clear coat. Now remember when I said dont sand the edges of the black paint because its raised? (at least until after the clear coat) Two reasons for that. For one you don't want to take away any black paint because I cant stress how easily the light will shine through. Also because you can sand down the clear coat for the same final effect. Do this by wet sanding the raised edges with 2000 grit sandpaper. Do it with little pressure, you will get scratches in the clear but its ok. If you didn't apply too much pressure you will get them all out later when you buff and wax.
TIP: After wet sanding the raised parts you'll want to buff and wax the lens to get that nice shine, but BE PATIENT. If you used automotive clear like I did you need to wait a week or two for it to completely dry. After a day it will look dry, and it will feel dry, but its not I promise. Same thing goes for when you get a car painted and they tell you not to buff or wax for a few weeks. If you buff and wax now it will look a little better but not as good as it would if you wait for it to completely dry.
Now on to the third brake light. Again up to you, but I'll show you what I did for some ideas. This will be done the same exact way as the tail lights using the wash, sand, tape, paint, clear process. I used the same 1" tape on the bottom. Just one strip placed where I thought it would look best. I used the bends in it as a guide to cut the tape evenly. Again, look through the holes to make sure the paint is thick enough.
For the top I placed tape in the center and used the bends as a guide again to get a black boarder. You'll notice I sprayed the clear too thick but its ok, it will buff out.
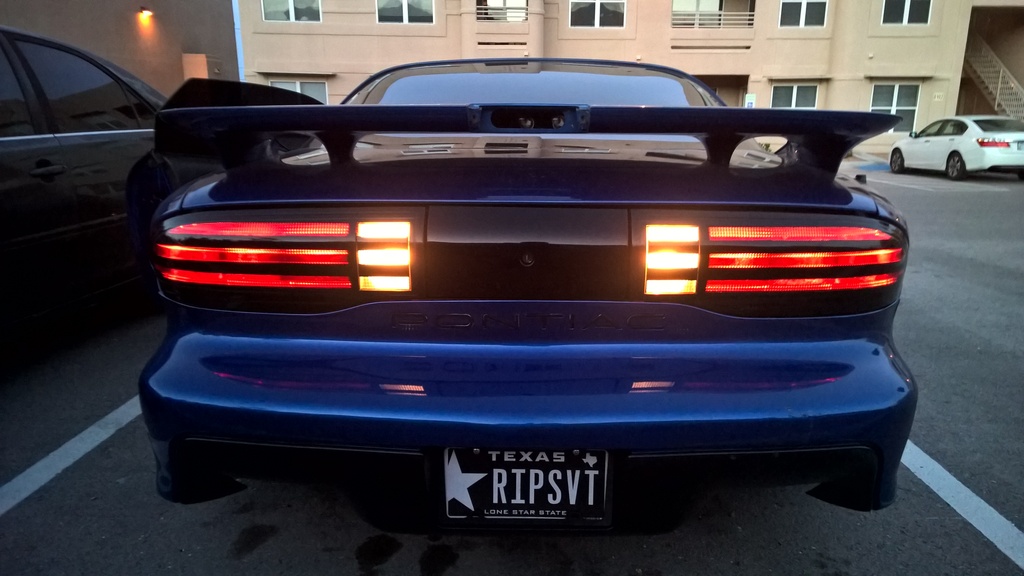
And here are some pics of the finished product
Running lights on
Brake lights on

Side view before 3rd brake light was put in
Reverse lights before 3rd brake light put in
FYI I am using normal bulbs for the brake lights, 3rd brake light, and reverse lights. If you want brighter light or a whiter reverse light you can use LED bulbs. I'll eventually get some but I've been lazy.
If you have any questions about anything feel free to ask and I'll answer the best I can. Also I'll get more pics and update later, just check future comments
TIP: After wet sanding the raised parts you'll want to buff and wax the lens to get that nice shine, but BE PATIENT. If you used automotive clear like I did you need to wait a week or two for it to completely dry. After a day it will look dry, and it will feel dry, but its not I promise. Same thing goes for when you get a car painted and they tell you not to buff or wax for a few weeks. If you buff and wax now it will look a little better but not as good as it would if you wait for it to completely dry.

Now on to the third brake light. Again up to you, but I'll show you what I did for some ideas. This will be done the same exact way as the tail lights using the wash, sand, tape, paint, clear process. I used the same 1" tape on the bottom. Just one strip placed where I thought it would look best. I used the bends in it as a guide to cut the tape evenly. Again, look through the holes to make sure the paint is thick enough.

For the top I placed tape in the center and used the bends as a guide again to get a black boarder. You'll notice I sprayed the clear too thick but its ok, it will buff out.

And here are some pics of the finished product
Running lights on

Brake lights on

Side view before 3rd brake light was put in

Reverse lights before 3rd brake light put in

FYI I am using normal bulbs for the brake lights, 3rd brake light, and reverse lights. If you want brighter light or a whiter reverse light you can use LED bulbs. I'll eventually get some but I've been lazy.
If you have any questions about anything feel free to ask and I'll answer the best I can. Also I'll get more pics and update later, just check future comments
Last edited by Jc803; 05-13-2015 at 04:50 PM.


 !
05-13-2015, 12:44 AM
!
05-13-2015, 12:44 AM
#5
@6Litereater Thanks but I honestly have to say MAKE THE DAMN LENSES WITH THE SQUARE REVERSE LIGHT!!! Lol. I love your guys work and I'm a repeat customer of yours. Thats why I was happy to give you guys a shout out at the beginning of the write up.
When I saw the "retro" lenses you make I knew I had to have them but the only thing that stopped me from buying them was the round reverse light. So thanks to you guys I'm missing half my hair after I pulled it out wanting them so bad until after two weeks of thinking about it I had to make my own.
But seriously... I love you guys. But I hate how you keep making stuff that I just have to buy.
Love/hate relationships are the best...
05-13-2015, 01:10 AM
#6
We have nothing but HATE for these stupid lenses lol! We probably have a solid two months (talking 24 hours times 30 x's 2 lol) into these things... we hate them lol. They look great when done but we hardly get to see pics on cars so... we hate them lol. Heck, you see what goes into just painting a few lines, imagine making the lens from scratch, applying vinyl THEN doing the painting you did lol.
05-13-2015, 01:26 AM
#7
Yea I hear that. It is a bunch of work.
But thanks for the compliments. Coming from my favorite aftermarket cosmetics company that means a lot. Totally made my year.
Now shut up and take my money! Jk. But seriously you'll be hearing from me again soon to buy even more stuff from you guys. Keep up the good work
But thanks for the compliments. Coming from my favorite aftermarket cosmetics company that means a lot. Totally made my year.
Now shut up and take my money! Jk. But seriously you'll be hearing from me again soon to buy even more stuff from you guys. Keep up the good work
Trending Topics
05-13-2015, 03:32 PM
#9
Great job man. Glad to see someone finally go through with it in depth and come out the way I envisioned it. I did the original photoshop of it years ago (black car from behind with florida tag) and fully intended on doing a set myself but just never found a good set of tails to start with, then got distracted with other things. Yours came out great, I love how they look


The following users liked this post:
Chlly Chill (07-06-2022)