What did you do to your V today?
#961
Re-installed diff into cradle, put axles back in, filled diff and re-fastened all rear components on cradle.
And just FYI since I had a bugger of a time finding most of this info (use at your own risk):
Rear sub-frame / rear cradle torque specs --
All three diff bolts - 129 ft lbs
Knuckle to lower control arm - 129 ft lbs
Trailing arm to knuckle - 129 ft lbs
Tie rod to knuckle - 95 ft lbs
Shock to knuckle - 111 ft lbs
Rear caliper to knuckle bolts - 88 ft lbs (front are 92 ft lbs)
Upper control arm ball joint to knuckle - 15 ft lbs +270*
Cradle/sub-frame front bolts (24mm) - 195 ft lbs
Cradle/sub-frame rear bolts (18mm) - 141 ft lbs
Last edited by crazy tarzan; 11-23-2016 at 09:40 AM.
#964
#966
Did an LS7 clutch swap (horrible nasty black tar all over in bell housing, dual mass fly wheel was shot) and replaced rear main seal that was leaking - and yes, getting the bell housing off was a pain in the rear!! Seriously it takes 1/10 the effort to put it back on after the flywheel swap.
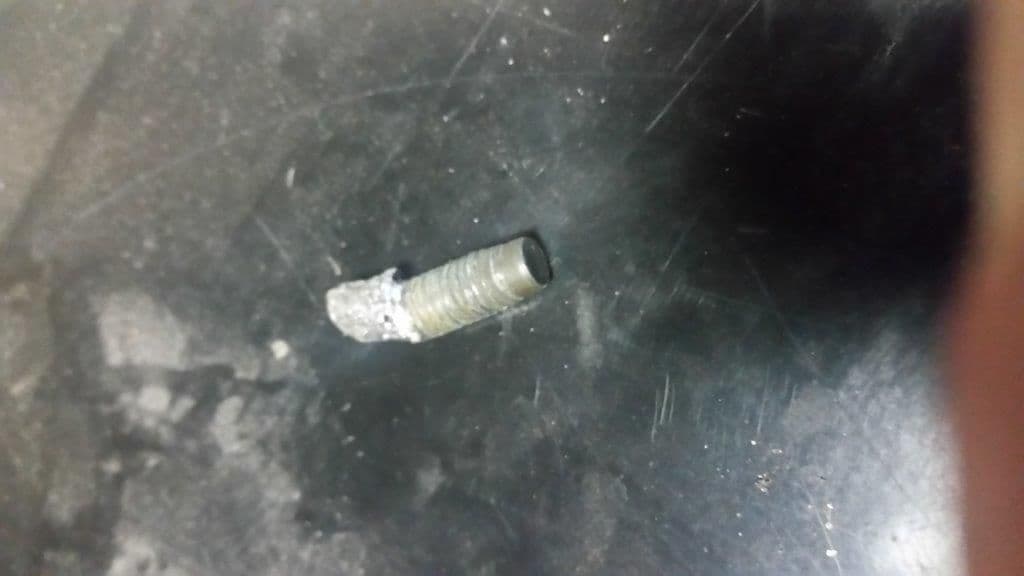
Replaced front drivers wheel hub, and am still fighting with the dang bolts that sheared off on the cats to exhaust connect (one per side)--I've told my wife that maybe I should just drive it without the cat back, because race car.
Replaced front drivers wheel hub, and am still fighting with the dang bolts that sheared off on the cats to exhaust connect (one per side)--I've told my wife that maybe I should just drive it without the cat back, because race car.
#967
TECH Junkie
iTrader: (3)
I'm planning to lower my subframe for a 2nd time after the cradle bushing install to put on some new upper control arms and toe rods soon. Can you tell me a little more about this breakage? I'd hate to run into that on a weekend project when I need my car for daily duties.
Did you put any 3M film over the plexi? I hear it chips/pits and scratches pretty easily. Looks great though!
Time for long tubes 
Did you put any 3M film over the plexi? I hear it chips/pits and scratches pretty easily. Looks great though!

#968
TECH Fanatic
iTrader: (5)
Originally Posted by BudRacing
I'm planning to lower my subframe for a 2nd time after the cradle bushing install to put on some new upper control arms and toe rods soon. Can you tell me a little more about this breakage? I'd hate to run into that on a weekend project when I need my car for daily duties.Did you put any 3M film over the plexi? I hear it chips/pits and scratches pretty easily. Looks great though!Time for long tubes 

I'm not the first to have one missing so human error is my guess. It was the front subframe.
#969
TECH Enthusiast
iTrader: (10)
Join Date: Dec 2011
Location: Grand Haven, MI
Posts: 622
Likes: 0
Received 0 Likes
on
0 Posts
I'm planning to lower my subframe for a 2nd time after the cradle bushing install to put on some new upper control arms and toe rods soon. Can you tell me a little more about this breakage? I'd hate to run into that on a weekend project when I need my car for daily duties.
Did you put any 3M film over the plexi? I hear it chips/pits and scratches pretty easily. Looks great though!
Time for long tubes
Did you put any 3M film over the plexi? I hear it chips/pits and scratches pretty easily. Looks great though!
Time for long tubes

#971
TECH Apprentice
Nice idea, when doin my motor mounts i had to take off the passenger side cat and sheered one off, luckily i had acces to a torch at the time and torched it out
#972
Finished putting exhaust back on (after fixing two sheared bolts on the cats).
Bled brakes on all 4 corners.
Bled clutch (get a power bleeder!!! seriously, took 20 min including hook up and clean up and it didn't require my sweetie out in the garage at 10 pm!) which now feels like a normal clutch again (it was bad pretty much since I got the car).
Finished buttoning up everything and took it for a test drive. Which was successful since I made it home again.
#973
TECH Apprentice
How was the brake bleed? I need to do mine since its old fluid and i also just added new pads and rotors recently, but I have never bled a car with 8 bleeders before
#974
Simple with the power bleeder and a catch can. I do inside then outside of each wheel (not sure if right order). You'll need to remove each wheel to get to the inside bleeder without being a contortionist.
The order of which corner is listed somewhere on here - I believe it's rear driver, rear passenger, front passenger, front driver.
The order of which corner is listed somewhere on here - I believe it's rear driver, rear passenger, front passenger, front driver.
#975
TECH Junkie
iTrader: (3)
Simple with the power bleeder and a catch can. I do inside then outside of each wheel (not sure if right order). You'll need to remove each wheel to get to the inside bleeder without being a contortionist.
The order of which corner is listed somewhere on here - I believe it's rear driver, rear passenger, front passenger, front driver.
The order of which corner is listed somewhere on here - I believe it's rear driver, rear passenger, front passenger, front driver.
#976
Except on the V the hard lines for brakes run on passenger side--the driver's side actually has an extra 4 ft + of hard line across the sub-frame from the disconnect vs the soft line direct like the passenger rear.
#977
TECH Addict
iTrader: (19)
Join Date: Aug 2007
Location: Where the Navy tells me to go
Posts: 2,398
Received 106 Likes
on
88 Posts

Per the FSM, RR – LF – LR – RF (inboard then outboard). With that said, I don't think doing it the "traditional" way causes any problems, it just might not be quite as efficient.
#979
Technically speaking, you can bleed both rear calipers together and then both front calipers together, if you have two bleeder bottles. Many manufacturers recommend this technique as a time saving measure. There's no downside other than having to keep a closer eye on your reservoir fluid level. If it ever runs dry, you'll need to bleed the master using a bench bleed kit, and you may need to bleed the EBCM (ABS module) as well using a GM Tech 2.
The method identified by AAIIIC is required for the automated bleed process because that's how it was programmed by Vetronix. The script activates the EBCM pump motor and cycles the RR solenoid while instructing you to pump the pedal. Once it stops, the process repeats on the LF caliper, finishing the bleeding process for Circuit #1. Then you do LR and RF to bleed Circuit #2.
Whether it's better to do the inside or the outside of each caliper is debated, but I agree with Stoptech, Brembo, Volkswagon, and several other vendors in that the outer bleeder valve should be cracked first. That prevents mixing of old and new fluid in the system. It's the same reason behind bleeding the each circuit's rear caliper first, before the front caliper.
Last edited by FuzzyLog1c; 11-29-2016 at 07:51 PM.
#980
TECH Apprentice
Thanks. Also had another question maybe someone could help me out with I got the creative steal package with the stage 2 mounts and tranny mount and rear diff bushing and shifter bushing, I installed the motor and tranny mounts what a bitch, but anyways sometimes when im gettin on it real hard it kind of sounds like something is rattling like maybe the aluminum heat shields on the motor mounts but I know they're on the right way and they're tight Has anyone else had this problem? maybe I thought it was my motor pinging but it stock and I run 93 octane so I figured it's not engine ping it has to be the heat sheilds? and also the shifter bushings should I put them in my stock shifter or wait and use them when I get a Hurst? there the rubber ones with the bronze copper things whatever those are


