


Line Lock Question
Guys I installed a line lock on my car today and I would have to say, I cant believe I waited this long to get one. Defiantly on the top rated mod scale for me. What would happen if you were driving and you flicked the switch while, lets say, you were going down the highway?
Flipping the switch doesn't lock the brakes until you press the brake pedal. Press the brake pedal even by a hair and you will be stopping. Don't ask how i know, but it's not because I know how a LL functions. lol

Launching!
Joined: Oct 2009
Posts: 207
Likes: 0
I mention that to many of our customers who consider using a line lock.
Regarding your question, you obviously do not have our SJM line lock kits as you wouldn't be asking that question. http://sjmmanufacturing.com/cam_brk_ls1.html.
We use a two stage configuration with the electrical portion of our kit. Your setup is not safe nor meet track regulations.
Regarding your question, you obviously do not have our SJM line lock kits as you wouldn't be asking that question. http://sjmmanufacturing.com/cam_brk_ls1.html.
We use a two stage configuration with the electrical portion of our kit. Your setup is not safe nor meet track regulations.
The easy answer is to put the switch where it's not accidentally going to be hit - I have mine mounted next to the TCS button. Been there for 8 years, never had an accidental activation. Plus it reminds me to turn off the TCS before doing a burnout. Alternatively if you're only using it for the track, and since you should install a fuse on the power side, pop out the fuse when you won't be needing the line lock.
Launching!
Joined: Oct 2009
Posts: 207
Likes: 0
I failed to respond to the initial question...if the switch was turned on without you knowing...what would happen is the next time you tap the brakes...the front calipers will RETAIN the pressure applied which means you're driving with your brakes on...you'll prematurely wear your pads, possibly overheat the rotors or worst case crash.
Most likely what will occur is when you tap the brakes, you'll continue to slow down and probably apply more gas or IF you attempt to apply the brakes more...you'll lock the caliper in a new position and worst case scenario lose control or have someone behind you hit you as you may be stopping abruptly for no reason.
NHRATA01, placing the switch in an area that is difficult to access is not the best solution. That doesn't prevent say someone from playing while you�re driving and hitting the switch accidently or intentionally wondering what it does. People do the strangest things.
IF when switched, you do not have visual feedback (LED indicator), you have no idea if the circuit is turned on!
Our SJM line lock kits use a two stage circuit, we have a remote mount LED indicator to visually show when you�re circuit is live...this is what we feel is the best solution to a safe and reliable configuration. The first stage controls the circuit and controls the second stage. The second stage controls the line lock.
Here�s a video which one of our customers created http://sjmmanufacturing.com/forum/vi....php?f=10&t=19 . We�ve got a few different videos which you can view if interested.
My advice is to obviously consider our kits first which is designed well and priced competitively. If you prefer another kit...get yourself new switches and redesign the electrical configuration.
Instead of using a regular toggle switch like the one supplied with my SLP LL kit, I opted to get a TCI transbrake button and switch, the one on the sprial cord, that way the line lock can only be engaged while your holding your finger on the button. Once you let go of the button it disengages the line lock, I believe that type of switch is called a momentary switch.
Trending Topics
Here's another idea for wiring a line lock:
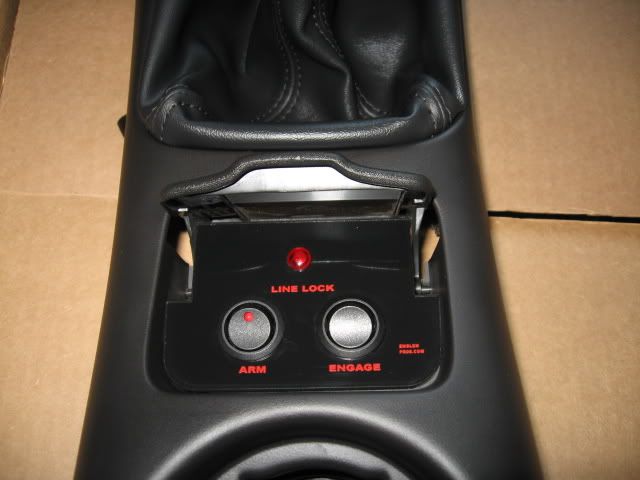
The switch on the left is a simple rocker switch - when it is on, it allows power to pass to the momentary rocker switch on the right (and also lights the small LED on the switch itself). Press the momentary switch, and the line lock engages. I know it is engaged because once the momentary switch is pressed, you hear the click of the solenoid and the LED in the middle of the switch panel lights up. Let off the momentary switch, and the LED goes off, the line lock disengages, and you roll out of the burnout. If the switch on the left isn't in the ON position, the momentary switch does nothing.
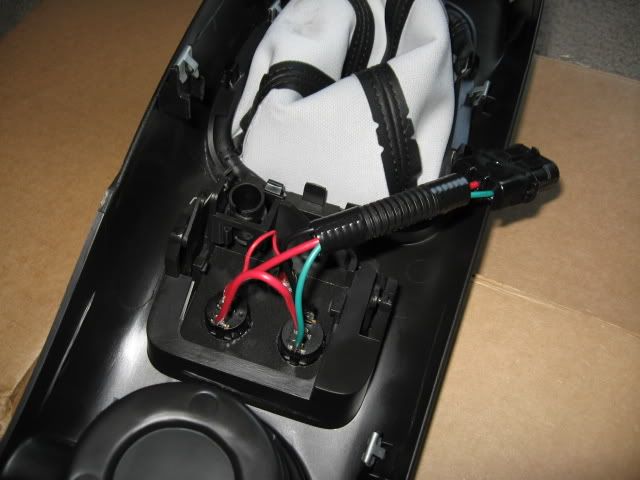
I also made sure that there was a quick way to disconnect everything for those times when I need to pull the center console, so everything runs through this weatherpack connector on the back:
As for wiring in the LED, since I only wanted mine to light when the solenoid was active, I wired the positive lead of the LED to the 12V hot that runs from the momentary switch back to the line lock.
LED wiring is pretty simple - there's a positive and a negative. A ground is a ground is a ground, so the only thing that changes its operation is where you wire in the positive. If you want it to activate when something is powered on, figure out where that something is getting it's positive 12V input from and tap into it. It is just that simple.
The switch on the left is a simple rocker switch - when it is on, it allows power to pass to the momentary rocker switch on the right (and also lights the small LED on the switch itself). Press the momentary switch, and the line lock engages. I know it is engaged because once the momentary switch is pressed, you hear the click of the solenoid and the LED in the middle of the switch panel lights up. Let off the momentary switch, and the LED goes off, the line lock disengages, and you roll out of the burnout. If the switch on the left isn't in the ON position, the momentary switch does nothing.
I also made sure that there was a quick way to disconnect everything for those times when I need to pull the center console, so everything runs through this weatherpack connector on the back:
As for wiring in the LED, since I only wanted mine to light when the solenoid was active, I wired the positive lead of the LED to the 12V hot that runs from the momentary switch back to the line lock.
LED wiring is pretty simple - there's a positive and a negative. A ground is a ground is a ground, so the only thing that changes its operation is where you wire in the positive. If you want it to activate when something is powered on, figure out where that something is getting it's positive 12V input from and tap into it. It is just that simple.
LS1 Tech Stories
The Best V8 Stories One Small Block at Time

Topdon ONE vs. Artidiag 800 BT2: Which is the Diagnostic Tablet For You?
Pouria Savadkouei
Gas Monkey Built a 6-Wheel Ferrari Testarossa With a Corvette LT4 Engine
Verdad Gallardo
7 Most Reliable High-Performance Engines GM Has Ever Built
Verdad Gallardo
Amazing '71 Camaro Restomod Is Modern Muscle Car Under the Skin
Verdad Gallardo
6 Common C5 Corvette Failures and What's Involved In Repairing Them
Pouria Savadkouei
Retro Modern Bandit Pontiac Trans AM Comes With Burt Reynolds' Autograph
Verdad Gallardo
Top 10 Greatest Cadillac V Series Performance Models Ever, Ranked
Pouria Savadkouei
Top 10 Most Powerful Chevy Trucks Ever Made!

