When you click on links to various merchants on this site and make a purchase, this can result in this site earning a commission. Affiliate programs and affiliations include, but are not limited to, the eBay Partner Network.
I'm having trouble getting my parking brake to hold. I've tried following the service manual procedure to adjust the free play, but I still can't get the brakes to hold on anything more than a small hill.
When pulling the brake handle, I can get one of the actuator levers to stop moving about halfway through its travel, but the other actuator moves all the way until it reaches the end end of its slot. I'm assuming this limits the amount of force its applying.
Is the goal to have the adjuster in so as to keep the pads parallel to the rotor, or should the adjuster be further out so that the pad angles when the parking brake is applied? Also, is the piston supposed to move in and out of the 'plate' to take up slack, or is the piston attached to the plate and they move together as one all the time?
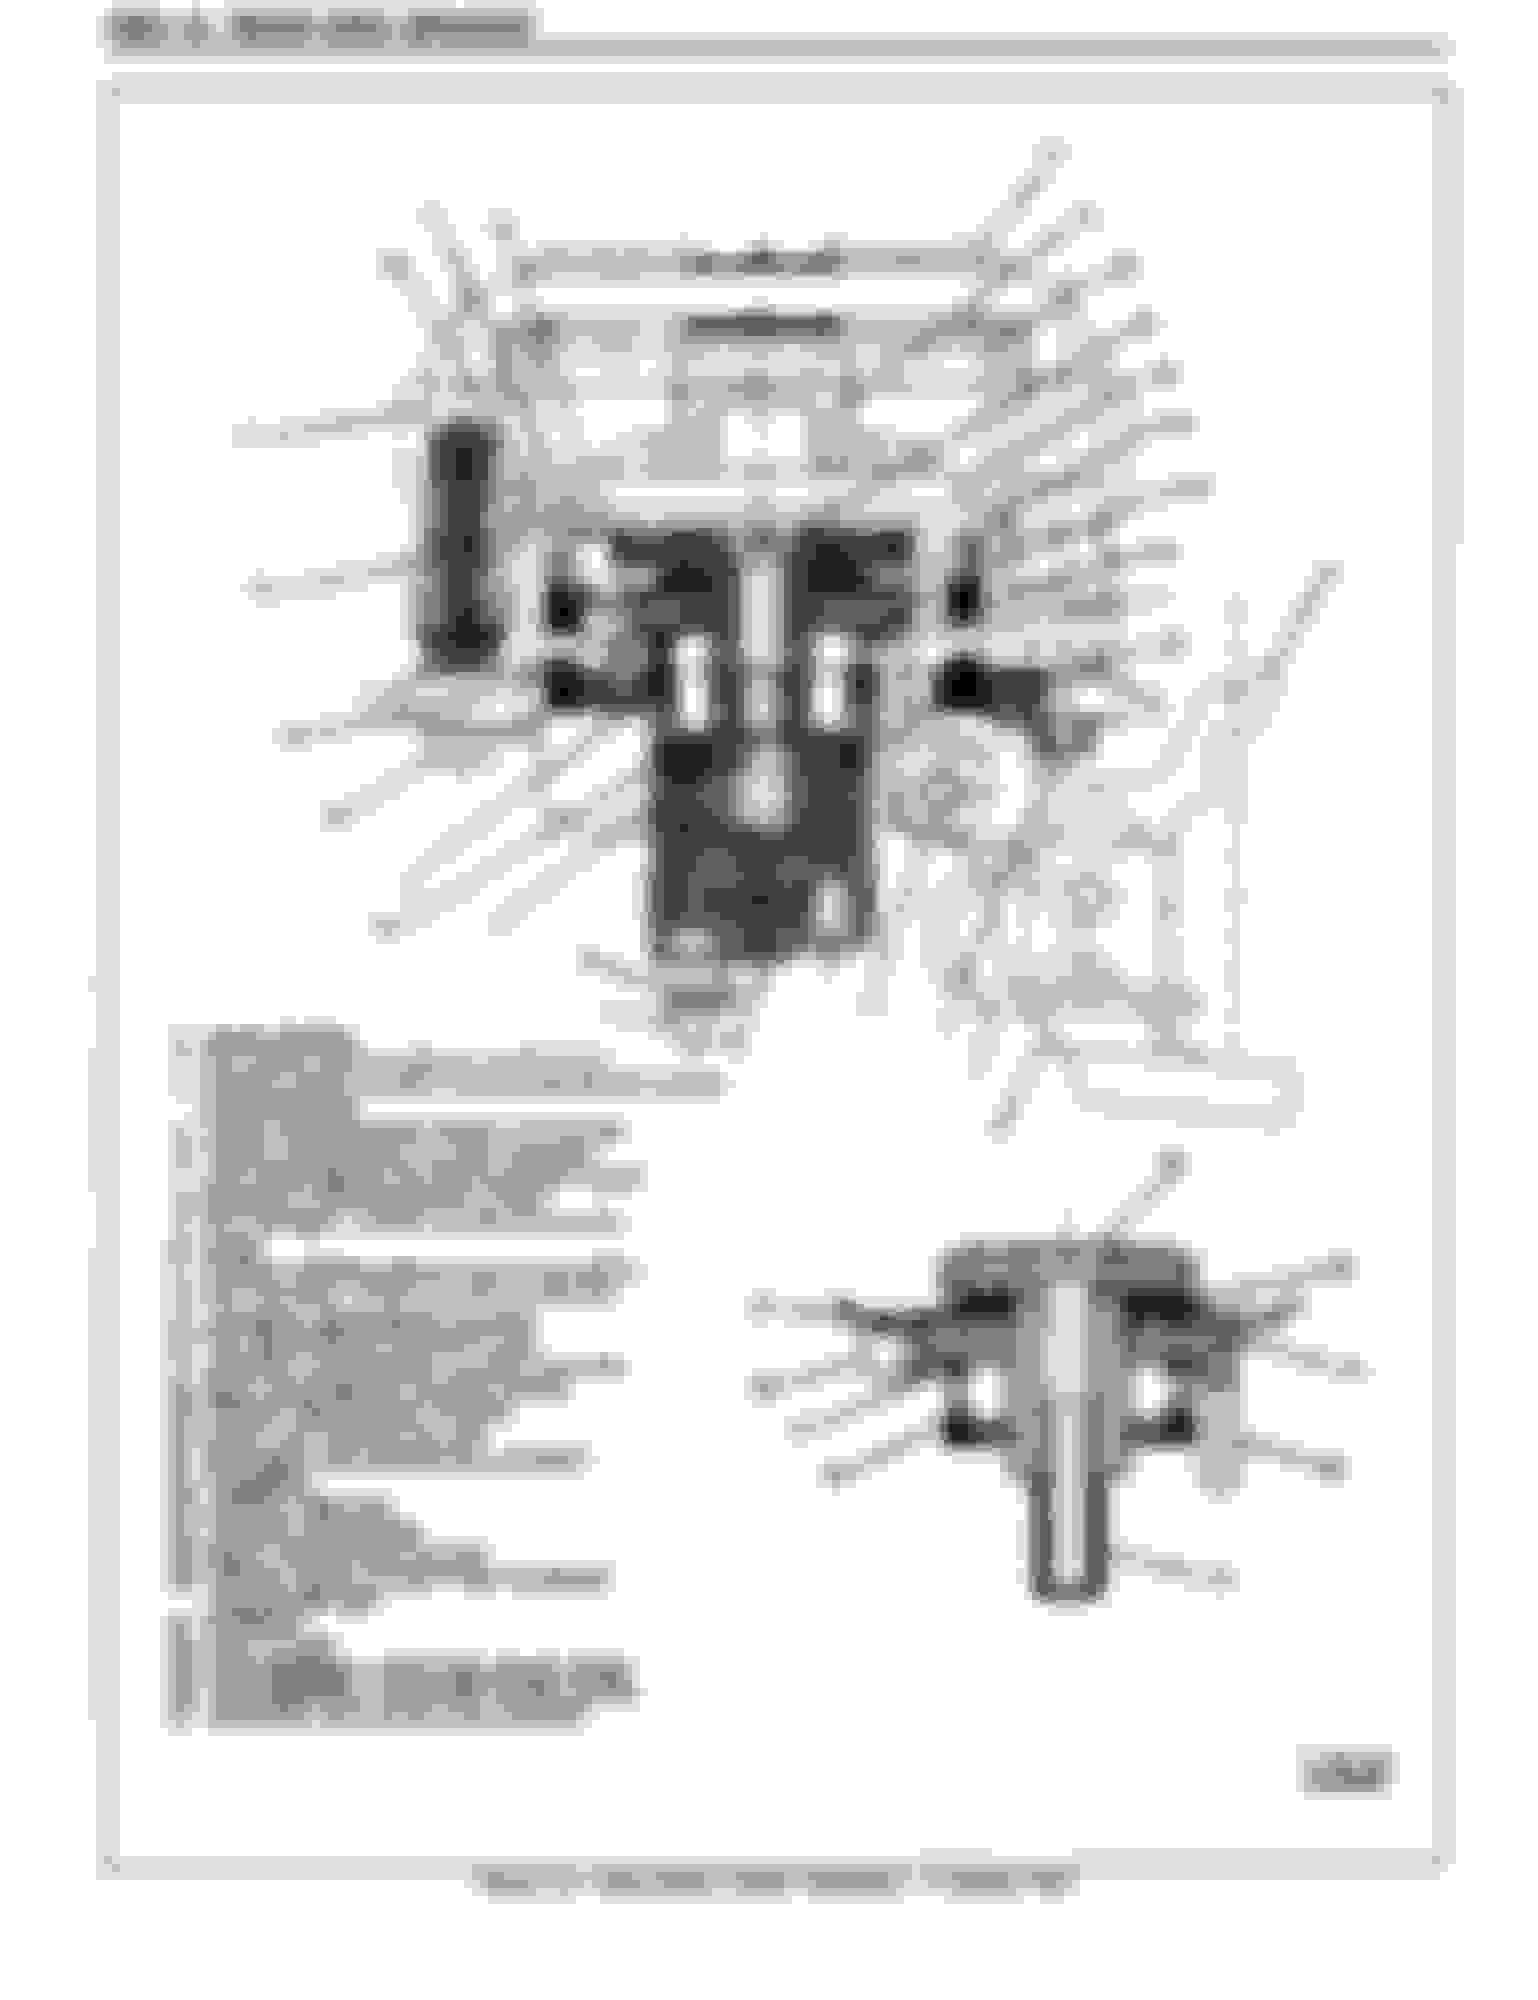
I think I've made some progress. I still had my old rear calipers (which are likely original) so I experimented with them using a piece of wood to simulate the rotor. With the allen screw (#11) fully in I could move the actuator lever (#5) all the way (bottomed out) and still remove the wood. With the allen screw fully out I could move the lever less than 1mm and the wood was clamped tightly. So this behaves as expected.
My new passenger side caliper, the lever was bottoming out when pulling the ebrake handle, even with the screw fully out. I removed the top caliper to bracket bolt and swung the caliper down. I then noticed that the rod clamp (#28) was actually loose and had about 1/8" of threads exposed. This meant that when the lever was moving the collar, the slack in the rod was preventing it from actually putting any force on the brake pad. After tightening it up I thought it was better. However, the ebrake handle still came all the way up and it still wouldn't hold on a hill.
I compared the old and new calipers again and noticed some gouge marks on the new rod clamp cylinder where there were none on the old one. It looked like they were from where the rod clamp contacts the cylinder. I also noticed that the old rod clamp seemed to fit more snugly in the collar compared to the new rod clamp in the new caliper. I put the new rod clamp in the old caliper and it still felt loose. I put the old rod clamp in the new caliper and it felt tighter. The old rod clamp was actually difficult to put into the old caliper. Using the old rod clamp in the new caliper I was able to get the free play to about 1mm and the ebrake handle would only pull up 4-5 clicks.
I checked the driver side and found that while the lever was only moving about halfway, the collar didn't seem to retract on its own and sit against the preload springs (#23), pushrod (#22) or screw (#11). The rod clamp seemed to be stuck in the collar and I thought maybe it was jammed from being at too much of an angle. When I got it out I noticed that it had a gouge and light rust where the rod clamp contacts the collar. I installed the old rod clamp into the new caliper and was able to get the free play down to around 1mm. It looked like the collar was gripping the rod clamp and pushing it, but because it the two were seized together the collar was being pulled away from its proper position and so the lever had to move halfway before it pushed the pushrod (#22) far enough that it contacted the collar.
Now both levers only move about halfway and my ebrake handle comes up 4-5 clicks and is firm. I'll test it out tomorrow and hopefully it can actually hold on a hill.
The problem seems to be that the actuating collar wasn't able to firmly grip the rod clamp so it was slipping rather than grabbing. I think this happens because the rod clamp is fractionally smaller than the original and is possibly a softer metal, as it had gouges while the originals had none.
I'm happy to report that my parking brake is working well! At first I thought it wasn't any better but I realized that it just needs some muscle to pull it after it first stops at 4 clicks. Now it holds easily on my driveway and only moves while applying throttle to force move it.
I am having a similar issue with the brake lever having to be almost straight up to begin to engage. I hope to follow your example and fixed this issue.
I think I've made some progress. I still had my old rear calipers (which are likely original) so I experimented with them using a piece of wood to simulate the rotor. With the allen screw (#11) fully in I could move the actuator lever (#5) all the way (bottomed out) and still remove the wood. With the allen screw fully out I could move the lever less than 1mm and the wood was clamped tightly. So this behaves as expected.
My new passenger side caliper, the lever was bottoming out when pulling the ebrake handle, even with the screw fully out. I removed the top caliper to bracket bolt and swung the caliper down. I then noticed that the rod clamp (#28) was actually loose and had about 1/8" of threads exposed. This meant that when the lever was moving the collar, the slack in the rod was preventing it from actually putting any force on the brake pad. After tightening it up I thought it was better. However, the ebrake handle still came all the way up and it still wouldn't hold on a hill.
I compared the old and new calipers again and noticed some gouge marks on the new rod clamp cylinder where there were none on the old one. It looked like they were from where the rod clamp contacts the cylinder. I also noticed that the old rod clamp seemed to fit more snugly in the collar compared to the new rod clamp in the new caliper. I put the new rod clamp in the old caliper and it still felt loose. I put the old rod clamp in the new caliper and it felt tighter. The old rod clamp was actually difficult to put into the old caliper. Using the old rod clamp in the new caliper I was able to get the free play to about 1mm and the ebrake handle would only pull up 4-5 clicks.
I checked the driver side and found that while the lever was only moving about halfway, the collar didn't seem to retract on its own and sit against the preload springs (#23), pushrod (#22) or screw (#11). The rod clamp seemed to be stuck in the collar and I thought maybe it was jammed from being at too much of an angle. When I got it out I noticed that it had a gouge and light rust where the rod clamp contacts the collar. I installed the old rod clamp into the new caliper and was able to get the free play down to around 1mm. It looked like the collar was gripping the rod clamp and pushing it, but because it the two were seized together the collar was being pulled away from its proper position and so the lever had to move halfway before it pushed the pushrod (#22) far enough that it contacted the collar.
Now both levers only move about halfway and my ebrake handle comes up 4-5 clicks and is firm. I'll test it out tomorrow and hopefully it can actually hold on a hill.
The problem seems to be that the actuating collar wasn't able to firmly grip the rod clamp so it was slipping rather than grabbing. I think this happens because the rod clamp is fractionally smaller than the original and is possibly a softer metal, as it had gouges while the originals had none.
I have this same issue. Parking brake level has to go all the way up to get it to hold on a hill (just barley).
Where do get replacement rod clamps from if you no longer have the orginal calipers?
I had my right caliper changed in 2017, helped a little, then got the left changed last year 2023 and had all 3 cables changed along with the parking brake lever and still have the same issue. The shop that changed it said it was the lever causing the issue and they welded some peice to it stating that fixed the issue. While it did hold tighter and went up only half way to lock, it caused too much tension and broke the front parking brake cable.
It doesn't look like the rod clamp parts are available anymore. I bought the powerstop calipers and they had the slipping problem, but I don't know they all are bad or if it's just hit-or-miss.
I also don't know if they are using new parts or just cleaning up the old, so it could be that the cleaning process affects the tolerances.
Thanks for the info. Read that thread and it seems to be an issue with the caliper components or cleaning process as you stated.
I'm not sure what brand my passenger side was replaced with but the driver side was replaced using a new caliper by A-Premium (part# APBC0872). Unfortunately I was not given the old parts, sucks cause it may have helped solving this issue. I did not replace the brake pads and or rotors.
When I get more time I will give a try on the fix stated in the thread you provided.

 11-22-2020, 02:08 PM