When you click on links to various merchants on this site and make a purchase, this can result in this site earning a commission. Affiliate programs and affiliations include, but are not limited to, the eBay Partner Network.
I've cleaned up the last few posts, I will ask everyone to please respect the message posted above by wssix99. Complaining about prior posts is not productive at this point, let's move forward with the tech topic at hand so that we may keep the thread open. Otherwise, it will simply be locked or members who cannot move forward might be given some time away from the site.
Ended up going with Weld Racing 18x10's up front and 18x11 in the back. What should be checked?
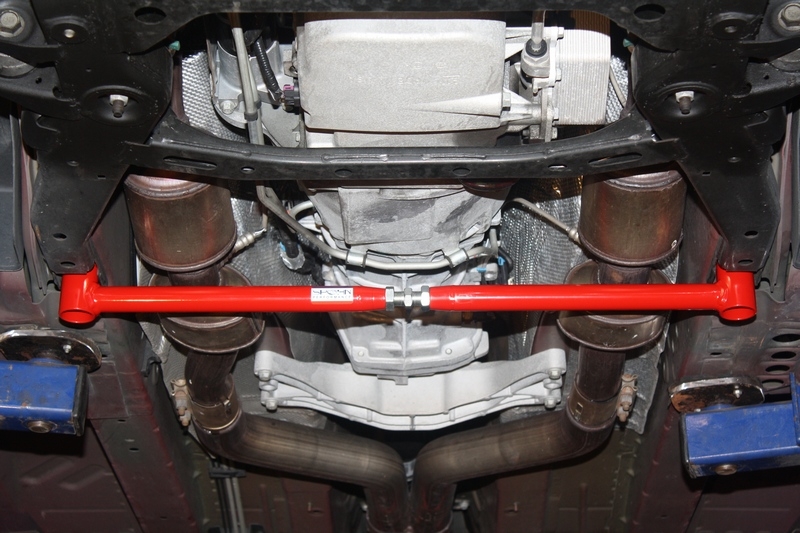
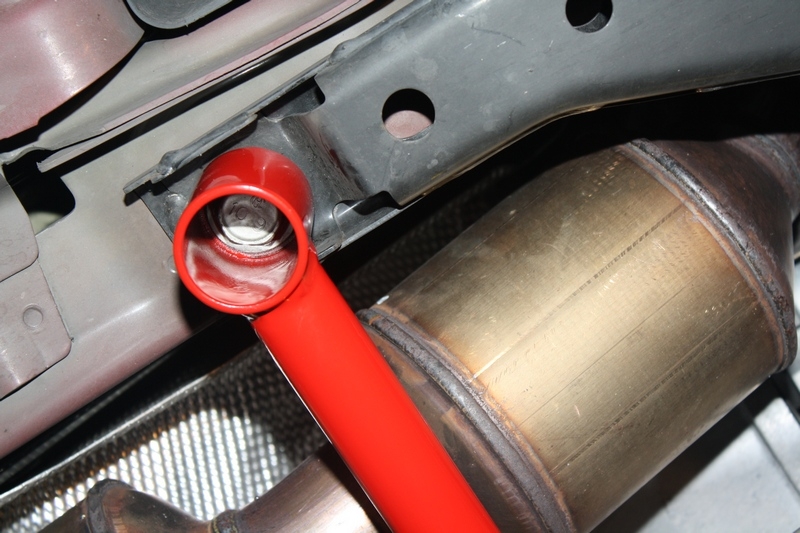
An 18X10 in front will thank you if you fabricate a K-frame brace like this one on my 2014 Z/28. It attaches easily bolting in, to both sides of the front sub frame making it far more resistant to flexing, exactly the same attachment for a 3rd and 4th generation F body.
Also, a solid 35 mm front sway bar, reinforced with the Strano attachment brackets. MUCH stronger than the OEM. Weirdly, the solid 35 mm front sway bars for all the Cadillac D body, all GM B body and G body, all the old A body and all the F body are slightly different shapes but a 35 mm solid does everything in handling and braking best. Thank Herb Adams when he was at Pontiac for proving this by having, in house, all those bars fabricated. Improved every GM car he installed them on. GM hated them.
Close up of K frame brace
Last edited by LSX Thunder; 06-17-2023 at 06:33 AM.
This is a 1 3/8" solid front sway bar made in Australia by Nolathane (that is the name of the Australian company, not only a bushing material). The same 1 3/8" (35 mm) diameter they have started making for 1st to 4th gen F body, the same solid 35 mm Suspension Techniques and Belltech made for the front of an F body's. This one on an Australian D body. They make a matching 35 mm solid rear bar that mounts to the axle like a F body rear. Notice the frame reinforcement that connects the OEM frame rails of the D body. That is necessary because the 35 mm solid will bend the frame rails like they were made of plastic without the added brace. That is how rigid that bar is.
Rear 1 1/4" solid, hopelessly deficient in roll stiffness. Bolted to the LCA's isn't ideal either. Ancient Hellwig no longer made. The new rear tubular hollow Hellwig 1 3/8" isn't stiff enough either, and the tubular Hotchkis 1 3/8" rear bar is even softer (it's too long and also bolted to the rear LCA's.) With the new solid 35 mm Nolathane F+R the car is neutral. GM mandated understeer because they got scared by Ralph Nader, so all too often the front bar was stiffer than the rear. This after they worked so hard to have very different spring rates F+R that made the handling neutral. Then they made it understeer with their sway bar choices.
You won't see an aluminum driveshaft on a Fleetwood Sedan very often.
Ever heard of guys using an F body front sway bar on the ancient Roadmaster or Caprice? Done a lot. How can an F body front sway bar fit (sort of) on a Cadillac Fleetwood? Pro-Touring F Body makes a front frame brace for the 3rd and 4th F body that on their site they write "fits 94-96 Impala SS". How?
Easy answer. They are almost the same front suspensions. Like the ancient A body and newer B body and newer G body and the Impala SS.
"Meet the new boss, same as the old boss".
Last edited by LSX Thunder; 06-18-2023 at 05:48 AM.
"Ended up going with Weld Racing 18x10's up front"
10" wide is not that different from OEM but does overload the front suspension some. An adjustable K frame brace allows you to pre-tension the front sub frame, making for less bump steer and more precise steering. A 3-point STB attached to the windshield surround helps to keep those wide tires from flexing the strut towers. You can't weld to the surround without cracking the windshield, hence a 3/4" bolt.
Used a one-inch-thick hub centric spacer similar to this
with OEM 17X9" and 275/40-17, and it did fit F+R. With the spacer it's close to the specs for your 18X10 and 275/35-18.
First though, a question, does anyone know what 1/2" studs exactly MWC uses for their rear axles? They are technically bolts and not studs, but what are they and where can they be found?
Now the issue, my MWC Fab 9 seems to be leaking oil out of both axles, it is all over the insides of both my rear rotors. The unit is less than a year old and hasn't even been to the track.
Why would this be happening and does it need to be shipped back to them to fix it?
The 1/2" studs are pressed into the axle from the backside of the axle but you mentioned they're bolted in so you should be able to contact them to get replacements and they may be the ones you find for the Moser axles. It sounds like the axle seals are leaking and may need to be replaced as well.
Last edited by 01CamaroSSTx; 07-28-2023 at 03:10 PM.
The 1/2" studs are pressed into the axle from the backside of the axle and you should be able to contact them to get replacements. It sounds like the axle seals are leaking and may need to be replaced as well.
My shop is saying that they are bolts and not studs, he is afraid of removing them and finding that there are threadings in the housing for them.
Here are some from Strange Engineering. Midwest Chassis orders a lot of parts from Strange and most likely the Strange A1026 0.5" x 3" long 1/2"x20 threads are the ones they used.
All your questions about part numbers and warranty work can be answered by MWC. Call them. A telephone is a wonderful thing.
If your mechanic can't identify a screw-in stud vs. pressed-in stud and is too scared to loose it, THEN TAKE YOUR STUFF AND RUN AWAY!!! Because things are only going to get more complex with bearing and seal replacement. MWC can tell you what you have. For reference, my Strange axles have screw-in studs for both M12 (stock) and 1/2" positions.
Screw-in studs are usually set in with red Loctite and torqued. If axle is loose on bench then an impact wrench makes easy work of removing the studs. If all you have is a hand wrench then slip the axle back in the housing to keep it from spinning and crack the studs loose (expect the Loctite to drag all the way out, won't turn free).
Getting things back together is more tricky if you don't have a way to restrain the axle on a bench. I had to tighten up the studs with axle in car. Had to use a claw foot attachment on the torque wrench to come in from the side. Wiki has the math for adjusting torque setting to account for the offset of the claw foot. Loctite has short working time (minutes) so I did one stud at a time (apply Loctite, screw in stud, torque).
Eh, this guy isn't a real mechanic. He's the body shop repairing all the cosmetic damage and putting my car back together. He was comfortable with replacing all the studs on the car while he had it and then putting the new wheels on until he found out that the studs in the rear where screw in studs. I told him to replace all my studs because the incorrect wheels and I wanted the new wheels to go on new studs, but I didn't realize the MWC studs were screw in at the time and he let me know that when he saw them. The unit is still in the car. I called MWC and they are going to send me the studs as well as the wheel bearing/seal assemblies. The mechanic was going to send them to a different shop to have them pressed.. I'm thinking of just collecting the parts and putting the new wheels on the old studs and use the old lugnuts until I can find someone able to service the rear axle.
So I've basically had my car's body completely disassembled and restored while it has been down from the damage.
Had all of the ground effects completely removed Removed all the bondo that was attached between the ground effects and the car and replaced with real fiberglass with the proper epoxy to prevent it from cracking, now it feels super sturdy.
Fixed several areas across the whole car where the body wasn't properly bonded to the frame
Removed the Hatch, repainted the hatch and hatch jam
Replaced Front Bumper and Front Ground Effect and fiberglassed.
Had the doors removed and jams repainted
replaced wiring boots for the doors
painted door hinges black
repainted the rest of the car.
Installed my new wheels and new front rotors
I should probably have started a new thread at this point but I wanted to show that I have decided to make lemons into lemonade with this ordeal:
Yes, it's a TVS2300 Supercharger Kit...
I also have a MWC 2 Point Sub Frame Connector, Tubular Turbo K-Member, and Tubular A-Arms on the way.
I am going to buy a tuned P59 PCM and tune for Flex Fuel as well.
I usually hate ground effects, but gawd, your car looks freakin' sweet like that!
It's gorgeous. I wish I had some before photos of this car, but those ground effects were being held together by double sided 3m tape when I bought it in 2014ish. Quite a story in this car in terms of how much has been invested from bringing from a beaten up junky F-Body to a beauty that will be making ~ 600 - 700 HP when I'm done..
had some fun with it today to get the emissions equipment warmed up. Bought a temporary permit to drive and it drove it to DFW ... I was doing 90 - 95 easy... but that was also the flow of traffic on a weekend morning in Texas... they dont play out here.
 06-17-2023, 02:04 AM