Koni SA Recommended Settings?

 04-18-2007, 06:27 PM
#23
Originally Posted by BlackHawk T/A
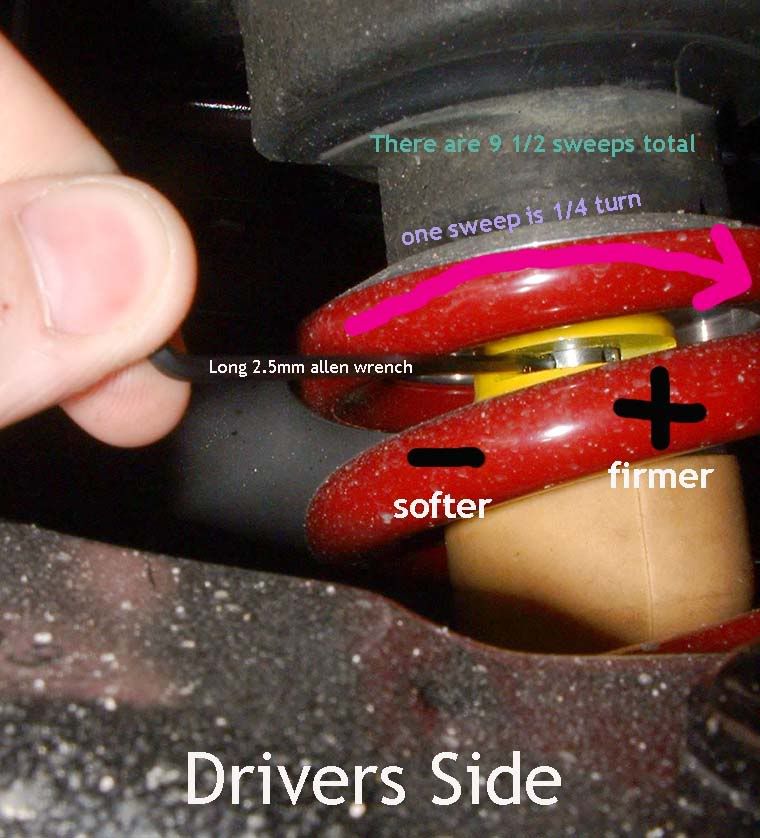
Jason...the pics help. I will assume from them you turn the allen wrench clockwise for firmer, since it wasn't stated?
If your looking down on the shock from above then clockwise is softer and counterclockwise is firmer.
On the drivers side, sweeping the wrench from front to rear of the car is firmer.
On the passenger side, sweeping the wrench from front to rear of the car is softer.
Hope that helps.
04-19-2007, 10:47 AM
#24

Originally Posted by ShevrolayZ28
PM sent

__________________
www.stranoparts.com --814-849-3450
Results matter. Talk is cheap. We are miles beyond the success anyone else has had with the 4th gens, and C5, C6, C7 Corvettes,
10 SCCA Solo National Championships, 2008 Driver of they Year, 2012 Driver of Eminence
13 SCCA Pro Solo Nationals Championships
2023 UMI King of the Mountain Champion
04-24-2007, 05:15 AM
#28
On The Tree
iTrader: (1)
Join Date: May 2005
Location: Calgary, Alberta
Posts: 104
Likes: 0
Received 0 Likes
on
0 Posts
Originally Posted by JasonWW
The front adjustment uses sweeps which is 1/4 of a turn.
2 turns on the rears is going to be very stiff. Start at full soft. Try 1/2 turns to get a feel for it and then 1/4 turns to get it just right.
2 turns on the rears is going to be very stiff. Start at full soft. Try 1/2 turns to get a feel for it and then 1/4 turns to get it just right.
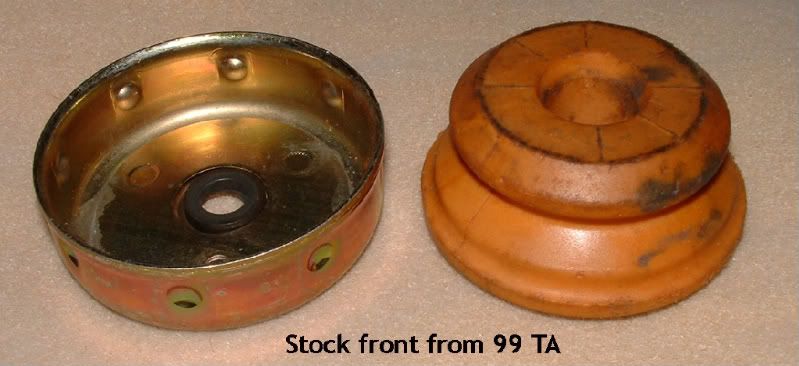
In this picture (attached) taken from a Koni install guide, I can only see the GM shock mount and the washer..... is something missing from the guide's photo?
Thanks,
UKCamaroSS
04-24-2007, 07:29 AM
#29
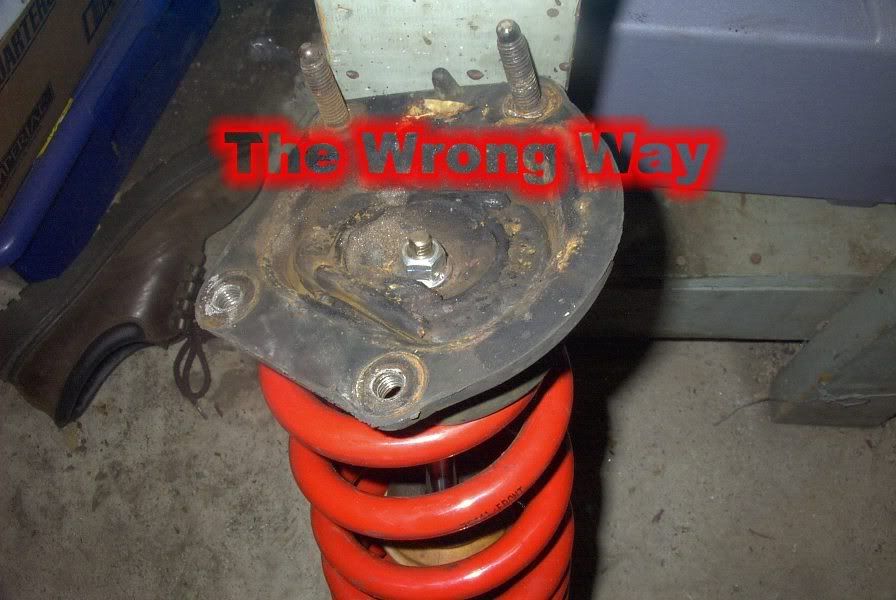
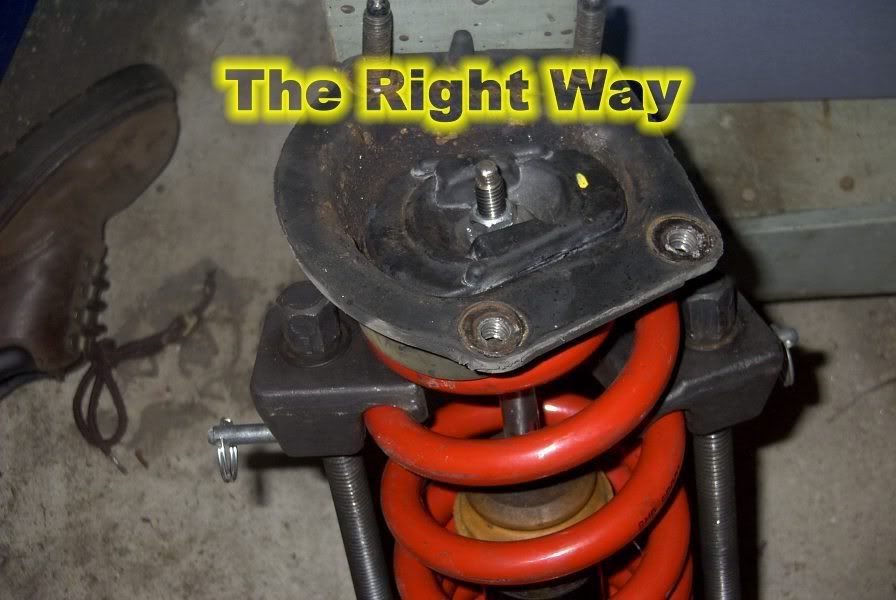
Let me try and explain. The red spring is a universal racing spring and is cut flat on both ends. On the top is the silver spring cup which is milled from aluminum and keeps the spring centered over the shock. Here is a better pic. This GC spring cup replaces the big flat metal stock piece.
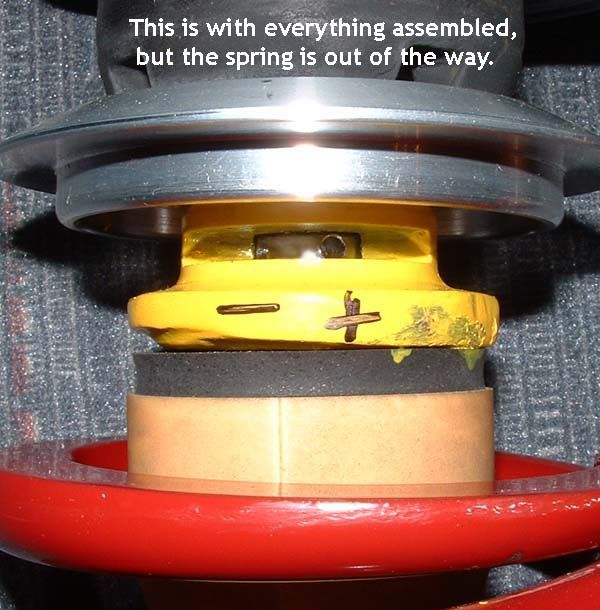
The stock shock has a big flat washer like piece built into the bumpstop holder. It's the gold colored piece.
When you use the Koni's with a regular spring it will come with big heavy duty washers. That washer slides onto the top of the shock and contacts the 4 rubber nubs you see. The pic in your atttachment doesn't look like it has the washer.

So the stock flat piece contacting the upper shock mount is the gold colored bell and the Koni and almost all aftermarket shocks come with big washers. The GC spring kit is unique in that it replaces the big washers with the aluminum spring cup.
It's good to have something there. Technically the dogbone (trapezoid piece that fits into the top of the shock mount) is bolted firmly to the shock rod and it prevents the shock rod from moving up and down while still allowing the shock rod to tilt slightly as the suspension goes up and down.
I've seen people not use the washers before and it's probably OK, but it may prevent pops or noises or might reduce the stress load or something. I'm not real sure what it's purpose is. If your tearing down your shocks and the washers are not there, then go pick some up at the hardware store.
The stock shock has a big flat washer like piece built into the bumpstop holder. It's the gold colored piece.
When you use the Koni's with a regular spring it will come with big heavy duty washers. That washer slides onto the top of the shock and contacts the 4 rubber nubs you see. The pic in your atttachment doesn't look like it has the washer.
So the stock flat piece contacting the upper shock mount is the gold colored bell and the Koni and almost all aftermarket shocks come with big washers. The GC spring kit is unique in that it replaces the big washers with the aluminum spring cup.
It's good to have something there. Technically the dogbone (trapezoid piece that fits into the top of the shock mount) is bolted firmly to the shock rod and it prevents the shock rod from moving up and down while still allowing the shock rod to tilt slightly as the suspension goes up and down.
I've seen people not use the washers before and it's probably OK, but it may prevent pops or noises or might reduce the stress load or something. I'm not real sure what it's purpose is. If your tearing down your shocks and the washers are not there, then go pick some up at the hardware store.
Last edited by JasonWW; 04-24-2007 at 07:40 AM.
04-24-2007, 09:21 PM
#31
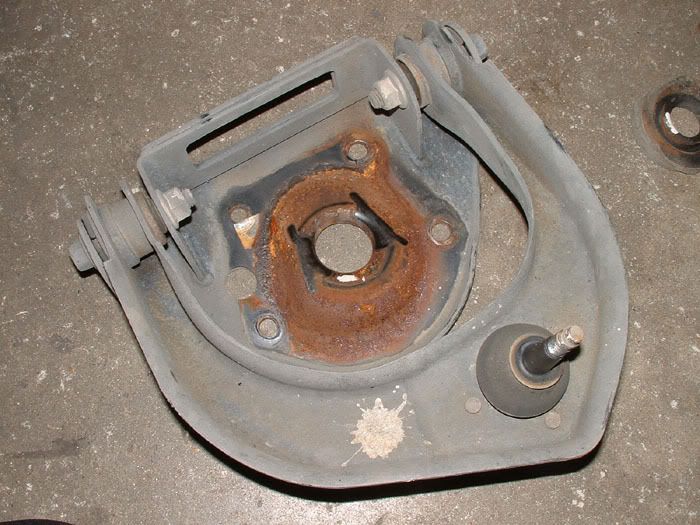
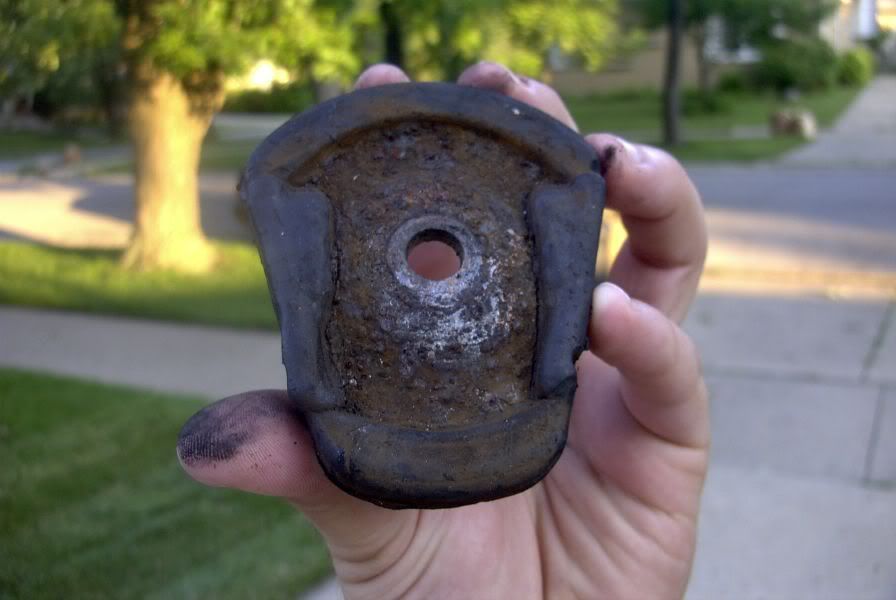
Yeah, I think I told you on another thread that the washer kept the shock rod from moving up, but I found out that the dogbone piece actually gets pressed both up and down. As everyone can see the dogbone that fits into the top of the shock mount obviously prevents the shock rod from being pulled down, but the upper a-arm mount is bent in such a way as to press down on the top of the dogbone. I just learned this from another member. You can see the marks here.
I think I also figured out how the upper spring perch is made. It starts out as a thick flat piece of steel and is stamped into a kind of stepped funnel shape and is then coated in rubber. Check this pic.

I think I also figured out how the upper spring perch is made. It starts out as a thick flat piece of steel and is stamped into a kind of stepped funnel shape and is then coated in rubber. Check this pic.
 04-25-2007, 03:16 AM
#33
Originally Posted by SpdFrk1990
Why would you want to cut that red section off?
You can cut the spring mount flat if you are running the flat cut springs like in the Ground Control kit. You can cut it flat and let the spring ride higher which makes it easier to get to the adjustor. The main thing is that it is just a build up of rubber. It also helped me determine the actual steel shape under the rubber. I was thinking about burning the rubber off just to see what it looked like, but I didn't want to waste a perfectly good mount.
 04-25-2007, 06:52 AM
#34
On The Tree

Join Date: Dec 2004
Posts: 129
Likes: 0
Received 0 Likes
on
0 Posts
Very helpful Jason!! When I bought my Konis I didn't get the washers for some reason. As a result I destroyed 2 sets up Strut mounts. After the 2nd set blew out around the bushing, I took a good look at it and mentally kicked myself in the *** for being such a dunce. After slapping some washers on there, it fixed the issue. I wish I had of seen your pictures before I put the second set on there. Hopefully this set of strutmounts last for the life of the car. At ~350bucks for a pair from GM, they better. It was an expensive lesson, thanks for sharing so others won't waste as much money as I have. lol
At ~350bucks for a pair from GM, they better. It was an expensive lesson, thanks for sharing so others won't waste as much money as I have. lol
04-25-2007, 09:38 AM
#35
Yes, how the upper shock mounts and dogbone work seem to be a big mystery to everyone. It's quite elaborate, but I think I finally figured it out. Maybe I should do a write up with all the pieces and such.
So running without the washers actually made them break? In this pic the blue area is a thick steel rod and the green is pure rubber. Did the inner rod seperate from the main outer piece by breaking the rubber?
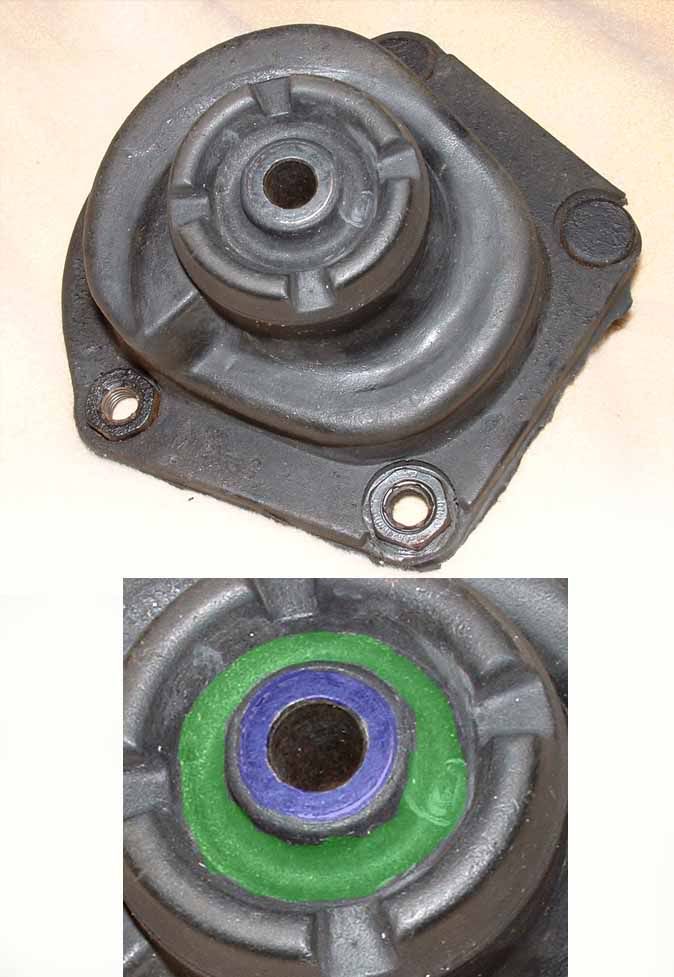
The shock rod slides into this and the dogbone then drops in and they are screwed together until the nut bottoms out. About 10 threads should be showing. The below pics are courtesy of Constrictor.
Here's the dogbone:
If you look close at this pic of a coilover mount you can see the depression stamped into the upper a-arm mounting plate that drops down and is angled.
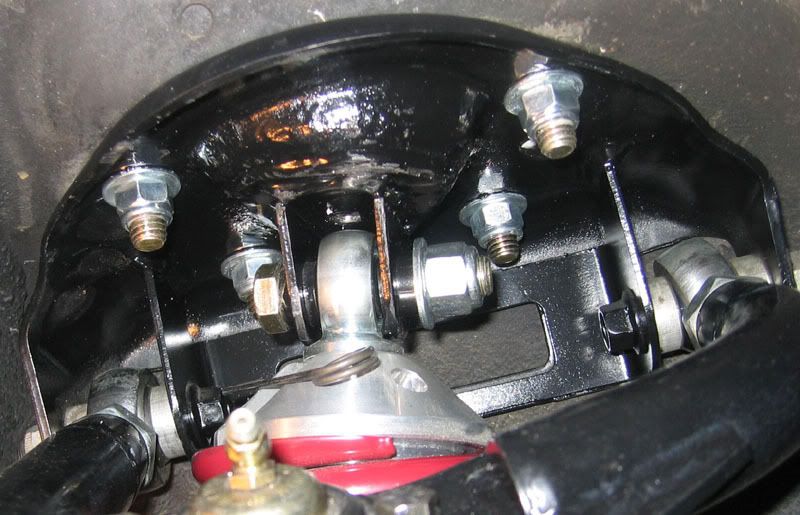
This dropped down area is what contacts the dogbone from the top and when you bolt the shock into the car the dogbone is captured from the top and bottom. This keeps the shock rod from moving up and down while still allowing the shock rod to tilt a little as the suspension moves up and down. If it didn't tilt it would bind up and possibly bend.
So running without the washers actually made them break? In this pic the blue area is a thick steel rod and the green is pure rubber. Did the inner rod seperate from the main outer piece by breaking the rubber?
The shock rod slides into this and the dogbone then drops in and they are screwed together until the nut bottoms out. About 10 threads should be showing. The below pics are courtesy of Constrictor.
Here's the dogbone:
If you look close at this pic of a coilover mount you can see the depression stamped into the upper a-arm mounting plate that drops down and is angled.
This dropped down area is what contacts the dogbone from the top and when you bolt the shock into the car the dogbone is captured from the top and bottom. This keeps the shock rod from moving up and down while still allowing the shock rod to tilt a little as the suspension moves up and down. If it didn't tilt it would bind up and possibly bend.
Last edited by JasonWW; 04-25-2007 at 09:54 AM.
04-26-2007, 01:30 PM
#36
TECH Fanatic

Join Date: Mar 2004
Location: Laguna Niguel, CA
Posts: 1,017
Likes: 0
Received 0 Likes
on
0 Posts

Wow, nice wirte-up, should be a sticky...
When I installed my Koni's I had no idea as to what I was doing except for the installuniversity write-up...
The above might have been exremely helpful.
When I installed my Koni's I had no idea as to what I was doing except for the installuniversity write-up...
The above might have been exremely helpful.
05-12-2007, 10:39 AM
#37
Originally Posted by ShevrolayZ28
Thanks for your assistance, Sam. It was nice to speak with you. The struts will be installed this weekend if I can somehow avoid helping my brother move a fish tank way up in Maine lol.
Thanks for the pics and the write up, JasonWW.
 . I want to get more information of this pix..

 07-07-2007, 01:45 AM
#40
Notice black arrow pointing at silver adjustment wheel. This area needs to be stuffed with grease to keep moisture out. I have seen this adjustment wheel oxidize very badly.