Air Ride Using YOUR Front Shocks for $350

 12-16-2007, 02:51 AM
#142
TECH Fanatic
iTrader: (12)
Join Date: May 2005
Location: Nashville, TN
Posts: 1,250
Likes: 0
Received 0 Likes
on
0 Posts

suicide doors has everything you would need, excerpt for cheap front bags.
And I've always bought my airride stuff from them.
-I'd say a 5 gallon slim&skinny from suicide would fit great underneath the back of the car
-You cant go wrong with SMC valves, get them, because other valves are wayy too much for your application, and the SMCs are very easy to rebuild.
-don't skimp out on as good compressor, any VIAIR compressor would be great, but a 450 (100% duty cycle) is all I would buy for a 5 gallon tank. They are not very loud and last a long time.
-I don't like airlift bags, they seem to always seperate at the crimp point, go with at least firestones in the back, 2500s work but 2600s would give better ride
Rule number 1 with bag setup cost- you will spend the most time and a bunch of money on fittings.
12-16-2007, 07:48 PM
#143
I've been going over a lot of info in my head the last day or so and I was thinking of building a one off suspension, but the video of the black Magnum having better performance with just a spring swap has really interested me.
So many guys here want to drop their stock cars about 1" or so without spending huge money, maybe air springs can help. I have complete stock assemblies for the front (spring, shock, upper mounts, etc...) that would bolt in very easily. I'm wondering how the car would ride and handle with just a spring swap. Take it apart, pull the stock metal springs off, swap the air springs on and then bolt them back in. Then air them up with a shop compressor or a portable Viair compressor. So it would be a $400 front spring swap with no other parts needed. As long as the bags and inflation valves can maintain their pressure over long periods it might work very well.
So many guys here want to drop their stock cars about 1" or so without spending huge money, maybe air springs can help. I have complete stock assemblies for the front (spring, shock, upper mounts, etc...) that would bolt in very easily. I'm wondering how the car would ride and handle with just a spring swap. Take it apart, pull the stock metal springs off, swap the air springs on and then bolt them back in. Then air them up with a shop compressor or a portable Viair compressor. So it would be a $400 front spring swap with no other parts needed. As long as the bags and inflation valves can maintain their pressure over long periods it might work very well.


 12-16-2007, 08:43 PM
#147
TECH Resident
iTrader: (6)

Join Date: Aug 2006
Location: Hampstead, MD
Posts: 766
Likes: 0
Received 0 Likes
on
0 Posts
Jason you come up with the craziest ****. Once the weather warms up up here I'll make sure to take a good bunch of pictures for you when I get my setup done. You'll be more than welcome to ask anything you like about it.
12-16-2007, 08:53 PM
#148
I'll take that as a compliment. What did you put together? I was thinking you had the $1000 Air Ride Shockwaves on the front.
BTW, you responded before I could finish the above post, so check it again.
This is how you could do air springs without the fancy adjustors like I want to do. In fact, I may just try this mount out as it is a lot simplier. If I don't like it I can do it with the adjustors.
BTW, you responded before I could finish the above post, so check it again.
This is how you could do air springs without the fancy adjustors like I want to do. In fact, I may just try this mount out as it is a lot simplier. If I don't like it I can do it with the adjustors.
12-16-2007, 08:59 PM
#149
TECH Resident
iTrader: (6)
Join Date: Aug 2006
Location: Hampstead, MD
Posts: 766
Likes: 0
Received 0 Likes
on
0 Posts
Yes, it was a compliment. And yes I have the Air Ride Shockwaves, same fronts as Ragtoprat if I recall correctly. However I am confused with your pipe addition, are you saying to take sch. 40 black pipe and make a spacer, weld it to the top mount and affix the bag to the bottom of it?
12-16-2007, 09:06 PM
#150
I think I know all I need to about the Shockwaves. Why did you think I need more info?
Yes, the pipe acts like a spacer to make sure the bag clears the upper A-arm. The flat disc that comes with the bag gets welded to the pipe and the pipe gets welded to the empty gold cup.
Then you take a much better bumpstop like the Koni 40mm and you slide it onto the shock shaft and then slide this upper spacer over it and bolt everything up just like stock.
You'll need to cut a hole for the air line to fit up top, but other than that, it should work just like the pics. I'm not sure what diameter pipe would be best, but that can be figured out once I have all the parts.
12-16-2007, 11:18 PM
#153
So for a Super Low Buck setup that you can adjust from inside the car:
2 Aero Sport Bags with mount kit $400
2 Rear bags $120-$140
4 manual switches $120 (8 3/8" electric valves are $220)
2 dual needle guages $50-$60
1 3 gallon chrome tank $50
1 Viair 380 compressor 200psi $184
1 pressure switch $20
100ft of 1/8 air line $13
This adds up to $987, so call it 1,000 bucks. That just leaves the cost of the fittings. What do 1/8" fittings typically cost? It will be somewhat slow to raise the car due to the 1/8 lines on the switches, but they are a lot cheaper than electric valves. Well, $100 cheaper. Maybe it would be worth it just for the larger lines.
A Bare Bones kit may consist of just the 4 bags with each one using an inflation valve. I guess you could add the guages just so you can watch over things. So that's like 600 bucks. Not bad for a smoother ride plus you can adjust the ride height. Not bad at all.
If I'm leaving something out, please let me know.
Last edited by JasonWW; 12-17-2007 at 02:47 AM.
12-16-2007, 11:38 PM
#154
I may go with the bigger, fancier air setup, but I still don't know exactly what I want the car to do. I'm going to tub the front and rear plus other mods to sit the car on the ground.
So I could set the ride height quite low like a Lambo or something and have the suspension travel I need to ride nicely. For instance, I could set my ride height one inch lower than it is now or like in post #141. Then forgo the fancy digital controller that automatically drops it on the ground when parked and lifts it on engine start. Just basically leave it parked at the normal ride height. It will still look super cool. I'll still need to flip switches to raise it up for steep driveways or even mildly steep driveways if it's riding that low. Plus I could still manually drop it to the ground for special occassions
I don't know. Maybe I should put together the Super Low Buck setup I mentioned above for $1000 (but get a fancy 5 gallon chromed aluminum tank for in car mounting and maybe a faster pump). That might be all I need. 200psi in the tank will help increase lift speed over 150 in the tank. With the smaller air lines they would not act much like an accumulator, so having the switches in the center console instead of by the front bags should be no big deal.
I just don't know. What do you guys think?
Check this post which shows other ride heights.
along with the above post 141.
Last edited by JasonWW; 12-17-2007 at 12:06 AM.
01-04-2008, 02:21 AM
#156
Originally Posted by koran49
I've been reading your posts about all different suspension stuff, all I have to say is that it's all very interesting. What is your latest thought and or ideas, are you leaning more towards air or hydraulic?
Jon
Jon
Air is so much cleaner, cheaper and lighter. I went back and worked out all the details that made me look into an alternative in the first place. My first front bag mount using the sleeve was a bit too complicated. As I got further in and measured things more I figured out a simpler way to do it. Post 144 and down.
https://ls1tech.com/forums/showthrea...=803631&page=8
About the only thing I need to figure out is exactly how long an extension I need for the pipe piece. I'll know that once I get it together and mounted and run the suspension through it's full travel. There is some wiggle room as far as mounting the bag a bit higher or lower or compressing it more at ride height, etc... so I'm sure everything will fit just fine.
06-24-2008, 11:03 PM
#158
I happened upon a set of used front bags on ebay and got them for $150. Soon we'll see how well they fit.

They are on Magnum shocks. The owner switched from 22's to 24's and needed a different setup.
They are on Magnum shocks. The owner switched from 22's to 24's and needed a different setup.
Last edited by JasonWW; 06-24-2008 at 11:32 PM.
07-30-2008, 03:37 AM
#160
Here's an update.
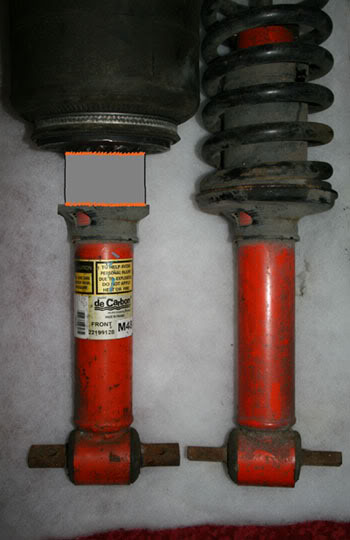
I got the complete shocks just like in the pics. I didn't really need the 300C shocks but I did want those lower brackets. Those SOB's welded them on solid! Soooo..... http://img.photobucket.com/albums/v3.../IMG_8700b.jpg
A comparison.

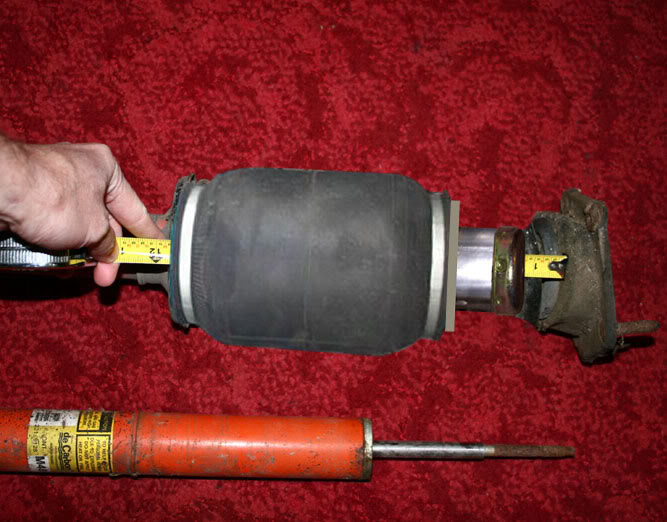
The bag.

This would probably be about the proper mounting height. There is a steel sleeve inside that limits compression to 4". At rest the bag is about 6.5" long. Inflated, it lengthens to 9". That last inch isn't really usable as it would require serious pressure and be too stiff anyway. So it's got a good usable 4" stroke which is a tad more than the shock at 3.75".

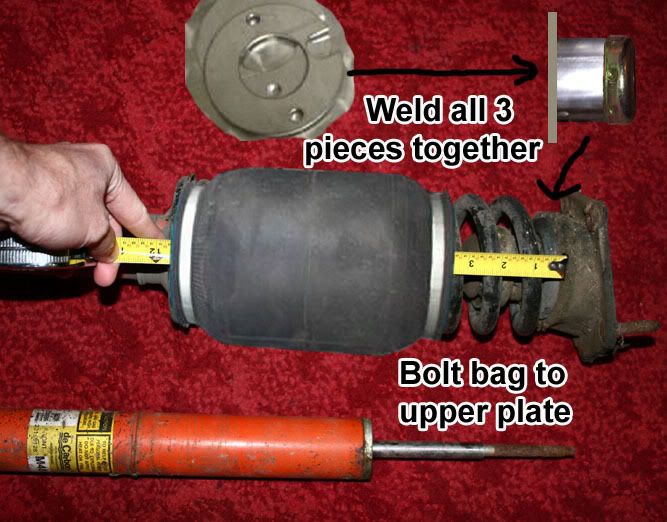
The easiest thing I can think of is to trim the diameter of the stock lower spring mounts and then slide some tubing over it and weld all 3 pieces together. Like so.
I actually have a more trick setup in mind for myself that will allow me to adjust the Koni shocks from under the hood. That's all top secret, but I'll keep you guys updated.
I got the complete shocks just like in the pics. I didn't really need the 300C shocks but I did want those lower brackets. Those SOB's welded them on solid! Soooo..... http://img.photobucket.com/albums/v3.../IMG_8700b.jpg
A comparison.
The bag.
This would probably be about the proper mounting height. There is a steel sleeve inside that limits compression to 4". At rest the bag is about 6.5" long. Inflated, it lengthens to 9". That last inch isn't really usable as it would require serious pressure and be too stiff anyway. So it's got a good usable 4" stroke which is a tad more than the shock at 3.75".
The easiest thing I can think of is to trim the diameter of the stock lower spring mounts and then slide some tubing over it and weld all 3 pieces together. Like so.
I actually have a more trick setup in mind for myself that will allow me to adjust the Koni shocks from under the hood. That's all top secret, but I'll keep you guys updated.
Last edited by JasonWW; 07-30-2008 at 04:18 AM.