
Welding vband without warp?


Thread Starter
Staging Lane
Joined: May 2008
Posts: 85
Likes: 0
Hi!
Ive done some searching on this topic. I just went on with my first build that needed alot of welding etc. Without thinking much on the issue with the vbands i just tacked it and welded it. Ive previouse done it with MIG without any big issue but this time with tig it warped like hell offcourse, TIG gets hotter?..
Anyway, i wanna do everyting stainless so i need to do it with TIG.
I`ll also get in troubble with the T6 turbo flange.
Is there a way to do it right? =D
And now, when im fu...ed is there a way to make it good? I started to sand off ot get it straight by hand but that means ALOT of hours.
Ive seen somewhere that someone used a graphite gasket. Not sure if i wanna do that.
All replies are welcome!
Ive done some searching on this topic. I just went on with my first build that needed alot of welding etc. Without thinking much on the issue with the vbands i just tacked it and welded it. Ive previouse done it with MIG without any big issue but this time with tig it warped like hell
offcourse, TIG gets hotter?..Anyway, i wanna do everyting stainless so i need to do it with TIG.
I`ll also get in troubble with the T6 turbo flange.
Is there a way to do it right? =D
And now, when im fu...ed is there a way to make it good? I started to sand off ot get it straight by hand but that means ALOT of hours.
Ive seen somewhere that someone used a graphite gasket. Not sure if i wanna do that.
All replies are welcome!

I've TIG some V-bands on some headers before without any problems. Granted that was a lot thicker gauge steel than you are probably using. I think you just have to be patient. Make sure your amps are right on your welder and take your time. If you really wanted to MIG weld it you could do that as well with a stainless steel spool.
Hi!
Ive done some searching on this topic. I just went on with my first build that needed alot of welding etc. Without thinking much on the issue with the vbands i just tacked it and welded it. Ive previouse done it with MIG without any big issue but this time with tig it warped like hell offcourse, TIG gets hotter?..
Anyway, i wanna do everyting stainless so i need to do it with TIG.
I`ll also get in troubble with the T6 turbo flange.
Is there a way to do it right? =D
And now, when im fu...ed is there a way to make it good? I started to sand off ot get it straight by hand but that means ALOT of hours.
Ive seen somewhere that someone used a graphite gasket. Not sure if i wanna do that.
All replies are welcome!
Ive done some searching on this topic. I just went on with my first build that needed alot of welding etc. Without thinking much on the issue with the vbands i just tacked it and welded it. Ive previouse done it with MIG without any big issue but this time with tig it warped like hell
offcourse, TIG gets hotter?..Anyway, i wanna do everyting stainless so i need to do it with TIG.
I`ll also get in troubble with the T6 turbo flange.
Is there a way to do it right? =D
And now, when im fu...ed is there a way to make it good? I started to sand off ot get it straight by hand but that means ALOT of hours.
Ive seen somewhere that someone used a graphite gasket. Not sure if i wanna do that.
All replies are welcome!
Why do you mention needing to do TIG while welding stainless? You can MIG stainless too you know. Just use SS filler wire and a Tri-mix shielding gas, though 75/25 will do if you need it to. If the welder is practiced up the TIG welds will look more presentable though.
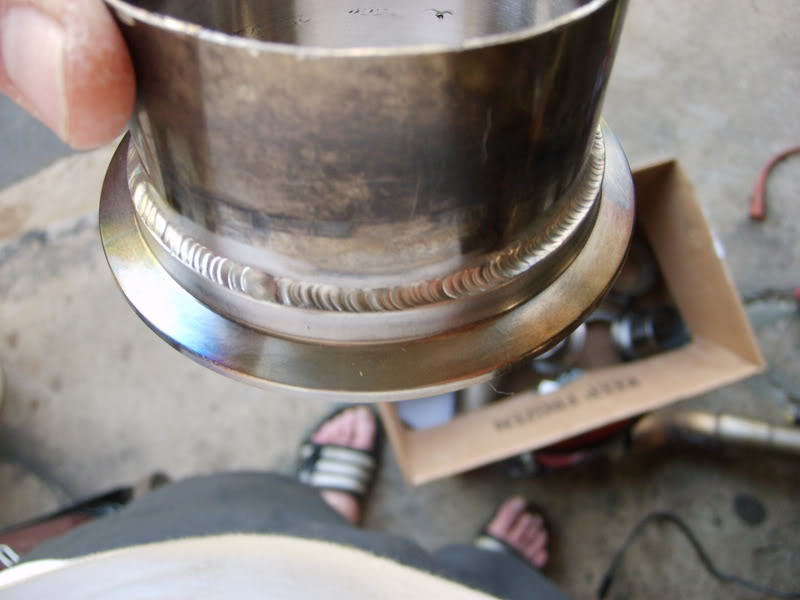
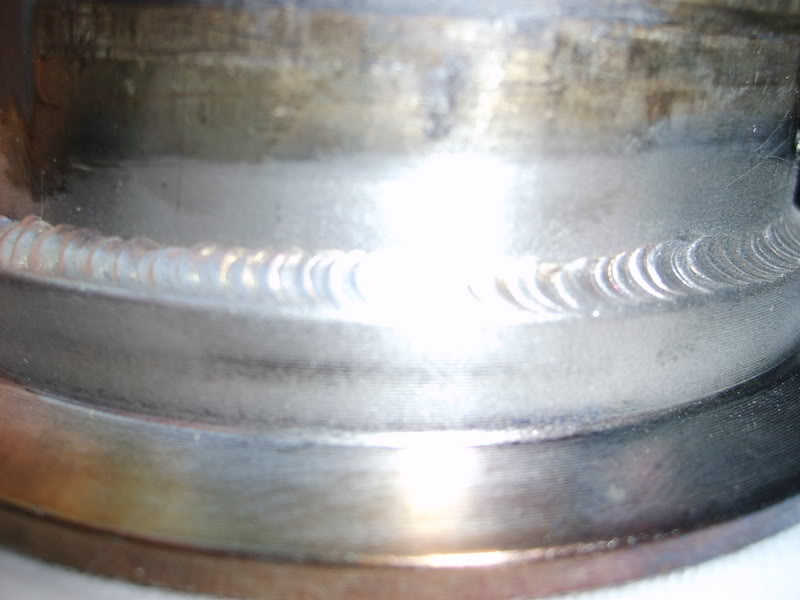
Whether using MIG or TIG to weld SS if you want to prevent warping as much as possible then just tack and move. Divide the weld area around the V band into 4 imaginary sections. Make 4 tacks evenly spaced around the V band and then just keep making a tack and move onto the other section and make a single tack and keep going. Eventually you will make it all around and will have put even heat into the V band and will not have warped it either.
Thread Starter
Staging Lane
Joined: May 2008
Posts: 85
Likes: 0
Yea i know i can buy stainless spoole for mig but i dont have that avalible =)
Okey, so the trick is patient and just move around with small tacks. I dont know the gauge of the vbands but i might have put much amp in them too. Im woundering if i should cut them off and try once more or try to get them straight.
Okey, so the trick is patient and just move around with small tacks. I dont know the gauge of the vbands but i might have put much amp in them too. Im woundering if i should cut them off and try once more or try to get them straight.
Ditto on the tacks, except I'd say a minimum of eight. The first one I did I welded half way around and noticed it curling up. I cut it off (that was hell), and it sprung back almost perfect. I tacked the heck out of all four halves, and they ended up OK.
Another tip is after it is all tacked, try to weld faster and add more filler than you have a tendency to want to. This helps keep the stainless more silvery, and helps reduce overall heat input.
Another tip is after it is all tacked, try to weld faster and add more filler than you have a tendency to want to. This helps keep the stainless more silvery, and helps reduce overall heat input.
You start with 4 tacks evenly spaced around the perimeter and then you sort of go in a wheel lugnut tightening pattern (so to speak) with the continuing tacks. Do not do full on beads because they put much much more heat into the material than a shitload of tacks to. Once finished the tacks will look attractive and you will have introduced minimal heat into the metal and it will be spread evenly too.
Good point.
Another tip if is not too late is to offset the halves on the ends of the pipes, so that the end of one pipe protrudes about 3/16" out of its clamp half, and the other half's pipe is recessed. This aids in assembly, and helps reduce leakage.
Another tip if is not too late is to offset the halves on the ends of the pipes, so that the end of one pipe protrudes about 3/16" out of its clamp half, and the other half's pipe is recessed. This aids in assembly, and helps reduce leakage.
Trending Topics
Not a bad idea. Sort of like dowel pins for cylinder heads in a way. I might have to try that the next time I am building a turbo system.

I would tig as much of that as you can. It is a much better process and you can weld much thinner material. At my shop we use heat markers to monitor the heat that is absorbed into the material and you can get a product known as anti-heat to act like a heat sink and draw some of the temperature out of the material. Main thing is to take your time and allow it all to cool to a reasonable level.
We use "Heat Fence" as an absorbant. Looks like bondo, and comes in a squeeze tube. Once done, it becomes dried out and can be brushed off. We also use this product. SOLARFLUX. It's applied to the inside of the weld area. http://www.solarflux.com/
It prevents "sugar" formation, and helps w/ heat control. If you are fabing a turbo exhaust, you don't want the "sugar" lumps coming off, and totalling your turbo!
As for the setup.. we assemble the flanges, then weld in short runs. [TIG]. Welding w/ the assy made, and clamped, there's much more area for heat absorbtion.
Keep the filler wire as small as possible, and that will allow use of lower heat.
Last edited by Old Geezer; Jan 1, 2010 at 09:36 AM.
I have never used solarflux. Sounds like a good product. I have always used argon to purge the inside of the pipes. Very good point on welding the assembly whole. It will help soak up the heat. Just take your time and weld different areas on the assembly to make sure that you don't put too much heat in one area and warp it. Make sure to keep the tungsten sharp and take your time.

Registered User
Joined: Jan 2010
Posts: 10
Likes: 0
brass stock inside as a heat sink fairly tight with alot of backsheild. should get down to 22 gauge or so. shouldnt be over 35 amps. what tig source you running? aerowave and dynasty are 2 amp stable precisoin tig is 5 amp stable. most arent stable below 50 or so. they will run but if you do a lot of thin stuff a good machine with a fully arc control is helpful. i can weld pop cans with my aerowave.

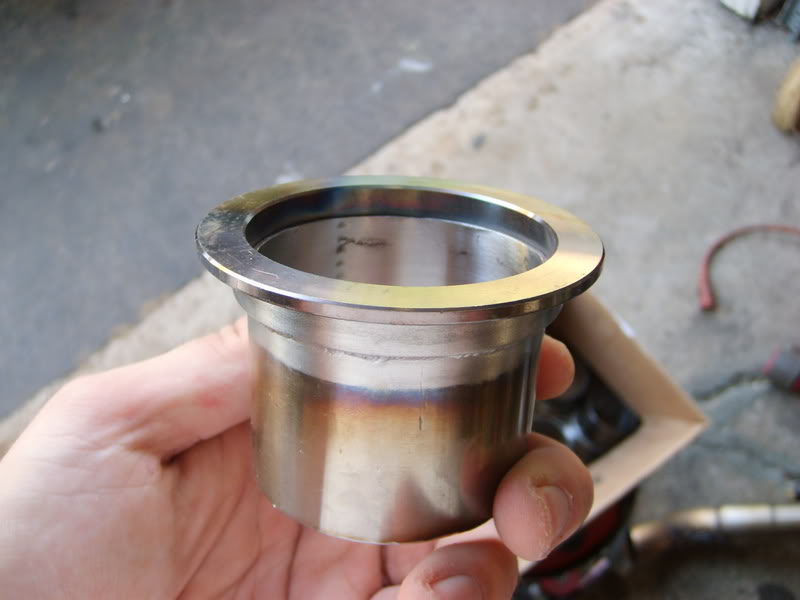
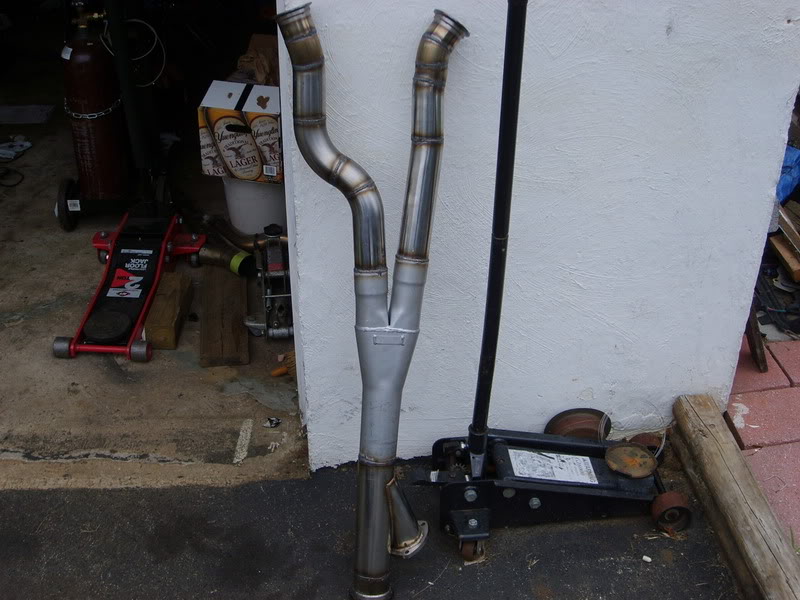
As for tigging the flanges...This is how I did mine. I made some "collectors" of sorts. Welded the flanges onto small pieces of stainless tubing so fitting and tacking under the car would be easier.
I tried MIG with 308L. Thats for dissimilar metals. Like carbon steel to stainless. And it didnt work very well. I screwed one up completely, had to grind the welds down, and then go over it with the TIG...which wasnt anywhere near as pretty as the others...
The reason I got 308L was because of my y-pipe. I had a flowmaster merge and thats carbon steel...everything else was stainless.
J.

