aluminum welding is kicking my aZZ


 09-13-2010, 08:02 PM
#22
TECH Addict
iTrader: (24)
Join Date: Oct 2006
Location: Webb City, MO...out in the garage
Posts: 2,610
Likes: 0
Received 0 Likes
on
0 Posts

no problem man. nice work, you're doing just fine, but like we all said, practice practice practice. if you're open for some more advice, i've got a little (i have to work with pipe all day):
1: On your initial fitup, take a piece of angle iron, or something that is "V" shaped, and clamp it to each of the two pipes you're fitting on either side of the weld joint so that your two pipes are aligned. Then you can tack them together and when they are welded, the transition will be smooth, as if it was one pipe all along. this also makes it possible to grind the weld down and if you paint/coat the pipe your joint will be invisible. Note that sometimes you may NEED the alignment to be off a bit so that you can connect A to B.....just food for thought on future projects.
you might also bevel the ends of the pipes so that when they are fitted together, you've got a nice little cradle to weld into. this will improve you penetration and overall weld strength, as well as give you well-defined boundaries on either side of the puddle so you won't have to put as much effort into maintaining the puddle's width.
2: While you practice, have a radio blasting in your ear, preferably a rock station. i don't care if you like rock music or not, just do it Some bands (like Godsmack especially) have very steady beats that are easy to follow throughout the entire song and are just the right pace to weld to. Get a puddle going and before moving, listen to the song and dip your rod to the beat once you have a feel for it. Move your torch in a robotic, almost subconscious way. Practice not speeding up/slowing down. Use the pedal and rod to dictate the puddle size and speed of travel. pretty soon you'll have welds that will look like stacks of nickels
3: Do what Xfactor_pitbulls said and check out weldingtipsandtricks.com and weldingweb.com. LOTS of great info on there and many knowledgeable people that help. Feel free to hit me up with any other questions.
P.S. I'll be picking up a Miller Dynasty 200 DX, hopefully this week, so i'll be able to put my money where my mouth is
1: On your initial fitup, take a piece of angle iron, or something that is "V" shaped, and clamp it to each of the two pipes you're fitting on either side of the weld joint so that your two pipes are aligned. Then you can tack them together and when they are welded, the transition will be smooth, as if it was one pipe all along. this also makes it possible to grind the weld down and if you paint/coat the pipe your joint will be invisible. Note that sometimes you may NEED the alignment to be off a bit so that you can connect A to B.....just food for thought on future projects.
you might also bevel the ends of the pipes so that when they are fitted together, you've got a nice little cradle to weld into. this will improve you penetration and overall weld strength, as well as give you well-defined boundaries on either side of the puddle so you won't have to put as much effort into maintaining the puddle's width.
2: While you practice, have a radio blasting in your ear, preferably a rock station. i don't care if you like rock music or not, just do it
Some bands (like Godsmack especially) have very steady beats that are easy to follow throughout the entire song and are just the right pace to weld to. Get a puddle going and before moving, listen to the song and dip your rod to the beat once you have a feel for it. Move your torch in a robotic, almost subconscious way. Practice not speeding up/slowing down. Use the pedal and rod to dictate the puddle size and speed of travel. pretty soon you'll have welds that will look like stacks of nickels 3: Do what Xfactor_pitbulls said and check out weldingtipsandtricks.com and weldingweb.com. LOTS of great info on there and many knowledgeable people that help. Feel free to hit me up with any other questions.
P.S. I'll be picking up a Miller Dynasty 200 DX, hopefully this week, so i'll be able to put my money where my mouth is
09-13-2010, 08:30 PM
#23
no problem man. nice work, you're doing just fine, but like we all said, practice practice practice. if you're open for some more advice, i've got a little (i have to work with pipe all day):
1: On your initial fitup, take a piece of angle iron, or something that is "V" shaped, and clamp it to each of the two pipes you're fitting on either side of the weld joint so that your two pipes are aligned. Then you can tack them together and when they are welded, the transition will be smooth, as if it was one pipe all along. this also makes it possible to grind the weld down and if you paint/coat the pipe your joint will be invisible. Note that sometimes you may NEED the alignment to be off a bit so that you can connect A to B.....just food for thought on future projects.
thats great advice. It was quite a big problem for me trying to get two pieces of tubing lined up. what do you use to clamp the tubing to the angle iron?
you might also bevel the ends of the pipes so that when they are fitted together, you've got a nice little cradle to weld into. this will improve you penetration and overall weld strength, as well as give you well-defined boundaries on either side of the puddle so you won't have to put as much effort into maintaining the puddle's width.
2: While you practice, have a radio blasting in your ear, preferably a rock station. i don't care if you like rock music or not, just do it Some bands (like Godsmack especially) have very steady beats that are easy to follow throughout the entire song and are just the right pace to weld to. Get a puddle going and before moving, listen to the song and dip your rod to the beat once you have a feel for it. Move your torch in a robotic, almost subconscious way. Practice not speeding up/slowing down. Use the pedal and rod to dictate the puddle size and speed of travel. pretty soon you'll have welds that will look like stacks of nickels
This is AWESOME. why didnt I think of that. I think it would be a great way to start getting that stack of dimes look. Im definitely going to get a radio in there. tbh, even on steel Ive been struggling to get that stack down and I honestly think this technique is what Ive been missing
3: Do what Xfactor_pitbulls said and check out weldingtipsandtricks.com and weldingweb.com. LOTS of great info on there and many knowledgeable people that help. Feel free to hit me up with any other questions.
P.S. I'll be picking up a Miller Dynasty 200 DX, hopefully this week, so i'll be able to put my money where my mouth is
ive been checking out those sites. definitely some good info. I wanted a 200dx but couldnt afford one, and wouldnt you know that the day after I picked up my syncrowave, a 200dx came on craiglist for only $200 more. I was pretty upset but Im kinda happy I got the syncrowave. it is beefy and I like that I can roll it across my workspace and not worry about it being tipped over or anything like that. I hope you enjoy your welder. I love tig welders.
1: On your initial fitup, take a piece of angle iron, or something that is "V" shaped, and clamp it to each of the two pipes you're fitting on either side of the weld joint so that your two pipes are aligned. Then you can tack them together and when they are welded, the transition will be smooth, as if it was one pipe all along. this also makes it possible to grind the weld down and if you paint/coat the pipe your joint will be invisible. Note that sometimes you may NEED the alignment to be off a bit so that you can connect A to B.....just food for thought on future projects.
thats great advice. It was quite a big problem for me trying to get two pieces of tubing lined up. what do you use to clamp the tubing to the angle iron?
you might also bevel the ends of the pipes so that when they are fitted together, you've got a nice little cradle to weld into. this will improve you penetration and overall weld strength, as well as give you well-defined boundaries on either side of the puddle so you won't have to put as much effort into maintaining the puddle's width.
2: While you practice, have a radio blasting in your ear, preferably a rock station. i don't care if you like rock music or not, just do it
Some bands (like Godsmack especially) have very steady beats that are easy to follow throughout the entire song and are just the right pace to weld to. Get a puddle going and before moving, listen to the song and dip your rod to the beat once you have a feel for it. Move your torch in a robotic, almost subconscious way. Practice not speeding up/slowing down. Use the pedal and rod to dictate the puddle size and speed of travel. pretty soon you'll have welds that will look like stacks of nickels This is AWESOME. why didnt I think of that. I think it would be a great way to start getting that stack of dimes look. Im definitely going to get a radio in there. tbh, even on steel Ive been struggling to get that stack down and I honestly think this technique is what Ive been missing
3: Do what Xfactor_pitbulls said and check out weldingtipsandtricks.com and weldingweb.com. LOTS of great info on there and many knowledgeable people that help. Feel free to hit me up with any other questions.
P.S. I'll be picking up a Miller Dynasty 200 DX, hopefully this week, so i'll be able to put my money where my mouth is
ive been checking out those sites. definitely some good info. I wanted a 200dx but couldnt afford one, and wouldnt you know that the day after I picked up my syncrowave, a 200dx came on craiglist for only $200 more. I was pretty upset but Im kinda happy I got the syncrowave. it is beefy and I like that I can roll it across my workspace and not worry about it being tipped over or anything like that. I hope you enjoy your welder. I love tig welders.
09-13-2010, 08:43 PM
#24
TECH Addict
iTrader: (16)
Join Date: Jul 2004
Location: Nevada, TX
Posts: 2,218
Likes: 0
Received 0 Likes
on
0 Posts
The offer is open to come by my shop if you or anyone else that wants to learn would like to come by my shop. There is a lot of good info in this thread that gets you off to a great starting point.
09-13-2010, 09:25 PM
#25
TECH Addict
iTrader: (24)
Join Date: Oct 2006
Location: Webb City, MO...out in the garage
Posts: 2,610
Likes: 0
Received 0 Likes
on
0 Posts
anything you can get your hands on really. vise grips usually work just fine or C-clamps. also, i forget the proper name for them, but there is a vise grip style clamp that uses a chain instead of feet/solid arms that are specially designed for securing pipe. hell, even ratchet straps will work. be creative. there are NO rules when it comes to making a hard job easier.
Practice practice practice. It can't be said enough. When i first started welding, i was learning on aluminum and worked "backwards" to stainless then finally to steel. Now, at my current job (code shop), i've picked up a bunch of exotic stuff, i.e. titanium, copper-nickel, aluminum-bronze, inconel, monel...various grades of stainless like 304, 410, 416, etc....The best way to learn is by not knowing anything at all to start with. Just try to lay a good looking bead, then start worrying about preheat, % compositions, filler materials, microstructures, etc....If i had known when i started welding what all i would know today, i doubt i would have stuck with it. it's really overwhelming when you sit back and look at what you need to know about making a good weld, at least in a code shop Before you know it, stuff like this will be second nature:
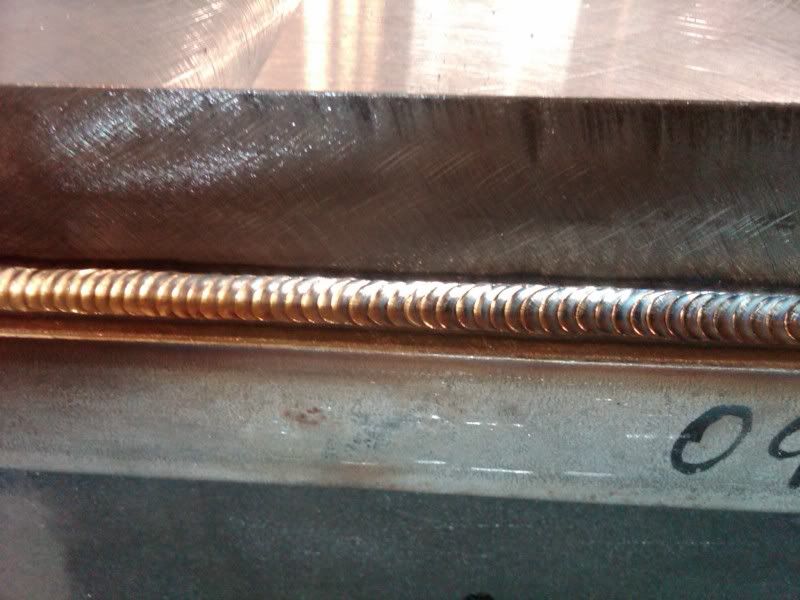
Practice practice practice. It can't be said enough. When i first started welding, i was learning on aluminum and worked "backwards" to stainless then finally to steel. Now, at my current job (code shop), i've picked up a bunch of exotic stuff, i.e. titanium, copper-nickel, aluminum-bronze, inconel, monel...various grades of stainless like 304, 410, 416, etc....The best way to learn is by not knowing anything at all to start with. Just try to lay a good looking bead, then start worrying about preheat, % compositions, filler materials, microstructures, etc....If i had known when i started welding what all i would know today, i doubt i would have stuck with it. it's really overwhelming when you sit back and look at what you need to know about making a good weld, at least in a code shop
Before you know it, stuff like this will be second nature:  09-21-2010, 12:56 PM
#28
Staging Lane
Join Date: Jun 2010
Location: Kingfisher Oklahoma
Posts: 69
Likes: 0
Received 0 Likes
on
0 Posts
10-21-2010, 08:05 PM
#30

You have rec some good advice especially the practice, practice. One thing I did not see mentioned was on aluminum do not ball Your tungsten prior to welding, it will ball itself. I have seen plenty of people use this method even heard it has been written in welding books, I have no idea what possible advantadge this provides.
Carl
Carl
11-16-2010, 09:04 PM
#31
TECH Addict
iTrader: (16)
Join Date: Jul 2004
Location: Nevada, TX
Posts: 2,218
Likes: 0
Received 0 Likes
on
0 Posts
You have rec some good advice especially the practice, practice. One thing I did not see mentioned was on aluminum do not ball Your tungsten prior to welding, it will ball itself. I have seen plenty of people use this method even heard it has been written in welding books, I have no idea what possible advantadge this provides.
Carl
Carl
11-19-2010, 11:38 PM
#32

You have rec some good advice especially the practice, practice. One thing I did not see mentioned was on aluminum do not ball Your tungsten prior to welding, it will ball itself. I have seen plenty of people use this method even heard it has been written in welding books, I have no idea what possible advantadge this provides.
Carl
Carl
To the OP you're moving too slow which is overheating the whole tube before you get it going well. on aluminum balance is your friend.
turning the adjuster towards cleaning will focus more "heat" on your tungsten
Turning it more towards penetration will focus more "heat" on your tubing.
They work hand in hand. more cleaning=less penetration and vice versa.
you want a high amperage. turn that 200 all the way up. control the puddle with your foot control, you can always let off, you cant always give it more.
If your amperage is too low then you'll overheat the material and never establish a puddle.
A lot of people have a hard time with aluminum and its mainly recognizing the puddle. it will turn shiny, and doesn't change colors like carbon or other metals. Keep the filler far away from the tungsten until that puddle is there. Most people try to put filler in too early when that puddle isnt there and it just ***** up.
And another thing, bump your flow rate up to about 20 C.F.H.