
Post pics of your garage / shop
 07-27-2012 | 04:56 PM
#681

Teching In
Joined: Jul 2012
Posts: 6
Likes: 0
Wow, this thread has been going for six years.
I'm late to the game and I don't have an LS1 in anything I own. But a friend sent me a link to this, and said I should show my garage.
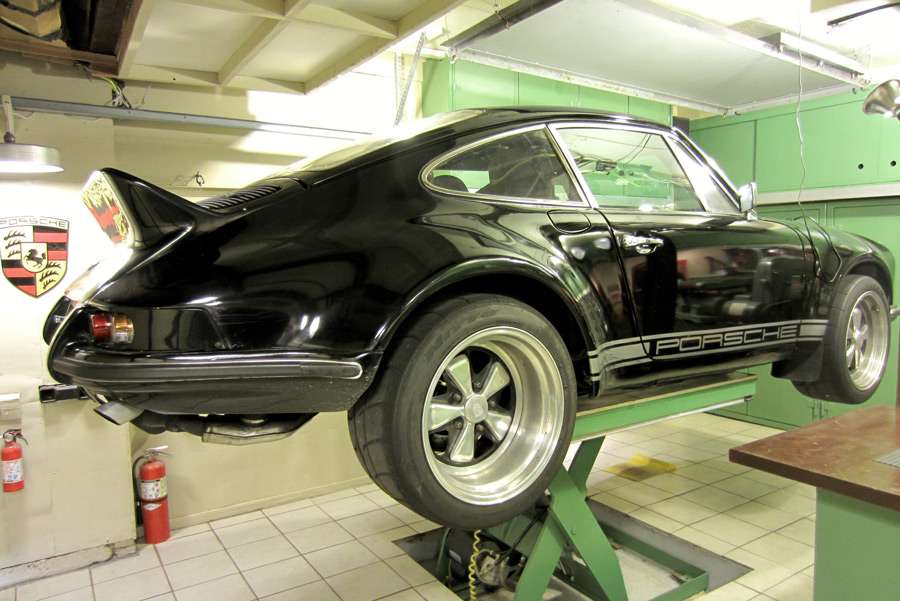
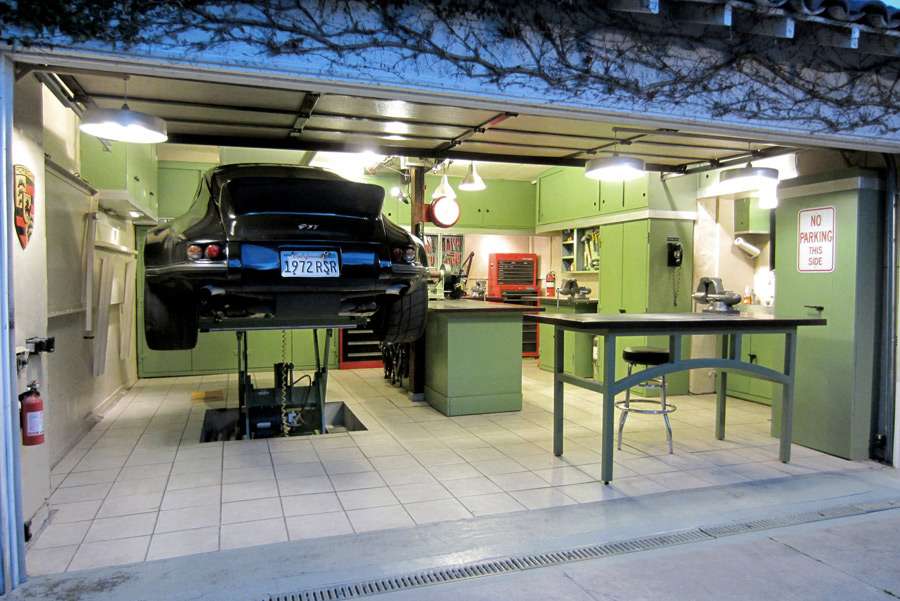
There is no substitute for square footage. But if all life hands you is a 20x22 box, you do what you can. I did everything you see in the place by myself, including setting the tile and digging the pit for the flush-to-the-floor lift. The total budget, including the floor, cabinets, benches and lift was less than $3,500. Everything in the place is second-hand, re-purposed or home-made.
I also made a website for it: http://www.12-gaugegarage.com


Work benches that fold down from the wall:

And it's got its own a video:
And yes, a video just about the lift I put in:
Is it always this clean? No. Not by a long shot.
But it does go back to clean very quickly -- that's the real accomplishment of it, I think. I finally took the time to work out a place for everything to go when It's not being used.
In practice, it makes a huge difference not having to spend so much time looking for things you've misplaced. I spent years doing that.
I'm late to the game and I don't have an LS1 in anything I own. But a friend sent me a link to this, and said I should show my garage.
There is no substitute for square footage. But if all life hands you is a 20x22 box, you do what you can. I did everything you see in the place by myself, including setting the tile and digging the pit for the flush-to-the-floor lift. The total budget, including the floor, cabinets, benches and lift was less than $3,500. Everything in the place is second-hand, re-purposed or home-made.
I also made a website for it: http://www.12-gaugegarage.com
Work benches that fold down from the wall:
And it's got its own a video:
And yes, a video just about the lift I put in:
Is it always this clean? No. Not by a long shot.
But it does go back to clean very quickly -- that's the real accomplishment of it, I think. I finally took the time to work out a place for everything to go when It's not being used.
In practice, it makes a huge difference not having to spend so much time looking for things you've misplaced. I spent years doing that.


 08-09-2012 | 12:20 AM
#689
Jack, your garage is the most beautiful, simple, purpose built garage I have ever seen. Perfect in every way. I love the whole idea of make do with the hand you were dealt and boy did you go way above and beyond "making it work".
08-09-2012 | 06:33 AM
#690

Jack Olsen thanks for sharing, your garage is amazing. I am moving to my first house in a month and my garage is big, but I still need to use the space wisely. You have given me many ideas and inspiration to do so. Thanks!
08-09-2012 | 10:37 AM
#691
Teching In
Joined: Jul 2012
Posts: 6
Likes: 0
Thanks.
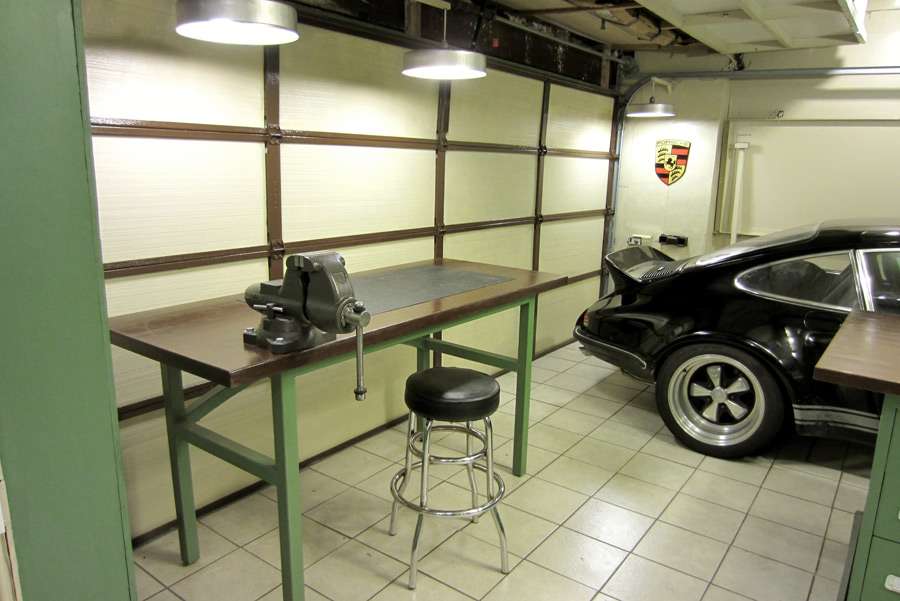
At the risk of overstaying my welcome, here's an example of how the stuff in the shop got put together on so low a budget. I did everything myself and used a lot of second-hand and bruised-and-damaged stuff to put it together. The main bench started out as this Equipto cabinet, which had some sheet metal separation where someone tried to force it open on the vertical column and had lost its keys and developed a problem with the locking bar.

I wanted a nice top, so I sprung for a piece of oak butcher block from Ikea.

The first thing I did was to cut the Equipto cabinet in half. Except that it was a nine-drawer unit, so 'half' was going to be a 4/5 proposition.

But that gave me an idea. I knew I was going to have a vise on the bench, and I knew the handle would interfere with a drawer opening and closing. So I figured I'd have to put in a false face where that drawer would have been, but the space there could be used for my air hose reel, if it could be mounted sideways.
First I made a base:

Then I mounted the thing sideways. I was worried about sag, but it worked great.

I didn't want to be bumping into the chair all the time, so I cut a little inset into the bench top. I also added some small drawers to the top, and cut into the wall to use the (uninsulated) space there. That way the drawers would eat up less of the bench top.

For a chair, I found an old adjustable one on Ebay and reupholstered it with leather left over from when I did the interior on the Porsche.


I picked up a 39-year-old drill press cheap and cleaned it up. I chopped its column and changed it from a floor model to a bench top model.


Cleaned up and painted a second-hand vise, too.

You might notice that I use a color of paint until it's all gone. The drawer handles, vise, drill press, chair and even that outlet strip are all the same shade of Rustoleum Anodized Bronze.
There's even a coffee-cup warmer on the top. I added a 3-hour automatic shut-off so it wouldn't cook an old cup of coffee overnight.

Here's the finished product. I also added a magnifying lamp (also cleaned up and painted) because my eyes aren't as young as they once were.
Before this, I didn't have a bench where I could sit while working. It's nice to have the option when you're working on one thing for a long time and want good light and a way to save yourself a little back pain.
I'm a big believer in DIY.
At the risk of overstaying my welcome, here's an example of how the stuff in the shop got put together on so low a budget. I did everything myself and used a lot of second-hand and bruised-and-damaged stuff to put it together. The main bench started out as this Equipto cabinet, which had some sheet metal separation where someone tried to force it open on the vertical column and had lost its keys and developed a problem with the locking bar.
I wanted a nice top, so I sprung for a piece of oak butcher block from Ikea.
The first thing I did was to cut the Equipto cabinet in half. Except that it was a nine-drawer unit, so 'half' was going to be a 4/5 proposition.
But that gave me an idea. I knew I was going to have a vise on the bench, and I knew the handle would interfere with a drawer opening and closing. So I figured I'd have to put in a false face where that drawer would have been, but the space there could be used for my air hose reel, if it could be mounted sideways.
First I made a base:
Then I mounted the thing sideways. I was worried about sag, but it worked great.
I didn't want to be bumping into the chair all the time, so I cut a little inset into the bench top. I also added some small drawers to the top, and cut into the wall to use the (uninsulated) space there. That way the drawers would eat up less of the bench top.
For a chair, I found an old adjustable one on Ebay and reupholstered it with leather left over from when I did the interior on the Porsche.
I picked up a 39-year-old drill press cheap and cleaned it up. I chopped its column and changed it from a floor model to a bench top model.
Cleaned up and painted a second-hand vise, too.
You might notice that I use a color of paint until it's all gone. The drawer handles, vise, drill press, chair and even that outlet strip are all the same shade of Rustoleum Anodized Bronze.
There's even a coffee-cup warmer on the top. I added a 3-hour automatic shut-off so it wouldn't cook an old cup of coffee overnight.
Here's the finished product. I also added a magnifying lamp (also cleaned up and painted) because my eyes aren't as young as they once were.
Before this, I didn't have a bench where I could sit while working. It's nice to have the option when you're working on one thing for a long time and want good light and a way to save yourself a little back pain.
I'm a big believer in DIY.
08-10-2012 | 06:20 AM
#693
Thanks.
At the risk of overstaying my welcome, here's an example of how the stuff in the shop got put together on so low a budget. I did everything myself and used a lot of second-hand and bruised-and-damaged stuff to put it together. The main bench started out as this Equipto cabinet, which had some sheet metal separation where someone tried to force it open on the vertical column and had lost its keys and developed a problem with the locking bar.
I'm a big believer in DIY.
Jack I think I could speak for everyone here by saying youre not over staying your welcome. Your garage and work youve done to get it that way is awe inspriring, and if you have anymore I would love to see it. If its on your website I apologize for asking for more as I cannot see it at work so I must remember to check it when I get home. Thanks again for your posts, your garage is awesome.
 08-10-2012 | 01:18 PM
#698
Teching In
Joined: Jul 2012
Posts: 6
Likes: 0
Thanks, guys.
And trust me, there's a little Red Green in there, too.
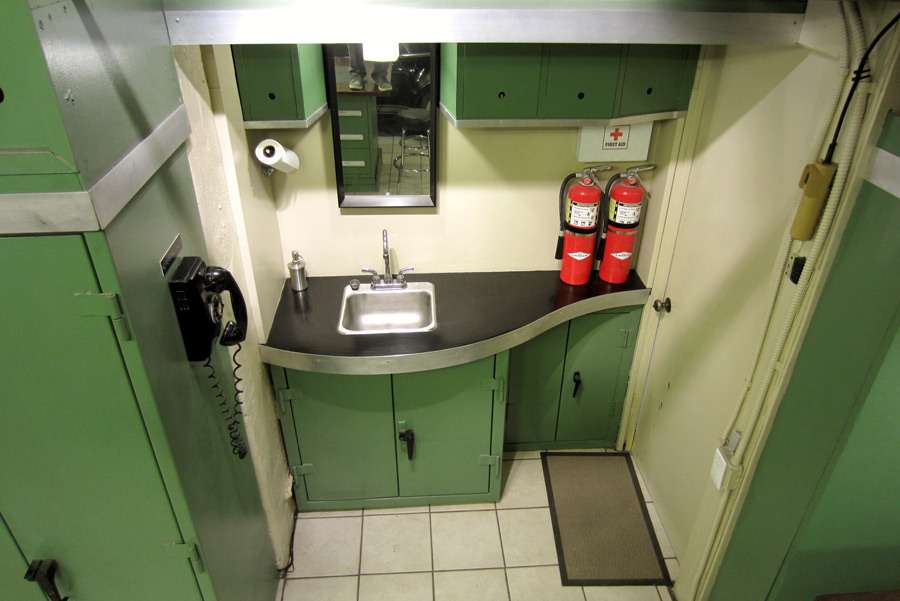
Thanks. Yes, you can take a virtual tour of the place at the web site, with a lot of information about how it all got put together. The sink area is kind of cool, since it was built by chopping up this (fork-lift-damaged) cabinet.
This:

Turned into this:

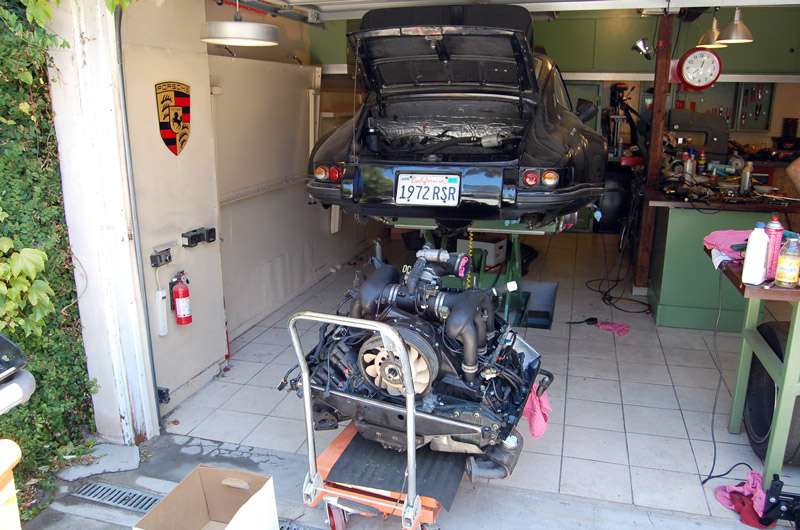
My father is a fire safety engineer. So part of it is in the blood.
But I also got most of the extinguishers second-hand, so the reason there are two by the exit is that one just might fail -- and at that point I won't have time to run out and buy a replacement.
I also know that the building is old and probably pretty brittle. And the car, which is also pretty old, has enough magnesium in it that once it gets burning, there might be nothing for the fire department to do but wait it out.
Thanks! I almost sold that Jeep about 15 years ago. Now whenever I need to haul a cabinet or anything else, I'm glad I kept it. I even made a rack for it so I can haul 20' lengths of steel.

I've lived in places with garages since 1999. But it wasn't until 2007 that I could actually park my car in one of them. Most of my adult life involved working on cars in the driveway, sometimes under a plastic tarp. So when I finally had the time to do something about it, I did. But there was a lot of patience involved -- and a lot of misplaced tools -- before that happened. 
And trust me, there's a little Red Green in there, too.
Jack I think I could speak for everyone here by saying youre not over staying your welcome. Your garage and work youve done to get it that way is awe inspriring, and if you have anymore I would love to see it. If its on your website I apologize for asking for more as I cannot see it at work so I must remember to check it when I get home. Thanks again for your posts, your garage is awesome.
This:
Turned into this:
But I also got most of the extinguishers second-hand, so the reason there are two by the exit is that one just might fail -- and at that point I won't have time to run out and buy a replacement.
I also know that the building is old and probably pretty brittle. And the car, which is also pretty old, has enough magnesium in it that once it gets burning, there might be nothing for the fire department to do but wait it out.
08-10-2012 | 04:10 PM
#699
I can appreciate making the most of what little space you have. I have a standard, 20x20 garage (2car) that during the winter houses 3 cars, a fridge, workbench, tool chest and a host of other odds and ends. At one point I had the John Deere in there as well, but now I have a shed for the outdoor tools and equipment. Anything I could get up on the walls, and over head, I did.

08-10-2012 | 04:37 PM
#700

I can appreciate making the most of what little space you have. I have a standard, 20x20 garage (2car) that during the winter houses 3 cars, a fridge, workbench, tool chest and a host of other odds and ends. At one point I had the John Deere in there as well, but now I have a shed for the outdoor tools and equipment. Anything I could get up on the walls, and over head, I did.