
 05-20-2016, 01:04 PM
Last edit by: IB Advertising
See related guides and technical advice from our community experts:
- Camaro and Firebird How to Install Steering Wheel with Radio Contorls<br>Step by step instructions for do-it-yourself repairs.

Axxess ASWC Install Walk-Through: 2001 Trans Am Steering Wheel Controls
04-24-2012, 12:43 PM
#1

For those that might have found this task a little intimidating at first like me, given all the wires that are available; here's a little walk-through that should simplify things quite a bit.
Again, this install was in a 2001 Pontiac Trans Am WS6 with the 10 speaker Monsoon system. I installed an aftermarket JVC head unit. Things are slightly different towards the end depending on what brand of head unit you’re installing, but it's only small differences depending on the brand.
I highly recommend disconnecting your battery before doing this.
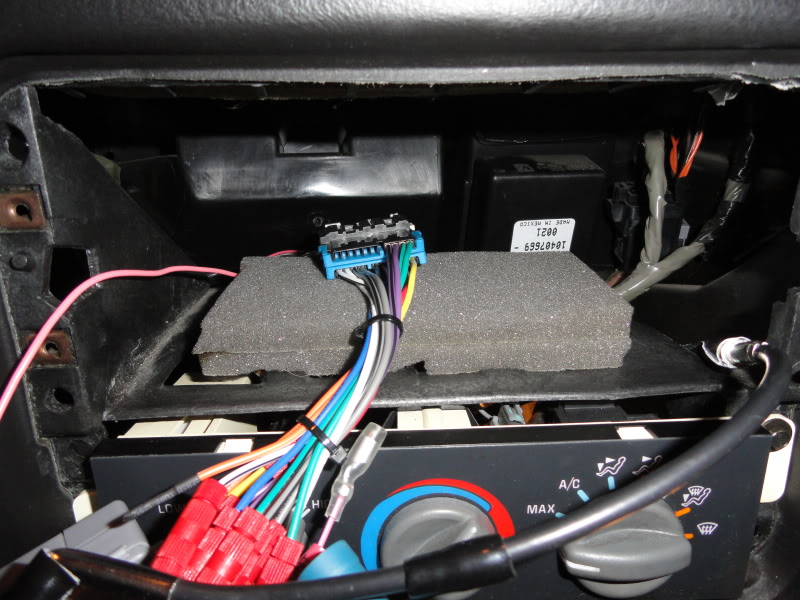
This is what it looked like at the start:

So, first I located the “steering wheel controls” input wire on the OEM harness, for me it was pin #14 and a dark blue color (red arrow pointing to it):


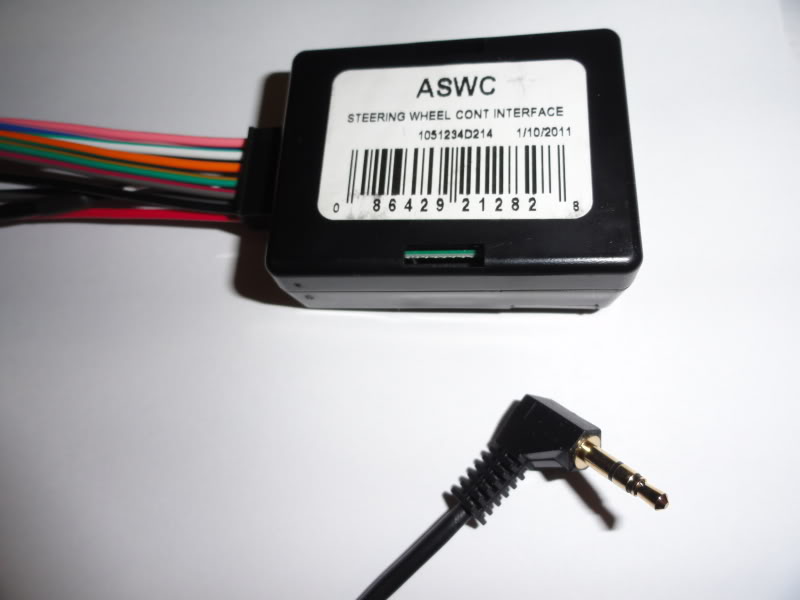
Next, on the harness that comes with the Axxess system there are a ton of different wires. I only needed to use 3. Red, black and the orange wire with a green stripe (all the other wires on the harness that came with the Axxess unit can be taped off).
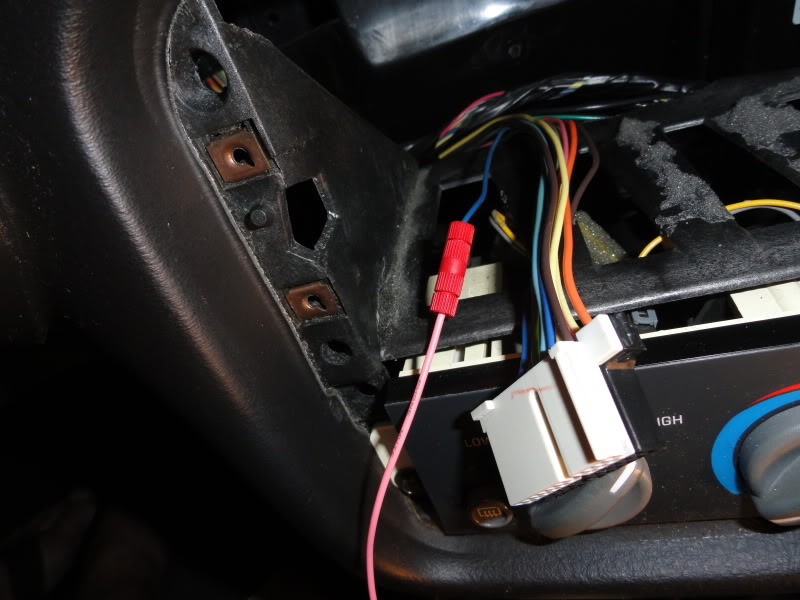
I posi-tapped the dark blue wire on the OEM harness with the orange/green stripe wire from the harness that came with the Axxess unit:


Next I tapped the red & black wires off of the main wiring harness and connected those to the red & black wires on the harness that came with the Axxess unit (it doesn't matter if you use the red/black on the OEM harness side or on the aftermarket harness adapter side):

Next I located the steering wheel wire on the aftermarket head unit's plug, mine was blue with a yellow stripe (I think that's standard) and I spliced that up with the solid brown wire of the small female 3.5mm connector that came with the Axxess unit (just tape off the brown/white stripe wire):


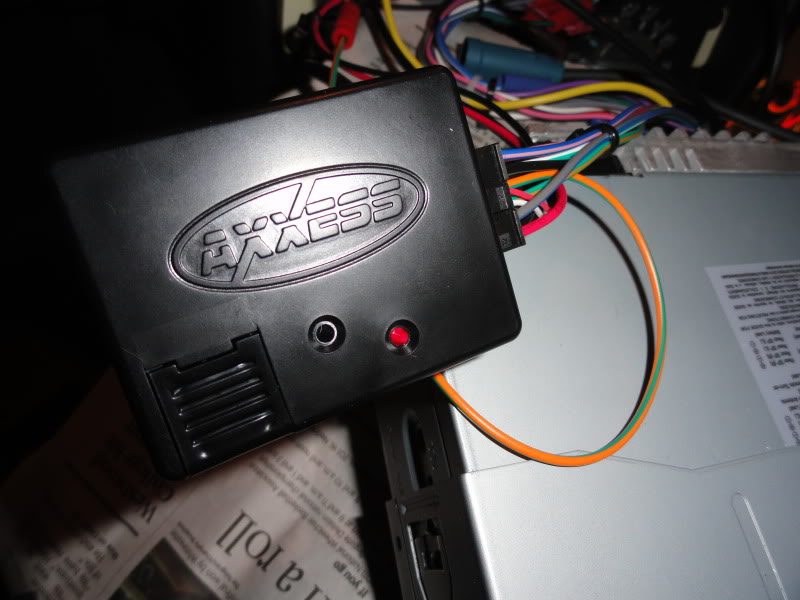
Finally I connected the male 3.5mm jack that's attached to the wire harness that came with the Axxess unit to the female 3.5mm connector I just spliced:

Yeah, it looks like a mess, but after all of it was hooked up and working properly some zip ties neatened things up quite a bit.
After that it was a simple matter of just reconnecting my battery and then turning the ignition on. Right away the Axxess unit began to blink and from there all I had to do was press & hold the volume up button on the steering wheel for a few seconds and then the Axxess unit did everything else on its own. It worked like a charm.
Again, this install was in a 2001 Pontiac Trans Am WS6 with the 10 speaker Monsoon system. I installed an aftermarket JVC head unit. Things are slightly different towards the end depending on what brand of head unit you’re installing, but it's only small differences depending on the brand.
I highly recommend disconnecting your battery before doing this.
This is what it looked like at the start:
So, first I located the “steering wheel controls” input wire on the OEM harness, for me it was pin #14 and a dark blue color (red arrow pointing to it):
Next, on the harness that comes with the Axxess system there are a ton of different wires. I only needed to use 3. Red, black and the orange wire with a green stripe (all the other wires on the harness that came with the Axxess unit can be taped off).
I posi-tapped the dark blue wire on the OEM harness with the orange/green stripe wire from the harness that came with the Axxess unit:
Next I tapped the red & black wires off of the main wiring harness and connected those to the red & black wires on the harness that came with the Axxess unit (it doesn't matter if you use the red/black on the OEM harness side or on the aftermarket harness adapter side):
Next I located the steering wheel wire on the aftermarket head unit's plug, mine was blue with a yellow stripe (I think that's standard) and I spliced that up with the solid brown wire of the small female 3.5mm connector that came with the Axxess unit (just tape off the brown/white stripe wire):
Finally I connected the male 3.5mm jack that's attached to the wire harness that came with the Axxess unit to the female 3.5mm connector I just spliced:
Yeah, it looks like a mess, but after all of it was hooked up and working properly some zip ties neatened things up quite a bit.
After that it was a simple matter of just reconnecting my battery and then turning the ignition on. Right away the Axxess unit began to blink and from there all I had to do was press & hold the volume up button on the steering wheel for a few seconds and then the Axxess unit did everything else on its own. It worked like a charm.
Last edited by lionel_luthor; 04-25-2012 at 08:51 AM.

The following users liked this post:
BimRon (05-30-2021)
04-24-2012, 03:08 PM
#2
On The Tree

Join Date: May 2004
Location: Orlando, FL
Posts: 183
Likes: 0
Received 0 Likes
on
0 Posts

Good job with the pics.
Another thing you can do, on your wiring harness adapter for your head unit your Pin 14 space is going to be empty. You can crimp a new wire and use a pin pusher to put it into the place where Pin 14 would go. Then theres no tapping the factory harness. I did this and its very clean.
Another thing you can do, on your wiring harness adapter for your head unit your Pin 14 space is going to be empty. You can crimp a new wire and use a pin pusher to put it into the place where Pin 14 would go. Then theres no tapping the factory harness. I did this and its very clean.
 04-26-2012, 07:48 AM
#4

Good job with the pics.
Another thing you can do, on your wiring harness adapter for your head unit your Pin 14 space is going to be empty. You can crimp a new wire and use a pin pusher to put it into the place where Pin 14 would go. Then theres no tapping the factory harness. I did this and its very clean.
Another thing you can do, on your wiring harness adapter for your head unit your Pin 14 space is going to be empty. You can crimp a new wire and use a pin pusher to put it into the place where Pin 14 would go. Then theres no tapping the factory harness. I did this and its very clean.
04-26-2012, 10:51 AM
#5
On The Tree
Join Date: May 2004
Location: Orlando, FL
Posts: 183
Likes: 0
Received 0 Likes
on
0 Posts
When you get the wiring harness adapters, they'll be the male side of the factory radio harness connectors (the side with the pins) with a bunch of loose wires coming off them.
One of these we're going to cannibalize for pins, and one of them we're going to actually use to install the radio.
Step 1) You extract a wire (of suitable color) with its attached pin from the donor harness. To do this I cut open the donor harness connector with a wire cutter. Its just plastic, so its not difficult. You can use a tiny flat bladed screwdriver to help push the pin through from the other side. If you mess up, you can always just choose a different pin and start over.
Step 2) Once you extract a wire with its attached pin, you insert it into the new harness in the proper space (For the steering wheel stuff, Pin 14, see the diagrams). I did this with a small flat bladed screwdriver. There are purpose-made tools for this, but I just used a tiny flat bladed screwdriver to catch the edge of the crimped part and pushed it in.
Step 3) You now have a harness adapter with an additional pin and wire that you will connect to your ASWC. Just connect it up and install.
08-26-2012, 03:54 PM
#6
On The Tree

Join Date: Jul 2003
Posts: 105
Likes: 0
Received 0 Likes
on
0 Posts
Just got mine working with a Kenwood KDC-BT852HD HU. I ordered them from Amazon so it didn't come with specific instructions. I followed the generic guide (and a pic above) and connected the pink wire (Pin 1) from the ASWC to the blue (pin 14) of the harness. That didn't work.
I went to the site and it said "orange/green" (pin 3) for my car. Turns out that it looks more yellow/green than orange/green, but when I hooked it up to Pin 14 on the harness it worked fine. I had to manually program, but it's all working now.
So at least for my car - USE THE ORANGE/GREEN (PIN 3) from the ASWC, NOT the PINK wire (PIN 1).
Trending Topics
 08-05-2014, 11:38 PM
#10
Teching In

Join Date: Oct 2013
Posts: 20
Likes: 0
Received 0 Likes
on
0 Posts
08-06-2014, 07:05 AM
#11
This is all covered on page 7 of the Axxess instructions.
08-06-2014, 05:55 PM
#12
Teching In
Join Date: Oct 2013
Posts: 20
Likes: 0
Received 0 Likes
on
0 Posts
That's only for aftermarket head units that don't come with a jack for the wired remote (Kenwood and newer JVC HUs are examples). The Axxess adapter comes with a jack to splice in when connecting to one of those head units. All head units that have a built-in 3.5mm jack require no splicing - just plug in the 3.5mm plug from the adapter.
This is all covered on page 7 of the Axxess instructions.
This is all covered on page 7 of the Axxess instructions.
08-09-2014, 03:03 PM
#13
Teching In
Join Date: Oct 2013
Posts: 20
Likes: 0
Received 0 Likes
on
0 Posts
One thing to note, there is no red wire on the oem harness. Not on my 2002 ta or mentioned in the extremely helpful monsoon writeup on these boards. The red wire from harness adapter lines up with yellow wire on oem harness. So I believe you would connect red wire from axxess harness to either red wire on harness adaptor or yellow wire on oem harness.
08-09-2014, 03:35 PM
#14
I could not find any mention of a red factory wire in the Monsoon FAQ sticky. I would like to correct that if you could be more specific about where (it's a rather lengthy thread and I've been through it so many times I could easily overlook something).
08-09-2014, 05:10 PM
#15
Teching In
Join Date: Oct 2013
Posts: 20
Likes: 0
Received 0 Likes
on
0 Posts
I didn't realize you did the monsoon sticky. Awesome job!! Very helpful and informative. But yeah, right below where you talk about adding aux input to factory stereo you got the breakdown of the color and what each of them do. There is no mention of a red factory wire. When you said you needed to correct, are you saying there shoul be a factory red wire on oem harness? Btw I've been asking questions because im waiting for my hu and other stuff, so I havent pulled hu yet. Just doing preliminary research.
08-10-2014, 08:29 AM
#16
Thank you for the kind words. Sorry, I misread your earlier post thinking you meant the FAQ had mention of a red wire in the OEM harness. Going back over this thread I realize you were commenting on the OP saying "use the red/black on the OEM harness side"... there is no red wire in the OEM harness.
08-10-2014, 12:56 PM
#17
Teching In
Join Date: Oct 2013
Posts: 20
Likes: 0
Received 0 Likes
on
0 Posts
Very good, clears that up. So red axcess wire goes to either red wire on adapter harness or yellow on oem harness. Im looking forward to getting everything and trying install. I got a pioneer 4600bt, axcess steering control, mirror link for my android, dvd bypass(so parking brake doesnt have to be on to watch dvd) and backup camera on order. Ive already got modified bezel for 2din stereo (got good deal on ebay) and harness and antenna adapter. My main concern is the cutting required to fit stereo in opening. I dont want to mess anything up I cant undo. But I got couple ideas, hopefully will go ok. Thanks again for clearing the wiring thing up for me.
03-12-2016, 08:18 PM
#18
Sorry for bringing this up from the grave. I have a pioneer hu. 02 camaro ss. I have the orange/green wire connected to the dark blue oem wire. It doesn't want to program with the auto function. I had half got the manual program to work. The right steering wheel buttons work (volume up, down, mute, play) but I can't get the left side to work (seek up, down, am/fm, preset). I unplugged the controls adapter and plugged in the factory hu and all the buttons worked. Not really sure where to go from here. Only thought is I plugged the wrong wire from the axxess unit (orange/green wire). Or maybe firmware update? Thanks for any help.
03-12-2016, 10:28 PM
#19
False alarm. Website told me the yellow/green wire. Tried that (duh) and it worked like a charm. So to repeat 2002 camaro 5.7 w/monsoon needs the yellow/green. NOT green/orange.
