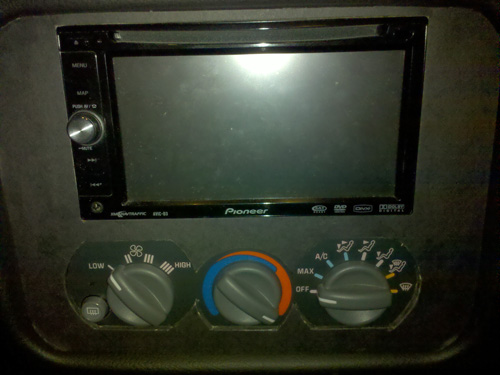
Pioneer AVIC-D3 Installed
 02-21-2011, 10:28 AM
#61
Copy & Paste Moderator
Thread Starter

Yes. I only changed the headunit. The stock amp and speakers remained unchanged.
That's how the stock setup works. The stock headunit is a regular OEM headunit with only speaker-level outputs. It sends the speaker-level outputs to the amp which further amplifies and splits it to the speakers. The stock Monsoon amp also only has speaker-level inputs.
That's not a problem either if you use properly matched speakers that work well with the amp and sound well together. Take a look at some threads (and some sponsors ex: Kee Audio) to see what packages work.
That's not a problem either if you use properly matched speakers that work well with the amp and sound well together. Take a look at some threads (and some sponsors ex: Kee Audio) to see what packages work.
 02-22-2011, 12:53 AM
#63
Thank you very much Whitebird00 and VIP1 for your responses. They were of great help to me. I am in the process of installing a Pioneer Avic Z110BT in my dash with 6LiterEater's modified double din Camaro bezel.
02-22-2011, 08:41 PM
#64
Copy & Paste Moderator
Thread Starter
Sorry, no. Its easy to make, but mine is custom fit to my car (a template and careful trimming was involved). It might not fit your car. Plus I'm not looking to start making these for others. If I was to make these, I'd have to make a higher quality piece that is a bit more generic/forgiving on the dimensions to better fit other people's setups.
 07-24-2011, 05:46 PM
#70
Copy & Paste Moderator
Thread Starter
The brace at the back of the tray had to be removed (not pictured). I used a cutting disk on the rotary tool to cut the plastic of the vertical brace at the back of the tray and just bent back the metal backing of it.
(Wear goggles when doing this to protect your eyes.)
(Wear goggles when doing this to protect your eyes.)
 08-08-2011, 10:57 PM
#72
Copy & Paste Moderator
Thread Starter
12-03-2011, 08:53 PM
#73
Copy & Paste Moderator
Thread Starter
I'm working on a new bezel with the HVAC **** area rounded out like more modern cars.
Keep in mind that this is just some rough prototype. The final version may be plastic. Possibly edge-lit acrylic (black or blue face with the visible edges around the ***** glowing blue).
Anyway onto pics.
First attempt using corrugated cardboard just to get some rough lines.

500x375
1600x1200
I didn't like how the the "holes" looked so I cut that area square again and re-did that area using some thin cardboard.

500x375
1600x1200
That's more the shape I was looking for so I used some thick cardboard. Its the stuff used in the back of furniture (as evident in the next pic). Dig that luxurious wood grain.

500x375
1600x1200
That was pretty close but a little rough. So I did it again with the same material but I glued some black construction paper and blacked-out the edges with a marker to give it a closer appearance to the look I'm going for. I'm not totally convinced of going this route though.
500x375
1600x1200
Here is what it looks like not installed:

500x375
1600x1200
Like I said above, this is only a prototype. I'm not sure how I want to have the final product appear:
1.) black or blue with velour paper (like now)
2.) blue textured "carbon-fiber" vinyl (matte finish)
3.) one of the above with blue edge-lighting around the HVAC *****.
I'm thinking #1, but I'd like to have a silver ring around the ***** to match my vents. I'm not sure how to achieve this though.
Option #3 is a bit ambitious to get looking right but I'd like to try.
For reference, this is how it looks now:
.jpg)
500 x 375
1280 x 960
2592 x 1944
.jpg)
500 x 375
1280 x 960
2592 x 1944
Keep in mind that this is just some rough prototype. The final version may be plastic. Possibly edge-lit acrylic (black or blue face with the visible edges around the ***** glowing blue).
Anyway onto pics.
First attempt using corrugated cardboard just to get some rough lines.
500x375
1600x1200
I didn't like how the the "holes" looked so I cut that area square again and re-did that area using some thin cardboard.
500x375
1600x1200
That's more the shape I was looking for so I used some thick cardboard. Its the stuff used in the back of furniture (as evident in the next pic). Dig that luxurious wood grain.
500x375
1600x1200
That was pretty close but a little rough. So I did it again with the same material but I glued some black construction paper and blacked-out the edges with a marker to give it a closer appearance to the look I'm going for. I'm not totally convinced of going this route though.
500x375
1600x1200
Here is what it looks like not installed:
500x375
1600x1200
Like I said above, this is only a prototype. I'm not sure how I want to have the final product appear:
1.) black or blue with velour paper (like now)
2.) blue textured "carbon-fiber" vinyl (matte finish)
3.) one of the above with blue edge-lighting around the HVAC *****.
I'm thinking #1, but I'd like to have a silver ring around the ***** to match my vents. I'm not sure how to achieve this though.
Option #3 is a bit ambitious to get looking right but I'd like to try.
For reference, this is how it looks now:
500 x 375
1280 x 960
2592 x 1944
500 x 375
1280 x 960
2592 x 1944
12-03-2011, 09:08 PM
#74
TECH Junkie
iTrader: (21)
Join Date: Aug 2004
Location: Virginia Beach, VA
Posts: 3,164
Likes: 0
Received 0 Likes
on
0 Posts

Instead of how it is cut out around the **** and leaves the graphics for the a/c controls open, can you make it to where it completely covers that part too and only the **** is visible?
You would have to have something made (screen printed maybe or custom painted) on the piece so you know what the a/c settings are, and you might have to some how extend the mounting points for the *****, but I think it would look better that way.
Getting different ***** would help out a lot too.
You would have to have something made (screen printed maybe or custom painted) on the piece so you know what the a/c settings are, and you might have to some how extend the mounting points for the *****, but I think it would look better that way.
Getting different ***** would help out a lot too.
12-04-2011, 09:31 AM
#75
Copy & Paste Moderator
Thread Starter
I didn't want to cover the graphics because I'd have to find some way to light up the new ones on the bezel. Otherwise I wouldn't see them at night. It's not impossible though. I'll keep it in mind. Thanks.
I am looking into alternate *****. I may have to go to a junk yard and see what I can make fit. I would like something black maybe with a silver/chrome accent ring, smooth top, ridges on the side for grip instead of the smooth one we have now with the raised stripe for grip.
I am looking into alternate *****. I may have to go to a junk yard and see what I can make fit. I would like something black maybe with a silver/chrome accent ring, smooth top, ridges on the side for grip instead of the smooth one we have now with the raised stripe for grip.
 12-22-2012, 01:02 PM
#80
Copy & Paste Moderator
Thread Starter
With what? a Pioneer AVIC-D3? There are newer / better units out now. I'm still using mine though.
I don't know if the 6LE bezel fits it. Probably. Ask 6LE. The 6LE bezel is designed for a standard Double-DIN.
I don't know if the 6LE bezel fits it. Probably. Ask 6LE. The 6LE bezel is designed for a standard Double-DIN.