


Pioneer AVIC-D3 Installed
Thread Starter
Copy & Paste Moderator


Joined: Apr 2002
Posts: 9,764
Likes: 208
From: Eastern MA
Here is my Pioneer AVIC-D3 installed.
Up Close
.jpg)
500 x 375
1280 x 960
2592 x 1944
Night - With Dash Lights
.jpg)
500 x 375
1280 x 960
2592 x 1944
Night - No Dash Lights
.jpg)
500 x 375
1280 x 960
2592 x 1944
Bluetooth Microphone Placement
(Lower right corner in front of gauge lens.)
.jpg)
500 x 375
1280 x 960
2592 x 1944
I wrapped 2 - 3" of the wire behind the microphone with a few layers of electrical tape to protect it from the edges of the gauge bezel.
Further away
.jpg)
500 x 375
1280 x 960
2592 x 1944
Bezel Removed
.jpg)
500 x 375
1280 x 960
2592 x 1944
I made my own mounting brackets using some spare steel I had lying around (the steel side panel from an old computer case). They are basically two large broad "L" brackets drilled/cut in the right places to mount them to the sides of the headunit and the headunit to the dash opening. I started out with the flat sides of a computer case, cut the rough amount I needed and bent it to shape. I think the measurements where: Height: height of the headuint, Depth: 4", Tab: 2". I then centered the headunit in the opening. There is a lip/bump-out about 3/16" back from the face and I lined that up flush with the HVAC panel. If you look at the pics, the tab of the brackets is slightly set back from that lip/bump-out. Then, I cut the brackets to fit (trimmed tab length and cut slots for the stock mounting screws and bezel mounting holes). With the brackets in place, I made note of how they aligned on the sides of the headunit. Then I removed the headunit and made a pattern using a piece of paper of the existing screw holes on the sides of the headunit. I used 4 screws on each side (8 screws total). The sides of the headunit already had screw holes because on some cars, it'll mount to the stock bracket that way. I transferred the pattern to the brackets and drilled the holes on the brackets to line up with the existing holes on the headunit. I attached the brackets to the sides of the headunit using the screws that came with the headunit.
Bezel Front
.jpg)
500 x 375
1280 x 960
2592 x 1944
Bezel Back
.jpg)
500 x 375
1280 x 960
2592 x 1944
I made my own trim bezel. I started out by trimming the plastic bezel that comes with the AVIC-D3 to the needed shape and used spray contact cement to attach a layer of 1/8" thick black "chip board" card board (under $3) over the resulting pieces of the trim (top-half/HVAC-sides/HVAC-bottom) . It is similar to notepad backer, but higher quality, better/smoother finish, and black. Actually, its more like photo mount. Architects (like my brother) use it often in model making. It is available at art supply stores. I also added some layers of the card board to the back in places to add depth so that it can't be pushed in too far when mounted. I was planning on wrapping it with some vinyl I had, but at another art supply store, I found some velour "paper" (under $2) and wrapped it with that instead. Its attached via double-sided "carpet-tape". I think it looks better and has a good feel. It looks and feels just like velour fabric, but its thinner and stiffer. I didn't use the contact cement because I didn't want to risk it seeping through. Total cost: roughly $30 ($23 of that is the spray glue... of which I used a tiny amount) Its attached via pressure fit with a little velcro at the bottom edge under the HVAC controls.
UPDATE: After a few months and some hot days, the shroud I made started to buckle and the middle and lower horizontal sections bulged out. I added a strip of steel behind each and will see how that does.
UPDATE: The added steel seems to have done the trick. Its still solid a few months later.
Dash Opening Trimmed
.jpg)
.jpg)
(WhiteBird00 took these 2 pictures, but I'm re-hosting them on my domain.)
The ribs at the top of the opening had to be trimmed about an 1/8". I used a coarse sanding drum on my rotary tool (Dremel knockoff) to trim the ribs at the top of the dash opening. My brother held a vacuum hose next to the work-in-progress to catch the flying plastic debris. WEAR GOGGLES WHEN DOING THIS TO PROTECT YOUR EYES!
The brace at the back of the tray also had to be removed (not pictured). I used a cutting disk on the rotary tool to cut the plastic of the vertical brace at the back of the tray and just bent back the metal backing of it. WEAR GOGGLES WHEN DOING THIS TO PROTECT YOUR EYES!
Wiring
The AVIC-D3 is connected to the stock wiring harness using a standard 21-pin 1988+ GM harness. The Scosche number is GM-02B. The Metra number is 70-1858.
The steering wheel controls are retained using a PAC (Pacific Accessory Corp) SWI-PS . It plugs into the remote port on the back of the AVIC-D3 (and other Pioneer headunits with a remore port).
The stock CD-Changer cable is no longer used. It is left disconnected.
[UPDATE -- 2009-05-10]
I bought the CDI200 IPOD cable from Amazon for $11 shipped and a 120GB IPOD Classic for $225+tax from Costco.
Here they are installed. The Cable connects to the back of the headunit and the IPOD is velcroed to the flat spot hidden by the right lip of the glove box. That lip doesn't touch the IPOD at all.
.jpg)
500 x 375
1280 x 960
2592 x 1944
.jpg)
500 x 375
1280 x 960
2592 x 1944
Up Close
500 x 375
1280 x 960
2592 x 1944
Night - With Dash Lights
500 x 375
1280 x 960
2592 x 1944
Night - No Dash Lights
500 x 375
1280 x 960
2592 x 1944
Bluetooth Microphone Placement
(Lower right corner in front of gauge lens.)
500 x 375
1280 x 960
2592 x 1944
I wrapped 2 - 3" of the wire behind the microphone with a few layers of electrical tape to protect it from the edges of the gauge bezel.
Further away
500 x 375
1280 x 960
2592 x 1944
Bezel Removed
500 x 375
1280 x 960
2592 x 1944
I made my own mounting brackets using some spare steel I had lying around (the steel side panel from an old computer case). They are basically two large broad "L" brackets drilled/cut in the right places to mount them to the sides of the headunit and the headunit to the dash opening. I started out with the flat sides of a computer case, cut the rough amount I needed and bent it to shape. I think the measurements where: Height: height of the headuint, Depth: 4", Tab: 2". I then centered the headunit in the opening. There is a lip/bump-out about 3/16" back from the face and I lined that up flush with the HVAC panel. If you look at the pics, the tab of the brackets is slightly set back from that lip/bump-out. Then, I cut the brackets to fit (trimmed tab length and cut slots for the stock mounting screws and bezel mounting holes). With the brackets in place, I made note of how they aligned on the sides of the headunit. Then I removed the headunit and made a pattern using a piece of paper of the existing screw holes on the sides of the headunit. I used 4 screws on each side (8 screws total). The sides of the headunit already had screw holes because on some cars, it'll mount to the stock bracket that way. I transferred the pattern to the brackets and drilled the holes on the brackets to line up with the existing holes on the headunit. I attached the brackets to the sides of the headunit using the screws that came with the headunit.
Bezel Front
500 x 375
1280 x 960
2592 x 1944
Bezel Back
500 x 375
1280 x 960
2592 x 1944
I made my own trim bezel. I started out by trimming the plastic bezel that comes with the AVIC-D3 to the needed shape and used spray contact cement to attach a layer of 1/8" thick black "chip board" card board (under $3) over the resulting pieces of the trim (top-half/HVAC-sides/HVAC-bottom) . It is similar to notepad backer, but higher quality, better/smoother finish, and black. Actually, its more like photo mount. Architects (like my brother) use it often in model making. It is available at art supply stores. I also added some layers of the card board to the back in places to add depth so that it can't be pushed in too far when mounted. I was planning on wrapping it with some vinyl I had, but at another art supply store, I found some velour "paper" (under $2) and wrapped it with that instead. Its attached via double-sided "carpet-tape". I think it looks better and has a good feel. It looks and feels just like velour fabric, but its thinner and stiffer. I didn't use the contact cement because I didn't want to risk it seeping through. Total cost: roughly $30 ($23 of that is the spray glue... of which I used a tiny amount) Its attached via pressure fit with a little velcro at the bottom edge under the HVAC controls.
UPDATE: After a few months and some hot days, the shroud I made started to buckle and the middle and lower horizontal sections bulged out. I added a strip of steel behind each and will see how that does.
UPDATE: The added steel seems to have done the trick. Its still solid a few months later.
Dash Opening Trimmed
(WhiteBird00 took these 2 pictures, but I'm re-hosting them on my domain.)
The ribs at the top of the opening had to be trimmed about an 1/8". I used a coarse sanding drum on my rotary tool (Dremel knockoff) to trim the ribs at the top of the dash opening. My brother held a vacuum hose next to the work-in-progress to catch the flying plastic debris. WEAR GOGGLES WHEN DOING THIS TO PROTECT YOUR EYES!
The brace at the back of the tray also had to be removed (not pictured). I used a cutting disk on the rotary tool to cut the plastic of the vertical brace at the back of the tray and just bent back the metal backing of it. WEAR GOGGLES WHEN DOING THIS TO PROTECT YOUR EYES!
Wiring
The AVIC-D3 is connected to the stock wiring harness using a standard 21-pin 1988+ GM harness. The Scosche number is GM-02B. The Metra number is 70-1858.
The steering wheel controls are retained using a PAC (Pacific Accessory Corp) SWI-PS . It plugs into the remote port on the back of the AVIC-D3 (and other Pioneer headunits with a remore port).
The stock CD-Changer cable is no longer used. It is left disconnected.
[UPDATE -- 2009-05-10]
I bought the CDI200 IPOD cable from Amazon for $11 shipped and a 120GB IPOD Classic for $225+tax from Costco.
Here they are installed. The Cable connects to the back of the headunit and the IPOD is velcroed to the flat spot hidden by the right lip of the glove box. That lip doesn't touch the IPOD at all.
500 x 375
1280 x 960
2592 x 1944
500 x 375
1280 x 960
2592 x 1944
Last edited by VIP1; May 10, 2009 at 04:11 PM.
TECH Resident
Joined: Mar 2008
Posts: 771
Likes: 0
Vip that looks really good. Where did you get the Knight Rider screen ? I want that..I hope I can get that on my Kenwood 512. I drumeled the ribs out on the top. I had to cut the tray some..I can get the Kenwood in without cutting the re enforcement in the back..Now if C5 KIdd would get back to me so I can get the bezel..I don't have the patience or the time to make my own bezel..You did a good job..
Thread Starter
Copy & Paste Moderator
Joined: Apr 2002
Posts: 9,764
Likes: 208
From: Eastern MA
Thanks for the compliments.
Its velour "paper" wrapped over a sandwich of plastic and cardboard. My first post in this thread has more detail. Let me know if anything doesn't make sense. I didn't take any work-in-progress pictures though.
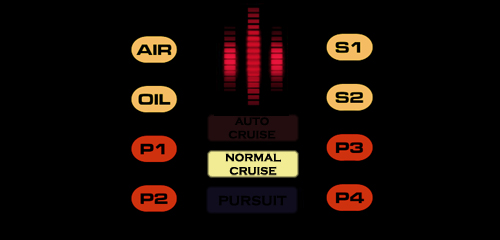
Its a composite of a picture of the real dash from the show and some cleanup work I did on the text and buttons using bits of other pictures I found online and some re-creation. The only thing left untouched is the actual red voice LED bars.
Here you go...
Load/Splash Screen

Nav Menu
AV Menu
Originally Posted by mycamaroSS
But what material is that bezel, looks like it's wrapped.
Originally Posted by Irocem99
Where did you get the Knight Rider screen?
Originally Posted by Irocem99
I want that..
Load/Splash Screen
Nav Menu
AV Menu
Last edited by VIP1; Jul 25, 2008 at 11:22 AM.
Trending Topics
LS1 Tech Stories
The Best V8 Stories One Small Block at Time

6 Common C5 Corvette Failures and What's Involved In Repairing Them
Pouria Savadkouei
Retro Modern Bandit Pontiac Trans AM Comes With Burt Reynolds' Autograph
Verdad Gallardo
Top 10 Greatest Cadillac V Series Performance Models Ever, Ranked
Pouria Savadkouei
Top 10 Most Powerful Chevy Trucks Ever Made!

Hennessey's New Supercharged Silverado ZR2 Has 700 HP
Verdad Gallardo
Coachbuilt N2A Anteros Is an LS2-Powered C6 Corvette In Italian Clothes
Verdad Gallardo
Awesome K5 Blazer Restomod Comes With C7 Corvette Power
Verdad Gallardo
10 Camaros You Should Never Buy

10 LS Engine Myths That Refuse to Die
Verdad Gallardo

Thread Starter
Copy & Paste Moderator
Joined: Apr 2002
Posts: 9,764
Likes: 208
From: Eastern MA
Sure you can use the pic.
Last edited by VIP1; May 26, 2008 at 11:55 PM.
Thread Starter
Copy & Paste Moderator
Joined: Apr 2002
Posts: 9,764
Likes: 208
From: Eastern MA
Its a pressure fit with two small pieces of velcro (you can seen them in the pics of the back of the bezel) to help secure the horizontal section under the HVAC controls.
Thread Starter
Copy & Paste Moderator
Joined: Apr 2002
Posts: 9,764
Likes: 208
From: Eastern MA
I made a mistake in describing the mounting depth.
The face of the AVIC-D3 has a lip/bump-out about 3/16" from the front. That lip is what is flush with the HVAC panel. If you look at the pictures in the thread, you can see that the tab of the brackets I made is lined up with that lip.
The face of the AVIC-D3 has a lip/bump-out about 3/16" from the front. That lip is what is flush with the HVAC panel. If you look at the pictures in the thread, you can see that the tab of the brackets I made is lined up with that lip.
I just picked up my d3. I cant wait to install it. I hope its worth the money it costs. So not to hijack your thread but have you or do you plan to try the PAC SWI-PS for steering wheel controls? Im thinking of getting one before i install the unit.
