
Blew up my 355, time for a 5.3 N2O e85 bargain bin build
 10-08-2015, 08:50 AM
#1
Teching In
Thread Starter
Join Date: Jan 2013
Posts: 37
Likes: 0
Received 0 Likes
on
0 Posts
I finally killed my little home built 355 after about 10 years of relentlessly beating on it like a rented mule. Dropped #7 exhaust valve, and punched a hole in the piston, broke the block, and destroyed the head. After pricing out some other SBC options, then realizing my screen name and budget, I decided to jump on the LS bandwagon. The old engine went a best of 11.72 @ 115 on motor, and 10.62 @ 125 on a 100 shot. It was 11.5:1, ported double bumps, super vic, and solid roller cam. The goal with this build is to survive an 11.50 index series next year and to beat the modest 10.60et. How much I need to spray it to do that is TBD, but I buy 2 mother bottles a year, so it's a non issue
Rip “ironsides” 1969-2015.


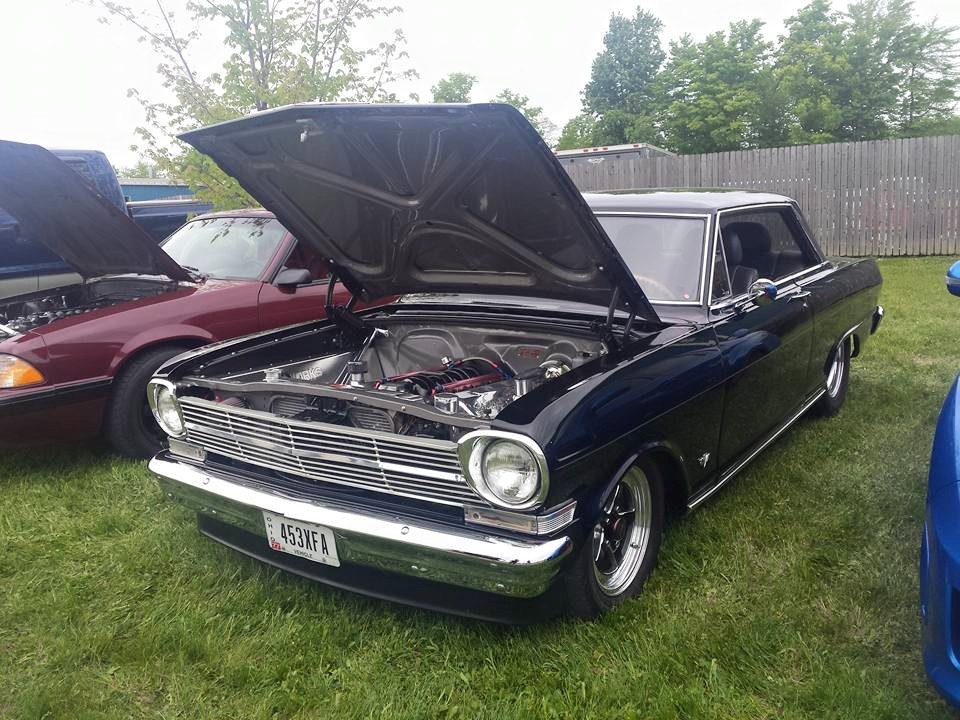
My friend Vinnie lent me this stroker engine to finish out my renegade racing association 11.50 index points weekend for the year. Went a best of 11.18 with this engine (on 93 and no nitrous), and made it to the semi’s on the second day, but lost to a .015 red-light. You can learn more about our series on our website http://www.renegaderacingassociation.com/ or facebook.

my fireturd in action.

This is the specs on the rest of the car, and what I’ll be adapting to the 5.3.
85 firebird all steel, full interior 3580#
770 E85 holley by Horsepower Innovations
Edelbrock RPM nitrous system http://static.summitracing.com/globa...Kitsforthe.pdf
Rossler TH400 Terminator 2.5 w/ JW bell.
FTI 4800 stall CONVERTER
Strange 4.11 S60 spool
28x10.5 3055s M/T slicks
spohn pro series torque arm
founders performance rear lca’s, panhard, lca brackets
steinjager sway bar
90/10 lakewood struts , QA1 DA stockers
dynomax bullets & 3" dual exhaust
Rip “ironsides” 1969-2015.


My friend Vinnie lent me this stroker engine to finish out my renegade racing association 11.50 index points weekend for the year. Went a best of 11.18 with this engine (on 93 and no nitrous), and made it to the semi’s on the second day, but lost to a .015 red-light. You can learn more about our series on our website http://www.renegaderacingassociation.com/ or facebook.

my fireturd in action.

This is the specs on the rest of the car, and what I’ll be adapting to the 5.3.
85 firebird all steel, full interior 3580#
770 E85 holley by Horsepower Innovations
Edelbrock RPM nitrous system http://static.summitracing.com/globa...Kitsforthe.pdf
Rossler TH400 Terminator 2.5 w/ JW bell.
FTI 4800 stall CONVERTER
Strange 4.11 S60 spool
28x10.5 3055s M/T slicks
spohn pro series torque arm
founders performance rear lca’s, panhard, lca brackets
steinjager sway bar
90/10 lakewood struts , QA1 DA stockers
dynomax bullets & 3" dual exhaust
Last edited by no green; 10-13-2015 at 01:50 PM.
 10-08-2015, 08:51 AM
#2
Teching In
Thread Starter
Join Date: Jan 2013
Posts: 37
Likes: 0
Received 0 Likes
on
0 Posts
My little brother donated this 5.3 to the cause. He got it in lot with another engine and some axles for his jeep project.

Unfortunately, this poor little engine looks like it served a past life as a boat anchor for the Exxon-Valdez. After pricing out a rebuild and parts, it�ll blow my budget to do anything with this right now, so for now I�m going to clean up the block enough to use it as a mock up block. I�m maybe going to save up for a stroker kit for it, and put a 4� crank in it when money allows. But, for now, I�m hunting boneyards for another suitable 5.3.


Unfortunately, this poor little engine looks like it served a past life as a boat anchor for the Exxon-Valdez. After pricing out a rebuild and parts, it�ll blow my budget to do anything with this right now, so for now I�m going to clean up the block enough to use it as a mock up block. I�m maybe going to save up for a stroker kit for it, and put a 4� crank in it when money allows. But, for now, I�m hunting boneyards for another suitable 5.3.


 10-08-2015, 08:52 AM
#3
Teching In
Thread Starter
Join Date: Jan 2013
Posts: 37
Likes: 0
Received 0 Likes
on
0 Posts
Another friend, Tom, has an LS swapped nova, and freshend his built 383 ls1 engine last winter.
So, he had these parts in the attic, and kindly donated them to the build. There’s an LS1 style aluminum underdrive dampner, a “Demos” camshaft with matched valve springs and TI retainers, and aftermarket pushrods. There was a box of hardware and gaskets he donated, too. http://demoscams.com/ sent me the cam card, below.


So, he had these parts in the attic, and kindly donated them to the build. There’s an LS1 style aluminum underdrive dampner, a “Demos” camshaft with matched valve springs and TI retainers, and aftermarket pushrods. There was a box of hardware and gaskets he donated, too. http://demoscams.com/ sent me the cam card, below.


Last edited by no green; 10-13-2015 at 01:51 PM. Reason: cam card
10-08-2015, 08:54 AM
#4
Teching In
Thread Starter
Join Date: Jan 2013
Posts: 37
Likes: 0
Received 0 Likes
on
0 Posts
I sold off enough of the leftover SBC parts to be able to afford to buy these headers and 1" set back adapter plates from racing innovation and supply, via their eBay store. They shipped super fast. They were made better than I expected. The welds on the headers look good, they are free of slag, the materials are heavy duty, and looks like whoever made them took some pride in it. The gaskets that came with them are cheapies, but good enough for mock up. I like the mounts, too. They were like $35, but came with $15 worth of hardware to install them.

Links to their parts:
http://racinginnovationandsupply.com...ap-header.html
http://racinginnovationandsupply.com...-ls7-swap.html

Links to their parts:
http://racinginnovationandsupply.com...ap-header.html
http://racinginnovationandsupply.com...-ls7-swap.html
10-08-2015, 08:54 AM
#5
Teching In
Thread Starter
Join Date: Jan 2013
Posts: 37
Likes: 0
Received 0 Likes
on
0 Posts
I sold off some other parts to a racing pal that lives next to Summit Racing Equipment in Talmadge, so I took the cash in there to scour through the bargain bin. I was rewarded with this Meziere flexplate, marked down to $200 from $457.


We have a wellness program at work, which rewards us with amazon gift cards. I was able to buy this alternator bracket kit using the points, and had $0 cash outlay. It uses an alternator from a 96-99 chevy truck. I have a couple of those alternators laying around from other LS truck swaps, so if the alternator tests good, the alternator setup will work out as a freebie�

It's an ICT billet 512-2.
http://www.ictbillet.com/ls1-camaro-...ls-billet.html
Updates when it shows up, and i sell off some more parts to be able to continue my shopping spree. Right now I'm sitting on $150 profit, but that'll go fast...
10-08-2015, 01:04 PM
#6

Looking good! I just helped a friend ls swap his 3rd gen and we used 1" setback plates and those headers.
Headers are good for the money but the passenger side needed some help. We had to heat up and hammer the primaries in a spot or two, and the collector where the 4 primaries come in to keep the header off the frame rail.
Headers are good for the money but the passenger side needed some help. We had to heat up and hammer the primaries in a spot or two, and the collector where the 4 primaries come in to keep the header off the frame rail.
10-08-2015, 01:51 PM
#7
Teching In
Thread Starter
Join Date: Jan 2013
Posts: 37
Likes: 0
Received 0 Likes
on
0 Posts
Looking good! I just helped a friend ls swap his 3rd gen and we used 1" setback plates and those headers.
Headers are good for the money but the passenger side needed some help. We had to heat up and hammer the primaries in a spot or two, and the collector where the 4 primaries come in to keep the header off the frame rail.
Headers are good for the money but the passenger side needed some help. We had to heat up and hammer the primaries in a spot or two, and the collector where the 4 primaries come in to keep the header off the frame rail.
Trending Topics
10-12-2015, 08:52 AM
#8
Teching In
Thread Starter
Join Date: Jan 2013
Posts: 37
Likes: 0
Received 0 Likes
on
0 Posts
The alternator bracket came in, and is nice quality. Heavy aluminum plate that looks laser cut, but there wasn't any burrs or sharp edges, and it came with factory type hardware to make it all work. The brackets were not polished, though. I don't care for this project, but don't expect a chrome like sparkle. Unfortunately, both alternators I have are froze up solid, so I'll have to get them rebuilt or head to NAPA.
I found ICT billet makes these adapters to put a big block chevy water pump onto an ls engine: http://www.ictbillet.com/ls-electric...ne-551515.html. So I'm going to keep hitting up the treadmill to rack up enough wellness points to get it from amazon...
After I found them, I put the word out I was looking for an electric BBC water pump. Turns out my friend ken was looking for an MSD digital 6 box that I just took off my car. So I traded him the box and 10# of nitrous for this, and $200 cash over the weekend at the dragstrip. My dog, Bullitt, quality inspects all my parts, before I bolt them on the car.

Ken wanted to put a black one on his car, aparently he had enough shiny stuff already... He drives this everywhere and runs 10s on engine with it.

 10-12-2015, 08:54 AM
#9
Teching In
Thread Starter
Join Date: Jan 2013
Posts: 37
Likes: 0
Received 0 Likes
on
0 Posts
A buddy Jay broke the rearend in his chevelle Friday , so he took this out of the wrapper to finish out the weekend. I'm using it for some inspiration!! I CANNOT wait to line up against this...


never seen a racecar with "that new car smell"


never seen a racecar with "that new car smell"
10-16-2015, 07:55 AM
#11
Teching In
Thread Starter
Join Date: Jan 2013
Posts: 37
Likes: 0
Received 0 Likes
on
0 Posts
Last night, I became the proud new owner of this yard fresh 5.3. My old neighbor owns a bone yard, and his guys damaged the valve cover and water pump pulling this gem out of a Tahoe. So, he sold it to me for the bargain bin price of $300, where all the other �running� ones he had were $600. It�s fitting, because I originally bought my old 355 of the same person 10 years ago�

Back home, it passed qc.

When they pulled it, the strap broke the top port off the water pump, and this boss off the valve cover, and one of the coils was busted. No big deal, though, I have these items from the other engine.

I pulled the valve cover, and my first thought was, �JACKPOT!!�

As of right now, I'm officially broke even, the parts I've sold equals the money I've spent... need to sell off some more stuff and/or save up some cash.
10-19-2015, 08:24 AM
#12
Teching In
Thread Starter
Join Date: Jan 2013
Posts: 37
Likes: 0
Received 0 Likes
on
0 Posts
I spent Saturday morning braving the sub 40 degree temps and snow to power wash both engines. I put enough of the first one together to use as a mock up, and wanted to pre-clean the grime off the one I�m going to use, because it was easier to do that while it was assembled.
The mock up block came out pretty good considering how bad it was.

After I took all the un-needed stuff off the �good� engine, it cleaned up nicer than I thought it would. It was well maintained and it showed. It had a fresh oil filter (high $ fram) and newer plugs in it, so it showed more evidence of a well maintained piece.


after

The bores still had a crosshatch in them, and the water jackets were spotless. Never mind the �rust� it was just water from washing, it cleaned up easily with a rag & some wd40. There was also very little carbon buildup. I think this out of a good maintained vehicle, that was unfortunately wrecked soon after a tune up...

Night and day difference from the other engine...

The busted up water pump in it's final resting place among the beer cans.

My water pump adapters came in Saturday from ICT billet. I bolted them on the mock up block. They are nice made, and fit the block great. My only complaint is that they use 10mm hardware to hold the water pump on, I wish they would have used 3/8� like a factory bbc. It might work fine with the Chinese pump they mention in their add, but I have to get some m10 Allen heads, and open the holes in this mezire pump to make it all work. Not a big issue, though, just something to watch for.

 10-22-2015, 08:44 AM
#13
Teching In
Thread Starter
Join Date: Jan 2013
Posts: 37
Likes: 0
Received 0 Likes
on
0 Posts
Got the mock up block set in place last night.

I sold the connecting rods out of the 355, so I was able to afford a box full of hardware and fittings from Summit that will be here tonight.
And i hung the #7 piston on the growing wall of shame, next to, ironically, the old #7 piston I melted last year.


I sold the connecting rods out of the 355, so I was able to afford a box full of hardware and fittings from Summit that will be here tonight.
And i hung the #7 piston on the growing wall of shame, next to, ironically, the old #7 piston I melted last year.
 10-26-2015, 09:00 AM
#14
Teching In
Thread Starter
Join Date: Jan 2013
Posts: 37
Likes: 0
Received 0 Likes
on
0 Posts
Made a little bit of progress this weekend, started round 1 of figuring out fittings and hardware. I use mechanical gauges, this is what I am using to adapt them.
For the oil pressure, I picked up an autometer 2268 oil pressure adapter.

I re-used the fittings from the small block, and it plugged right in. Don't forget to use the restrictor fitting with mechanical oil pressure gauges.

I read somewhere that an autometer 2275 would work in the head, so I gave it a shot, and found that it wont work in the head. I did some more research and decided my best option would be to drill out the water temp hole to 3/8" NPT and us an autometer 2263 adapter.

 10-26-2015, 09:01 AM
#15
Teching In
Thread Starter
Join Date: Jan 2013
Posts: 37
Likes: 0
Received 0 Likes
on
0 Posts
Something that I'm finding is the metric bolts I need to use aren't fitting in the standard holes from the transmission and stuff. 10mm = .394", and the holes in my belhousing, motor mounts, and water pump are .375". So I need to pull the mock up engine back out and enlarge the holes on the bellhousing and other stuff. If you need to do this in a hurry, check out your bellhousing, or you might be in for a surprise.
I'm re-using the puke tank from the 355, and needed to figure out how to mount it. Dad made me this bracket once upon a time for the old engine, so I decided to reuse it.

after messing with some cardboard, i decided it just needed a few cuts, and two new holes drilled in it.

turned it around, and mounted to the head.

It was nice on Sunday, so I decided to get a jump start on some gardening for next year. A little mulch and some flowers, and my new yard ornament will be all set!!

 10-30-2015, 07:53 AM
#18
Teching In
Thread Starter
Join Date: Jan 2013
Posts: 37
Likes: 0
Received 0 Likes
on
0 Posts
Thanks, guys!!
I pulled the mock up block back out, and drilled the bellhousing bolt holes out. I found a 27/64" drill bit worked perfect for the new M10 bolts. I didnt have to do this on swaps with an OE bellhousing, though, just this Ultrabell. The top bolt hole here, above the dowl, is always a PITA to get to, so I am going to try and reshape the firewall with a BFH in the near future.

These are the bolts I used to adapt the JW Ultrabell over to an LS. I was hoping they would use a 10mm wrench (like a 3/8"), but they came with a 13mm, and my ratchet wrench was about the same size as the 9/16 I had always used.
 10-30-2015, 07:54 AM
#19
Teching In
Thread Starter
Join Date: Jan 2013
Posts: 37
Likes: 0
Received 0 Likes
on
0 Posts
Up until this point, the block was just setting in place. I wanted to bolt it in solid, and mock in the headers. So, I started messing with the new mounts while the mock up block was on the bench, and quickly found a problem. The hardware that came in the kit was way too long for any sbc mount I can think of. The kit also came with a handful of nylock nuts, and I cant see what the point of them are. I called racing innovation and supply and the owner answered. After discussing the issue, he said he was going to investigate and get back to me. I said I could source shorter bolts or cut these, but he said he would like to resolve the issue so it doesn't happen to someone else. Hopefully he does, but in the mean time, I found some bigger problems.

After trying for about an hour to adapt the Moroso 62510 & 62610 solid motor mounts, I see they wont work like I had hoped.
Drivers side

passenger side

after some google searching, I quickly found I'm not alone: https://ls1tech.com/forums/conversio...l#post15027680
Apparently, the moroso mounts are a little taller than stock for increased oil pan clearance, but add in the 1/4" thick LS adapter and different block, and there's no more margin for error. I think a rubber mount would have some leeway, and probably work fine.
I don't want to go to a rubber mount like he did, and I'm not liking the 3 piece adapter to the adapter thing I got going on here, so I'm thinking of designing something different. Since I'm short on cash, I might end up building something out of what I got, or even re-drilling the K member to make it all work. In the mean time, google is free, so I'm going to search around for another option.
01-11-2016, 07:40 AM
#20
Teching In
Thread Starter
Join Date: Jan 2013
Posts: 37
Likes: 0
Received 0 Likes
on
0 Posts
Now that the holidays are over, and my house renovations are done, I'm back on this.
I've been spending some money since the last post...
I went to Hutter in Chardon Ohio, and got my new smart spark from Daytona sensors. I've been hearing a lot of good stuff about this box, and it's got some more bells and whistles than the MSD, so I took the plunge. Also, Hutter usually pits by me at the track, so tech help and trouble shooting should be a breeze. And Hutter was cool enough to give me a cash discount on this.


After looking into oil pans, I found most all of the used F body pans were like $275... so for a few bucks more, I sprung and got all new stuff from summit. I think it was worth it, because the new stuff came with all the gaskets, hardware, and pickup o ring to make it all work, so it's a better buy to get new. Besides, I got enough summit gift cards for christmas to cover this, and a box of hardware I need.

I traded in some workout points for a new valley cover from ICT billet. It's a nice piece, dresses up the engine, and gets rid of the knock sensors.
