
Home port and polish
 09-18-2010, 04:21 PM
#1
TECH Addict
Thread Starter
iTrader: (16)
Join Date: Jul 2005
Location: Anchorage, ALASKA
Posts: 2,899
Likes: 0
Received 0 Likes
on
0 Posts
Does anyone have any tips or tricks for doing this? I will be doing this on some 317s, just a small port and polish.
I know its suppose to be rough on the intake and its good to be smooth on the exhaust to prevent carbon build up. For the combustion chamber, is it ok to be smooth or should some texture be left? Also what tools are you using?
I know its suppose to be rough on the intake and its good to be smooth on the exhaust to prevent carbon build up. For the combustion chamber, is it ok to be smooth or should some texture be left? Also what tools are you using?
 09-18-2010, 05:36 PM
#2

I used to port Pontiac and Ford heads, maybe 4 or 5 sets over the years, strictly backyard DIY. Good variable speed grinder, carbide and/or aluminum bits, cartridge rolls of varying texture and shape. Most gains are in the bowl and short side radius. The combustion chamber may be polished, exhaust polished, intake rougher than the others. Don't increase volume by grinding up the port throat, unless your cubes demand more volume. You can remove high spots, but just shining things up isn't going to do anything but waste time. A good multiangle valve job is also going to net quite a bit more flow than the stock valve job. Having the stock valves back cut may also give a little more flow. I can't remember how many hours I spent on each head, but it wasn't a simple weekend job. I used cardboard templates to try to keep the ports similar in dimension. Just diving in there and grinding away is not a good idea.
09-18-2010, 07:49 PM
#3
TECH Addict
Thread Starter
iTrader: (16)
Join Date: Jul 2005
Location: Anchorage, ALASKA
Posts: 2,899
Likes: 0
Received 0 Likes
on
0 Posts
What about using grinding stones? I dont really know where to get carbide or aluminum bits but they sound like they would take off an awful lot of material. I really just want to take off this bumpy texture.
09-18-2010, 08:11 PM
#6
Stones are going to load up if used on aluminum. You can get carbide burrs that don't have aggressive patterns to work on aluminum. You use the burr to contour and remove the majority of material, but not all the material you want removed. Leave enough to finish off with the cartridge rolls (Kind of like boring a block. They remove the majority with the boring machine, but remove the rest during the honing process). If you're not willing to spend the money on a proper die grinder, burrs, rolls, buffs, tool speed controller, research and practice, then have a reputable shop do the work. Harbor Freight has a decent die grinder you can use. I still use the 20 or so year old Craftsman I bought as a youngster.
BTW, WD40 or a similar product works well at keeping the cartridge rolls from loading up with material.
The first set of heads I did I was around 16-18. I thought I could get away with my father's drill and an old carbide burr. I did more damage than help.
Years ago I bought a DIY porting kit because I needed some of the components. I still have it. I'll see if the booklet is still in it and post the info here.
If you are afraid to use a carbide burr, you can get away with rolls and buffs just to take off the sharp edges and contour things a bit, just don't go crazy, and apply tape around the valve seat area to avoid damaging it with the grinder and tools. I have rolls from 60 grit up to 220 or so. The 60 grit rolls will remove more material than expected, so you could probably get away with just the rolls if you want to remove the high spots and smooth things.
Edit: Standard Abrasives Deluxe porting kit. I'll bet Summit, Jegs, etc has it. Just google for the best price. If you are going to give it a go, I have a quantity of cartridge rolls, mandrels, and a tool speed controller you can have cheap. I don't use the tools much anymore, so I should part out some of it.
Last edited by lubelizard; 09-18-2010 at 08:20 PM.
09-18-2010, 11:17 PM
#7
TECH Addict
Thread Starter
iTrader: (16)
Join Date: Jul 2005
Location: Anchorage, ALASKA
Posts: 2,899
Likes: 0
Received 0 Likes
on
0 Posts
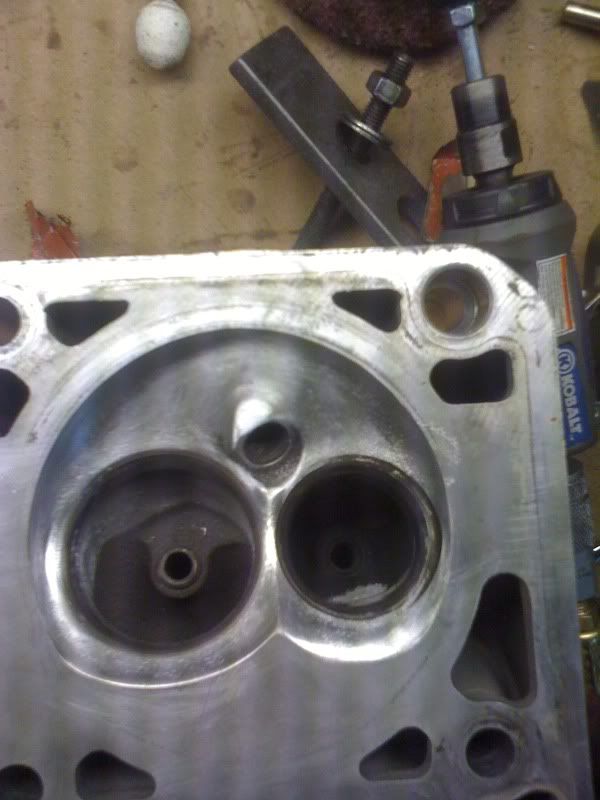
Thanks guys. I had some stones around so I used those for now, they definitely load up quick though. Heres where I took down the ridge on the intake bowl and blended it in.

Did a pretty good job staying from the valve seats. Should I hit the valve seats with some sand paper? If so, what grit?
I have a die grinder and some other tools, should be plenty to finish the job. I think Ill pick up some cartidges tomorrow! Theres so many god damn shapes on the CC, Ill end up sanding a good bit of it by hand I think
Trending Topics
09-18-2010, 11:30 PM
#9
TECH Addict
Thread Starter
iTrader: (16)
Join Date: Jul 2005
Location: Anchorage, ALASKA
Posts: 2,899
Likes: 0
Received 0 Likes
on
0 Posts
To lap the valves you just put the valve in place and hook the stem up to an electric drill on low speed right? Ill use some 220 on the seats, is that ok? Im not getting a valve job done, just killing time waiting for my cam and valvesprings to get here. 
This is for an FI application btw.
This is for an FI application btw.
09-19-2010, 07:32 AM
#10
You NEED valve lapping compound, and lap by hand. Any auto parts store with have the items. The hand mandrel for lapping has a suction cup on either end. Put a little compound on the valve, attach the mandrel, and rotate between your hands while the valve is on the valve seat. Make absolutely sure the valve stem is clean and has some lube on it. Compound that gets on the valve stem could migrate to the valve guide. You know you're done when there's an even grayish ring around both the valve and seat, you don't need to go further.
I have done the trick with the valve in a drill, with rubber on the stem while in the chuck, to polish off carbon. I think I used a scotchbrite pad and some wd40 while the drill was spinning the valve.
I have done the trick with the valve in a drill, with rubber on the stem while in the chuck, to polish off carbon. I think I used a scotchbrite pad and some wd40 while the drill was spinning the valve.
09-19-2010, 02:18 PM
#11
TECH Addict
Thread Starter
iTrader: (16)
Join Date: Jul 2005
Location: Anchorage, ALASKA
Posts: 2,899
Likes: 0
Received 0 Likes
on
0 Posts
All of the port and polish kits I see dont include buffs, just fine cartridges. Would it be ok to just use those? The buffs themselves look like thick scotchbrites of varying grits.
Thanks for all your help!
Thanks for all your help!
09-19-2010, 02:22 PM
#12
The standard abrasive kit I bought had red and gray buffs in it, but that was years ago. The buffs aren't necessary, just a nice addition to polish the combustion chamber and exhaust. Don't remove material from the CC, just polish it to remove hot spots. I think 60, 120, 180, and 220 grit rolls in cylinder and tapered shapes would be okay.
09-19-2010, 04:21 PM
#13
TECH Addict
Thread Starter
iTrader: (16)
Join Date: Jul 2005
Location: Anchorage, ALASKA
Posts: 2,899
Likes: 0
Received 0 Likes
on
0 Posts
I have no stores that sell cartridge rolls around me so I did some work by hand today:
NAPA has valve grinding compound, is that the same as lapping?
NAPA has valve grinding compound, is that the same as lapping?
09-19-2010, 05:10 PM
#14
Yes. It's a grayish gritty compound in a tube. You don't have to use a lot, and you only lap until there is an even ring of gray around the valve seat and valve. Keep an eye on how long it takes to do each one. If one is taking a long time, then you may have a bent valve or bad seat.
09-19-2010, 07:22 PM
#15
TECH Addict
Thread Starter
iTrader: (16)
Join Date: Jul 2005
Location: Anchorage, ALASKA
Posts: 2,899
Likes: 0
Received 0 Likes
on
0 Posts
Whats the final grit I should use on the CC? I still have some scratches from using a heavier grit before but its fairly smooth to the touch after 120 grit.
09-19-2010, 09:06 PM
#16
When I used to do it, I'd polish the CCs as best I could without removing material. I don't know what common thinking is with current porting, the experts may want a bit of roughness for atomization of the mixture or something. You can go to Home Depot and get a fine grit buffing wheel, the kind that fits in a Dremel tool.
09-26-2010, 08:38 PM
#18

You should be able to tell if the valve is fully seated when lapping them in. You can also put the valves and springs back in and the combustion chambers will hold water if everything is seated.

