
Ricey or In good taste?
 02-22-2011, 05:58 PM
#1
Teching In
Thread Starter

Join Date: Nov 2010
Posts: 46
Likes: 0
Received 0 Likes
on
0 Posts
So I figured I would ask the forum before doing this (even though its up to me obv) but in the morning before school, its pitch black out and there are no interior lights in my T/A besides the gauges. I'm assuming the hardtop models came with a dome light, however mine is a T-Top.
I was thinking about putting some kid of floor lighting (red) to match the color of the car. But is this in good taste? Or Riceyish?

I was thinking about putting some kid of floor lighting (red) to match the color of the car. But is this in good taste? Or Riceyish?
 02-22-2011, 07:06 PM
#4
TECH Apprentice
iTrader: (10)
Join Date: Feb 2005
Location: Kernersville, NC
Posts: 319
Likes: 0
Received 0 Likes
on
0 Posts

I think it looks good. It's all about the fit and finish though. It can be a great idea and if you can see the lights (not tucked up out of the way) it'll look ricey to me. I had blue LEDs in my 95 Z in the doors and got compliments from everyone. You could see the light output, but not where it was coming from.
02-22-2011, 07:11 PM
#6
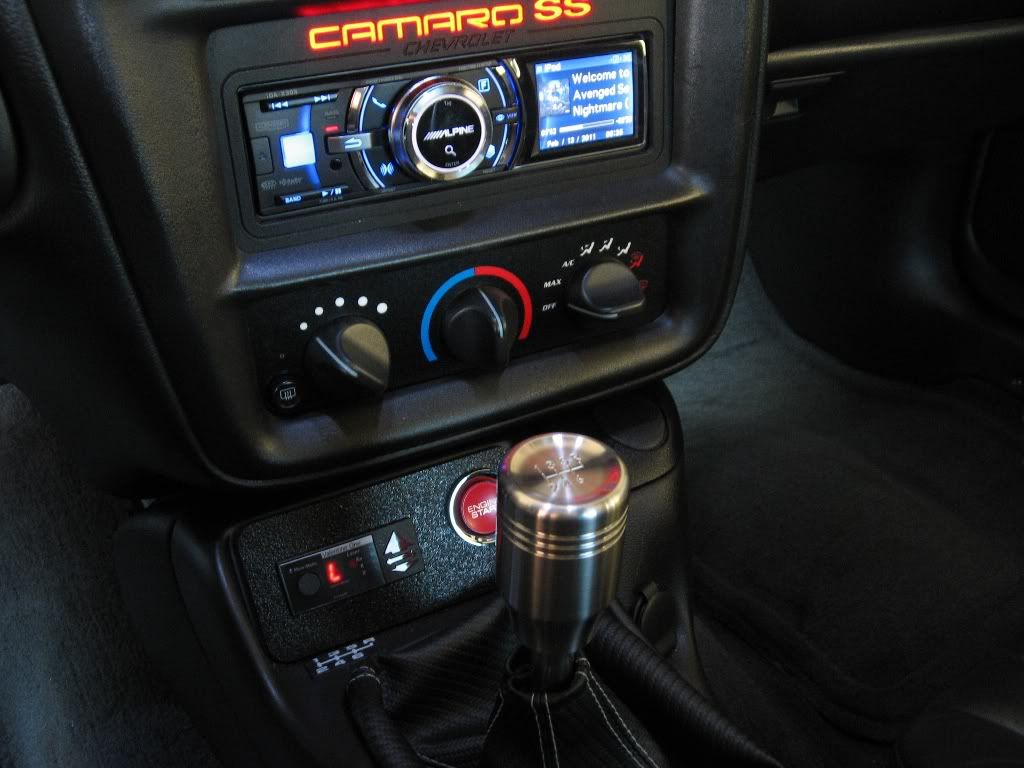
If you look closely, you can see my footwells lit with white LEDs (same color as the rest of the interior lights) - they are wired to the interior lights, so they come on when you open the door, etc. I got the idea after driving a C6 Corvette for a week. I was very pleased with how it turned out.
Trending Topics
 02-22-2011, 07:25 PM
#9
Teching In
Thread Starter
Join Date: Nov 2010
Posts: 46
Likes: 0
Received 0 Likes
on
0 Posts
I think it looks good. It's all about the fit and finish though. It can be a great idea and if you can see the lights (not tucked up out of the way) it'll look ricey to me. I had blue LEDs in my 95 Z in the doors and got compliments from everyone. You could see the light output, but not where it was coming from.
@meentss02 those white L.E.D's look great in ur camaro
 02-22-2011, 08:17 PM
#12
TECH Addict
iTrader: (4)
Join Date: Apr 2010
Location: Longview,TX & Tricitys,WA
Posts: 2,201
Likes: 0
Received 1 Like
on
1 Post
x2 meent, i pm'ed ya bout that. Interior lights look good when not overdone or tacky, if any sort of bulb or light strip is seen it looks riced for sure, even then, i think you still gotta watch out. All the ones ive seen in person look like ****, most of the ones ive seen in here look pretty good though.
02-22-2011, 08:24 PM
#14
good taste in music you got there LOL I love that song, just curiouse where did you run your wiring too and what kind of lighting did you use and how was it mounted
If you look closely, you can see my footwells lit with white LEDs (same color as the rest of the interior lights) - they are wired to the interior lights, so they come on when you open the door, etc. I got the idea after driving a C6 Corvette for a week. I was very pleased with how it turned out.
02-22-2011, 09:45 PM
#18
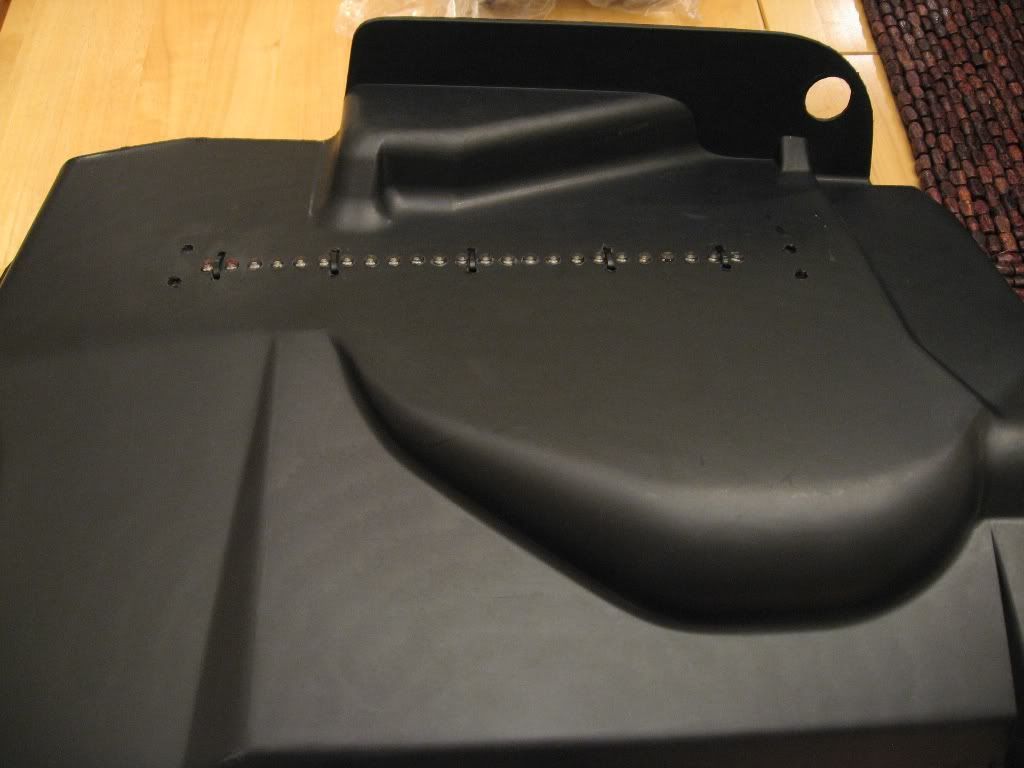
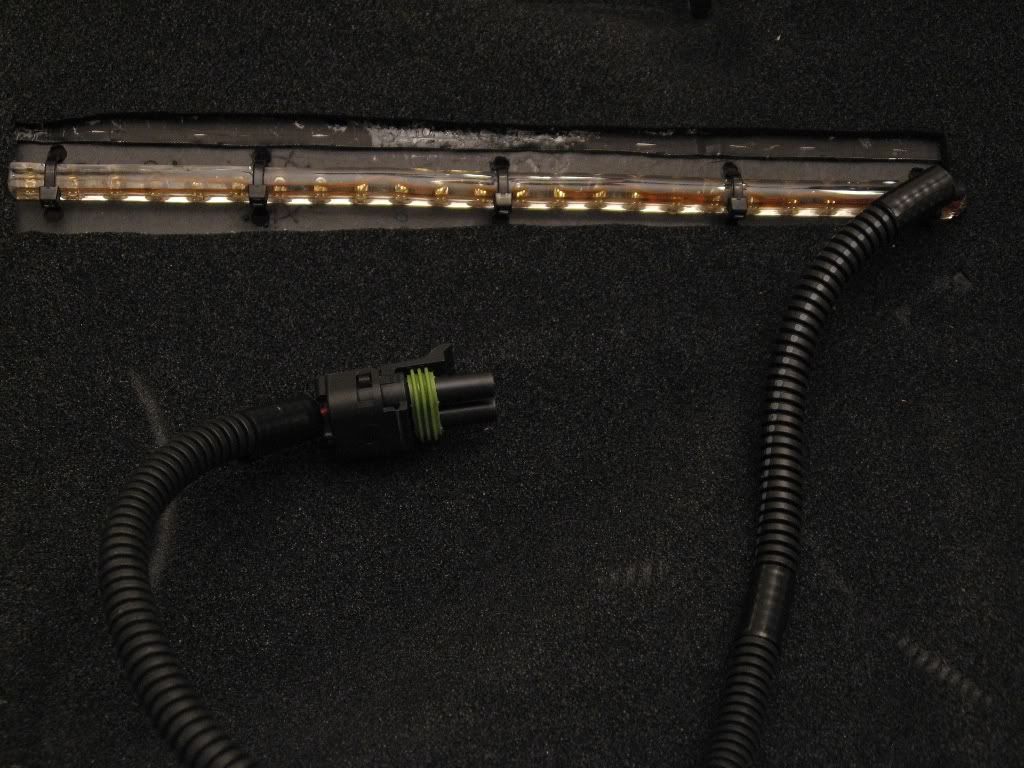
Here's how I did mine - it is a bit ghetto, but it works, and can't be seen under normal circumstances. The pictures below are taken of the passenger side panel that would be just above your feet...the driver's side was done in a similar fashion.
The LED light strip was from SuperBrightLEDs - it is their waterproof, flexible light strip, 9.5" long, 24 lights, cool white color (WFLB-CW24). This is the same light strip I used to light up my license plate, and is where I got the idea.
What I did was drill holes in the panel for each light as well as some smaller holes for small zip ties to hold it in place (nevermind the other holes...that was from another lighting idea that didn't work out) - I wanted to be able to remove the light strip if I needed, but still wanted it to remain secure without using glue. Ghetto? You betcha, but it works. Here's what the bottom looks like:
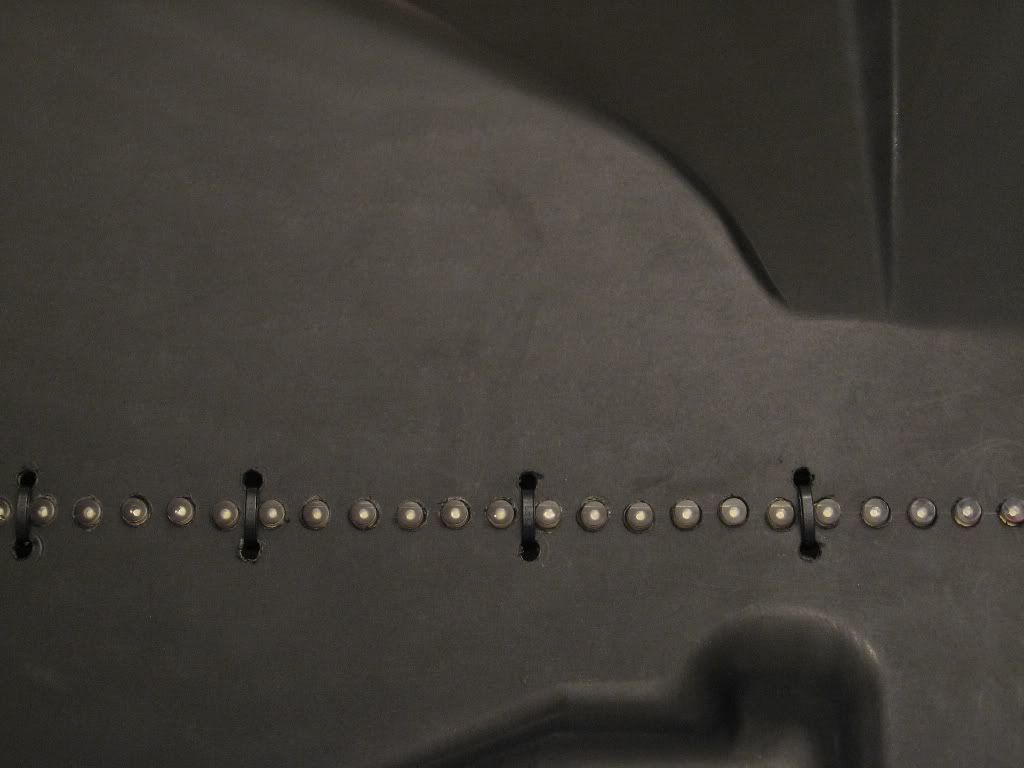
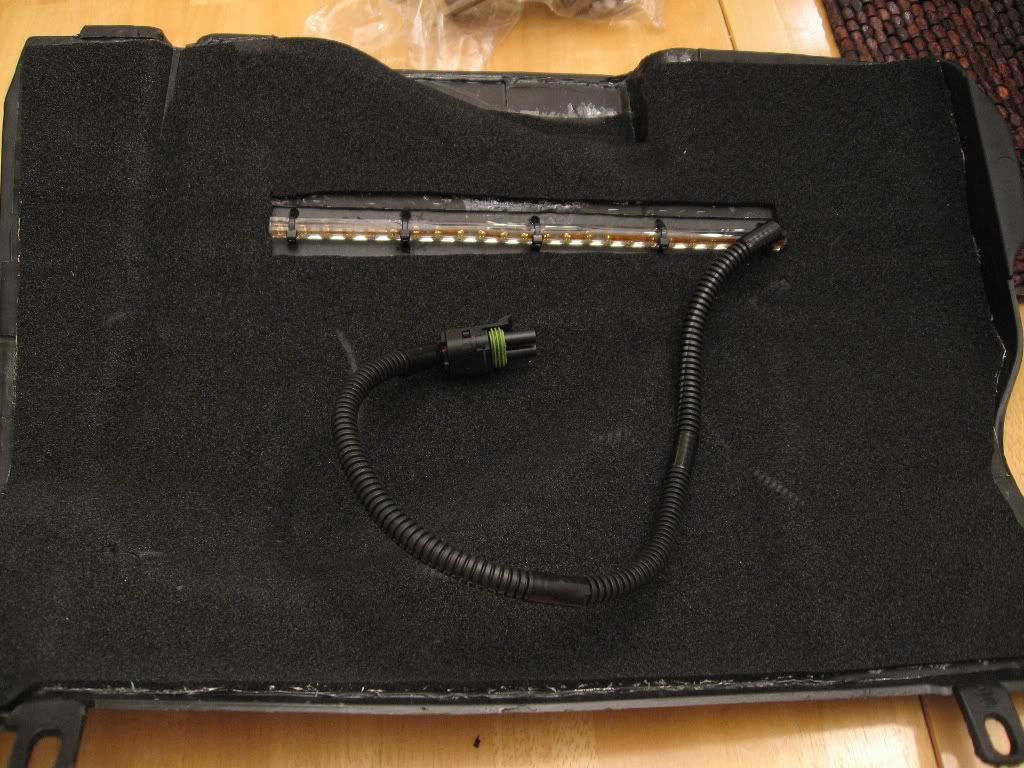
And the other side that shows the light strip and the weatherpack connector I used to make it easy to disconnect should I want to bring the panel in to take pictures :
:
The LED light strip was from SuperBrightLEDs - it is their waterproof, flexible light strip, 9.5" long, 24 lights, cool white color (WFLB-CW24). This is the same light strip I used to light up my license plate, and is where I got the idea.
What I did was drill holes in the panel for each light as well as some smaller holes for small zip ties to hold it in place (nevermind the other holes...that was from another lighting idea that didn't work out) - I wanted to be able to remove the light strip if I needed, but still wanted it to remain secure without using glue. Ghetto? You betcha, but it works. Here's what the bottom looks like:
And the other side that shows the light strip and the weatherpack connector I used to make it easy to disconnect should I want to bring the panel in to take pictures
:
02-22-2011, 09:55 PM
#19
"But Steve...how is it wired?"
Hang on to your panties...I'm getting there.
You need two things to make this work - a +12V source that is always on regardless of key position, and I wanted to tie it in to the existing courtesy lights so that they would turn on with the door open or any other time the interior lights are on. That is done by tapping in to a particular ground wire on the BCM...courtesy of WhiteBird00:
If I remember right, I tapped the all white wire on the BCM for the ground, and the always on +12V came from the driver's side interior fuse panel - I circled the slot you want on the diagram:
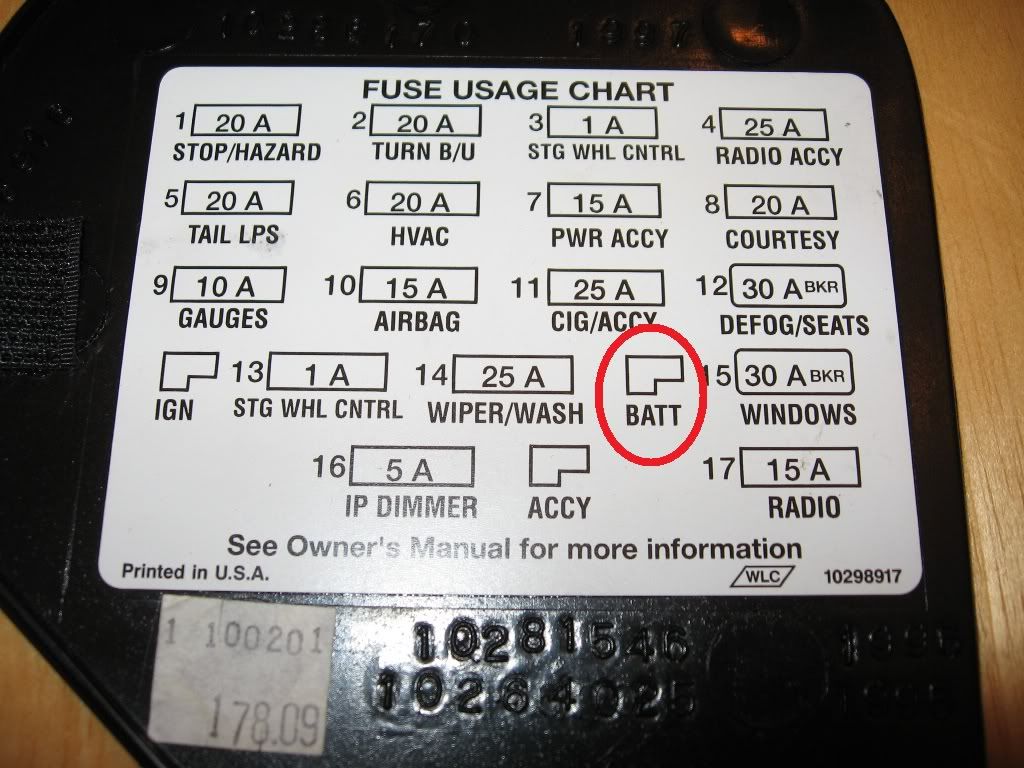
All you have to do to get power from that slot is crimp a spade connector on the end of a piece of wire and push the spade into the slot. Incidentally, there are three total types of +12V power you can tap from that panel - +12V always on (BATT), +12V switched (IGN), and +12V retained accessory (ACCY). GM actually put those there to help us owners wire in aftermarket accessories...how nice.
Hang on to your panties...I'm getting there.
You need two things to make this work - a +12V source that is always on regardless of key position, and I wanted to tie it in to the existing courtesy lights so that they would turn on with the door open or any other time the interior lights are on. That is done by tapping in to a particular ground wire on the BCM...courtesy of WhiteBird00:
The BCM is a black box about the size of a paperback book mounted to the ductwork behind the glovebox on the passenger side of the dash. It has three connectors - 6-pin green, 6-pin black, and 32-pin blue.
The BCM controls the courtesy lamps using both the power and ground connections. The white ground wire controls the theater dimming effect to turn off the lights after the doors are closed. But the dark blue with white power wire is also used to turn off the lights if a door is left open - this is part of the battery protection function. You can substitute a constant (battery) power source but you run the risk of killing your battery if something goes wrong and the lights stay on all the time (e.g. door switch problem, etc.). The dark blue with white wire is available in all the same locations as the white wire.
The BCM controls the courtesy lamps using both the power and ground connections. The white ground wire controls the theater dimming effect to turn off the lights after the doors are closed. But the dark blue with white power wire is also used to turn off the lights if a door is left open - this is part of the battery protection function. You can substitute a constant (battery) power source but you run the risk of killing your battery if something goes wrong and the lights stay on all the time (e.g. door switch problem, etc.). The dark blue with white wire is available in all the same locations as the white wire.
All you have to do to get power from that slot is crimp a spade connector on the end of a piece of wire and push the spade into the slot. Incidentally, there are three total types of +12V power you can tap from that panel - +12V always on (BATT), +12V switched (IGN), and +12V retained accessory (ACCY). GM actually put those there to help us owners wire in aftermarket accessories...how nice.
