
Questions about wiring ASR switch for Garage door opener
 06-25-2008, 09:55 PM
#1
On The Tree
Thread Starter
iTrader: (25)
Join Date: Nov 2001
Location: NW Houston
Posts: 131
Likes: 0
Received 0 Likes
on
0 Posts

So I already hacked one of my garage door openers, using phone line. I soldered two of the wires to the sides of one button and closed it up so now I have an opener that works normally with a phone line sticking out of it with phone plug.  I'm going to use a union adapter and another phone wire with plug on the switch. I confirmed the wiring because when I plug it into another phone line with bare wires I can touch the other ends of the wires together and make the door open/close.
The remote will still use its own battery power to work, I will just use the ASR switch to close the circuit, hiding the remote behind the panel with easy access to change the battery whenever its necessary.
For the ASR switch I want the LED to be ON whenever the car is on and the white illumination to work with the headlights like the other factory switches.
Wiring details for ASR switch from another thread:
A - Purple/White - ground for ON indicator LED
B - Pink - power for ON indicator LED
C - Gray - power from headlights for switch illumination
D - not used
E - Brown/White - ground input from control module (connect this to the ground side of a relay coil for your accessory)
F - Black/White - ground (this provides ground for both the illumination and the control module - or your accessory relay)
So I'm thinking:
Since I already have the stock ASR switch in its place and this one is extra I can:
1) Wire the Purple/White and Pink wires to the same ones on the existing ASR switch for the ON LED
2) Connect Gray to Gray on the other switch for illumination power.
3) Connect Brown/White to one of the two wires from the Garage remote.
4) Connect Black/White to Black/White from other ASR switch AND to the second wire from Garage remote.
Questions:
A) Since the existing ASR switch only has the LED ON when the ASR is activated and OFF when its not, does this mean that if I wire my extra switch this way, that my LED on the additional ASR switch will only stay ON when the ASR is ON too?
B) The Garage remote will be connected at the Brown/White and Black/White wires. Since the Black/White is just a GROUND for Illumination I shouldn't have any unwanted power coming back through and frying my remote, right?
C) This won't have the battery from the remote powering the LED, right?
D) Also, I'm going to open the switch and solder in a new LED to make it a different color. So I can just get any LED from my local electronics Shack with its corresponding resistor? It's 5mm, right? Does it have to be rated for a certain voltage?
Thanks for any advice.
I'm going to use a union adapter and another phone wire with plug on the switch. I confirmed the wiring because when I plug it into another phone line with bare wires I can touch the other ends of the wires together and make the door open/close. The remote will still use its own battery power to work, I will just use the ASR switch to close the circuit, hiding the remote behind the panel with easy access to change the battery whenever its necessary.
For the ASR switch I want the LED to be ON whenever the car is on and the white illumination to work with the headlights like the other factory switches.
Wiring details for ASR switch from another thread:
A - Purple/White - ground for ON indicator LED
B - Pink - power for ON indicator LED
C - Gray - power from headlights for switch illumination
D - not used
E - Brown/White - ground input from control module (connect this to the ground side of a relay coil for your accessory)
F - Black/White - ground (this provides ground for both the illumination and the control module - or your accessory relay)
So I'm thinking:
Since I already have the stock ASR switch in its place and this one is extra I can:
1) Wire the Purple/White and Pink wires to the same ones on the existing ASR switch for the ON LED
2) Connect Gray to Gray on the other switch for illumination power.
3) Connect Brown/White to one of the two wires from the Garage remote.
4) Connect Black/White to Black/White from other ASR switch AND to the second wire from Garage remote.
Questions:
A) Since the existing ASR switch only has the LED ON when the ASR is activated and OFF when its not, does this mean that if I wire my extra switch this way, that my LED on the additional ASR switch will only stay ON when the ASR is ON too?
B) The Garage remote will be connected at the Brown/White and Black/White wires. Since the Black/White is just a GROUND for Illumination I shouldn't have any unwanted power coming back through and frying my remote, right?
C) This won't have the battery from the remote powering the LED, right?
D) Also, I'm going to open the switch and solder in a new LED to make it a different color. So I can just get any LED from my local electronics Shack with its corresponding resistor? It's 5mm, right? Does it have to be rated for a certain voltage?
Thanks for any advice.
 06-26-2008, 05:09 AM
#2

I did this to my car though about two years ago. Here's some advice...
1) Put the opener under the DASH right where the defrost vents are (there is a support bar there I actually taped it to. Otherwise, I could NOT find a place inside the dash that the signal could actually penetrate.
2) I do not think you can safely wire it the way you want as far as illumination goes. I blacked out the part that said ASR and wired it so the "activation" light lit up at night when the headlights are on (this way I can see the button at night). The way the switch is wired, I don't know how you could possibly illuminate it the way you are trying to without frying the garage door opener since the switch illumination comes from the power that comes into the switch that will go out to the device it is switching...
Hard to explain but basically you have to remember this switch is setup to GROUND a circuit from my understanding...
06-26-2008, 06:39 PM
#5

Questions:
A) Since the existing ASR switch only has the LED ON when the ASR is activated and OFF when its not, does this mean that if I wire my extra switch this way, that my LED on the additional ASR switch will only stay ON when the ASR is ON too?
B) The Garage remote will be connected at the Brown/White and Black/White wires. Since the Black/White is just a GROUND for Illumination I shouldn't have any unwanted power coming back through and frying my remote, right?
C) This won't have the battery from the remote powering the LED, right?
D) Also, I'm going to open the switch and solder in a new LED to make it a different color. So I can just get any LED from my local electronics Shack with its corresponding resistor? It's 5mm, right? Does it have to be rated for a certain voltage?
Thanks for any advice.
B) You won't have any unwanted power but you also won't have a working circuit. The two wires you've added need to complete a closed circuit in order to trigger the door opener. Connecting to the black/white wire in the existing harness will just route both wires to ground (rather than to each other).
C) No. Although the built-in LED on the door opener will still function off the battery as normal.
D) Don't know - never took one apart.
There is a better way to use the switch to control a garage door opener. Instead of using your switch as a remote for the original push button, use your ASR switch to control power to the opener. Connect the two wires you've already added together so that the button is "pressed" all the time. If you have a fairly new door opener, it probably uses a 12V barrel battery (like a half-size AA battery). If you have an older door opener, it probably uses a 9V battery so you'll need a 12V to 9V stepdown transformer (available at most auto parts stores). Connect fused, ignition-switched power to the positive battery terminal in the opener - either directly for a 12V opener or through the transformer for a 9V opener (take the original battery out of course). Connect a wire from the negative battery terminal of the opener to the brown/white wire of the ASR switch. Connect the other wires as discussed. That way, when you press the ASR switch, the power circuit will ground through the black/white wire, power will flow to the opener and the door opener will activate since the button is permanently wired closed. This setup also allows you to use the ground (black/white) wire for the ASR switch illumination so it works like you wanted.
06-26-2008, 06:45 PM
#6
I forgot the LED part... I just used LED's from radio shack but you MUST use a resistor. I forgot the size though  I wired mine into the wire leading 12v power into the switch, you could also do it inside the switch just takes some patience, I have done this as well.
Also, YOU HAVE TO FIND THE POSITIVE TERMINAL as LED's are DIRECTIONAL. Won't work wired the wrong way.
I wired mine into the wire leading 12v power into the switch, you could also do it inside the switch just takes some patience, I have done this as well.Also, YOU HAVE TO FIND THE POSITIVE TERMINAL as LED's are DIRECTIONAL. Won't work wired the wrong way.
06-26-2008, 10:36 PM
#7
On The Tree
Thread Starter
iTrader: (25)
Join Date: Nov 2001
Location: NW Houston
Posts: 131
Likes: 0
Received 0 Likes
on
0 Posts
Thanks guys
So WhiteBird00,
I finally found the circuit and plug as shown in my Helms Manual. Its a 99 manual and i think the colors are off (they have brown instead of pink) but is the same:
http://i178.photobucket.com/albums/w...BIGCIRCUIT.jpg
http://i178.photobucket.com/albums/w...99/ASRPLUG.jpg
So the LED part of it isn't involved in the switch at all. Connect Pink wire to other Pink and Pink/White to a ground.
Connect Gray to Gray from other switch for illumination.
Though it isnt shown in my circuit diagram, I assuming that the Gray wire for illumination is actually connected one side of the 'illumination bulb' and other side of that bulb is connected to the pole of the switch along with the Black/White wire. That way if the lights are on, the illumination is always on regardless of switch position. When you close the switch you are grounding everything that is connected to the Brown/White wire (like the garage opener). When switch is open, Brown/White wire is disconnected.
Your idea makes more sense for the opener install... the only thing is I have a remote with a 3V 2032 watch battery. Here are some pics:

open

So I should be able to get some kind of voltage transformer to reduce from +12V to +3V.. connect Brown/White wire to negative terminal in remote then I'm good? Could this be done with a relay? Use the Brown/White wire to ground the coil and connect both sides of the remote as its wired now, with its own battery, to the other circuit on the relay with the common disconnected?
So WhiteBird00,
I finally found the circuit and plug as shown in my Helms Manual. Its a 99 manual and i think the colors are off (they have brown instead of pink) but is the same:
http://i178.photobucket.com/albums/w...BIGCIRCUIT.jpg
http://i178.photobucket.com/albums/w...99/ASRPLUG.jpg
So the LED part of it isn't involved in the switch at all. Connect Pink wire to other Pink and Pink/White to a ground.
Connect Gray to Gray from other switch for illumination.
Though it isnt shown in my circuit diagram, I assuming that the Gray wire for illumination is actually connected one side of the 'illumination bulb' and other side of that bulb is connected to the pole of the switch along with the Black/White wire. That way if the lights are on, the illumination is always on regardless of switch position. When you close the switch you are grounding everything that is connected to the Brown/White wire (like the garage opener). When switch is open, Brown/White wire is disconnected.
Your idea makes more sense for the opener install... the only thing is I have a remote with a 3V 2032 watch battery. Here are some pics:
open
So I should be able to get some kind of voltage transformer to reduce from +12V to +3V.. connect Brown/White wire to negative terminal in remote then I'm good? Could this be done with a relay? Use the Brown/White wire to ground the coil and connect both sides of the remote as its wired now, with its own battery, to the other circuit on the relay with the common disconnected?
Trending Topics
06-27-2008, 07:38 AM
#8
The switches are wired the same although my diagram is for Firebird TCS switch and the power source appears to be different (pink wire from GAUGES fuse in Firebird = brown wire from TURN B/U fuse in Camaro).
I have a switchable transformer I got from Radio Shack a few years ago that can produce 1.5V, 3V, 4.5V, 6V, or 9V from a 12V input. It was called a "universal power adapter" and it was designed to plug into a car's cigarette lighter. I cut off the lighter plug and hardwired the two power input wires to ignition and ground. I don't know if they still sell them but you might be able to find something like it online.
Yes, you could use a relay to control your two switch wires. Connect 86 to power, 85 to the brown/white wire, 30 to one of the door opener switch wires, and 87 to the other switch wire.
One big advantage of using the ASR switch to control power is that you don't have to worry about replacing the opener's battery - especially if you end up putting it under the dash somewhere that's hard to reach.
EDIT: Found a universal adapter online here: http://store.sundancesolar.com/undcadpoco.html
Last edited by WhiteBird00; 06-27-2008 at 08:38 AM.
 07-04-2008, 10:36 AM
#11
On The Tree
Thread Starter
iTrader: (25)
Join Date: Nov 2001
Location: NW Houston
Posts: 131
Likes: 0
Received 0 Likes
on
0 Posts
Hey Wayne! Yes its been a long time. The last time I went to Steele was Jan '03, but still have the car and still tinkering. A friend and I spent all day yesterday buffing the whole thing after 9 years of punishment. I'm always checking the boards but my time is about 99% lurking/searching and 1% posting. It's amazing how big this place has gotten over the years.
If my parts ever get here from that so-called partsdirect place I'll get this project done with some pics. Good to hear from you!
A friend and I spent all day yesterday buffing the whole thing after 9 years of punishment. I'm always checking the boards but my time is about 99% lurking/searching and 1% posting. It's amazing how big this place has gotten over the years.If my parts ever get here from that so-called partsdirect place I'll get this project done with some pics.
Good to hear from you! 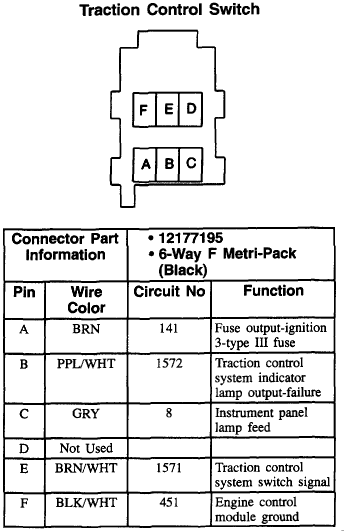 07-13-2008, 11:04 PM
#13
On The Tree
Thread Starter
iTrader: (25)
Join Date: Nov 2001
Location: NW Houston
Posts: 131
Likes: 0
Received 0 Likes
on
0 Posts
Thanks nitemarechevy. Mine actually looks like the diagram you show. Maybe since my 99 was built in late 98 it got the 98 plug. The 99 helms manual shows the colors for A and B switched. I'm SURE it's not an error in the Helms manual. 
07-13-2008, 11:26 PM
#14
On The Tree
Thread Starter
iTrader: (25)
Join Date: Nov 2001
Location: NW Houston
Posts: 131
Likes: 0
Received 0 Likes
on
0 Posts
I finally got everything in and got it done this weekend. Thanks for everybody's help! I ended up using a relay with the garage remote just to have less stuff behind the radio. I changed the LEDs too.
So it turns out you can have the LED on and the Illumination and do the job at the same time. I just had to do:
1) pink to pink on other ASR switch for LED power
2) purple/white to GROUND for LED ground
3) Gray to Gray on other switch for illumination
4) Black/White to Ground
5) Brown/white to one side of my SPST relay coil. (86)
Other side of Relay coil is on +12V source (85)
Other two pins of relay to the two wires of my telephone cable that is connected inside the remote. (30 and 87)
I had two autometer temp gauges on the column that i replaced with one in the convertible top switch plate on the console. Tranny temp & coolant temp. The senders are the same and so are the gauges so i'm using just the trans temp gauge and using a third ASR switch to switch between the two senders going to it. I did the same wiring as above but used a SPDT relay. (wire to gauge is 30, trans temp sender on 87a, coolant sender on 87) It shows trans temp normally and when i hold it down it switches between the senders and shows the coolant temp. I got tired of the gauge pillar and put a stock pillar back on. I used to use this ASR switch for just the line lock--so what I did was put a quick disconnect on the brown/white wire so I can pull the trim panel and switch that wire between the relay for the gauges and the relay for the linelock if I ever go back to the track. :burnout: I may go with a dedicated switch somewhere else to switch the gauges.
About the LED's I got them from a Chinese source on Ebay. free shipping, 11 days to get to Tennessee from Hong Kong. 105 leds for $9.99 with free resistors! And holy crap they are bright at night!
 I followed keliente's page for the install, it was pretty easy.
So it turns out you can have the LED on and the Illumination and do the job at the same time. I just had to do:
1) pink to pink on other ASR switch for LED power
2) purple/white to GROUND for LED ground
3) Gray to Gray on other switch for illumination
4) Black/White to Ground
5) Brown/white to one side of my SPST relay coil. (86)
Other side of Relay coil is on +12V source (85)
Other two pins of relay to the two wires of my telephone cable that is connected inside the remote. (30 and 87)
I had two autometer temp gauges on the column that i replaced with one in the convertible top switch plate on the console. Tranny temp & coolant temp. The senders are the same and so are the gauges so i'm using just the trans temp gauge and using a third ASR switch to switch between the two senders going to it. I did the same wiring as above but used a SPDT relay. (wire to gauge is 30, trans temp sender on 87a, coolant sender on 87) It shows trans temp normally and when i hold it down it switches between the senders and shows the coolant temp. I got tired of the gauge pillar and put a stock pillar back on. I used to use this ASR switch for just the line lock--so what I did was put a quick disconnect on the brown/white wire so I can pull the trim panel and switch that wire between the relay for the gauges and the relay for the linelock if I ever go back to the track. :burnout: I may go with a dedicated switch somewhere else to switch the gauges.
About the LED's I got them from a Chinese source on Ebay. free shipping, 11 days to get to Tennessee from Hong Kong. 105 leds for $9.99 with free resistors! And holy crap they are bright at night!
I followed keliente's page for the install, it was pretty easy.
12-03-2008, 01:37 AM
#15
Launching!
iTrader: (20)

Join Date: Jun 2005
Location: Clarksville, MD
Posts: 265
Likes: 0
Received 0 Likes
on
0 Posts
I am trying to upgrade my '95 switch to a '97 switch for a firebird.
here is my switch:

Here is the '95 wiring:

Here is the wiring shown above, my '97+ tcs switch plug looks the same as the asr switch, it seems like i just need to add the grey interior lamp wire. Can i just rewire using this diagram by adding the grey interior lamp wire? Is a 97+TCS switch the same as an asr switch?

here is my switch:
Here is the '95 wiring:
Here is the wiring shown above, my '97+ tcs switch plug looks the same as the asr switch, it seems like i just need to add the grey interior lamp wire. Can i just rewire using this diagram by adding the grey interior lamp wire? Is a 97+TCS switch the same as an asr switch?
12-03-2008, 09:21 AM
#16
You already have all the information you need from earlier in this thread and your own diagrams. The wires in your car go to the switch positions corresponding to the same wire colors on the new switch. Add a wire for dash illumination power to position C (gray) and the switch will work as intended. You can get dash illumination power from the gray wire in position 7 of the black connector at the radio. There are two gray wires in that connector so check the radio pinout diagram in the Monsoon FAQ sticky to make sure you use the correct one.
12-03-2008, 09:05 PM
#17
Launching!
iTrader: (20)
Join Date: Jun 2005
Location: Clarksville, MD
Posts: 265
Likes: 0
Received 0 Likes
on
0 Posts
I was thinking of just daisy chaining it from the ashtray light because that uses a gray wire and is controlled by interior illumination, unless its the wrong gray.