
 04-29-2016, 05:34 PM
Last edit by: IB Advertising
See related guides and technical advice from our community experts:
- Camaro and Firebird How to Repair Wrap Dash<br>Step by step instructions for do-it-yourself repairs.

how to fix or wrap your dash pad to look brand new
08-14-2010, 10:53 PM
#101
TECH Regular
Join Date: May 2008
Location: Marissa, Il
Posts: 458
Likes: 0
Received 0 Likes
on
0 Posts

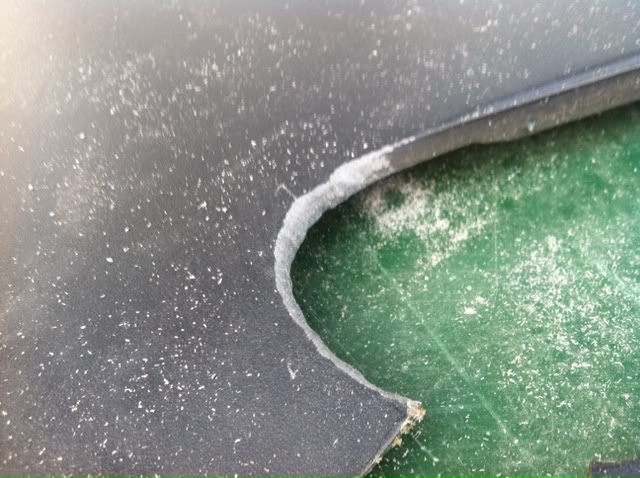
I'm going to preempt this with this statement: I'm about the un-craftiest person I know. I always sucked at sewing and art and stuff like that. This is no different. Well actually it would have turned out better if my dog didn't step on it about half way through gluing it back together, breaking off 4 new pieces, including obliterating the vent section.
As you will see in the first few pictures I didn't have much of a disaster, but well it got worse.
As you can see it didn't turn out perfectly, especially in the area of the vent. I thought that maybe there I could have just cut out all the gridded plastic as it was all broke and then put maybe porch screening material there instead or something. All I know is that I'm happy with it, and it looks better than a cracked dash with chunks missing that had slid underneath. Not perfect but good enough for me, I'm not driving a show car by any means.
In closing: Don't be worried about doing this. You would have to really mess it up for it to turn out worse than looking at a pile of destroyed plastic every time you sat down in your car.
As you will see in the first few pictures I didn't have much of a disaster, but well it got worse.
As you can see it didn't turn out perfectly, especially in the area of the vent. I thought that maybe there I could have just cut out all the gridded plastic as it was all broke and then put maybe porch screening material there instead or something. All I know is that I'm happy with it, and it looks better than a cracked dash with chunks missing that had slid underneath.
In closing: Don't be worried about doing this. You would have to really mess it up for it to turn out worse than looking at a pile of destroyed plastic every time you sat down in your car.

 08-14-2010, 11:52 PM
#103
08-16-2010, 09:42 PM
#104
btw If you get them to pull it for you (which is what I did) they can go through every F-body on their lot trying to pull one until they get a nice one out that you are willing to pay for. Its not like they will pull it and hand you the pieces and ask for $100 bucks. The guy that was pulling the parts broke one and got the 2nd one out fine.
08-17-2010, 08:05 AM
#107
TECH Enthusiast
Thread Starter
iTrader: (6)
Join Date: Nov 2008
Location: Puyallup WA
Posts: 698
Likes: 0
Received 0 Likes
on
0 Posts
08-17-2010, 05:10 PM
#108
TECH Resident
iTrader: (12)
Join Date: Jul 2004
Location: Georgetown, IL 61846-1105
Posts: 988
Likes: 0
Received 1 Like
on
1 Post
3M Top & Landau Adhesive would be best for this, the spray bomb's don't hold up well in temp over a long period of time. All upholstery shops use this method. Looks good with the work tho!
09-13-2010, 09:17 PM
#109
TECH Resident
iTrader: (9)
I followed the directions and it came out pretty good. Got the headliner adhesive from autozone and the vinyl from a fabric store. total cost was about 35$ and it took maybe an hour or so.
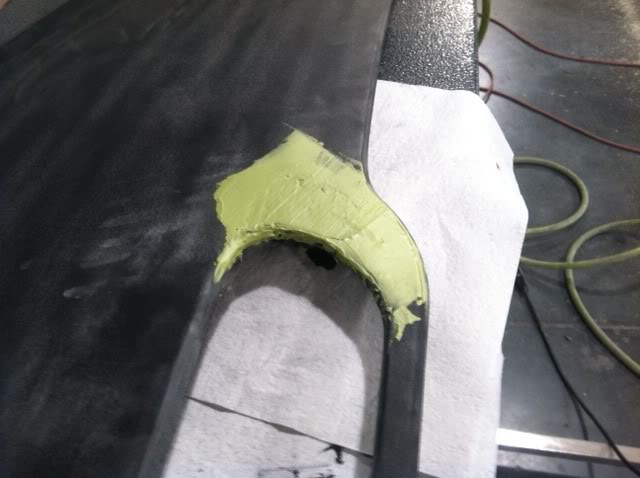
This was after repairing and sanding the crack, i probably could have done better

First coat of adhesive.


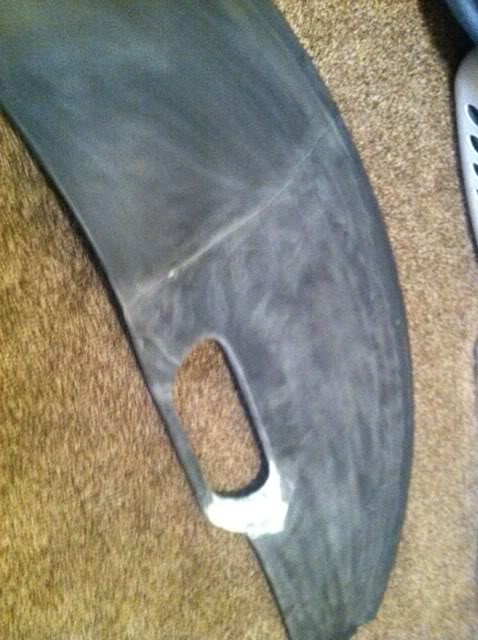
After laying the vinyl and super gluing the edges down.


then came the cutting of the defroster. this took probably the most time, considering i had to remove all of the adhesive from in between the grill with goof off.

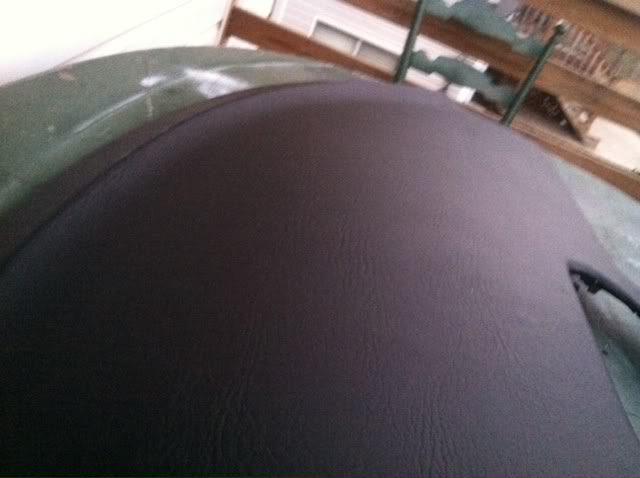
finished product


This was after repairing and sanding the crack, i probably could have done better
First coat of adhesive.
After laying the vinyl and super gluing the edges down.
then came the cutting of the defroster. this took probably the most time, considering i had to remove all of the adhesive from in between the grill with goof off.
finished product
09-13-2010, 10:40 PM
#110
I'm about to do mine with an ultrasuede type of material which I discovered with the help of some other members.
It's about the same price as the vinyl at $10-$12 per yard and I think it would be easier to work with, and it would be a little custom touch because it would look like what a lot of road course cars have. I'll likely be starting the project tomorrow afternoon... We'll see what happens...
It's about the same price as the vinyl at $10-$12 per yard and I think it would be easier to work with, and it would be a little custom touch because it would look like what a lot of road course cars have. I'll likely be starting the project tomorrow afternoon... We'll see what happens...
03-26-2011, 12:00 PM
#111
Registered User

Join Date: Mar 2011
Posts: 17
Likes: 0
Received 0 Likes
on
0 Posts
What do u do if your dash is cracked, the vent is shattered, but the rest of my wrapping looks good, but where the vent is shattered the area below it is broke into 3 pieces(93-96). The triangle section, well wrapping that keeps messing up bc it keeps breaking, how would you do that?

 12-07-2012, 06:55 PM
#115
My dashpad cracks every year and a half, pretty much clockwork. My car sits in a garage
and is only driven on nice days or at night. Never in direct sunlight. All my dashpads have
been brand new OEM $250+ each time. Yet they crack all the damn time. So I am gonna
give this a shot.
and is only driven on nice days or at night. Never in direct sunlight. All my dashpads have
been brand new OEM $250+ each time. Yet they crack all the damn time. So I am gonna
give this a shot.
06-16-2013, 09:02 AM
#116
TECH Regular
iTrader: (5)
Join Date: Sep 2006
Location: Lynchburg, VA
Posts: 404
Likes: 0
Received 0 Likes
on
0 Posts
Glad I found this old thread. I've had my car since March 2007 and the dash pad has always been pristine. I drop the car off to get painted and to pick it up, boom, nice cracked dash pad....
06-30-2013, 07:57 PM
#118
Teching In

Join Date: Apr 2013
Location: Buford, GA
Posts: 10
Likes: 0
Received 0 Likes
on
0 Posts
I bought my 98 TA about 2 months ago and have been slowly working on fixing all the small things. One was my dashboard. It was in about 10 different pieces and looked like crap. Because it was so bad I figured I couldn't make it any worse so I gave this thread a shot.
While pulling the dash out it continued to break like a tortilla chip is some thick dip. When it was all said and done it was in 15+ pieces. Since I already had bought the epoxy, headliner glue, and vinyl from Hobby Lobby I gave it a shot anyway.
Connecting all the pieces together took a lot of patience, and almost 3 full tubes of epoxy... Then came sanding, which in hindsight I should have used some sort of bondo to help get the cracks less noticeable, but it looks 1 million times better, and kinda matches the rest of the "fit and finish" of the wonderful 90's GM interior. haha
07-13-2013, 10:52 AM
#119
Ok so I know where to buy the vinyl question has been asked a dozen times. But has anyone bought grey vinyl and where?
Looking to do this right away.
And as far as the vent goes I'm doing this... Painting it a darker shade and not putting the pad in
https://ls1tech.com/forums/appearanc...n-fbodies.html
With this...
http://www.marketworks.com/StoreFron...879&i=18133032
Looking to do this right away.
And as far as the vent goes I'm doing this... Painting it a darker shade and not putting the pad in
https://ls1tech.com/forums/appearanc...n-fbodies.html
With this...
http://www.marketworks.com/StoreFron...879&i=18133032
07-19-2013, 08:32 PM
#120
Teching In

Join Date: Jul 2013
Location: kentucky
Posts: 12
Likes: 0
Received 0 Likes
on
0 Posts
I've tried wrapping an didn't like the look. maybe vinyl was too thick or not enough glue. Anyway. I sanded all my edges used super glue to get back in one piece sanded the entire crash pad front an back fiberglassed the back. Used a roto zip to cut the vent out. bondo the cracks to smooth it out. Sprayed it with rust-oleum truck bed coating spray. Using a grill to replace the vent just haven't found one I like yet. It will last longer than any vinyl an glue an looks extremely close the texture of the door handle an trimming.