
Write-up: BMW E46 bixenon projector headlight conversion for LT1 Firebirds


Thread Starter
TECH Regular
Joined: Feb 2005
Posts: 400
Likes: 2
I'd been researching affordable projector headlight conversions for LT1 Firebirds for a while and I came across JasonWW's firebird headlight upgrade guide https://ls1tech.com/forums/appearanc...ral-guide.html
First a little bit of history on my headlight conversion. I was fed up with the poor lighting and goofy appearance of my LT1 headlights so I decided to completely remove the stock headlights along with the headlight basket and bezel, and replace them with something smaller and brighter. I originally intended to install separate high and low beams lamps but soon found that I couldn't get any decent driving lights without spending a lot of coin so I settled for some cheap autozone lights (not DOT legal) for temporary low beam duty while I looked up other options.
I modded the headlight doors to come up only about halfway for a less goofy look. All it took was a piece of metal bolted in the right place to function as a stop.
Now not only did I not have high beam, these lamps didn't provide enough peripheral coverage either, i.e. they were probably worse than the stock lights.
What I now wanted to do was remove these lights and install some projectors instead. After reading the guide, I found the following options most appealing:
1) Hella 90mm projectors (HL60137) for low beams with H9 halogen bulbs. Would still need to figure out a separate lamp for high beams.
2) BMW E46 bi-xenon projectors with modded H7 halogen bulbs. Would need to wire up the solenoids for high beam control (a solid state controller is available for this purpose).
3) Infiniti FX bixenon projectors. I stumbled across this option later, and after doing the E46 conversion, I think working with the FX projectors would have definitely been easier. They're more compact and already sealed from the weather.
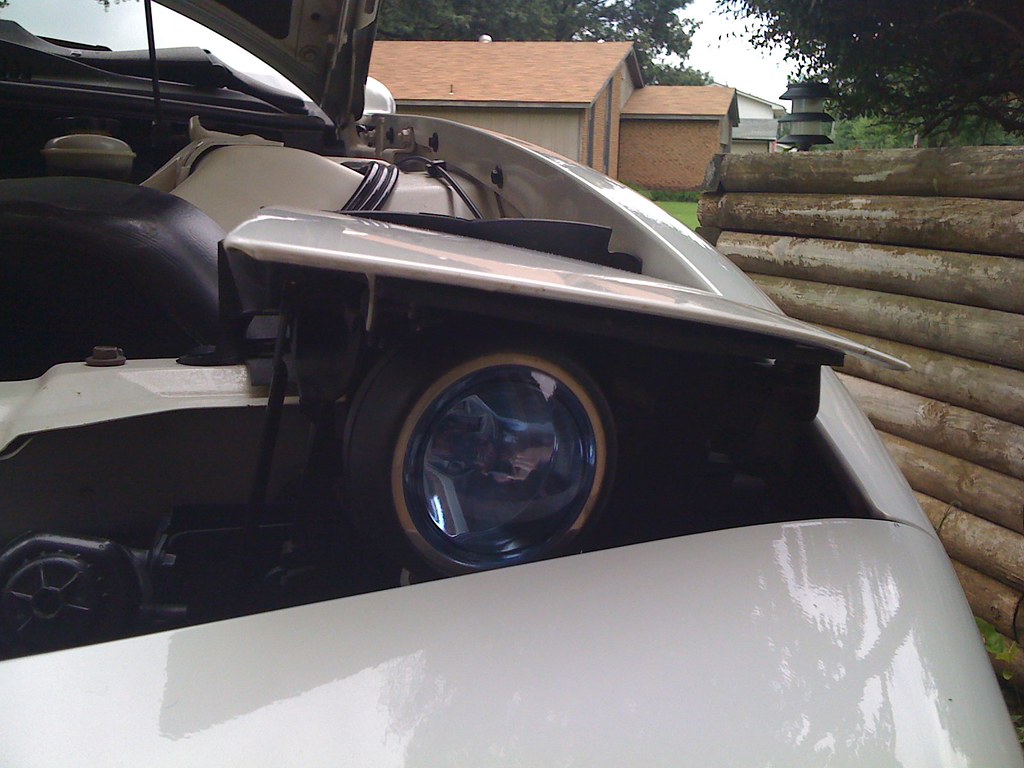
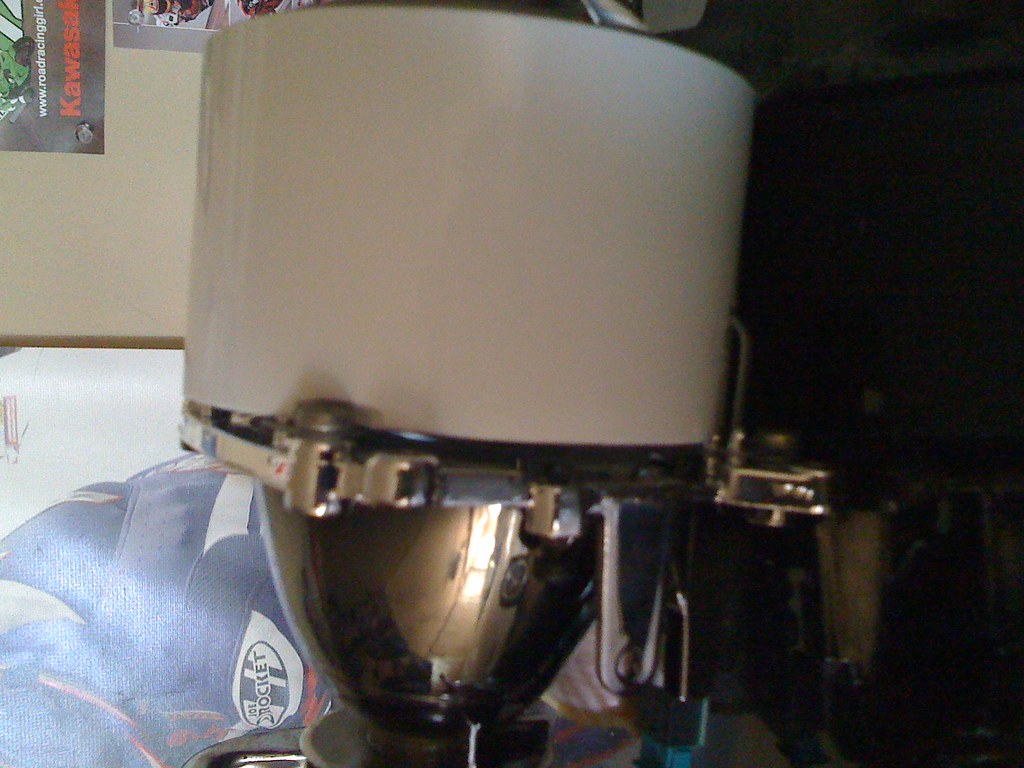
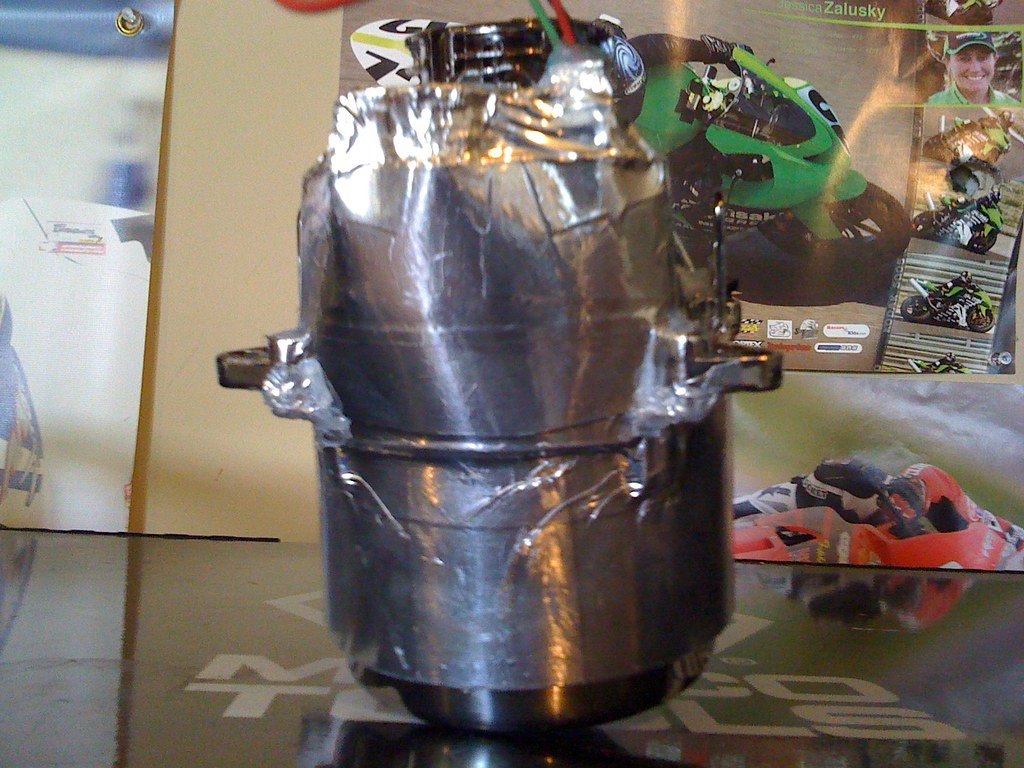
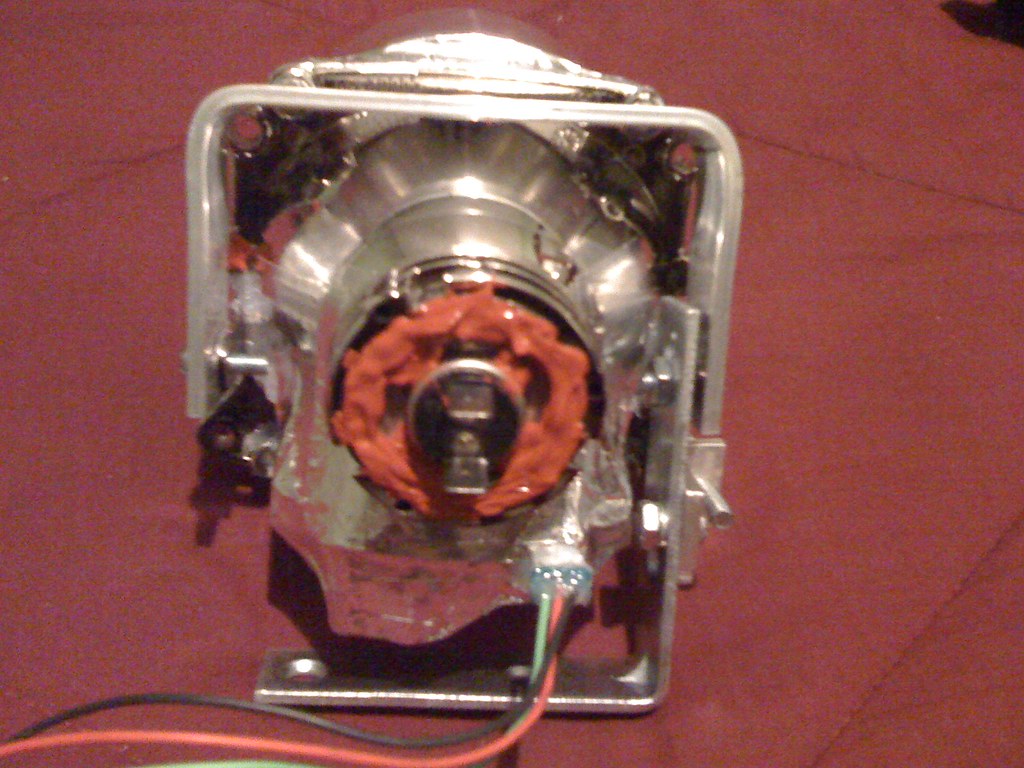
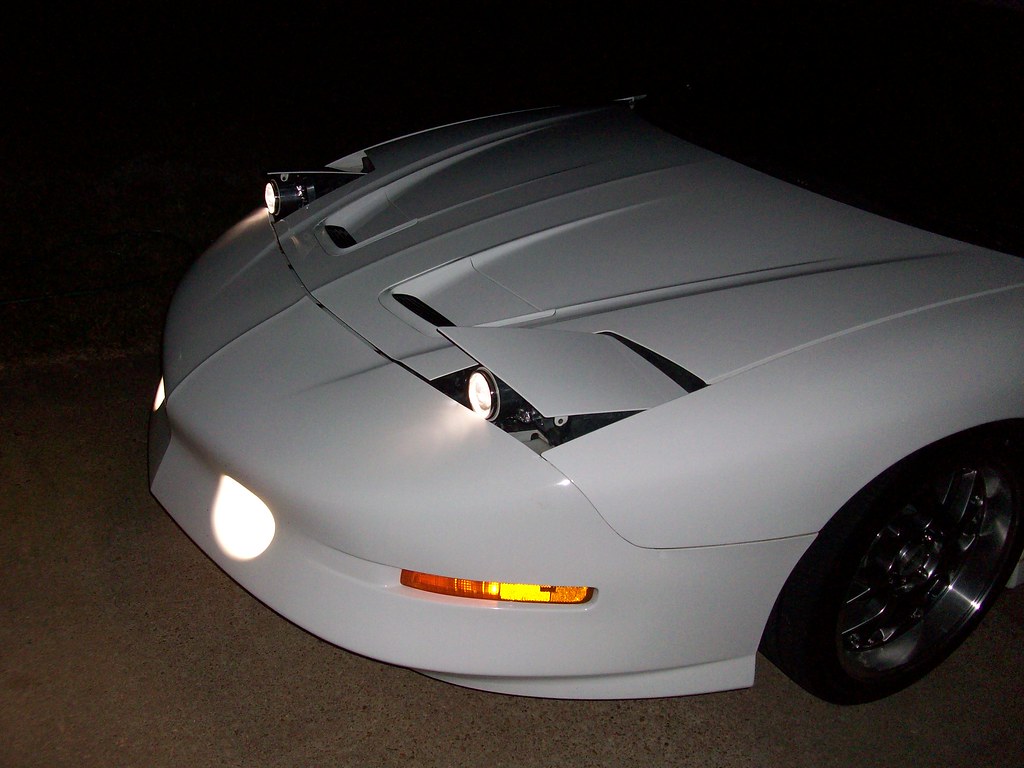
I finally decided on these E46 bixenons, mainly because it was too good a deal to pass up, and also because I've heard nothing but good things about the E46s. In this picture you can see that I already trimmed the upright stops from the corners of the cutoff shield, as they would later prove to interfere with the shroud I built.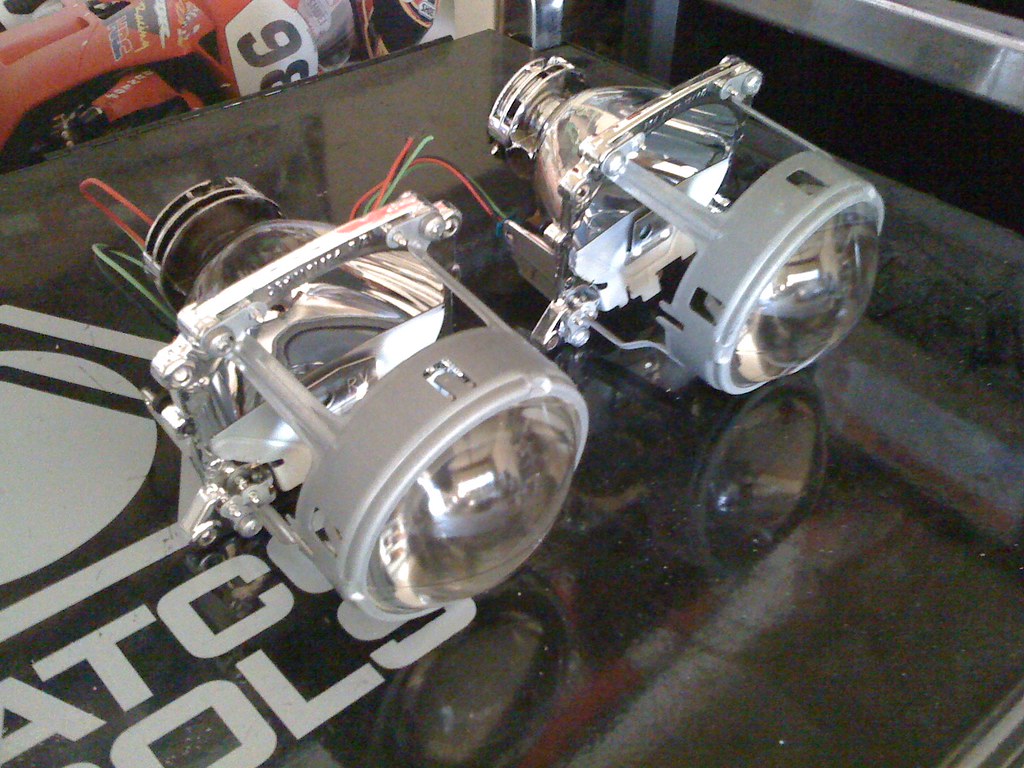
First a little bit of history on my headlight conversion. I was fed up with the poor lighting and goofy appearance of my LT1 headlights so I decided to completely remove the stock headlights along with the headlight basket and bezel, and replace them with something smaller and brighter. I originally intended to install separate high and low beams lamps but soon found that I couldn't get any decent driving lights without spending a lot of coin so I settled for some cheap autozone lights (not DOT legal) for temporary low beam duty while I looked up other options.
I modded the headlight doors to come up only about halfway for a less goofy look. All it took was a piece of metal bolted in the right place to function as a stop.
Now not only did I not have high beam, these lamps didn't provide enough peripheral coverage either, i.e. they were probably worse than the stock lights.
What I now wanted to do was remove these lights and install some projectors instead. After reading the guide, I found the following options most appealing:
1) Hella 90mm projectors (HL60137) for low beams with H9 halogen bulbs. Would still need to figure out a separate lamp for high beams.
2) BMW E46 bi-xenon projectors with modded H7 halogen bulbs. Would need to wire up the solenoids for high beam control (a solid state controller is available for this purpose).
3) Infiniti FX bixenon projectors. I stumbled across this option later, and after doing the E46 conversion, I think working with the FX projectors would have definitely been easier. They're more compact and already sealed from the weather.
I finally decided on these E46 bixenons, mainly because it was too good a deal to pass up, and also because I've heard nothing but good things about the E46s. In this picture you can see that I already trimmed the upright stops from the corners of the cutoff shield, as they would later prove to interfere with the shroud I built.
Thread Starter
TECH Regular
Joined: Feb 2005
Posts: 400
Likes: 2
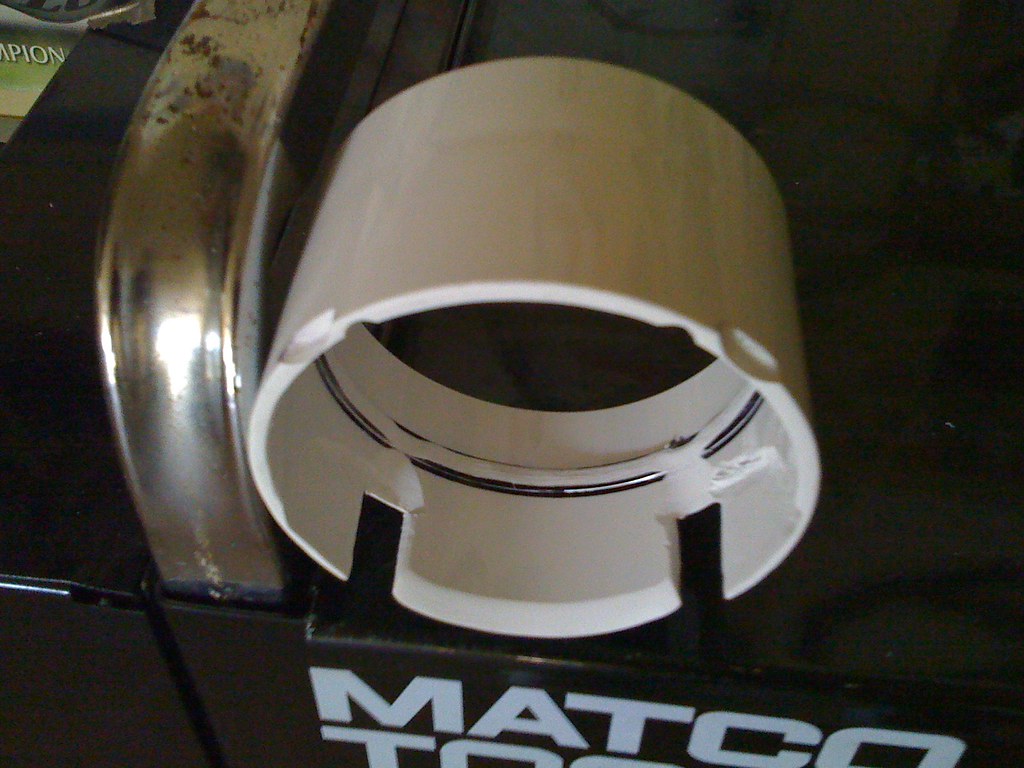
Took a trip down to the local Lowes to figure out what I would need to build a shroud. Turns out that this 3" PVC pipe coupling is nearly a perfect fit. There is a ridge inside the coupling which needs to be ground away a bit for the lens housing to fit through it. I drew a line with a sharpie along the ridge for reference and let the Dremel loose on it until it was a snug fit over the lens housing. This picture also shows where I had to scallop 'drop zones' for the cutoff shield on either sides of the slots. You need that space or the shield won't drop for the high beam. This is critical because if the shield interferes with the shroud at all, it will get stuck in the high beam position. I also cleared some room for the screws and mounting pins for a flush fit.
Also had to grind a little bit off and bevel edge the bottom part of the shroud where the cutoff shield was binding on it.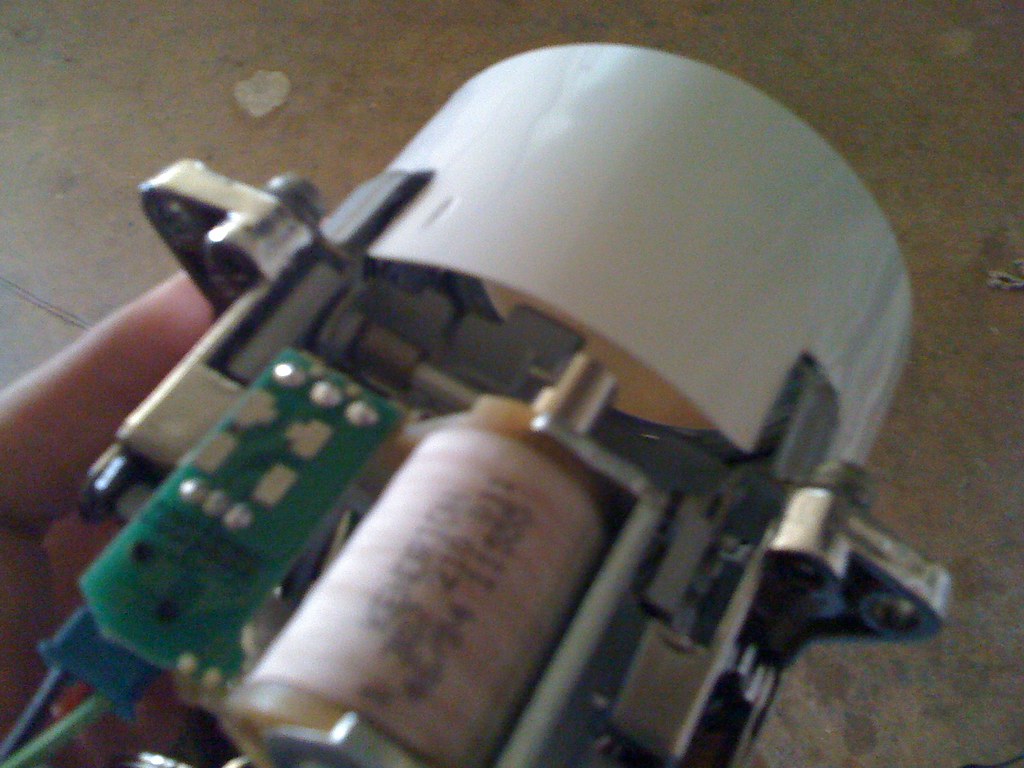
Now before you permanently seal the shroud to the projector, remove the lens from each projector, put a thin bead of clear silicon on the lip where the lens sits and reassemble it. Like the rest of the projector, this part isn't originally watertight. Make sure you push the lens all the way back in and snug it up with the locking ring and bendable tabs. Any excess silicon pushed out on to the lens should be cleaned up promptly. Unfortunately, I don't have any pics of this forgotten step.
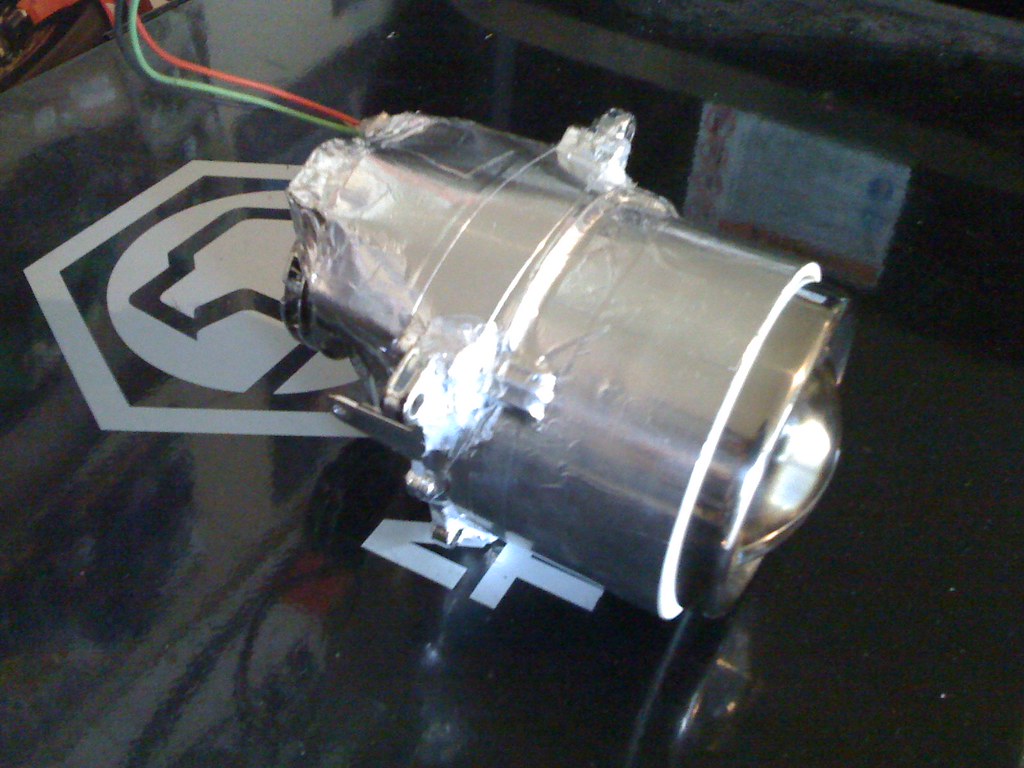
Once I was satisfied with the fit of the shroud and certain that the shield would not bind on it, it was time to seal it to the projector. Lots of aluminum tape sealed all the gaps between the reflector bowl and the PVC shroud. I wrapped some more around the whole shroud to give it a neater appearance. The corners around the screws holes are tricky and they need a liberal dose of silicone for a watertight seal. Don't be afraid to use lots of tape - the stuff is thin and it takes a few layers to build a strong seal that can be handled without fear of puncturing it.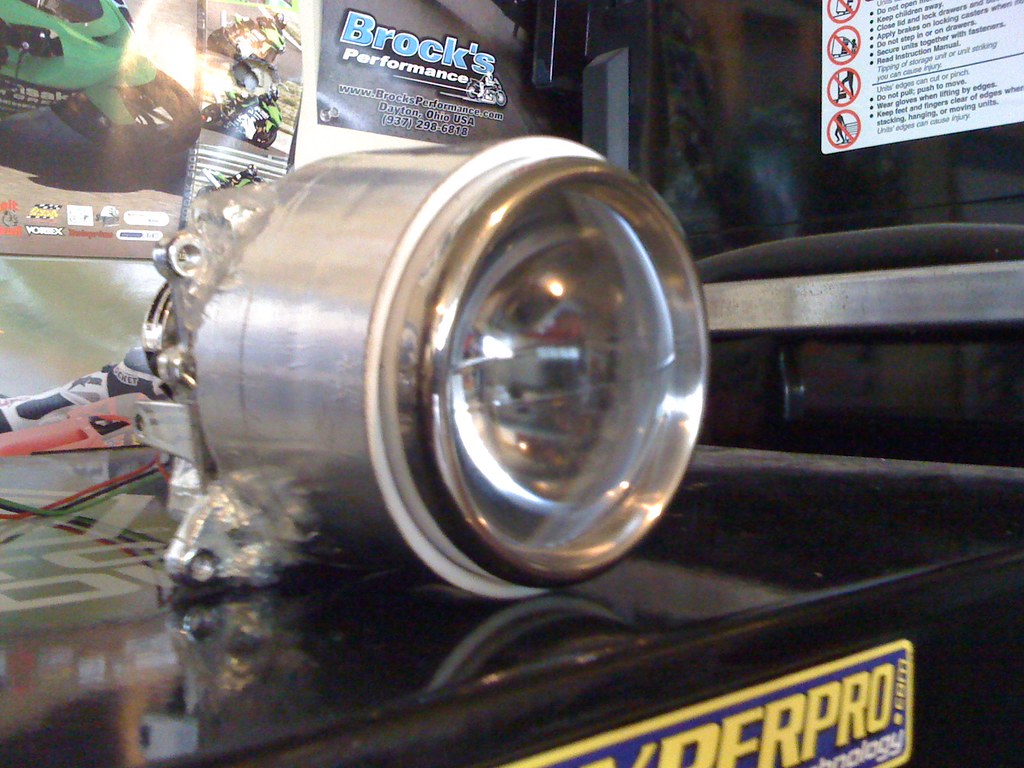
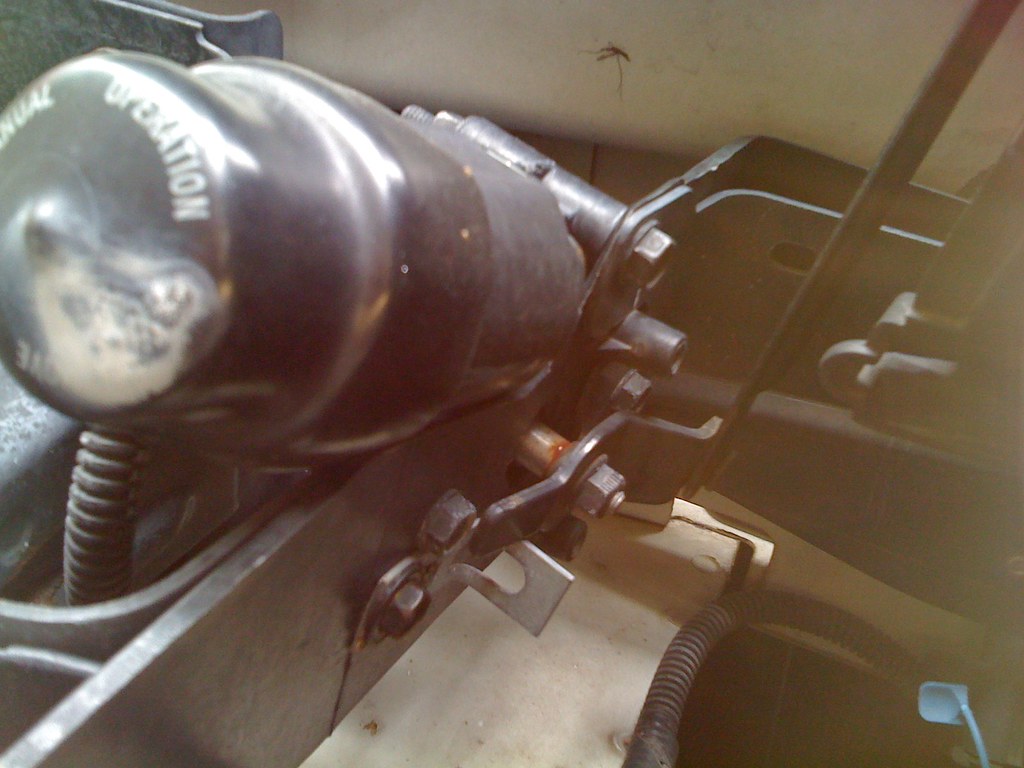
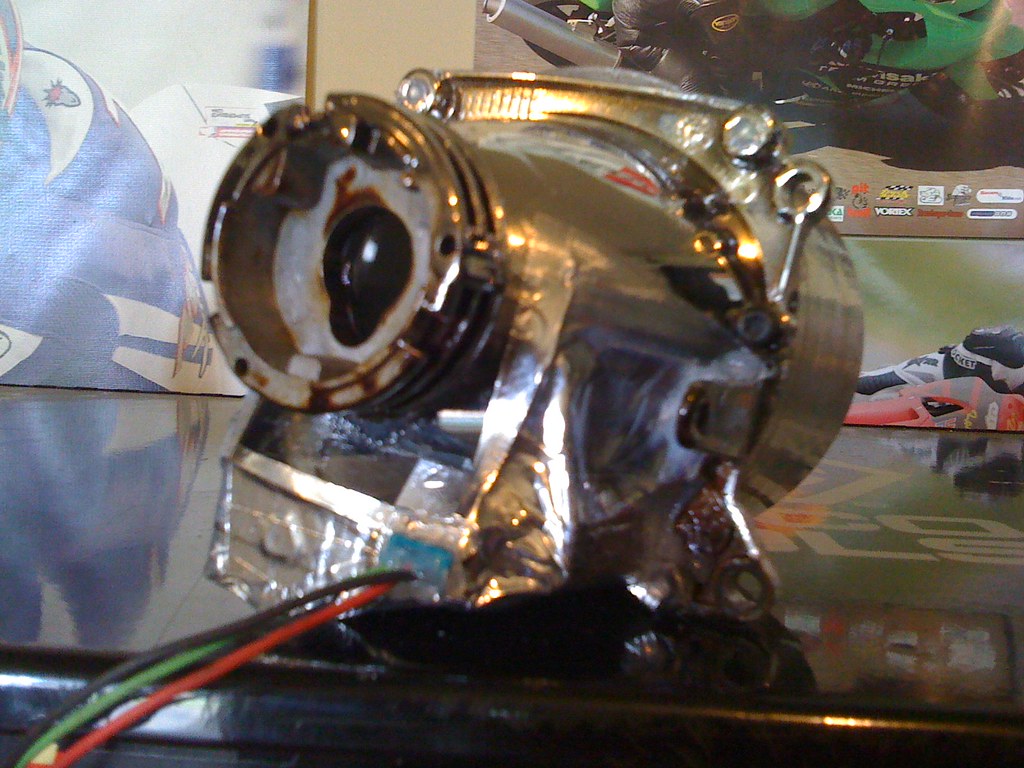
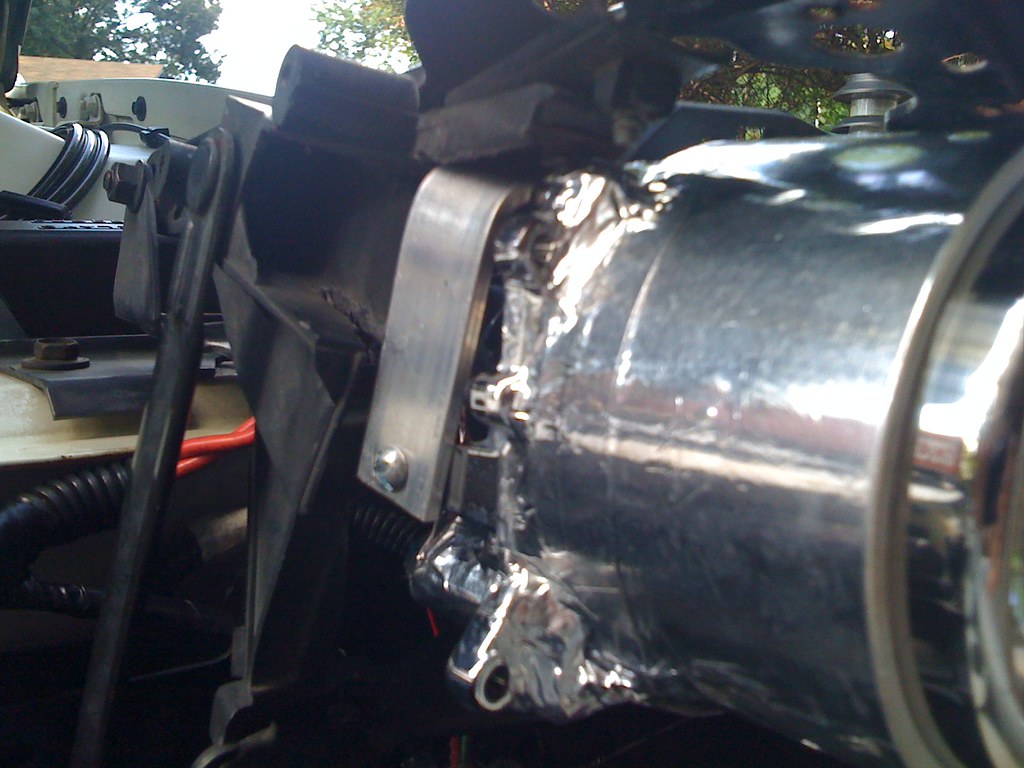
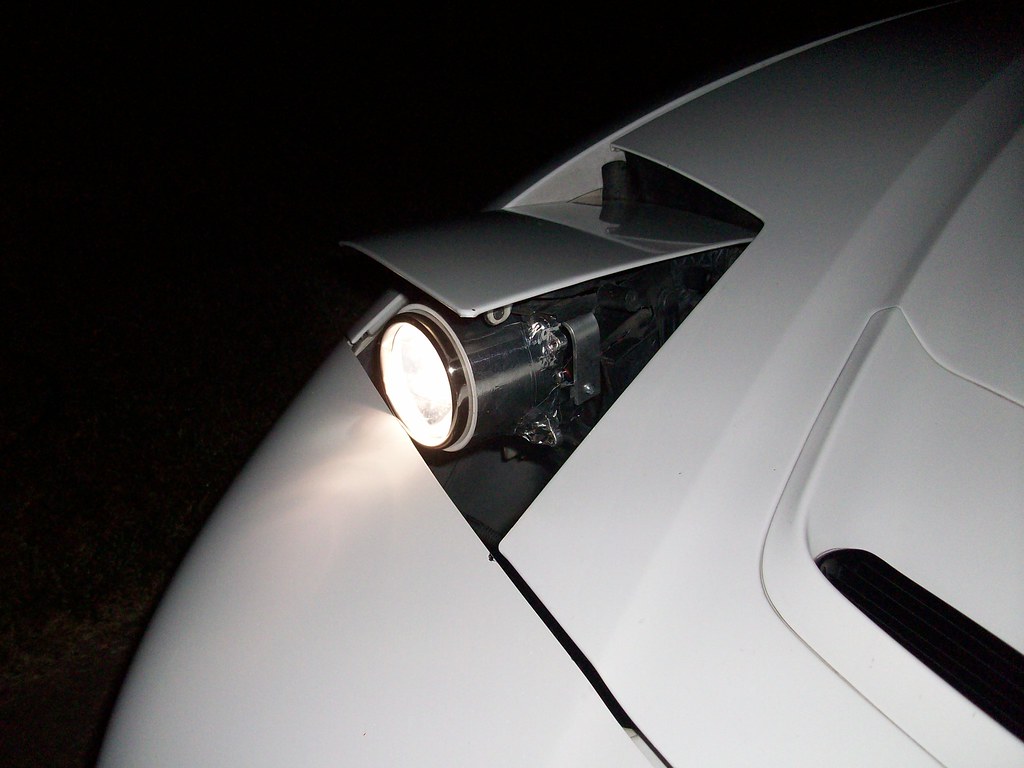
Sealing the bottom and the back of the projector is a lot more involved. I cut some pieces of clear polycarbonate packaging to form shields around the exposed parts of the high beam solenoid and the cutoff shield. I put one piece around the bottom and securely taped it in place. I then cut another piece that follows the curve around the rear of the housing and extends down to the solenoid, and taped it up too. Any remaining holes and cracks, like where the polycarbonate piece meets the neck of the reflector bowl, can be sealed up with silicon. Again, use lots of the stuff to make sure you have a good seal. There are many little seams and crevices that will need to be siliconed up. Although I didn't do it, there is a hole in the wide part of the reflector bowl which is an excellent place to mount a vent tube. You need this because no matter how hard you try, a very slight amount of moisture will eventually get inside. The vent tube will keep your lenses from getting fogged up. Here's the projector totally mummified in aluminum tape. Note the silicone around the solenoid pigtail.
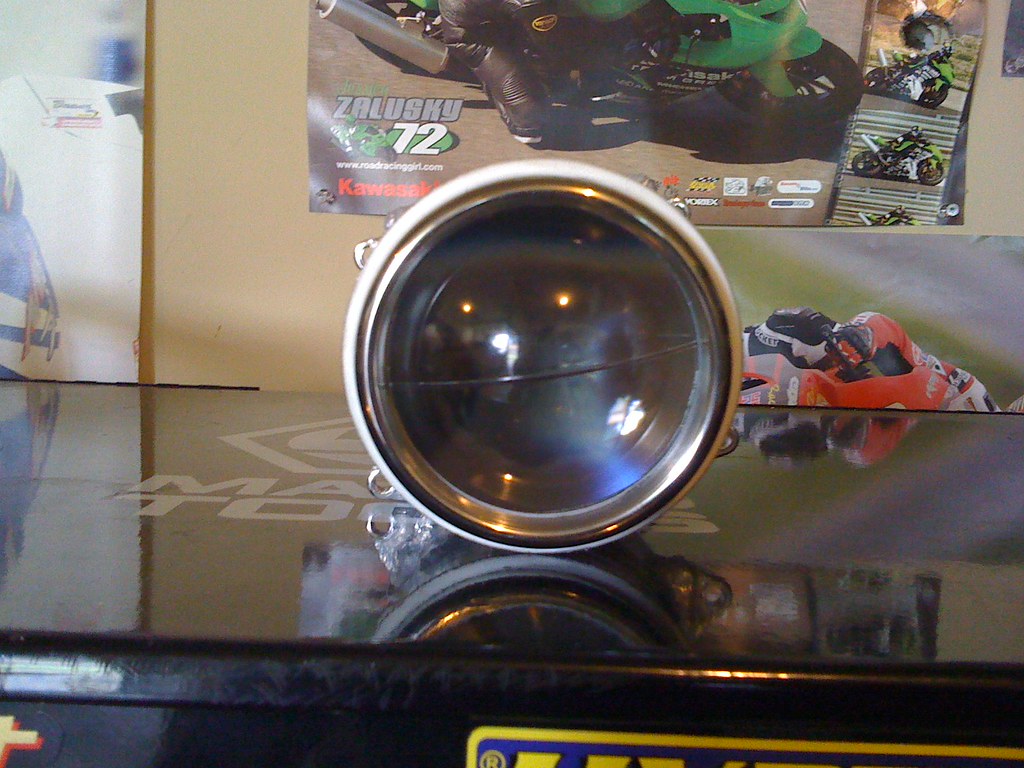
See the bezel around the lens? That's Walmart to the rescue! I picked up a couple of travel mugs from the automotive accessories section. These mugs have a stainless ring around the lid that pops right off and it's a perfect fit, both around the lens and the PVC shroud! For more bezel and shroud ideas, check out this thread at HIDplanet forums http://www.hidplanet.com/forums/view...f5fc57605caa25 You will have to register to view it though. Lots of creativity on that board!
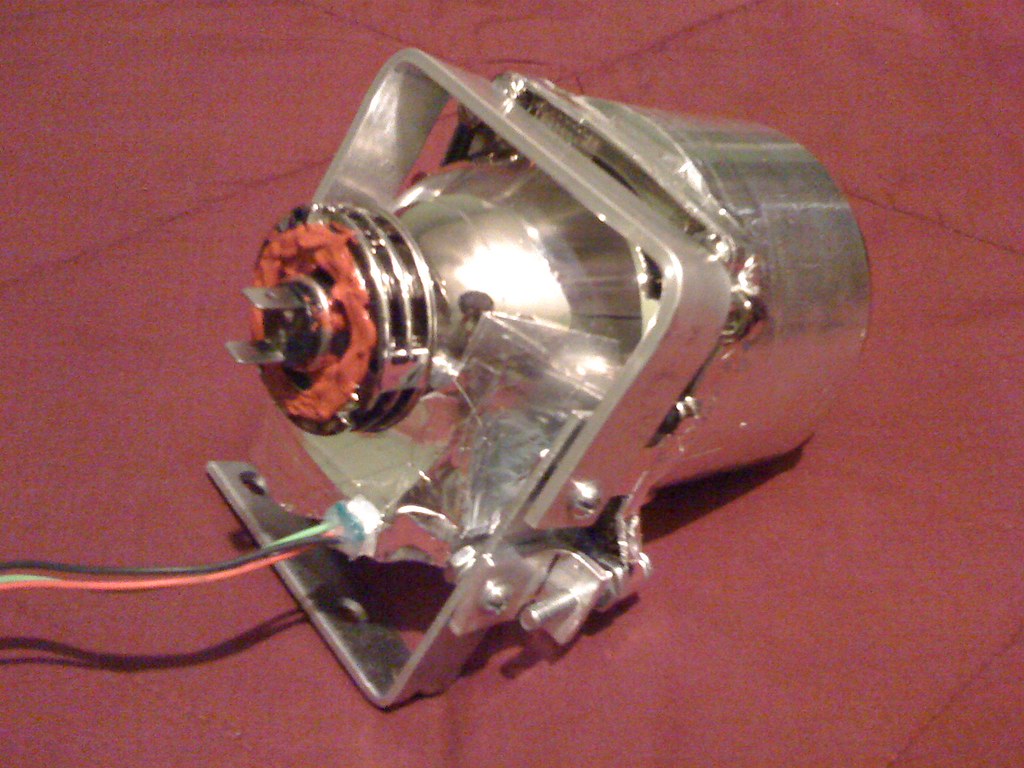
Next, once I figured out exactly where to mount the projectors, I had to build a mounting and aiming rig. I based mine on the design in this thread https://ls1tech.com/forums/appearanc...-1997-z28.html, but added a lower mounting point for extra stability. Mine is also not as tall, and it allows the the projector to tuck in as high as possible. I used 1" x 1/8" aluminum flat bar for the top half and some Walmart angle brackets I had sitting around for the bottom part. I didn't feel confident enough to build it all out of one piece without a vise, therefore the two-piece design. That long screw threaded into the angled aluminum piece on the bottom part is for vertical adjustment. Tip: drill all holes slightly undersized for your screws and tap them. The fewer nuts you have to use for assembly, the easier and simpler it is.
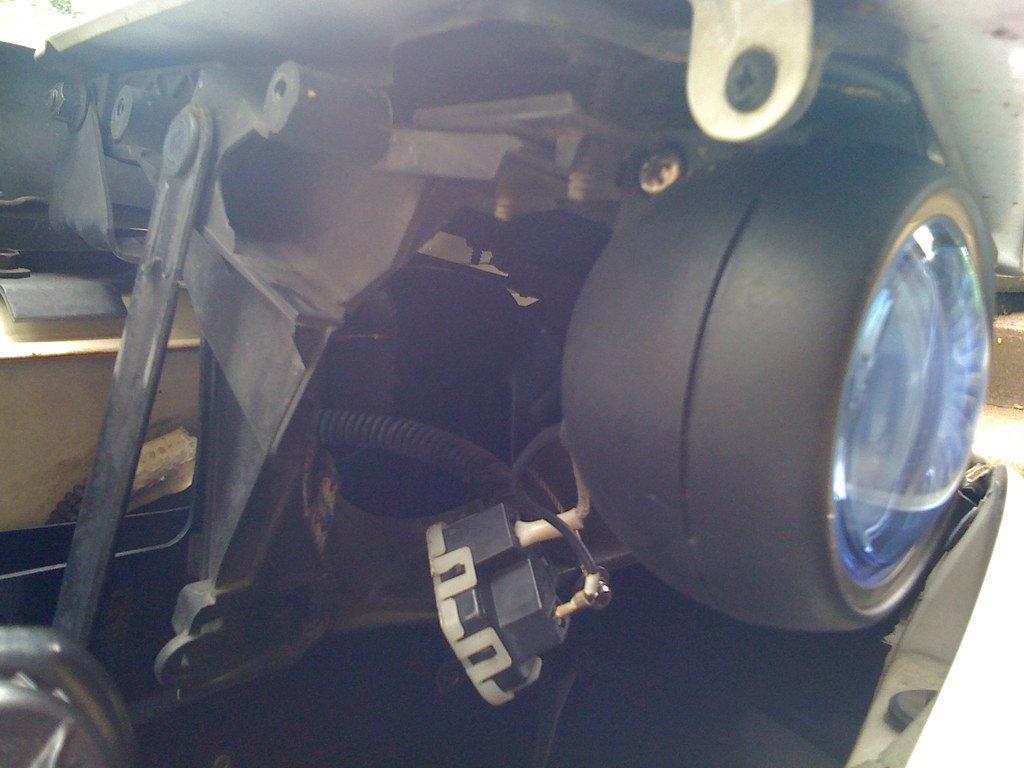
I originally didn't want to cut anything out of the headlight assembly because I wanted to be able to put the whole thing back to stock if need be. However, for a couple of reasons, I decided to move the projectors as far inboard as possible. First, I didn't want the goofy airbrakes deploying any higher than absolutely necessary. Second, it turns out that mounted anywhere else, either the back of the projector would hit the radiator cross member, or the lens/bezel would hit the bumper (another reason to study the FX bixenon option more closely). This view of the passenger side from the front of the car shows where I had to do some trimming. I cut a wide slot across the top, another one down the inside, and a 90* piece out of the bottom. I lost some of the pivot area for the stock headlight basket but I think they can still fit back in there since no mounting points have been lost.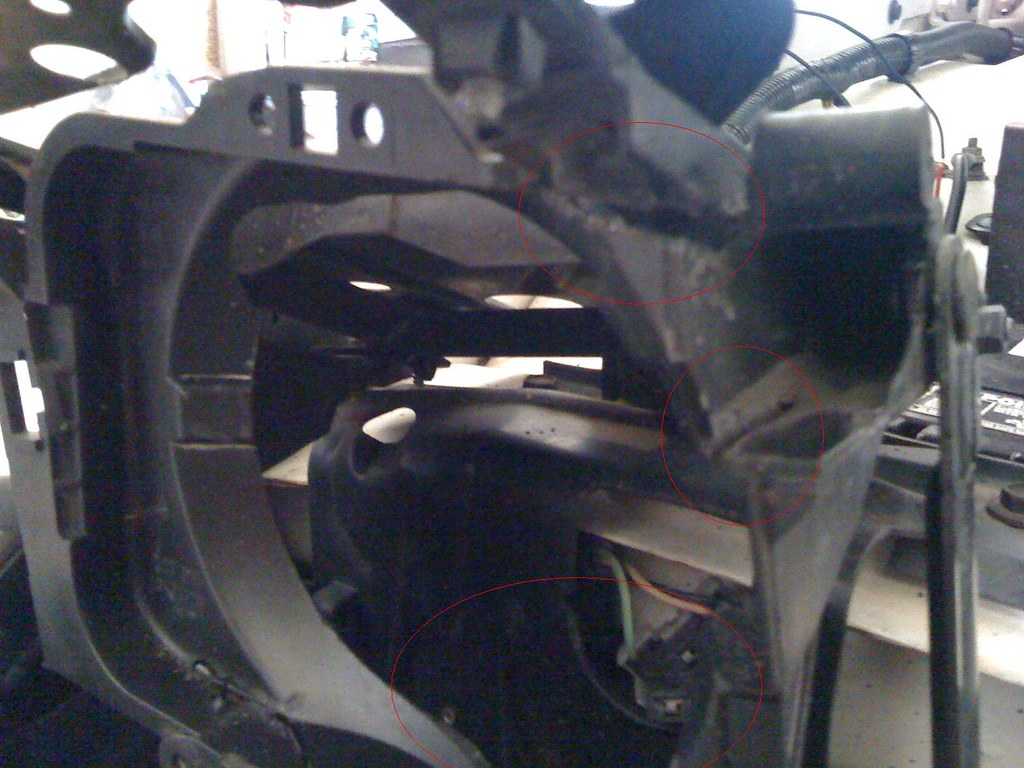
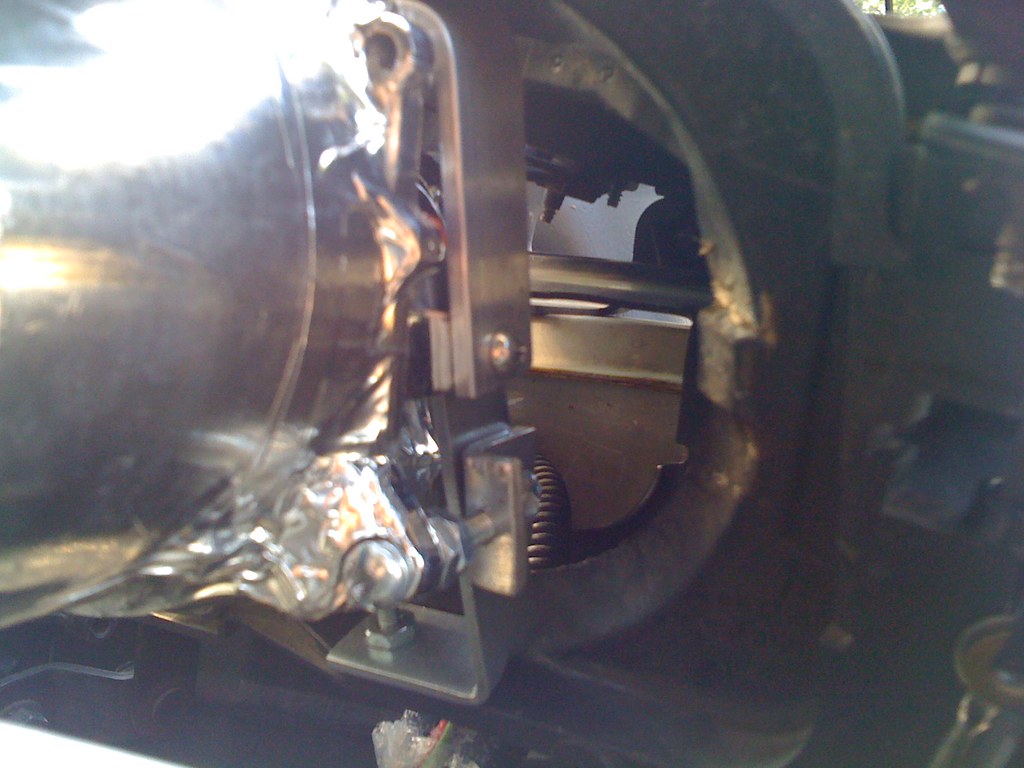
This view of the driver's side headlight from the top shows how I mounted the projectors. Two screws go through the top - the one on the left being nearly in the center of the mount and therefore very close to the reflector bowl, so use washers. You want the other hole on the right in the plastic part to be a slot, so that you can make horizontal adjustments. Another one goes through the bottom.
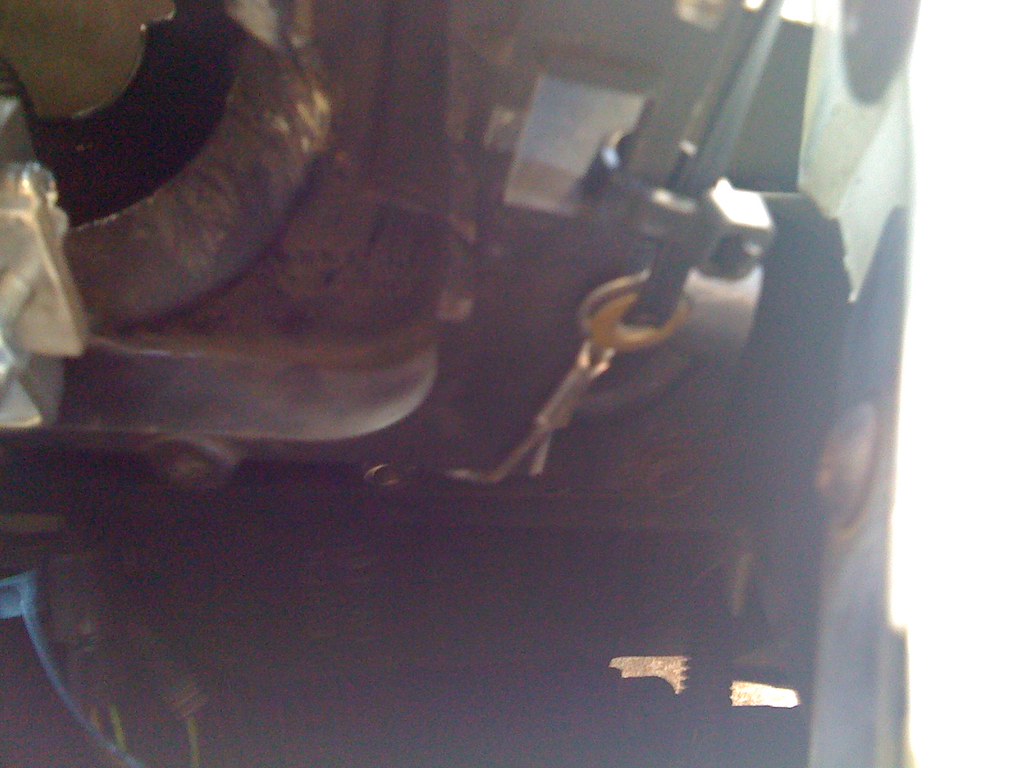
As far the electrical bits and pieces, I used this schematic to build a heavy duty circuit for the increased current draw from the 80w bulbs I am using. Mine draws power through a fused 12-gauge wire directly from the alternator for maximum possible juice.
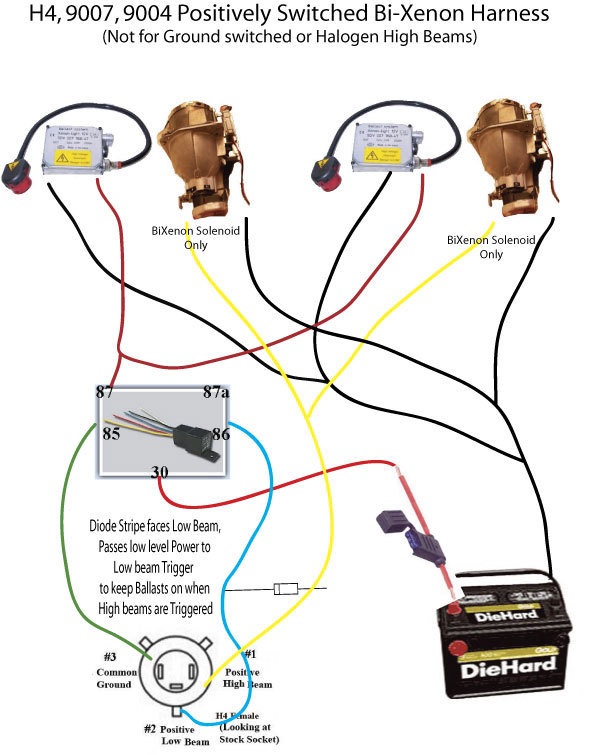
Since the E46 bixenons use a 3-wire harness for high beam control, you will also need this nifty little solid state controller that hooks up to the factory high beam wire. This little guy greatly simplifies what would otherwise be another circuit full of capacitors, diodes and yet one more 5-pin relay. Probably costs less in time and parts too!


Also had to grind a little bit off and bevel edge the bottom part of the shroud where the cutoff shield was binding on it.
Now before you permanently seal the shroud to the projector, remove the lens from each projector, put a thin bead of clear silicon on the lip where the lens sits and reassemble it. Like the rest of the projector, this part isn't originally watertight. Make sure you push the lens all the way back in and snug it up with the locking ring and bendable tabs. Any excess silicon pushed out on to the lens should be cleaned up promptly. Unfortunately, I don't have any pics of this forgotten step.
Once I was satisfied with the fit of the shroud and certain that the shield would not bind on it, it was time to seal it to the projector. Lots of aluminum tape sealed all the gaps between the reflector bowl and the PVC shroud. I wrapped some more around the whole shroud to give it a neater appearance. The corners around the screws holes are tricky and they need a liberal dose of silicone for a watertight seal. Don't be afraid to use lots of tape - the stuff is thin and it takes a few layers to build a strong seal that can be handled without fear of puncturing it.
Sealing the bottom and the back of the projector is a lot more involved. I cut some pieces of clear polycarbonate packaging to form shields around the exposed parts of the high beam solenoid and the cutoff shield. I put one piece around the bottom and securely taped it in place. I then cut another piece that follows the curve around the rear of the housing and extends down to the solenoid, and taped it up too. Any remaining holes and cracks, like where the polycarbonate piece meets the neck of the reflector bowl, can be sealed up with silicon. Again, use lots of the stuff to make sure you have a good seal. There are many little seams and crevices that will need to be siliconed up. Although I didn't do it, there is a hole in the wide part of the reflector bowl which is an excellent place to mount a vent tube. You need this because no matter how hard you try, a very slight amount of moisture will eventually get inside. The vent tube will keep your lenses from getting fogged up. Here's the projector totally mummified in aluminum tape. Note the silicone around the solenoid pigtail.
See the bezel around the lens? That's Walmart to the rescue! I picked up a couple of travel mugs from the automotive accessories section. These mugs have a stainless ring around the lid that pops right off and it's a perfect fit, both around the lens and the PVC shroud! For more bezel and shroud ideas, check out this thread at HIDplanet forums http://www.hidplanet.com/forums/view...f5fc57605caa25 You will have to register to view it though. Lots of creativity on that board!
Next, once I figured out exactly where to mount the projectors, I had to build a mounting and aiming rig. I based mine on the design in this thread https://ls1tech.com/forums/appearanc...-1997-z28.html, but added a lower mounting point for extra stability. Mine is also not as tall, and it allows the the projector to tuck in as high as possible. I used 1" x 1/8" aluminum flat bar for the top half and some Walmart angle brackets I had sitting around for the bottom part. I didn't feel confident enough to build it all out of one piece without a vise, therefore the two-piece design. That long screw threaded into the angled aluminum piece on the bottom part is for vertical adjustment. Tip: drill all holes slightly undersized for your screws and tap them. The fewer nuts you have to use for assembly, the easier and simpler it is.
I originally didn't want to cut anything out of the headlight assembly because I wanted to be able to put the whole thing back to stock if need be. However, for a couple of reasons, I decided to move the projectors as far inboard as possible. First, I didn't want the goofy airbrakes deploying any higher than absolutely necessary. Second, it turns out that mounted anywhere else, either the back of the projector would hit the radiator cross member, or the lens/bezel would hit the bumper (another reason to study the FX bixenon option more closely). This view of the passenger side from the front of the car shows where I had to do some trimming. I cut a wide slot across the top, another one down the inside, and a 90* piece out of the bottom. I lost some of the pivot area for the stock headlight basket but I think they can still fit back in there since no mounting points have been lost.
This view of the driver's side headlight from the top shows how I mounted the projectors. Two screws go through the top - the one on the left being nearly in the center of the mount and therefore very close to the reflector bowl, so use washers. You want the other hole on the right in the plastic part to be a slot, so that you can make horizontal adjustments. Another one goes through the bottom.
As far the electrical bits and pieces, I used this schematic to build a heavy duty circuit for the increased current draw from the 80w bulbs I am using. Mine draws power through a fused 12-gauge wire directly from the alternator for maximum possible juice.
Since the E46 bixenons use a 3-wire harness for high beam control, you will also need this nifty little solid state controller that hooks up to the factory high beam wire. This little guy greatly simplifies what would otherwise be another circuit full of capacitors, diodes and yet one more 5-pin relay. Probably costs less in time and parts too!
Last edited by VIP1; Aug 25, 2009 at 10:42 AM.
Thread Starter
TECH Regular
Joined: Feb 2005
Posts: 400
Likes: 2
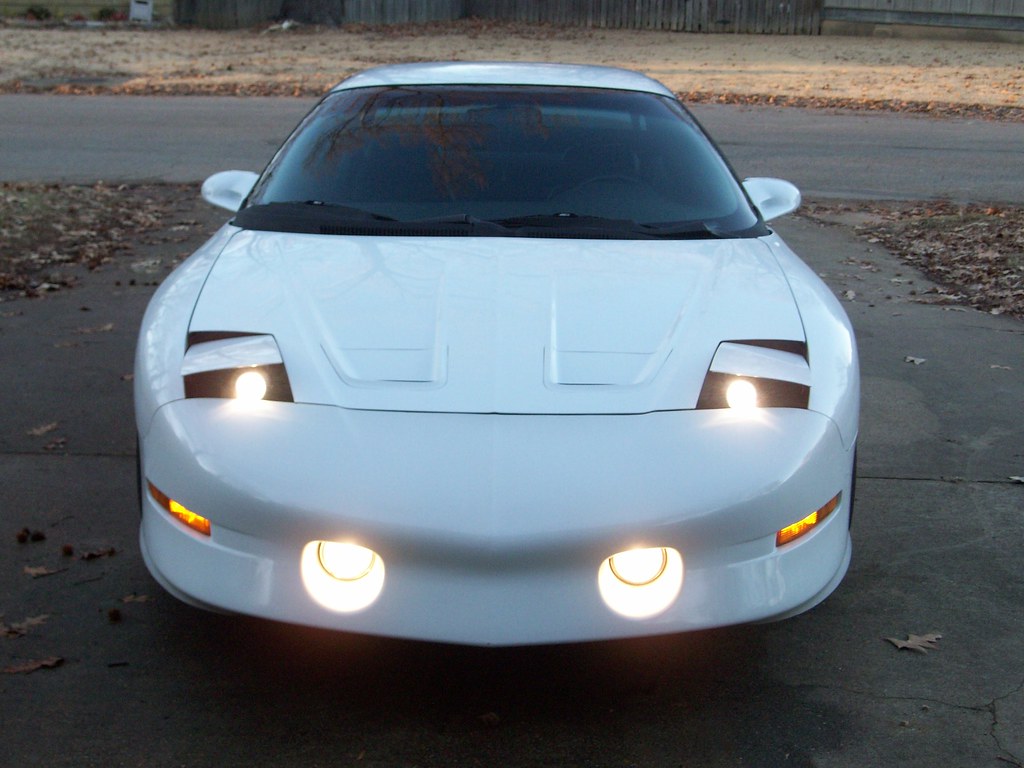
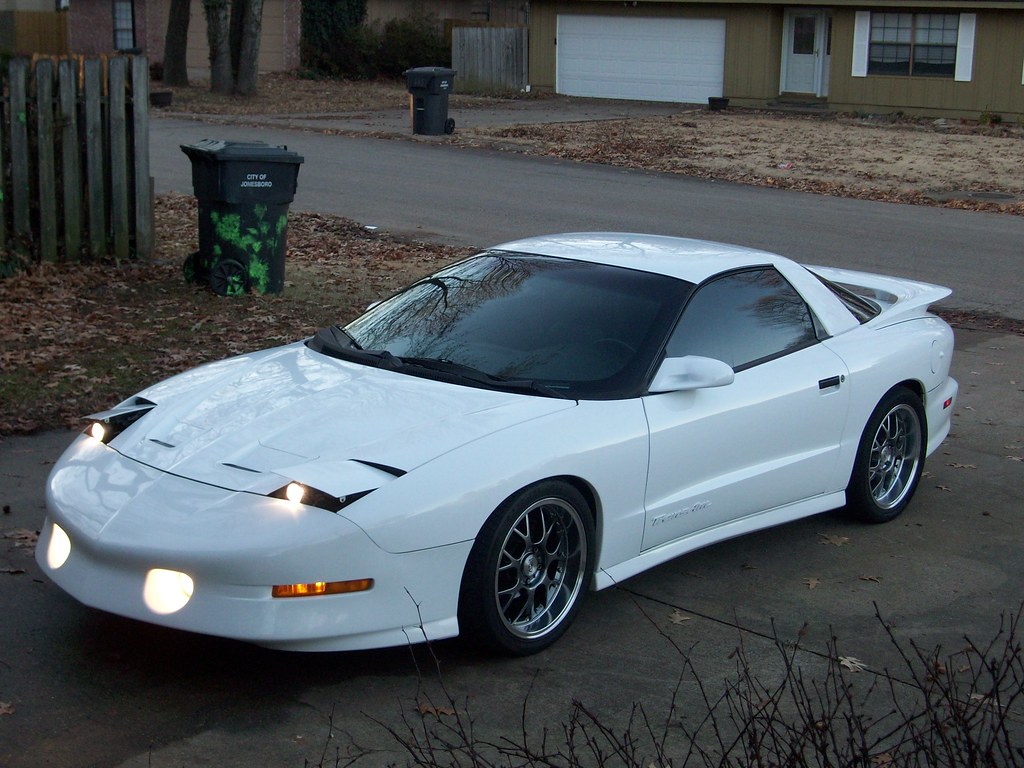
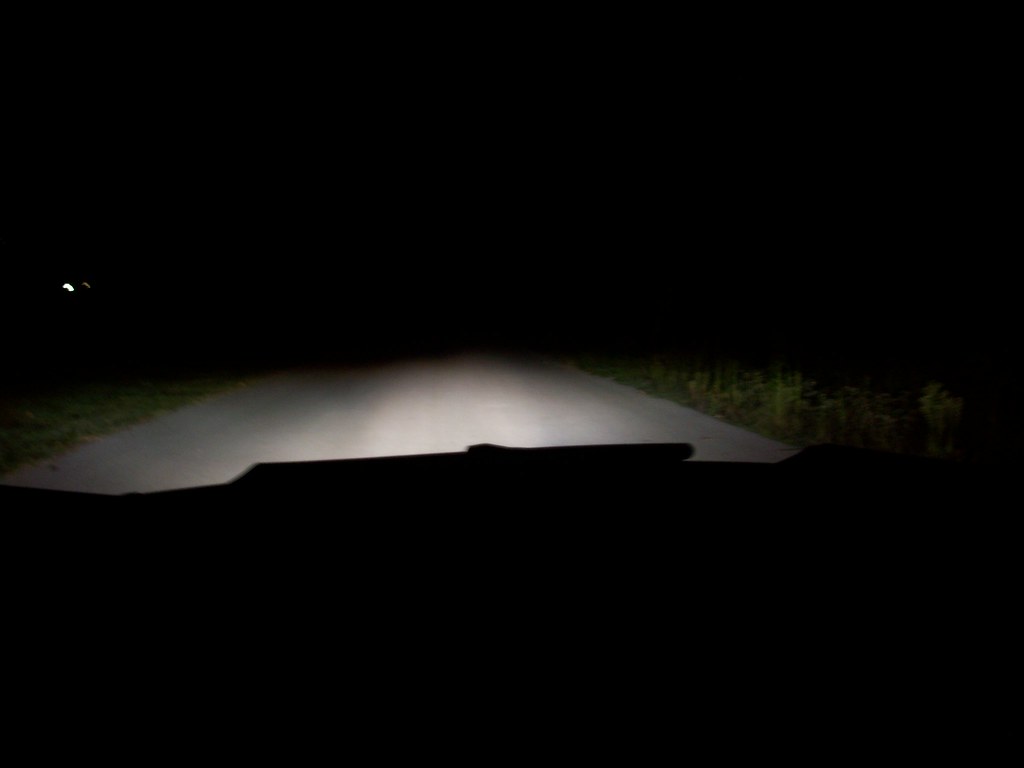
I don't have any before pictures of the output but this is the end result.
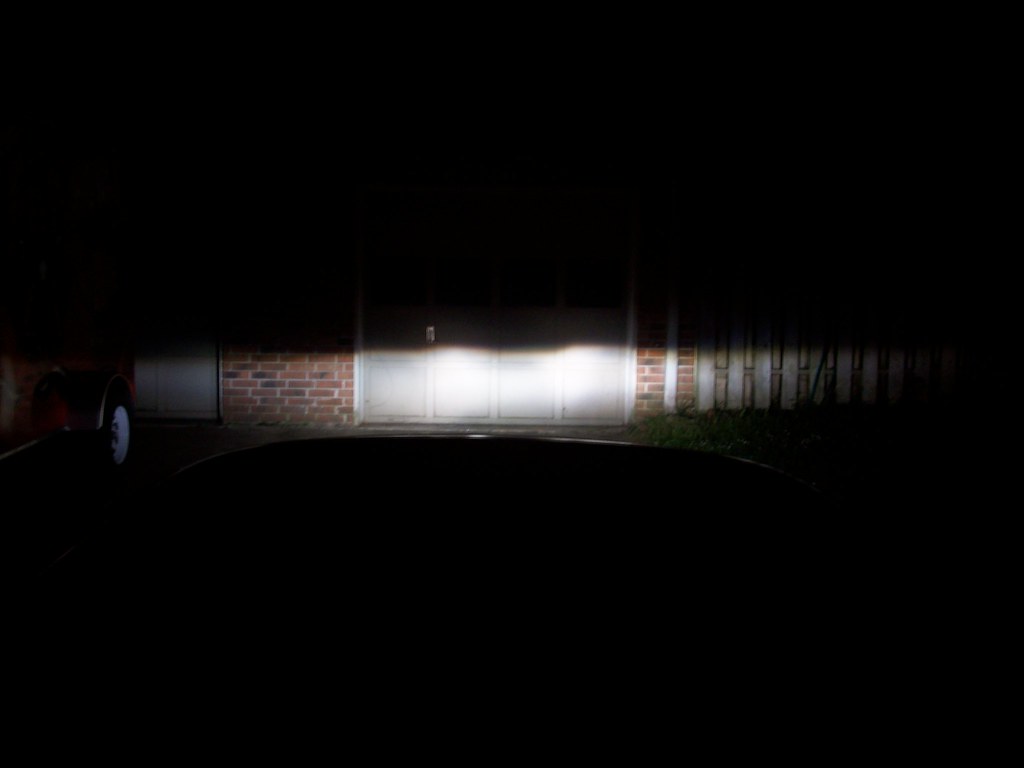
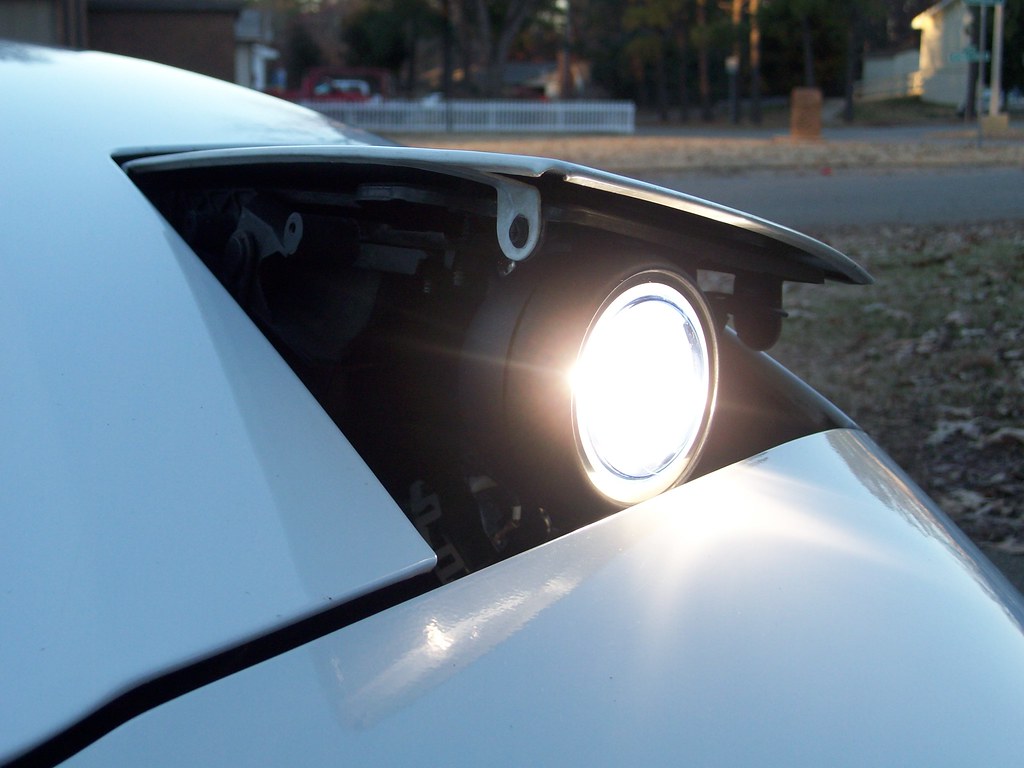
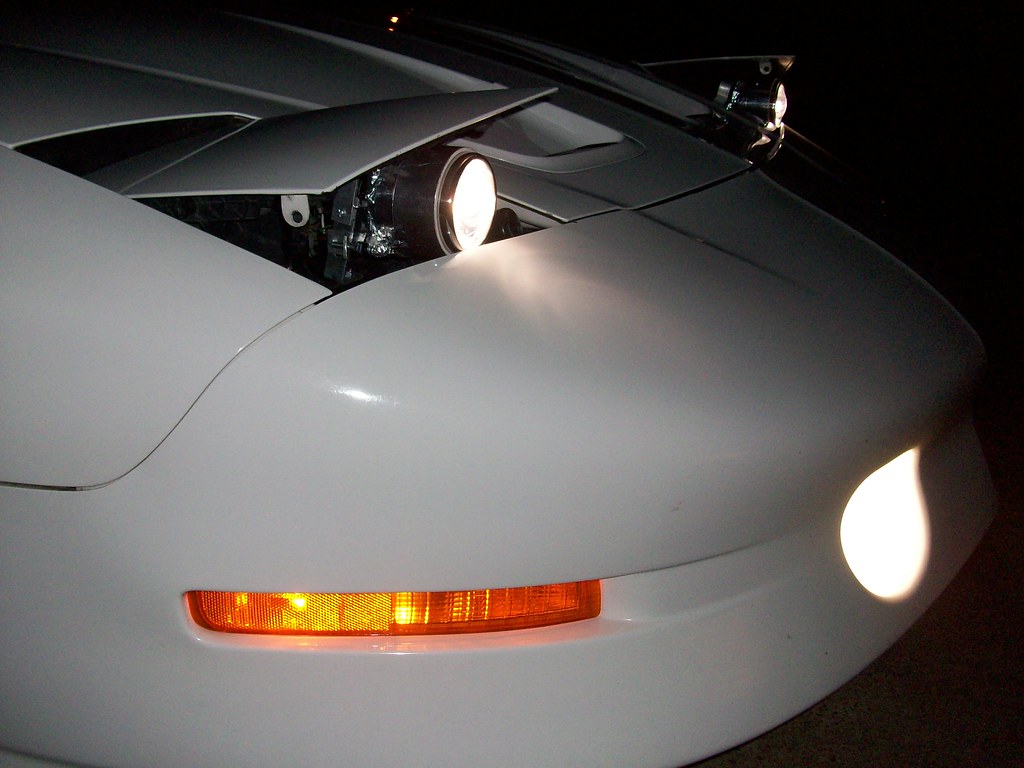
Low beam on the road.
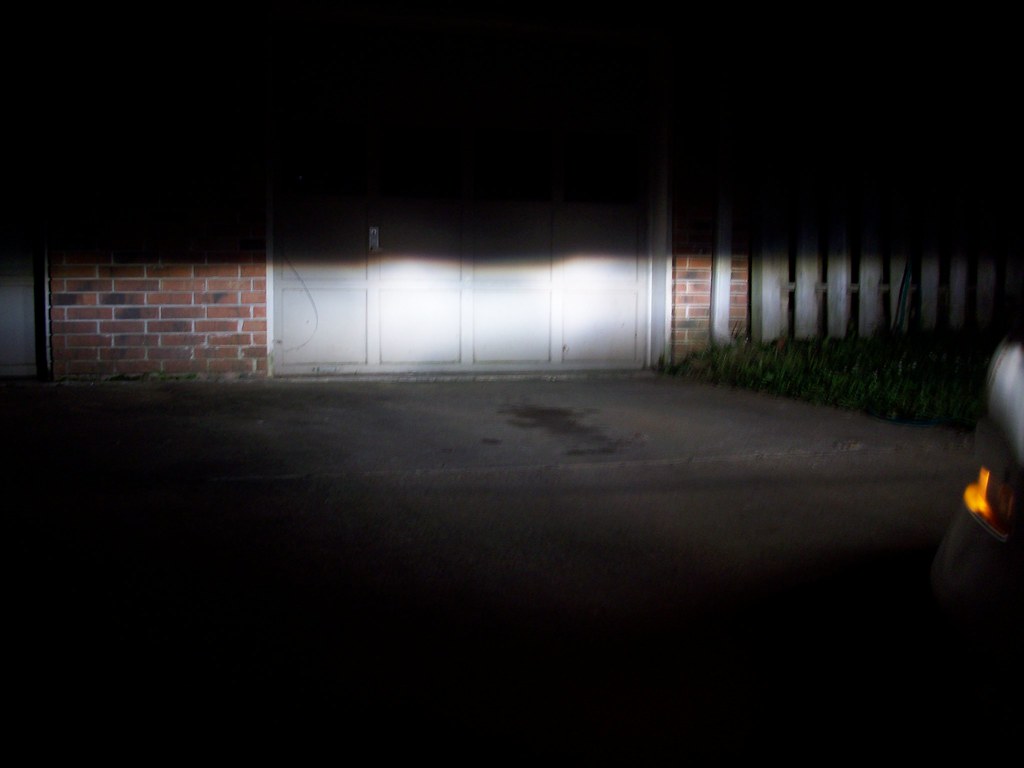
High beam on the road. The camera doesn't really pick up the illumination in the distance - it's actually a lot brighter than it appears.
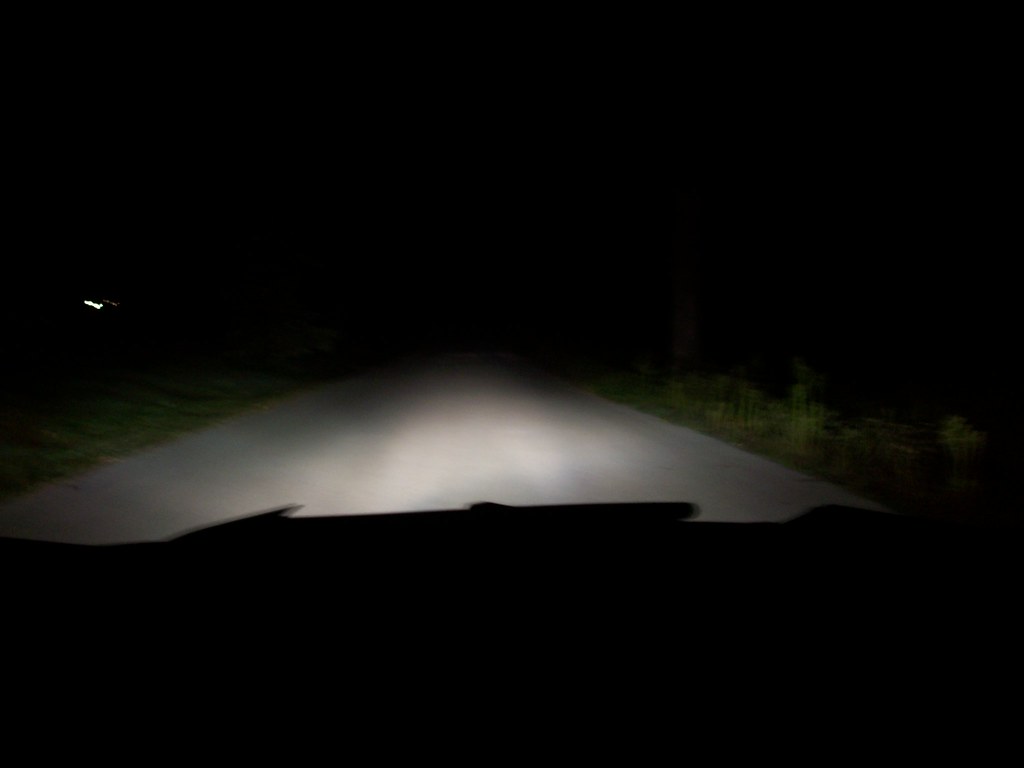
Not bad at all given the budget nature of this retrofit. I am neither blind at night now, nor am I blinding anybody else! Considering how much brighter the lighting is with 80w 5000K halogen bulbs, I can't wait to drop in some real D2S HID bulbs!
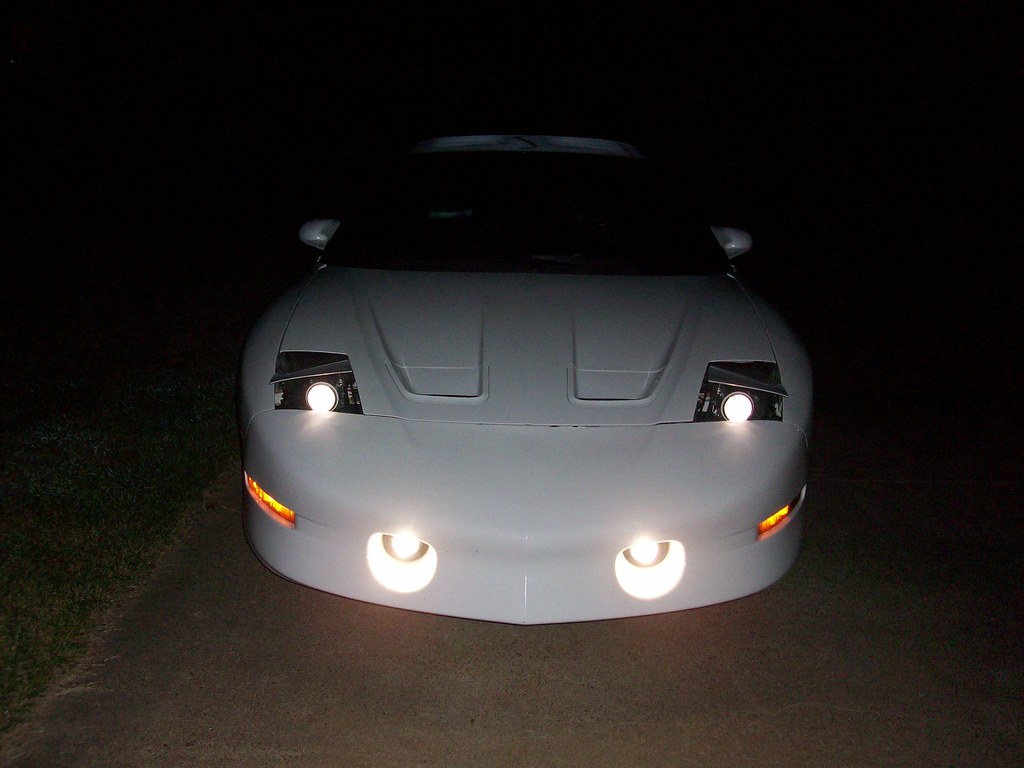
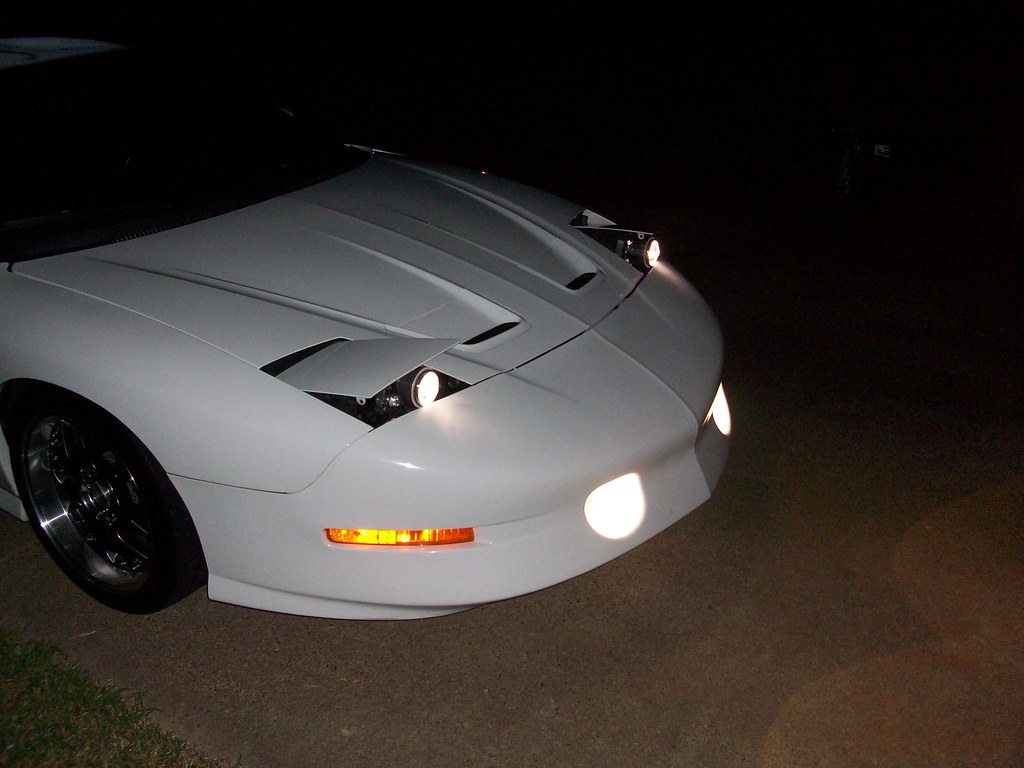
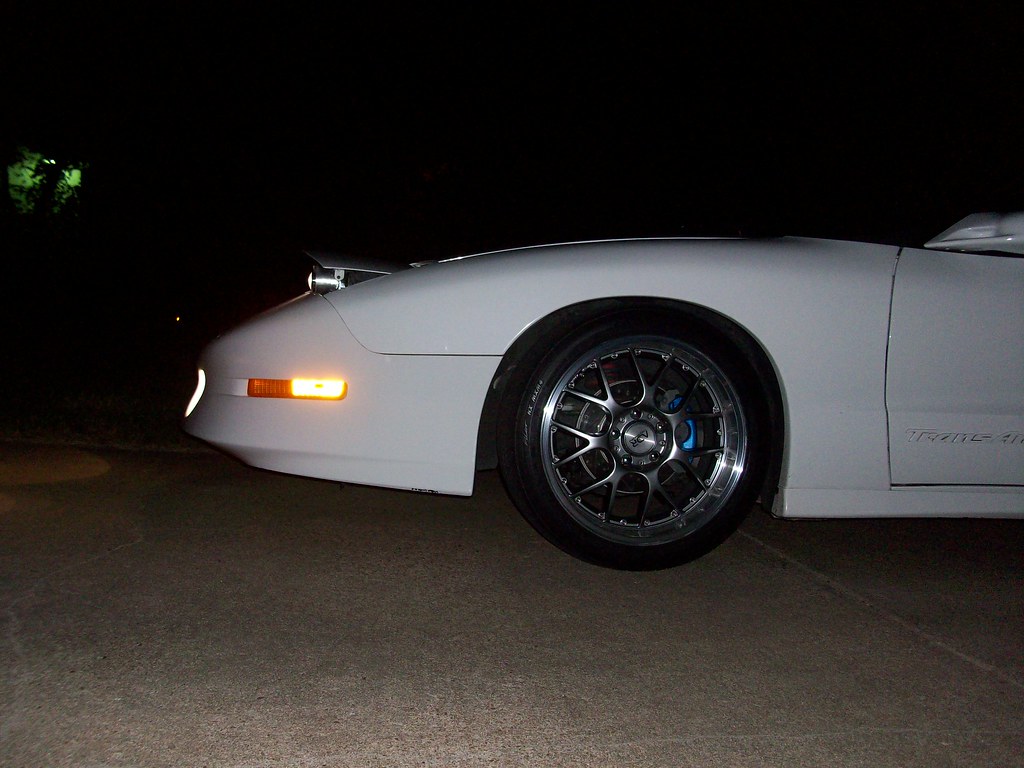
Some exterior shots:
Some final thoughts:
The factory lights have limiting straps to prevent rattling and headlight shake. I used zip ties to secure them to a new location where the length can be shortened for less headlight travel. These straps need to be TIGHT!
I really wanted to incorporate some sort of protective lens cover because I am afraid to bust the lenses. However, there just isn't any room for anything of the sort in the current configuration.
I do intend to fill up the empty spot on either side with some decent driving lights hooked up to the high beam. Once that's done I'll make a trim panel something like the stock piece to wrap around the assembly and hide all the shiny "Johnny 5 alive" bits lol.
Comments welcome!
Low beam on the road.
High beam on the road. The camera doesn't really pick up the illumination in the distance - it's actually a lot brighter than it appears.
Not bad at all given the budget nature of this retrofit. I am neither blind at night now, nor am I blinding anybody else! Considering how much brighter the lighting is with 80w 5000K halogen bulbs, I can't wait to drop in some real D2S HID bulbs!
Some exterior shots:
Some final thoughts:
The factory lights have limiting straps to prevent rattling and headlight shake. I used zip ties to secure them to a new location where the length can be shortened for less headlight travel. These straps need to be TIGHT!
I really wanted to incorporate some sort of protective lens cover because I am afraid to bust the lenses. However, there just isn't any room for anything of the sort in the current configuration.
I do intend to fill up the empty spot on either side with some decent driving lights hooked up to the high beam. Once that's done I'll make a trim panel something like the stock piece to wrap around the assembly and hide all the shiny "Johnny 5 alive" bits lol.
Comments welcome!
Last edited by Jeep_junkie; Aug 25, 2009 at 12:10 PM.
Copy & Paste Moderator


Joined: Apr 2002
Posts: 9,761
Likes: 206
From: Eastern MA
Nice work. I'm adding this to the Lighting FAQ.
https://ls1tech.com/forums/appearanc...hting-faq.html
I fixed a broken image link above for you.
It would be nice to cover the front of the projector with a clear lens, but I can see how you'd have trouble fitting it. Did you see the vacuforming threads?
BTW, the FX is not a sealed projector either. It is still intended to be installed inside a housing. It's just not as "open" as the E46.
Nice wheels too.
Last edited by VIP1; Aug 25, 2009 at 10:53 AM.
Thread Starter
TECH Regular
Joined: Feb 2005
Posts: 400
Likes: 2
Nice work. I'm adding this to the Lighting FAQ.
https://ls1tech.com/forums/appearanc...hting-faq.html
I fixed a broken image link above for you.
It would be nice to cover the front of the projector with a clear lens, but I can see how you'd have trouble fitting it. Did you see the vacuforming threads?
BTW, the FX is not a sealed projector either. It is still intended to be installed inside a housing. It's just not as "open" as the E46.
Nice wheels too.
https://ls1tech.com/forums/appearanc...hting-faq.html
I fixed a broken image link above for you.
It would be nice to cover the front of the projector with a clear lens, but I can see how you'd have trouble fitting it. Did you see the vacuforming threads?
BTW, the FX is not a sealed projector either. It is still intended to be installed inside a housing. It's just not as "open" as the E46.
Nice wheels too.
Before I discovered the lack of room, I did try to force form some plexiglass lens covers but they all turned out wavy and that would have distorted the beam pattern. I'll probably try again with thinner material in the near future. The FX projectors appear a bit more compact, so they're probably easier to fit a lens cover on and waterproof.
I'm not totally satisfied with the fit of the bulbs either. Trimming the flange off the bulbs' base allowed them to sit slightly deeper but they're still a bit out of focus since the wide collar at the base of the glass capsule doesn't fit past the restriction in the projector housing. That's what's causing the two hot spots you see in the output pictures.
Thread Starter
TECH Regular
Joined: Feb 2005
Posts: 400
Likes: 2
I also did a total cost tally for my retrofit.
Pair of E46 bixenon projectors minus bulbholders $68
Nokya 80w 5000K H7 halogen bulbs $24
2 PVC 3" couplings for shrouds $3
2 Walmart travel coffee mugs for bezels $6
High beam solenoid controllers $23
Aluminum tape $7
Clear silicone $3
3' x 1" x 1/8" aluminum flat bar $6
Assorted screws and washers $4
Wiring supplies $30
Total $174
Last edited by Jeep_junkie; Aug 25, 2009 at 04:51 PM.
TECH Regular
Joined: Apr 2013
Posts: 456
Likes: 5
Interesting modification! The lower raised headlights help to streamline the car a little, but a streamlined, or airfoil-like, bezel would further capitalize on this modification, and complete it. It's always nice to have a factory finished look, or performance, to modifications.
Trending Topics
Thread Starter
TECH Regular
Joined: Feb 2005
Posts: 400
Likes: 2
Interesting modification! The lower raised headlights help to streamline the car a little, but a streamlined, or airfoil-like, bezel would further capitalize on this modification, and complete it. It's always nice to have a factory finished look, or performance, to modifications.


Copy & Paste Moderator
Joined: Apr 2002
Posts: 9,761
Likes: 206
From: Eastern MA
The first one you posted with a bunch of LEDs in mini reflectors have a crappy output that is basically an uncontrolled blob of light.
The second set you posted that look like a couple of projectors in the housing often do have a good controlled output but depends on brand and quality control. You need to see output pics.
Do the LT1 use a 5x7 housing? You might find other options that look similar to the second set and even some that look like the original bulbs but LED. You might even find a decent set of retrofit 5x7 housings that use a replaceable halogen bulb and swap them out for a decent "dual filament" style LED.
I think "The Retrofit Source" has some options.
Last edited by VIP1; Feb 24, 2025 at 11:08 PM.

On The Tree
Joined: Dec 2024
Posts: 120
Likes: 22
From: Virginia
Found out most of those LED combo lights won't actually fit our F body cars. I ordered the proper lenses from the popular truck supplier and some LED bulbs to get the light I need. I had HID's in my other bird. Crazy bright. I lived in the country so the bright over kill was needed to avoid bears and bucks. I could literately light up a stop sign from 1/4 mile away. Now in the city, I think led is good enough.