
Shortened Dipstick & Dipstick Tube *COMPLETED*
 09-01-2010, 10:10 PM
#1

Whose done this? I want to do it because I hate the way the dipstick sits higher than the rest of my motor.
I see it should be fairly simple in shortening the dipstick itself, just drilling out rivets, cutting the length down, drill 2 small new holes, and rivet it back together.
But as far as the dipstick tube goes, toward the top of the tube there is about 1.5" that is larger in diameter than the rest of the tube. If I were to cut the length down 4-5", is it possible and what tool would I need to enlarge that portion of the tube to look OEM?
Thanks all
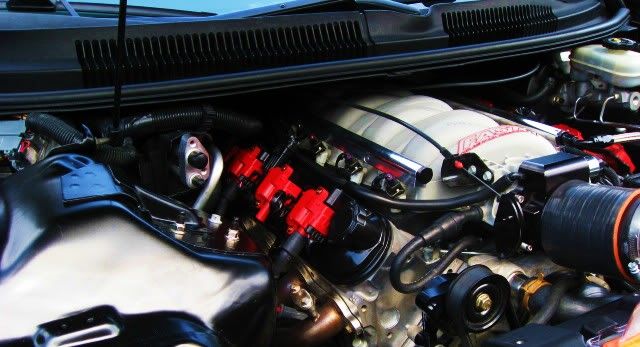
*UPDATE* Completed on 09/12/2010!
Looks much better now.
Yes I know the coil pack is disconnected behind the dipstick, I took pictures as soon as I put it on
I see it should be fairly simple in shortening the dipstick itself, just drilling out rivets, cutting the length down, drill 2 small new holes, and rivet it back together.
But as far as the dipstick tube goes, toward the top of the tube there is about 1.5" that is larger in diameter than the rest of the tube. If I were to cut the length down 4-5", is it possible and what tool would I need to enlarge that portion of the tube to look OEM?
Thanks all
*UPDATE* Completed on 09/12/2010!
Looks much better now.
Yes I know the coil pack is disconnected behind the dipstick, I took pictures as soon as I put it on
Last edited by djfury05; 09-12-2010 at 10:38 AM. Reason: Completed
 09-09-2010, 10:32 AM
#7
Go for it bud. The only thing holding me back right now from doing it is getting a small enough drill bit and new rivets for the dipstick. I believe they are 1/8" rivets and similar size drill bit or slightly smaller needed. It appears that you shouldn't have to enlarge the opening of the tube itself for the dipstick to slide into. I'm just too lazy to go to the store for the supplies right now lol. I will get it today I guess haha you have motivated me to be the first to do it!
Trending Topics
09-12-2010, 11:11 AM
#10
TECH Apprentice
iTrader: (10)
Join Date: Jan 2008
Location: Florida
Posts: 309
Likes: 0
Received 0 Likes
on
0 Posts
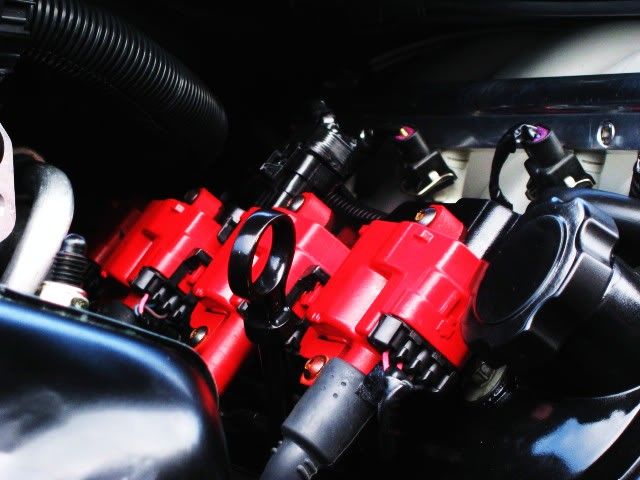
Dude I thought your engine bay couldn't get any cleaner looking, but I noticed your changed your valve covers from the stock look to black. It makes your coils stand out a lot better!
09-12-2010, 11:18 AM
#11
First I pulled the dipstick out and unbolted the dipstick tube using a 15mm socket and ratchet and pulled it out. Might take a little twisting and tugging to get it to come out.
Then I measured the length of the dipstick that sticks out of the end of the dipstick tube down into the oil pan, which was 3 7/8".
Next I drilled out the (2) original rivets on the dipstick itself and disassembled the (3) pieces of the dipstick. (2 long pieces and 1 brace type thing in the middle where the rivets are) Then I cut 4" off the dipstick tube with my dremel and smoothed the lip out with a sanding roll.
Next thing I did was take the (2) long pieces of the dipstick and used some tape to hold it together. I put the dipstick through the shortened dipstick tube until I had 3 7/8" sticking out the end of it. After I did this I used the (2) original riveted holes on the bottom long piece of the dipstick and marked new holes above the old holes on the top longer piece of the dipstick. (Hope that makes sense) I used a 1/8" drill bit and made (2) holes, and then I just riveted it all together.
Last thing I did was modify the dipstick handle. The bottom of it where the dipstick is riveted into needs to be sanded down to a thinner diameter, so as to fit in the dipstick tube now. I did not take the dipstick tube to a machine to flare it or anything. I just kept sanding down the bottom cylindrical piece of the dipstick handle until it fit snugly into the dipstick tube. I am using an o-ring pushed up and around the cylindrical type piece.
It was a pain in the *** and I could do it much better if I had another dipstick to use. Drilling through the dipstick was the hardest part, I had shitty drill bits I guess. Be careful with the dipstick as it is easy to bend and break off, ask how I know lol.