


Blue Dash LEDS
Thread Starter
TECH Fanatic
Joined: Jul 2008
Posts: 1,483
Likes: 3
Yea it was a great mod, i love it! looks amazing at nite, and was real easy to do, took me 15 minutes, i pmed u the details
yeah looks good in the pictures, the factory white...actually looks off white/yellowish is just boring,i really like the blue and i dont have the cash to throw up for the 6le gauges yet lol hood and longtubes first
Thread Starter
TECH Fanatic
Joined: Jul 2008
Posts: 1,483
Likes: 3
Trending Topics
LS1 Tech Stories
The Best V8 Stories One Small Block at Time

Gas Monkey Built a 6-Wheel Ferrari Testarossa With a Corvette LT4 Engine
Verdad Gallardo
7 Most Reliable High-Performance Engines GM Has Ever Built
Verdad Gallardo
Amazing '71 Camaro Restomod Is Modern Muscle Car Under the Skin
Verdad Gallardo
6 Common C5 Corvette Failures and What's Involved In Repairing Them
Pouria Savadkouei
Retro Modern Bandit Pontiac Trans AM Comes With Burt Reynolds' Autograph
Verdad Gallardo
Top 10 Greatest Cadillac V Series Performance Models Ever, Ranked
Pouria Savadkouei
Top 10 Most Powerful Chevy Trucks Ever Made!

Hennessey's New Supercharged Silverado ZR2 Has 700 HP
Verdad Gallardo
Coachbuilt N2A Anteros Is an LS2-Powered C6 Corvette In Italian Clothes
Verdad Gallardo Thread Starter
TECH Fanatic
Joined: Jul 2008
Posts: 1,483
Likes: 3
Joined: Oct 2006
Posts: 2,608
Likes: 0
From: Webb City, MO...out in the garage
the odometer is pretty easy, but can be some work getting it out. you need to pull the cluster back out and pull the clear cover off the front, then pull the cover off the back. then pull the circuitry off, you'll see the odometer from the back, from there you unplug it and then carefully lift the overlay off the front just enough to get the odometer out...I THINK....if i recall correctly you can just unplug it and pull it out. you'll see once you get in there and take stuff apart, it isn't hard.
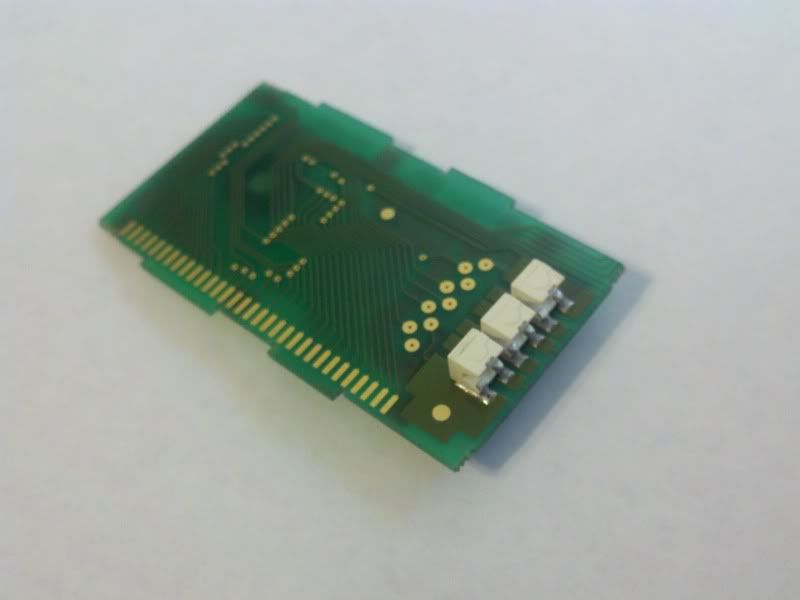
Once it's out, you have to pry a couple tabs sideways on the back to get the circuit board out of the odometer. it has 3 SMD LED's on it, you need to remove them. i found it easiest to just take the soldering iron and "push" them off to the side, if you can melt both contacts at the same time with the iron, the light will just slide off.
This is what you should have:
This is after new lights are soldered in:
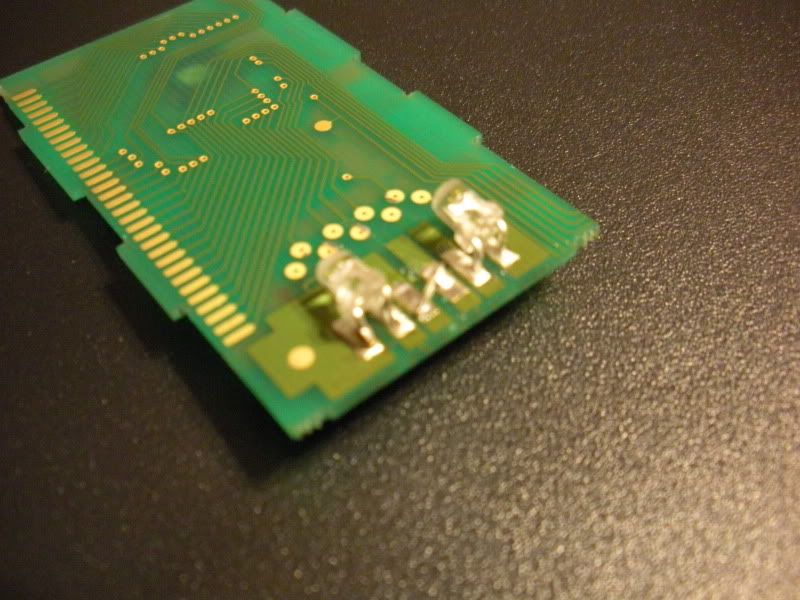
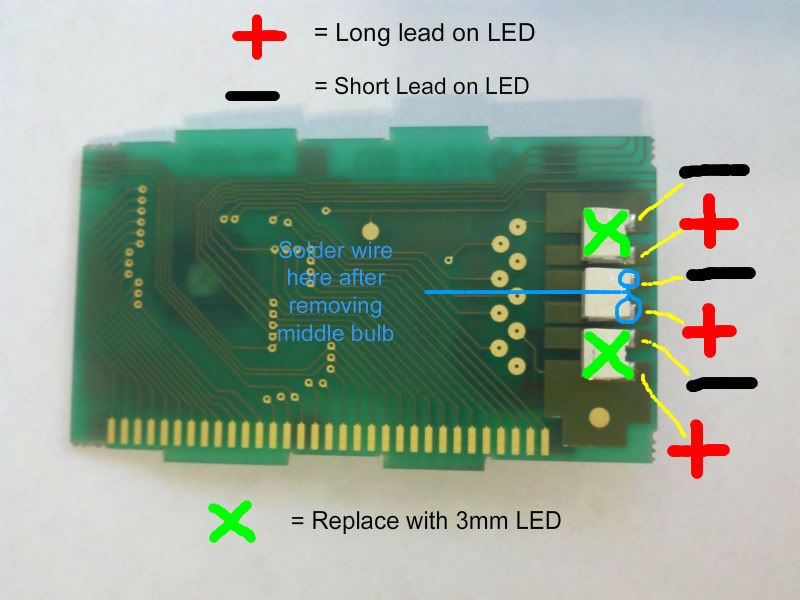
I actually ended up putting 3 LED's in, but it didn't make any difference, two will suffice. make sure to sand the tops smooth so the light dispersses well, and solder a small wire where the middle bulb was, i used a piece of on the LED's leads that i cut off. Make sure you put the bulbs as close as possible to the board because clearance is an issue, you'll see when you do it, test fit as you go. Here's a diagram i made up to show what needs to be done:
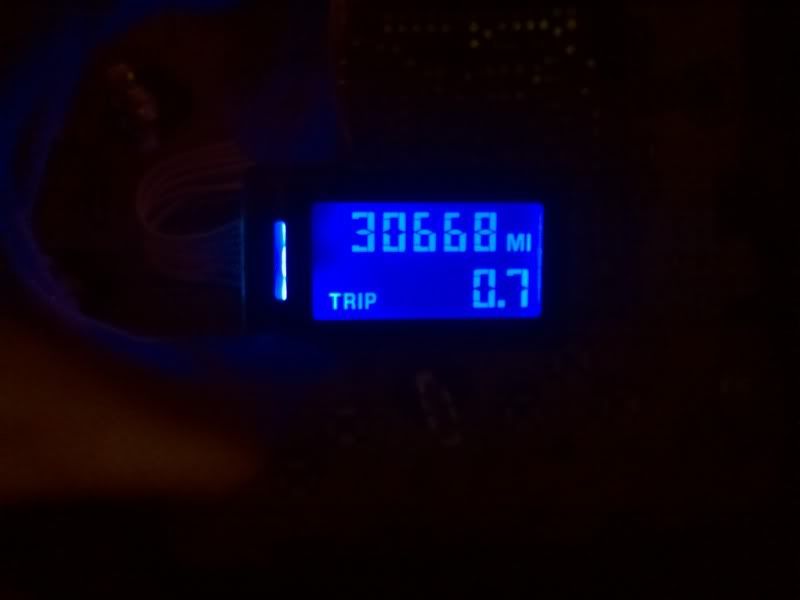
Be sure to just plug the odometer back in once it's reassembled, don't put it all back in the cluster, then plug the cluster back in and turn the key on to verify everything works. if not, go back and check your work, if it's good, pull the cluster back out and put it back together completely.
Here's mine:
Once it's out, you have to pry a couple tabs sideways on the back to get the circuit board out of the odometer. it has 3 SMD LED's on it, you need to remove them. i found it easiest to just take the soldering iron and "push" them off to the side, if you can melt both contacts at the same time with the iron, the light will just slide off.
This is what you should have:
This is after new lights are soldered in:
I actually ended up putting 3 LED's in, but it didn't make any difference, two will suffice. make sure to sand the tops smooth so the light dispersses well, and solder a small wire where the middle bulb was, i used a piece of on the LED's leads that i cut off. Make sure you put the bulbs as close as possible to the board because clearance is an issue, you'll see when you do it, test fit as you go. Here's a diagram i made up to show what needs to be done:
Be sure to just plug the odometer back in once it's reassembled, don't put it all back in the cluster, then plug the cluster back in and turn the key on to verify everything works. if not, go back and check your work, if it's good, pull the cluster back out and put it back together completely.
Here's mine:

Thread Starter
TECH Fanatic
Joined: Jul 2008
Posts: 1,483
Likes: 3
the odometer is pretty easy, but can be some work getting it out. you need to pull the cluster back out and pull the clear cover off the front, then pull the cover off the back. then pull the circuitry off, you'll see the odometer from the back, from there you unplug it and then carefully lift the overlay off the front just enough to get the odometer out...I THINK....if i recall correctly you can just unplug it and pull it out. you'll see once you get in there and take stuff apart, it isn't hard.
Once it's out, you have to pry a couple tabs sideways on the back to get the circuit board out of the odometer. it has 3 SMD LED's on it, you need to remove them. i found it easiest to just take the soldering iron and "push" them off to the side, if you can melt both contacts at the same time with the iron, the light will just slide off.
This is what you should have:
This is after new lights are soldered in:
I actually ended up putting 3 LED's in, but it didn't make any difference, two will suffice. make sure to sand the tops smooth so the light dispersses well, and solder a small wire where the middle bulb was, i used a piece of on the LED's leads that i cut off. Make sure you put the bulbs as close as possible to the board because clearance is an issue, you'll see when you do it, test fit as you go. Here's a diagram i made up to show what needs to be done:
Be sure to just plug the odometer back in once it's reassembled, don't put it all back in the cluster, then plug the cluster back in and turn the key on to verify everything works. if not, go back and check your work, if it's good, pull the cluster back out and put it back together completely.
Here's mine:
looks good, but its too much for me lol
i don't like that all the places on the cluster that used to be red, aren't anymore with the lights on. can you use white LED's so it'll look like stock, just not have that yellowish tent?
TECH Apprentice
Joined: Sep 2005
Posts: 360
Likes: 0
From: Bay Area, CA
What color bulbs did you use? I purchased the White bulbs and my cluster looks blue like yours. Im thinking maybe they sent me the White/Blue bulbs instead of the Ultra White which is what i ordered
TECH Junkie
Joined: Oct 2009
Posts: 3,551
Likes: 2
From: Rutherford, North Carolina
If you still have the factory overlay, theres this film on the back of the overlay causing it to be blue even though you have white behind there.