


Interior + Courtesy LED's Finished
From this thread:
https://ls1tech.com/forums/appearanc...ood-taste.html
Here's how I did it - it is a bit ghetto, but it works, and can't be seen under normal circumstances. The pictures below are taken of the passenger side panel that would be just above your feet...the driver's side was done in a similar fashion.
The LED light strip was from SuperBrightLEDs - it is their waterproof, flexible light strip, 9.5" long, 24 lights, cool white color (WFLB-CW24). This is the same light strip I used to light up my license plate, and is where I got the idea.
What I did was drill holes in the panel for each light as well as some smaller holes for small zip ties to hold it in place (nevermind the other holes...that was from another lighting idea that didn't work out) - I wanted to be able to remove the light strip if I needed, but still wanted it to remain secure without using glue. Ghetto? You betcha, but it works. Here's what the bottom looks like:
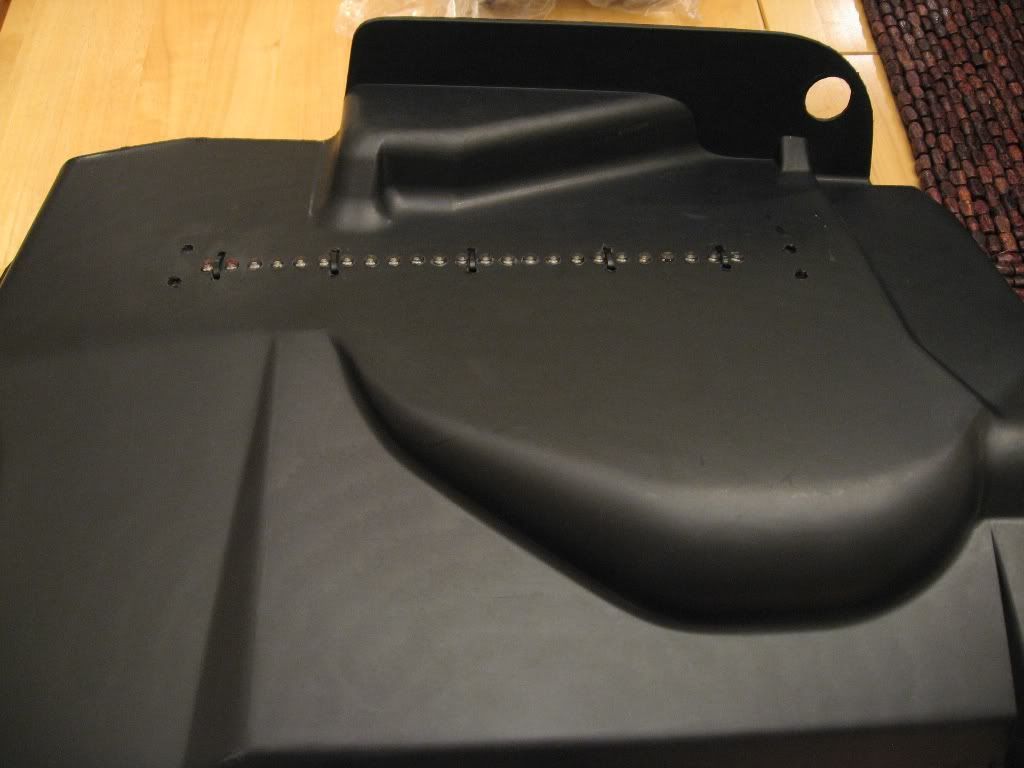
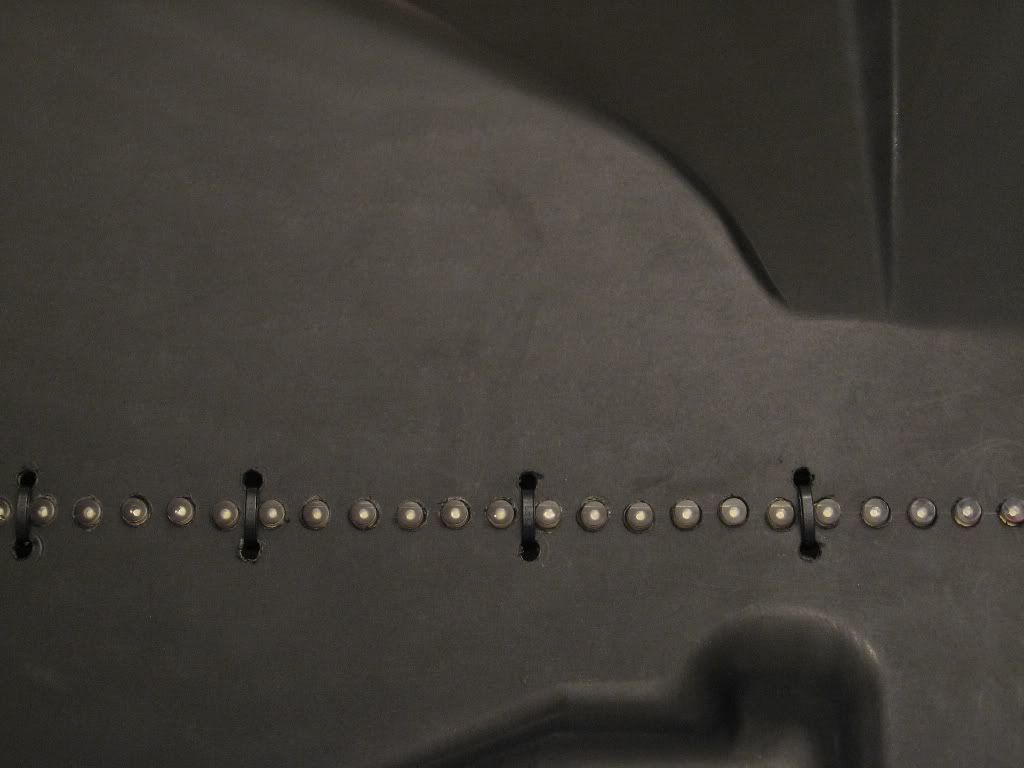
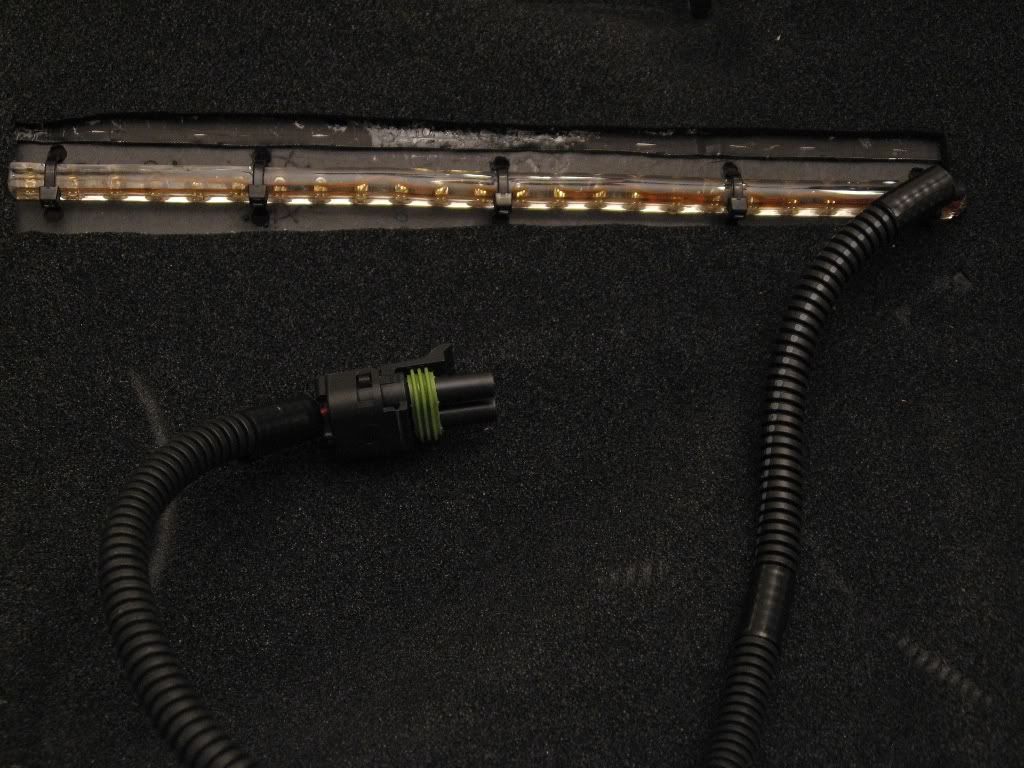
And the other side that shows the light strip and the weatherpack connector I used to make it easy to disconnect should I want to bring the panel in to take pictures :
:
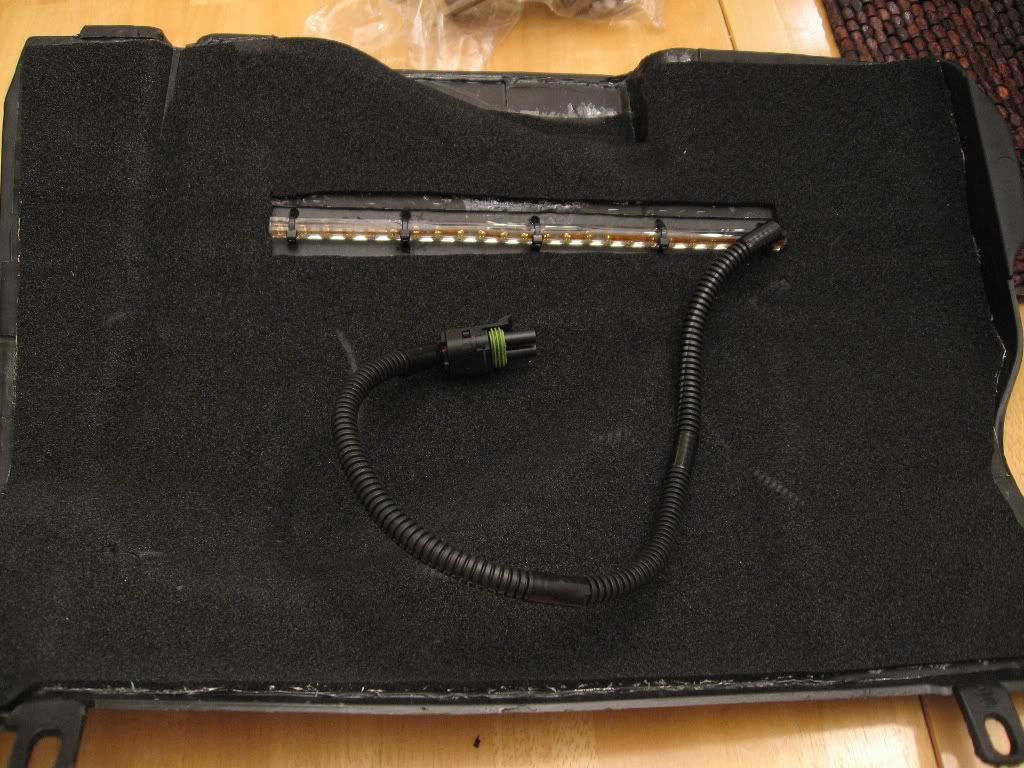
As for wiring, you need two things to make this work - a +12V source that is always on regardless of key position, and I wanted to tie it in to the existing courtesy lights so that they would turn on with the door open or any other time the interior lights are on. That is done by tapping in to a particular ground wire on the BCM...courtesy of WhiteBird00:
If I remember right, I tapped the all white wire on the BCM for the ground, and the always on +12V came from the driver's side interior fuse panel - I circled the slot you want on the diagram:
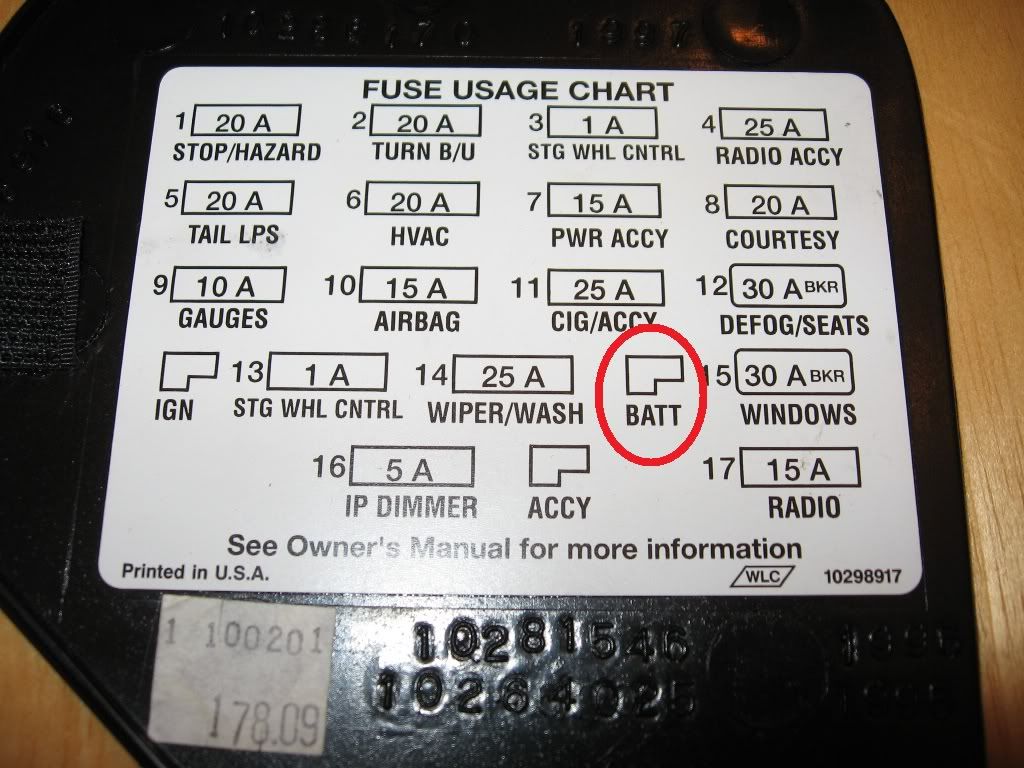
All you have to do to get power from that slot is crimp a spade connector on the end of a piece of wire and push the spade into the slot. Incidentally, there are three total types of +12V power you can tap from that panel - +12V always on (BATT), +12V switched (IGN), and +12V retained accessory (ACCY). GM actually put those there to help us owners wire in aftermarket accessories...how nice.
https://ls1tech.com/forums/appearanc...ood-taste.html
Here's how I did it - it is a bit ghetto, but it works, and can't be seen under normal circumstances. The pictures below are taken of the passenger side panel that would be just above your feet...the driver's side was done in a similar fashion.
The LED light strip was from SuperBrightLEDs - it is their waterproof, flexible light strip, 9.5" long, 24 lights, cool white color (WFLB-CW24). This is the same light strip I used to light up my license plate, and is where I got the idea.
What I did was drill holes in the panel for each light as well as some smaller holes for small zip ties to hold it in place (nevermind the other holes...that was from another lighting idea that didn't work out) - I wanted to be able to remove the light strip if I needed, but still wanted it to remain secure without using glue. Ghetto? You betcha, but it works. Here's what the bottom looks like:
And the other side that shows the light strip and the weatherpack connector I used to make it easy to disconnect should I want to bring the panel in to take pictures
:As for wiring, you need two things to make this work - a +12V source that is always on regardless of key position, and I wanted to tie it in to the existing courtesy lights so that they would turn on with the door open or any other time the interior lights are on. That is done by tapping in to a particular ground wire on the BCM...courtesy of WhiteBird00:
The BCM is a black box about the size of a paperback book mounted to the ductwork behind the glovebox on the passenger side of the dash. It has three connectors - 6-pin green, 6-pin black, and 32-pin blue.
The BCM controls the courtesy lamps using both the power and ground connections. The white ground wire controls the theater dimming effect to turn off the lights after the doors are closed. But the dark blue with white power wire is also used to turn off the lights if a door is left open - this is part of the battery protection function. You can substitute a constant (battery) power source but you run the risk of killing your battery if something goes wrong and the lights stay on all the time (e.g. door switch problem, etc.). The dark blue with white wire is available in all the same locations as the white wire.
The BCM controls the courtesy lamps using both the power and ground connections. The white ground wire controls the theater dimming effect to turn off the lights after the doors are closed. But the dark blue with white power wire is also used to turn off the lights if a door is left open - this is part of the battery protection function. You can substitute a constant (battery) power source but you run the risk of killing your battery if something goes wrong and the lights stay on all the time (e.g. door switch problem, etc.). The dark blue with white wire is available in all the same locations as the white wire.
All you have to do to get power from that slot is crimp a spade connector on the end of a piece of wire and push the spade into the slot. Incidentally, there are three total types of +12V power you can tap from that panel - +12V always on (BATT), +12V switched (IGN), and +12V retained accessory (ACCY). GM actually put those there to help us owners wire in aftermarket accessories...how nice.
i like .. give details you said you tapped into wires for map light on rear view mirror?
that sounds do -able because its tied into dome light circuit . makes for an easy
install.
that sounds do -able because its tied into dome light circuit . makes for an easy
install.
Last edited by formula vincent; Mar 10, 2011 at 11:41 PM.
LS1 Tech Stories
The Best V8 Stories One Small Block at Time

6 Common C5 Corvette Failures and What's Involved In Repairing Them
Pouria Savadkouei
Retro Modern Bandit Pontiac Trans AM Comes With Burt Reynolds' Autograph
Verdad Gallardo
Top 10 Greatest Cadillac V Series Performance Models Ever, Ranked
Pouria Savadkouei
Top 10 Most Powerful Chevy Trucks Ever Made!

Hennessey's New Supercharged Silverado ZR2 Has 700 HP
Verdad Gallardo
Coachbuilt N2A Anteros Is an LS2-Powered C6 Corvette In Italian Clothes
Verdad Gallardo
Awesome K5 Blazer Restomod Comes With C7 Corvette Power
Verdad Gallardo
10 Camaros You Should Never Buy

10 LS Engine Myths That Refuse to Die
Verdad Gallardo


So the footwell LEDs operate the same way as the map lights?
By that I mean, when the door is open, the footwell lights turn on, and when the door is closed they turn off (unless turned on by another button or something?)
By that I mean, when the door is open, the footwell lights turn on, and when the door is closed they turn off (unless turned on by another button or something?)
If you tap into the map lighting, then yes. That's what I'm in the process of doing. Got the driver side done and am now working on the passenger side. Although I'm using my custom-made LED "strips".


So if I were to do this, would they come on when I switched on my maps lights or not?
If you roll your dimmer switch up all the way (turns on ALL interior lights) the strips, map, and dome lights (everything) will light up. Everything will light up when you open the doors/hatch as well.
After all you're only tapping into the power/ground wires running to the harness that plugs into the mirror. The individual map light switches are just on/off for each side.
TECH Enthusiast
Joined: Jun 2008
Posts: 573
Likes: 1
From: TN
Im sorry if i hijack, i installed some leds from a superbright leds and my dimmer works but only at the top right before you turn on the courtesy light. is this common? i swear i thought it just started dying while testing yesterday.

 Is that the 7" LED strip? I'll have to do that one too.
So I have you to thank/blame for this recent purchase.
From this thread:
https://ls1tech.com/forums/appearanc...ood-taste.html
Here's how I did it - it is a bit ghetto, but it works, and can't be seen under normal circumstances. The pictures below are taken of the passenger side panel that would be just above your feet...the driver's side was done in a similar fashion.
The LED light strip was from SuperBrightLEDs - it is their waterproof, flexible light strip, 9.5" long, 24 lights, cool white color (WFLB-CW24). This is the same light strip I used to light up my license plate, and is where I got the idea.
What I did was drill holes in the panel for each light as well as some smaller holes for small zip ties to hold it in place (nevermind the other holes...that was from another lighting idea that didn't work out) - I wanted to be able to remove the light strip if I needed, but still wanted it to remain secure without using glue. Ghetto? You betcha, but it works. Here's what the bottom looks like:
And the other side that shows the light strip and the weatherpack connector I used to make it easy to disconnect should I want to bring the panel in to take pictures :
As for wiring, you need two things to make this work - a +12V source that is always on regardless of key position, and I wanted to tie it in to the existing courtesy lights so that they would turn on with the door open or any other time the interior lights are on. That is done by tapping in to a particular ground wire on the BCM...courtesy of WhiteBird00:
If I remember right, I tapped the all white wire on the BCM for the ground, and the always on +12V came from the driver's side interior fuse panel - I circled the slot you want on the diagram:
All you have to do to get power from that slot is crimp a spade connector on the end of a piece of wire and push the spade into the slot. Incidentally, there are three total types of +12V power you can tap from that panel - +12V always on (BATT), +12V switched (IGN), and +12V retained accessory (ACCY). GM actually put those there to help us owners wire in aftermarket accessories...how nice.
https://ls1tech.com/forums/appearanc...ood-taste.html
Here's how I did it - it is a bit ghetto, but it works, and can't be seen under normal circumstances. The pictures below are taken of the passenger side panel that would be just above your feet...the driver's side was done in a similar fashion.
The LED light strip was from SuperBrightLEDs - it is their waterproof, flexible light strip, 9.5" long, 24 lights, cool white color (WFLB-CW24). This is the same light strip I used to light up my license plate, and is where I got the idea.
What I did was drill holes in the panel for each light as well as some smaller holes for small zip ties to hold it in place (nevermind the other holes...that was from another lighting idea that didn't work out) - I wanted to be able to remove the light strip if I needed, but still wanted it to remain secure without using glue. Ghetto? You betcha, but it works. Here's what the bottom looks like:
And the other side that shows the light strip and the weatherpack connector I used to make it easy to disconnect should I want to bring the panel in to take pictures
:As for wiring, you need two things to make this work - a +12V source that is always on regardless of key position, and I wanted to tie it in to the existing courtesy lights so that they would turn on with the door open or any other time the interior lights are on. That is done by tapping in to a particular ground wire on the BCM...courtesy of WhiteBird00:
If I remember right, I tapped the all white wire on the BCM for the ground, and the always on +12V came from the driver's side interior fuse panel - I circled the slot you want on the diagram:
All you have to do to get power from that slot is crimp a spade connector on the end of a piece of wire and push the spade into the slot. Incidentally, there are three total types of +12V power you can tap from that panel - +12V always on (BATT), +12V switched (IGN), and +12V retained accessory (ACCY). GM actually put those there to help us owners wire in aftermarket accessories...how nice.
^ I believing he was implying using a ground switch from the BCM.
And the BCM is under the center console? Or is that an airbag module? It's been a while since I was in there. If it isn't, where's the BCM located?
And the BCM is under the center console? Or is that an airbag module? It's been a while since I was in there. If it isn't, where's the BCM located?
yea its located under there but i seems like he said to connect the ground to the white wire and the power to the BATT and it will work the same as going into the blue/white
well i found one of my problems.. i tapped into the white wire that my installer put in for my alarm i think haha about now im looking for this damn white wire. i found a white with a small line down it
edit! i found it and although it looks ugly under the panel i got it working! that damn white wire was a bitch to cut and crimp connectors onto
edit! i found it and although it looks ugly under the panel i got it working! that damn white wire was a bitch to cut and crimp connectors onto
Last edited by my bandit; Apr 1, 2011 at 09:44 PM.