Hella 60mm Projector Shrouds
 03-28-2022, 07:03 PM
#1
Copy & Paste Moderator
Thread Starter

Since this was asked in another thread, I tried out making a shroud for the Hella 60mm Projectors.
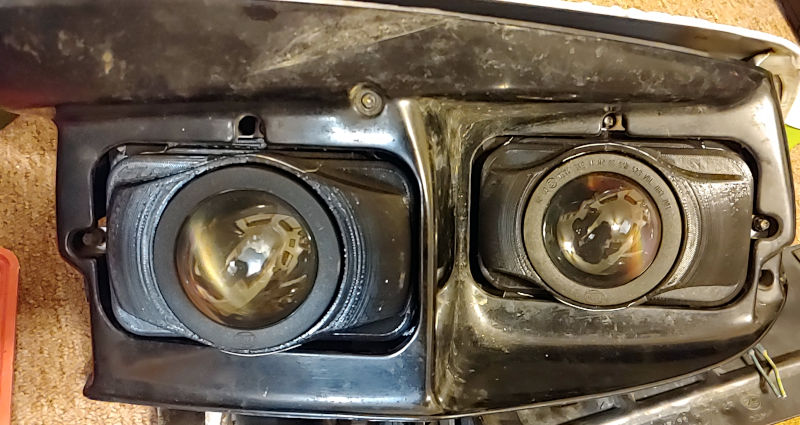
I made a prototype shroud for the Hella 60mm Projector. You can attach it to the bracket instead of the car's existing shroud. The shroud is symmetrical and should work for low beam and high beam. Although it looks like the position in the low beam isn't centered. This is a spare headlight mechanism that I had and these are the low beam projectors and low beam brackets from ebay. I don't have the Hella 60mm High Beam projectors or the high beam brackets so I put low beam in both positions for prototyping.
I don't know if this mounting/spacing is typical or if something is warped. The Low Beam looks off-center towards the high beam and the bottom of the shroud rubs a little on the bottom opening of the high beam. If these end up fitting like this on others, I can alter the design of these shrouds to be asymmetrical to fit the low beam better. The high beam looks fairly centered left/right.
The "bumpiness" of the design is to make it look more flush with the stock shrouds on the car and to fit around screw heads that mount the projectors.
I was tempted to make a style to mount to the backside of the car's shroud, but that would make fitment more trial-and-error and could mean drilling into the stock shroud like I did. Not everyone wants to do that so I made these to attach to the ebay bracket and keep things more modular and reversible.
Ignore the extra cuts and holes in the brackets. I was prototyping fitment of different projectors and ended up not using these brackets for that. So these were siting around as spares.
Here is how it would look installed - Without Car's Shroud.

https://www.fadingarrow.com/images/H...r%20Shroud.jpg
http://www.fadingarrow.net/images/He...r%20Shroud.jpg
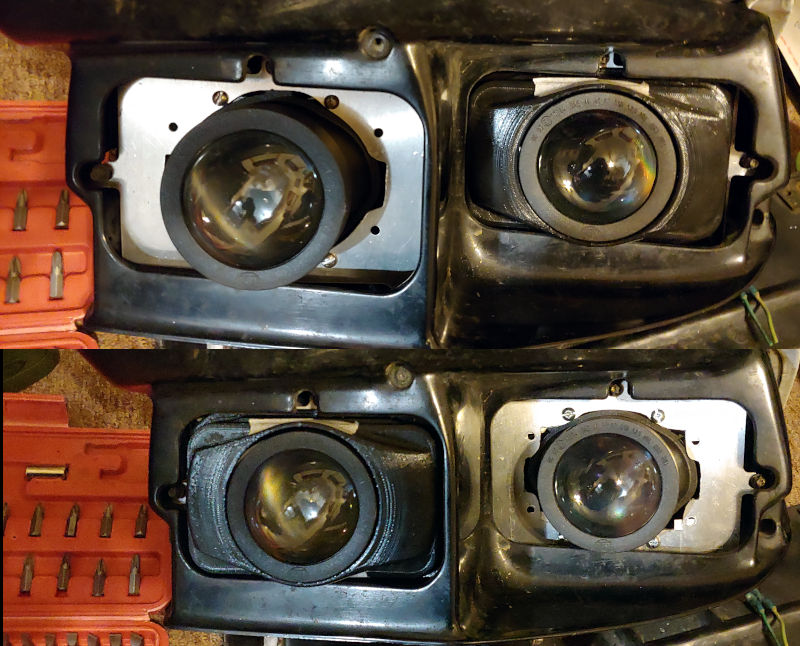
Here is how it would look installed - With Car's Shroud.
(This is two pics cropped together since I only have the 1 prototype.)
https://www.fadingarrow.com/images/H...r%20Shroud.jpg
http://www.fadingarrow.net/images/He...r%20Shroud.jpg
My printer can't print that large or in ABS so this is printed in PLA (which can't handle the heat near a headlight) and I had to print in two halves that I taped together (I didn't want to glue in case i needed to make it asymmetrical so I would only print the half that I changed).
The shrouds I have installed on my car on the Sinolyn Projectors I uploaded to CraftCloud to print in ABS. The pair on my car were $35 delivered ($25 for pair printed + $10 shipping) These should cost something similar.
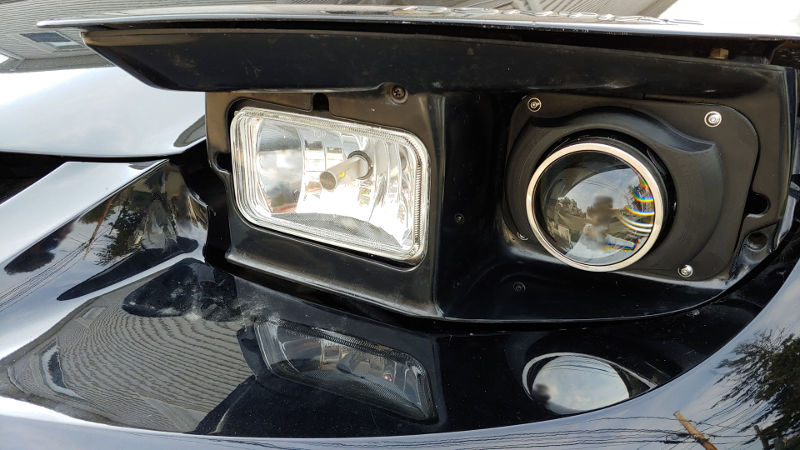
For reference, these are what I have on my car.
https://www.fadingarrow.com/images/F...lted_SMALL.jpg
http://www.fadingarrow.net/images/Fi...lted_SMALL.jpg
Build Thread Here:
https://ls1tech.com/forums/appearanc...rojectors.html
Looking at the ones mounted on my car, these aren't symmetrical either. I might have to alter the design to fit the low beam better. The high beam might be close enough as it is.
I made a prototype shroud for the Hella 60mm Projector. You can attach it to the bracket instead of the car's existing shroud. The shroud is symmetrical and should work for low beam and high beam. Although it looks like the position in the low beam isn't centered. This is a spare headlight mechanism that I had and these are the low beam projectors and low beam brackets from ebay. I don't have the Hella 60mm High Beam projectors or the high beam brackets so I put low beam in both positions for prototyping.
I don't know if this mounting/spacing is typical or if something is warped. The Low Beam looks off-center towards the high beam and the bottom of the shroud rubs a little on the bottom opening of the high beam. If these end up fitting like this on others, I can alter the design of these shrouds to be asymmetrical to fit the low beam better. The high beam looks fairly centered left/right.
The "bumpiness" of the design is to make it look more flush with the stock shrouds on the car and to fit around screw heads that mount the projectors.
I was tempted to make a style to mount to the backside of the car's shroud, but that would make fitment more trial-and-error and could mean drilling into the stock shroud like I did. Not everyone wants to do that so I made these to attach to the ebay bracket and keep things more modular and reversible.
Ignore the extra cuts and holes in the brackets. I was prototyping fitment of different projectors and ended up not using these brackets for that. So these were siting around as spares.
Here is how it would look installed - Without Car's Shroud.
https://www.fadingarrow.com/images/H...r%20Shroud.jpg
http://www.fadingarrow.net/images/He...r%20Shroud.jpg
Here is how it would look installed - With Car's Shroud.
(This is two pics cropped together since I only have the 1 prototype.)
https://www.fadingarrow.com/images/H...r%20Shroud.jpg
http://www.fadingarrow.net/images/He...r%20Shroud.jpg
My printer can't print that large or in ABS so this is printed in PLA (which can't handle the heat near a headlight) and I had to print in two halves that I taped together (I didn't want to glue in case i needed to make it asymmetrical so I would only print the half that I changed).
The shrouds I have installed on my car on the Sinolyn Projectors I uploaded to CraftCloud to print in ABS. The pair on my car were $35 delivered ($25 for pair printed + $10 shipping) These should cost something similar.
For reference, these are what I have on my car.
https://www.fadingarrow.com/images/F...lted_SMALL.jpg
http://www.fadingarrow.net/images/Fi...lted_SMALL.jpg
Build Thread Here:
https://ls1tech.com/forums/appearanc...rojectors.html
Looking at the ones mounted on my car, these aren't symmetrical either. I might have to alter the design to fit the low beam better. The high beam might be close enough as it is.
Last edited by VIP1; 03-31-2022 at 09:39 AM.

The following users liked this post:
InfiniteReality (03-29-2022)
 03-29-2022, 07:00 PM
#4
Copy & Paste Moderator
Thread Starter
Here is an updated asymmetrical version for the low beam.
fhttps://adingarrow.com/images/Hella...e%20-%20V2.jpg
http://fadingarrow.net/images/Hella%...e%20-%20V2.jpg
fhttps://adingarrow.com/images/Hella...e%20-%20V2.jpg
http://fadingarrow.net/images/Hella%...e%20-%20V2.jpg
03-29-2022, 07:03 PM
#5
Copy & Paste Moderator
Thread Starter
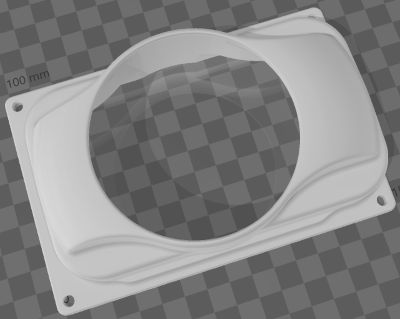
Here are the renders of the prototype.
Symmetrical

https://www.fadingarrow.com/images/H...ymmetrical.jpg
http://www.fadingarrow.net/images/He...ymmetrical.jpg
Here is a link to download the model if you want to get it printed. I would recommend printing in ABS.
https://www.fadingarrow.com/images/H...ymmetrical.stl
Asymmetrical
https://fadingarrow.com/images/Hella...ymmetrical.jpg
https://fadingarrow.com/images/Hella...ymmetrical.jpg
Here is a link to download the model if you want to get it printed. I would recommend printing in ABS.
https://www.fadingarrow.com/images/H...ymmetrical.stl
Symmetrical
https://www.fadingarrow.com/images/H...ymmetrical.jpg
http://www.fadingarrow.net/images/He...ymmetrical.jpg
Here is a link to download the model if you want to get it printed. I would recommend printing in ABS.
https://www.fadingarrow.com/images/H...ymmetrical.stl
Asymmetrical
https://fadingarrow.com/images/Hella...ymmetrical.jpg
https://fadingarrow.com/images/Hella...ymmetrical.jpg
Here is a link to download the model if you want to get it printed. I would recommend printing in ABS.
https://www.fadingarrow.com/images/H...ymmetrical.stl
Last edited by VIP1; 03-29-2022 at 07:10 PM.
03-29-2022, 07:04 PM
#6
Copy & Paste Moderator
Thread Starter
Anyone want to try printing these and testing on their own car for others to see if it fits well or not?
Let me know if any pictures are missing or any links to models are broken.
Let me know if any pictures are missing or any links to models are broken.
Last edited by VIP1; 03-29-2022 at 07:18 PM.

Trending Topics
03-31-2022, 09:21 AM
#8
Copy & Paste Moderator
Thread Starter
You can download the two STL files I posted above and have CraftCloud3D print them in ABS with 20% infill.
When you upload the model(s) to them they ask:
Also, I don't actually have the High Beam projectors. I modeled these shrouds on the Low Beam Projectors. The dimensions of the High Beam are similar so what I modeled should work.
When you upload the model(s) to them they ask:
- Dimension Scale: MM (millimeter)
- Print Count: (As many as you want)
- Material: ABS (default infill is 20% there)
- Finish/Color: Standard/Default Finish and pick the color you want (I'd stick with black, its no extra cost too)
- Select a Vendor Offer that has the right balance of speed and cost (you can pick anywhere from fastest to get to you or cheapest or somewhere in between)
- Double-Check what is in your cart and pay
Also, I don't actually have the High Beam projectors. I modeled these shrouds on the Low Beam Projectors. The dimensions of the High Beam are similar so what I modeled should work.
Last edited by VIP1; 03-31-2022 at 09:39 AM.