
[Pics] Detailers: What should I use?
 02-21-2006, 03:42 PM
#1
TECH Fanatic
Thread Starter
iTrader: (7)
Join Date: Jan 2005
Posts: 1,051
Likes: 0
Received 0 Likes
on
0 Posts
I took some pictures of my car today to show some examples of the imperfections of the paint. I'd like those who have had a lot of experience to chime in on what I should do/use to get it looking as good as I can make it. I took the pictures mainly to show the multiple hairline etches that I would like to remove but I also have some problem areas from a front end bra. I don't know how often it was used on the car before I got it, but I've probably used it 4 or 5 times myself to go on 100 mile freeway trips.
I'm going to list the products that I already have and which are on the car at this time. I want to use polish(es) and glaze(s) with my Porter DA to restore the finish. The car does look very nice in the shade and at dusk but I want it to look that way in the sun.
Klasse All in One
Klasse Sealant Glaze
Mothers pure Carnauba paste
The above is what I have used on the car so far. I only have 2 blue finishing pads for the polisher because I was very nervous about scratching the paint with any other pad. But I've gathered in another thread that there's not a lot to worry about with the polisher that I have and that a cutting-type pad is required with polish.
What are the polishes, glazes, and pads that I should use with them? I'll probably do the actual work in several months. I have a piece of trim that needs to get a repaint because the original is cracked - it's my understanding that I can polish new paint but I can't wax it, correct?
Now for the photo examples. The first two are the spoiler and hood to show generally what the whole car looks like at noon.
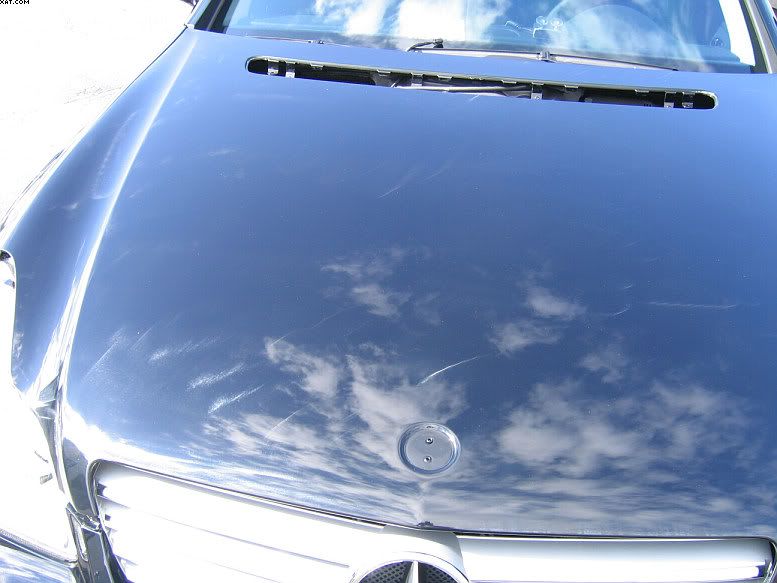
Picture #3: It looks like there is a haze of some kind burned into the paint sort of like a ghost. It's got something to do with that front end bra and was there when I got the car. It looks sort of like a hologram when it catches light in certain settings.
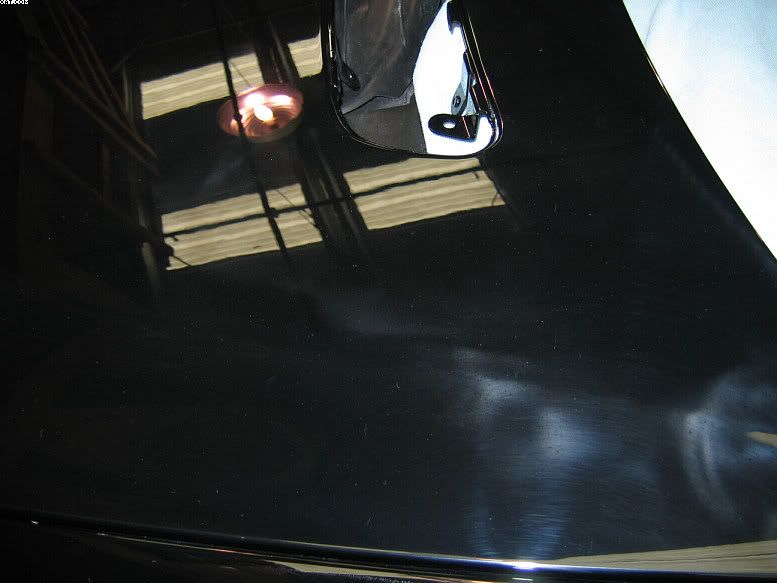
Picture #4: Actual scratches in the paint - damn the bra. There must have been some junk trapped in it without my knowledge when I put it on.
Picture #5: bra damage - bottom right corner of picture; I turned the camera sideways. It looks like a a patch of scuffs sitting on top of the surface - sometimes it is translucent.
If it takes multiple products, several pads and a few days that's fine by me. Love the car. I just need a couple things cleared up before I do it. First, will car wash soap and a claybar session followed by another wash remove all the wax? I've got quite a bit on there right now. Also, since the Klasse All in One is a cleaner wax, should I even use it? If I should then at what point in the detailing process? I'm not looking to get any new waxes, only polish/glaze/pads.
Thanks to any that took the time to read this, look at the pics, and respond.
I'm going to list the products that I already have and which are on the car at this time. I want to use polish(es) and glaze(s) with my Porter DA to restore the finish. The car does look very nice in the shade and at dusk but I want it to look that way in the sun.
Klasse All in One
Klasse Sealant Glaze
Mothers pure Carnauba paste
The above is what I have used on the car so far. I only have 2 blue finishing pads for the polisher because I was very nervous about scratching the paint with any other pad. But I've gathered in another thread that there's not a lot to worry about with the polisher that I have and that a cutting-type pad is required with polish.
What are the polishes, glazes, and pads that I should use with them? I'll probably do the actual work in several months. I have a piece of trim that needs to get a repaint because the original is cracked - it's my understanding that I can polish new paint but I can't wax it, correct?
Now for the photo examples. The first two are the spoiler and hood to show generally what the whole car looks like at noon.
Picture #3: It looks like there is a haze of some kind burned into the paint sort of like a ghost. It's got something to do with that front end bra and was there when I got the car. It looks sort of like a hologram when it catches light in certain settings.
Picture #4: Actual scratches in the paint - damn the bra. There must have been some junk trapped in it without my knowledge when I put it on.
Picture #5: bra damage - bottom right corner of picture; I turned the camera sideways. It looks like a a patch of scuffs sitting on top of the surface - sometimes it is translucent.
If it takes multiple products, several pads and a few days that's fine by me. Love the car. I just need a couple things cleared up before I do it. First, will car wash soap and a claybar session followed by another wash remove all the wax? I've got quite a bit on there right now. Also, since the Klasse All in One is a cleaner wax, should I even use it? If I should then at what point in the detailing process? I'm not looking to get any new waxes, only polish/glaze/pads.
Thanks to any that took the time to read this, look at the pics, and respond.
Last edited by SmokeySS; 02-21-2006 at 03:49 PM.
 02-21-2006, 04:55 PM
#3
Without seeing it in person its hard to say, but this is where I would start. I would try some light compound followed by a swirl cutter. Then clean the paint. (wash and clay) Then apply some polish and see if that helps. On polishing new paint, you need to talk to the painter and see what they say. It varies for different types of paint. Your picture #3 looks like the hood on my old car about 15 years ago. I bought it used and tried everything I could and at certain angles you could still see the "ghost" effects. Where are you located? Maybe your close to someone that could see it in person
02-21-2006, 05:10 PM
#4
TECH Addict

Join Date: Jul 2003
Location: Amarillo, Texas
Posts: 2,375
Likes: 0
Received 0 Likes
on
0 Posts

Originally Posted by 99zee
Without seeing it in person its hard to say, but this is where I would start. I would try some light compound followed by a swirl cutter. Then clean the paint. (wash and clay) Then apply some polish and see if that helps. On polishing new paint, you need to talk to the painter and see what they say. It varies for different types of paint. Your picture #3 looks like the hood on my old car about 15 years ago. I bought it used and tried everything I could and at certain angles you could still see the "ghost" effects. Where are you located? Maybe your close to someone that could see it in person
Light compound shouldn't be used over the entire car if it's not needed...only necessary areas.
02-21-2006, 05:10 PM
#5
Teching In
iTrader: (1)
Join Date: Nov 2004
Location: Marietta GA
Posts: 33
Likes: 0
Received 0 Likes
on
0 Posts
SmokeySS your f-bod can be saved, however, none of the pads and products you own are going to do it.
Pictures 1, 2 and 3 are general light swirling and marring. You'll need a few good polishes along with cutting and polishing pads for your PC to remove.
Picture 4 looks to be through the paint but can be saved. You'll need touch-up paint as well as a few different grits (2K and 2.5K) of sandpaper to fix.
Picture 5 looks to be heavy clear scratches but can be removed via PC.
For products:
Menzerna Intensive Polish
Menzerna Final Polish II
For pads:
Lake Country light cut (orange)
Lake Country polish (white)
Use the IP with the orange pad at speeds 5-6 working in SLOW overlapping strokes until the polish is completely broken down. Some areas will need this step done several times. Your trading speed for safety with the PC.
Use the FPII with the white pad again at speeds 5-6 and again in slow overlapping strokes. After that is done you can finish with the product of your choice as both Menzerna polishes are oil and filler free making them compatible with everything from sealant to carnaubas.
Last edited by 1 Clean WS6; 02-21-2006 at 05:17 PM.
 02-21-2006, 05:12 PM
#7
Shirley Temple Drinker
iTrader: (1)

Join Date: Oct 2005
Location: IL
Posts: 3,333
Likes: 0
Received 0 Likes
on
0 Posts
Wait, you can make touch up paint look like stock? I've got some on the edge of my door that I can see that bugs me, how should I go about making that un-see able?? Sorry for the hijack..
Trending Topics
02-21-2006, 05:16 PM
#8
Teching In
iTrader: (1)
Join Date: Nov 2004
Location: Marietta GA
Posts: 33
Likes: 0
Received 0 Likes
on
0 Posts
Sgt. Spuds...no...not like stock but certainly better than bare primer or metal. When filled and sanded properly the defect will be much less noticeable and won't have that touch-up "blob" look to it either.
02-21-2006, 05:18 PM
#9
TECH Junkie
iTrader: (10)
Join Date: Jan 2004
Location: Pearland, TX
Posts: 3,778
Likes: 0
Received 0 Likes
on
0 Posts
The hood and spoiler can easily be remedied with an orange pad and some Menzerna Intensive polish.
In pics 4 and 5, if the scratches can be felt with your fingernail (i.e. they go down below the clearcoat), your best bet is to get some touch up paint and apply it in VERY VERY thin coats in the scratches. Apply it with a toothpick and don't let it "glob". Let it dry for about 15-30 minutes, then apply another layer. Keep doing this until it is JUST higher than the paint around it, then use some 2000 grit sand paper and wet sand it level. If you're not comfortable with this, ask a professional.
Pic 3: honestly, I have no idea. I've never seen that sort of distortion before. Sorry.
As for pads and process, here is what has worked for me:
1) Wash to remove loose dirt and crap
2) Clay to remove old wax and trapped dirt. Use plenty of lubricant.
3) Wash to remove clay residue
4) Dry with waffle weave microfiber towel
5) Menzerna Intensive Polish with Orange Pad. Porter Cable 7336 polisher (PC) set on 5. Spray pad with two "spritzes" of water (preferrably distilled or drinking water) from a squirt bottle. Go with a lower speed if you are unfamiliar. Work in 2'x2' sections and work the polish until it is almost clear (no more chalky white).
6) Wipe off excess with a spray bottle and a clean microfiber towel
7) Menzerna Final Polish 2 with White Pad. Same setup as with the Intensive Polish.
8) Repeat step 6 with a fresh microfiber towel.
9) Menzerna Finishing Touch Glaze applied with dry black pad. PC set on 3 (glaze splatters). This step is optional.
10) Wipe off excess with clean dry microfiber towel
11) Seal with Blackfire, Zaino, or Menzerna FMJ, depending on what I have. I apply by hand with an applicator that has been sprayed with a little detailnig spray. This keeps the sealant from going into the applicator and onto the car.
I just did this last month. It looks like this: http://photobucket.com/albums/y251/c...2006%20Detail/
-Mike
02-21-2006, 06:11 PM
#10
TECH Fanatic
Thread Starter
iTrader: (7)
Join Date: Jan 2005
Posts: 1,051
Likes: 0
Received 0 Likes
on
0 Posts
I read that the Menz Intensive Polish can dull the paint's finish. So if I'm only at 12k miles on this 02, do you still recommend it? Like I said I took the pictures at noon at angles that show off the crap the best, but I don't want to lose luster when it's looked at during sunset hours and low light.
02-21-2006, 06:17 PM
#11
TECH Addict
Join Date: Jul 2003
Location: Amarillo, Texas
Posts: 2,375
Likes: 0
Received 0 Likes
on
0 Posts
Menzerna IP finishes down pretty nicely when used with the right pad, but it's usually best to follow up with FP to remove any hazing and fully burnish the finish.
02-21-2006, 06:26 PM
#13
TECH Fanatic
Thread Starter
iTrader: (7)
Join Date: Jan 2005
Posts: 1,051
Likes: 0
Received 0 Likes
on
0 Posts
Few more examples, this time in the garage. The flash exposes all! 
#1 This spot feels smoother than the surrounding paint. When moving my fingertip across the paint it feels slightly grabby but my finger slides more freely over this.
#2 & #3 Same spot. This is that ghost spot I was trying to describe. You may notice it's a diagonal line which follows the line the bra makes.
After reading a couple replies I don't even think I want to do this myself anymore.
02-21-2006, 06:35 PM
#14
TECH Addict
Join Date: Jul 2003
Location: Amarillo, Texas
Posts: 2,375
Likes: 0
Received 0 Likes
on
0 Posts
Originally Posted by 99zee
Correct, I assumed the paint would be clean before starting any kind of repair.
Originally Posted by 99zee
I would try some light compound followed by a swirl cutter. Then clean the paint. (wash and clay)
02-21-2006, 07:11 PM
#15

Originally Posted by SmokeySS
After reading a couple replies I don't even think I want to do this myself anymore.
With the proper tools and technics, anyone can do it, I've got a black T/A and following the advice of the folks here, (and another site) it's deep black and swirl free, and I've never (until I got this car) ever done anything like this (I was the wash once a week with a sponge and dish soap, and wax with an old t shirt (oh how thats changed
02-21-2006, 07:17 PM
#16
Teching In
iTrader: (1)
Join Date: Nov 2004
Location: Marietta GA
Posts: 33
Likes: 0
Received 0 Likes
on
0 Posts
The Menzerna polishes finish down very nicely...you just have to make ultra sure they are completely broken down and you'll be good to go.
Here is the IP/FPII combo via PC on a CLS 55 AMG I recently detailed...
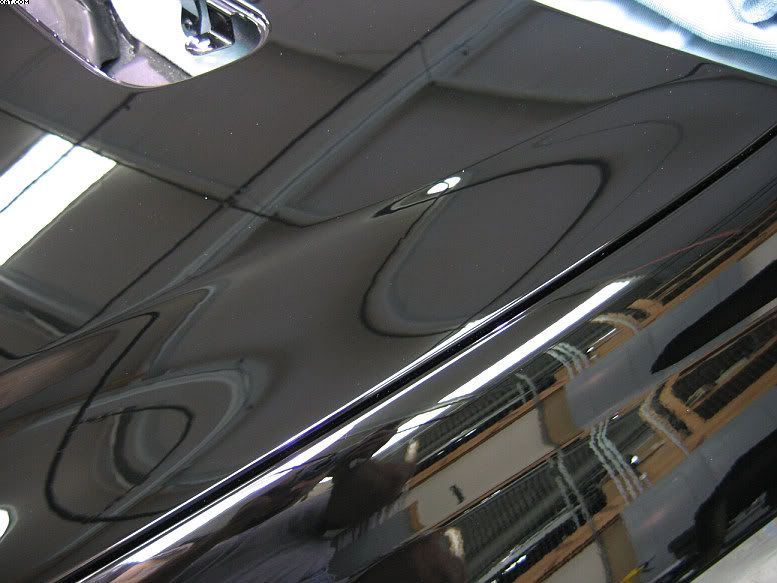
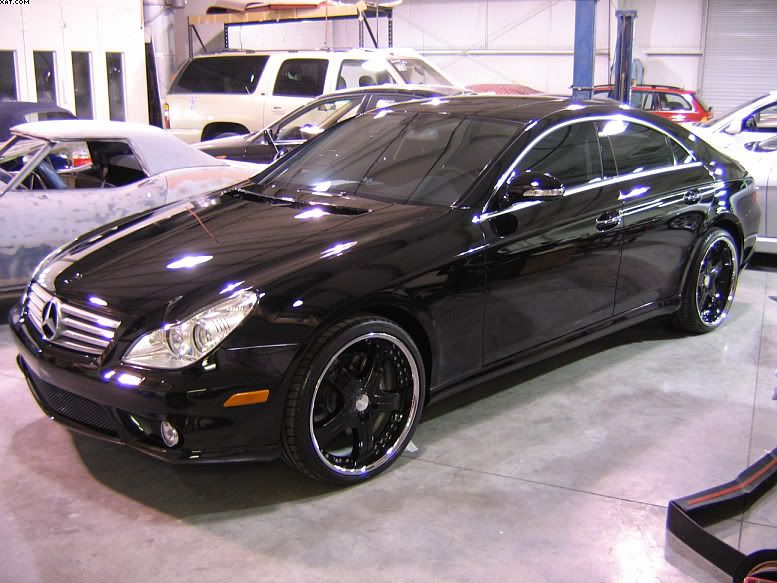
Same car prior to me polishing it. These are after it was compounded with a wool pad and a rotary...
Here is the IP/FPII combo via PC on a CLS 55 AMG I recently detailed...
Same car prior to me polishing it. These are after it was compounded with a wool pad and a rotary...
02-21-2006, 08:32 PM
#19
TECH Fanatic
Thread Starter
iTrader: (7)
Join Date: Jan 2005
Posts: 1,051
Likes: 0
Received 0 Likes
on
0 Posts
Ah well let me rephrase. The car hasn't had the opportunity to have any imperfections on it yet, so no, I don't get it. And I would expect the paint on a new Benz to be really good.
02-21-2006, 08:47 PM
#20
Well if you notice in the last 2 pics, you can see the swirls/marring, they show up as the fuzzy reflections (especially in the last pic, on the lower rh side) if you look at the first pic, notice how sharp the reflections are, compared to the last pic