recovered my door panels *writeup and pics*
 12-24-2006, 01:26 AM
#1
Launching!
Thread Starter
iTrader: (7)

Join Date: May 2005
Location: Aiken, SC
Posts: 202
Likes: 0
Received 0 Likes
on
0 Posts
*PICS ARE AT THE BOTTOM IF YOU DON'T WANT TO READ*
I’m not a big fan of the gray cloth and I didn’t want to spend the money on a set of factory leather door panels so I decided to make my own. It was a pain but for about $30 in materials I don’t think it turned out half bad. Since I haven’t seen a write-up on how to recover camaro panels I decided to make one myself so others can see my techniques. Part 2 can be applied to firebird panels b/c the whole fabric covered part is just fabric glued to cardboard and held on in the same manner as the carpet on the lower part of camaro panels.
Time: a few days, mainly so everything has plenty of time to cure
Recommended tools/materials:
Carpet for lower portion (I already had some leftovers)
Material of choice for upper portion. I picked up a yard of black vinyl at a local home upholsterer for $15
1 can of spray adhesive. I used 3M (~$13 at Advance Auto) but you may want to try something a little less pricey/potent.
1 tube Liquid Nails ~$2 at Lowe’s, also need a caulking gun
Cutters, wire cutters are fine
Flat head screw drivers
Big and regular Phillips head driver for removing door panel
Razor blade or sharp knife
Needle nose pliers
Small clamps are handy
Soldering gun or some type of heat source
Part 1: Removing door panel
First things first, the door panel must be removed from the car. There are 3 big screws in the armrest part, 2 right under the bezel that can be seen from the top and 1 up under the handle used to pull the door closed. The bezel is held on by a screw behind the handle and another right above the 3rd big screw. The plastic door lock cover just pops off the metal bar, you can pry it off or if it’s being a pain and you have to pull everything off at once you can just push it off from the back. It can be tricky to get everything off….especially without breaking something. You also need to remove the plastic triangle behind the side mirror, one screw, no biggie. To get the actual door panel off, once the screws are off, just pull it up and off. It helps to have the window rolled down when you do this.
Now just find a good place to work. The first thing you need to do is pull off the insulator on the back of the panel. Most likely it will just pull off but keep a razor blade or putty knife handy in case it decides to stick a little.
Part 2: Lower panel carpet
Now you can see what’s going on. You will see that the carpet is just glued to a piece of cardboard backing and held on to the panel by plastic tabs (that are part of the door panel itself) that are melted down to hold the cardboard in place. Cut off the melted plastic and remove the cardboard. You will also notice a white piece of melted plastic where the arm rest handle attaches, cut that too. Remove the carpeting from the cardboard. I found it easiest to just let it pull off the first layer of cardboard rather than try to separate it all.
http://i41.photobucket.com/albums/e2...p/DSCN1277.jpg
Now lay out the carpet you want to use (or any material of choice really) and spray some adhesive on the back. Do the same to the cardboard you took off. I used 3M spray adhesive. Let it tack a couple minutes then put the cardboard on the carpet. Let it dry and trim off the excess carpet.
Now for the reattachment. Obviously you can’t use the same technique the factory used unless you are REALLY good. This is where you can get creative. When I did my firebird door panels, I cut new slots in the cardboard and made brackets with metal plumbing strap and bent them over and held them to the panel with construction grade Liquid Nails which can be purchased at Lowe’s and Home Depot and the like. I know it sounds incredibly redneck but it works, they haven’t given me any problems in the 2.5 years since I did them. This time I decided to try something different. I fed some wire ties through the slots, cut them to my desired length, used a soldering iron to melt the head down to the back of the cardboard, and used Liquid Nails to hold the other end to the door panels. It may help to rough up the surface of the plastic to help hold.
http://i41.photobucket.com/albums/e2...p/DSCN1270.jpg
Also, there the armrest attaches, I just put a screw in the plastic there.
http://i41.photobucket.com/albums/e2...p/DSCN1267.jpg
Part 3: Upper Panel
Ok that was the easy part, if you are having second thoughts about this project I suggest you stop now. This part is held on in the same manner; however the plastic that is melted down is part of the piece you will be removing. You will see 2 rows of “welds” along the back and I think 3 along the curved end.
http://i41.photobucket.com/albums/e2...p/DSCN1271.jpg
Use a soldering iron to melt out these “welds” so that you can pull off the fabric covered piece.
http://i41.photobucket.com/albums/e2...p/DSCN1274.jpg
You will also need to remove the staples attaching the weather stripping to the top of this piece. You only need to remove the ones on this part, not the entire piece of weather stripping. It will be helpful later on when lining everything up.
Lay out the material you wish to use (in this case black vinyl) and spray some adhesive on the back, along with the fabric covered piece you wish to recover. No need to remove the old fabric as I’m sure it wouldn’t be very easy, plus it adds extra padding. Let the adhesive tack and then lay the old fabric covered piece on the vinyl (I found this to be best at avoiding wrinkles) and kind of roll it with the curve. Pull the edges of the vinyl around the edges like the existing fabric. I’ll warn you now, the corners are tricky and the front top corner is a real beast. I put some staples along the flat edge where the weather stripping attached and use clamps to hold the material in place in the corners until everything dried.
http://i41.photobucket.com/albums/e2...p/DSCN1278.jpg
Now to put it back together. Again, this is where you can get creative. Maybe you have a better way of doing this, but here is how I got the job done. I put a blob of Liquid Nails on the material covered piece where the “welds” were and a bead on the door panel (I figured better too much than not enough). Lay the material covered piece on the door panel and let it sit overnight. You may need to use something to hold it in place and bunched up material on the corners will throw alignment off. It is best to let the top edge of the door panel hang off of the work surface….basically to keep the panel from flexing.
http://i41.photobucket.com/albums/e2...p/DSCN1279.jpg
Once everything is dry it’s time to reattach the weather stripping. You would need a beast of a staple gun for this job, or you can use screws like me. Just hold the rubber where you want it, drill a small hole and put the screw in. Keep in mind that this piece is thicker with the new layer of vinyl so the weather stripping may not be perfectly straight.
http://i41.photobucket.com/albums/e2...p/DSCN1280.jpg
Ok, flip the door panel over, spray on some adhesive, lay the insulator back in place, let it dry and go put everything back in the car!
Part 4: RESULTS!!!!
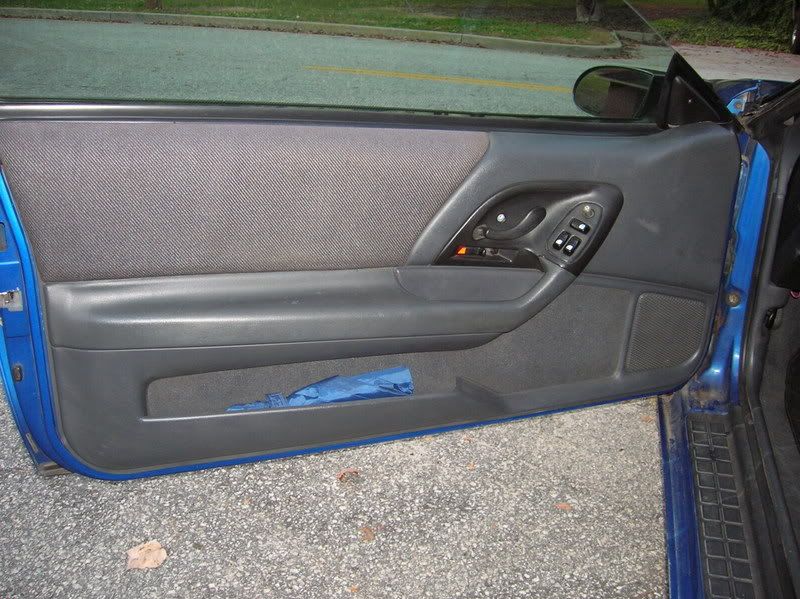
Before:
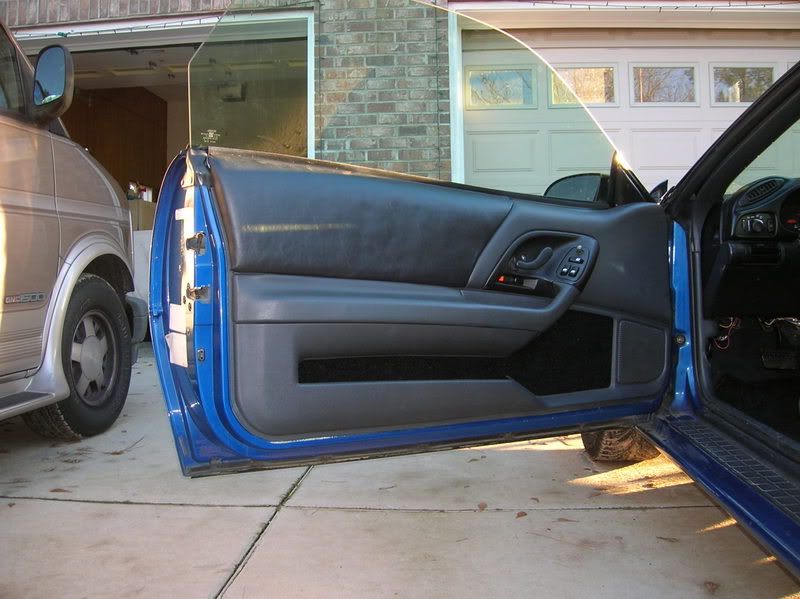
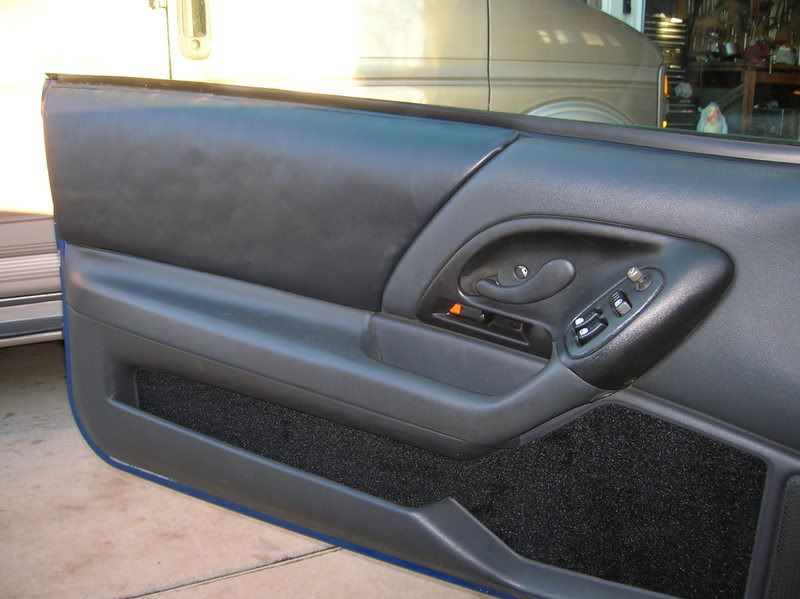
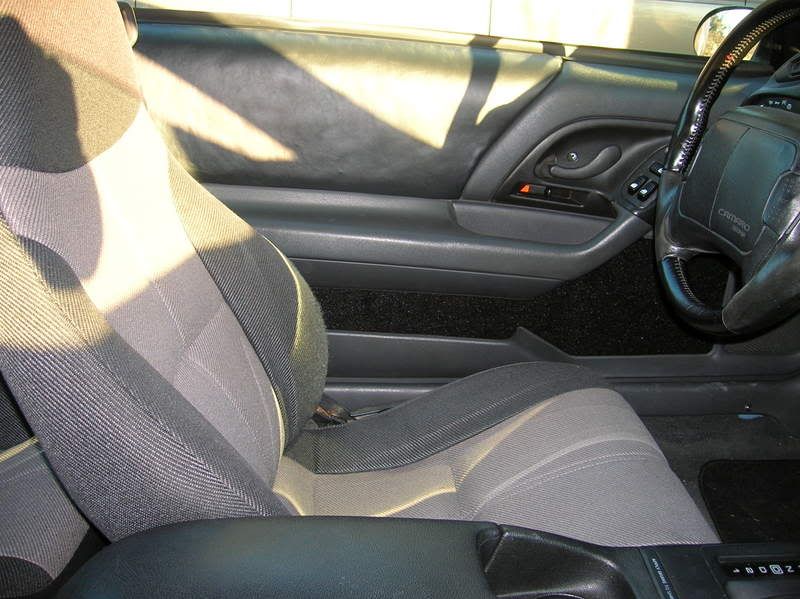
After:
The help. He couldn’t turn a wrench but he was there to calm me down when I got frustrated. He’s camera shy.

That’s it! I know it’s not perfect buy hey, I’m happy with the results. I think the adhesive faded the color of the vinyl a tad, but oh well. Hope you found the write-up helpful.
I’m not a big fan of the gray cloth and I didn’t want to spend the money on a set of factory leather door panels so I decided to make my own. It was a pain but for about $30 in materials I don’t think it turned out half bad. Since I haven’t seen a write-up on how to recover camaro panels I decided to make one myself so others can see my techniques. Part 2 can be applied to firebird panels b/c the whole fabric covered part is just fabric glued to cardboard and held on in the same manner as the carpet on the lower part of camaro panels.
Time: a few days, mainly so everything has plenty of time to cure
Recommended tools/materials:
Carpet for lower portion (I already had some leftovers)
Material of choice for upper portion. I picked up a yard of black vinyl at a local home upholsterer for $15
1 can of spray adhesive. I used 3M (~$13 at Advance Auto) but you may want to try something a little less pricey/potent.
1 tube Liquid Nails ~$2 at Lowe’s, also need a caulking gun
Cutters, wire cutters are fine
Flat head screw drivers
Big and regular Phillips head driver for removing door panel
Razor blade or sharp knife
Needle nose pliers
Small clamps are handy
Soldering gun or some type of heat source
Part 1: Removing door panel
First things first, the door panel must be removed from the car. There are 3 big screws in the armrest part, 2 right under the bezel that can be seen from the top and 1 up under the handle used to pull the door closed. The bezel is held on by a screw behind the handle and another right above the 3rd big screw. The plastic door lock cover just pops off the metal bar, you can pry it off or if it’s being a pain and you have to pull everything off at once you can just push it off from the back. It can be tricky to get everything off….especially without breaking something. You also need to remove the plastic triangle behind the side mirror, one screw, no biggie. To get the actual door panel off, once the screws are off, just pull it up and off. It helps to have the window rolled down when you do this.
Now just find a good place to work. The first thing you need to do is pull off the insulator on the back of the panel. Most likely it will just pull off but keep a razor blade or putty knife handy in case it decides to stick a little.
Part 2: Lower panel carpet
Now you can see what’s going on. You will see that the carpet is just glued to a piece of cardboard backing and held on to the panel by plastic tabs (that are part of the door panel itself) that are melted down to hold the cardboard in place. Cut off the melted plastic and remove the cardboard. You will also notice a white piece of melted plastic where the arm rest handle attaches, cut that too. Remove the carpeting from the cardboard. I found it easiest to just let it pull off the first layer of cardboard rather than try to separate it all.
http://i41.photobucket.com/albums/e2...p/DSCN1277.jpg
Now lay out the carpet you want to use (or any material of choice really) and spray some adhesive on the back. Do the same to the cardboard you took off. I used 3M spray adhesive. Let it tack a couple minutes then put the cardboard on the carpet. Let it dry and trim off the excess carpet.
Now for the reattachment. Obviously you can’t use the same technique the factory used unless you are REALLY good. This is where you can get creative. When I did my firebird door panels, I cut new slots in the cardboard and made brackets with metal plumbing strap and bent them over and held them to the panel with construction grade Liquid Nails which can be purchased at Lowe’s and Home Depot and the like. I know it sounds incredibly redneck but it works, they haven’t given me any problems in the 2.5 years since I did them. This time I decided to try something different. I fed some wire ties through the slots, cut them to my desired length, used a soldering iron to melt the head down to the back of the cardboard, and used Liquid Nails to hold the other end to the door panels. It may help to rough up the surface of the plastic to help hold.
http://i41.photobucket.com/albums/e2...p/DSCN1270.jpg
Also, there the armrest attaches, I just put a screw in the plastic there.
http://i41.photobucket.com/albums/e2...p/DSCN1267.jpg
Part 3: Upper Panel
Ok that was the easy part, if you are having second thoughts about this project I suggest you stop now. This part is held on in the same manner; however the plastic that is melted down is part of the piece you will be removing. You will see 2 rows of “welds” along the back and I think 3 along the curved end.
http://i41.photobucket.com/albums/e2...p/DSCN1271.jpg
Use a soldering iron to melt out these “welds” so that you can pull off the fabric covered piece.
http://i41.photobucket.com/albums/e2...p/DSCN1274.jpg
You will also need to remove the staples attaching the weather stripping to the top of this piece. You only need to remove the ones on this part, not the entire piece of weather stripping. It will be helpful later on when lining everything up.
Lay out the material you wish to use (in this case black vinyl) and spray some adhesive on the back, along with the fabric covered piece you wish to recover. No need to remove the old fabric as I’m sure it wouldn’t be very easy, plus it adds extra padding. Let the adhesive tack and then lay the old fabric covered piece on the vinyl (I found this to be best at avoiding wrinkles) and kind of roll it with the curve. Pull the edges of the vinyl around the edges like the existing fabric. I’ll warn you now, the corners are tricky and the front top corner is a real beast. I put some staples along the flat edge where the weather stripping attached and use clamps to hold the material in place in the corners until everything dried.
http://i41.photobucket.com/albums/e2...p/DSCN1278.jpg
Now to put it back together. Again, this is where you can get creative. Maybe you have a better way of doing this, but here is how I got the job done. I put a blob of Liquid Nails on the material covered piece where the “welds” were and a bead on the door panel (I figured better too much than not enough). Lay the material covered piece on the door panel and let it sit overnight. You may need to use something to hold it in place and bunched up material on the corners will throw alignment off. It is best to let the top edge of the door panel hang off of the work surface….basically to keep the panel from flexing.
http://i41.photobucket.com/albums/e2...p/DSCN1279.jpg
Once everything is dry it’s time to reattach the weather stripping. You would need a beast of a staple gun for this job, or you can use screws like me. Just hold the rubber where you want it, drill a small hole and put the screw in. Keep in mind that this piece is thicker with the new layer of vinyl so the weather stripping may not be perfectly straight.
http://i41.photobucket.com/albums/e2...p/DSCN1280.jpg
Ok, flip the door panel over, spray on some adhesive, lay the insulator back in place, let it dry and go put everything back in the car!
Part 4: RESULTS!!!!
Before:
After:
The help. He couldn’t turn a wrench but he was there to calm me down when I got frustrated. He’s camera shy.
That’s it! I know it’s not perfect buy hey, I’m happy with the results. I think the adhesive faded the color of the vinyl a tad, but oh well. Hope you found the write-up helpful.
Last edited by Pyro97; 12-24-2006 at 01:52 AM.


 looks good
 12-24-2006, 06:00 PM
#6
Copy & Paste Moderator

Nice writeup.
Here is a writeup for a Firebird:
http://www.lastofthebreed.com/Instal.../DoorPanel.htm
(I used blobs of Locktite plastic epoxy instead of remelting the posts,)
Here is a writeup for a Firebird:
http://www.lastofthebreed.com/Instal.../DoorPanel.htm
(I used blobs of Locktite plastic epoxy instead of remelting the posts,)
12-24-2006, 11:31 PM
#7
Launching!
Thread Starter
iTrader: (7)
Join Date: May 2005
Location: Aiken, SC
Posts: 202
Likes: 0
Received 0 Likes
on
0 Posts
Originally Posted by *KANDY SS*
+1 for the writeup...my friend will be reading this very soon! thanks!
Firebird panels aren't to bad...I think that's why I got ballsy enough to try this. Now I see why I've never seen anyone recover camaro door panels before

And the dog...yea I'm sure it was really tiring watching me yell and throw stuff
Everytime he saw the camera pointed at him he either turned away or hid his head behind the seat. 
 !
!