
02 Firebird headlight/signal light upgrade questions

Two questions (searched for both, couldn't find the specific answer I was looking for):
1. I want to modify some H4703 sealed beam headlights to take H4 bulbs so I can go with Silverstar bulbs (don't have $300+ to spend on HID)... do I or don't I need a wiring harness to make that work? Will an H4 bulb plug straight into the existing plug?
2. My front turn signal/DRL lenses are filthy... on the inside. How can I open those up to clean up the lenses? They look terrible, especially compared to my nice clean fog light lenses.


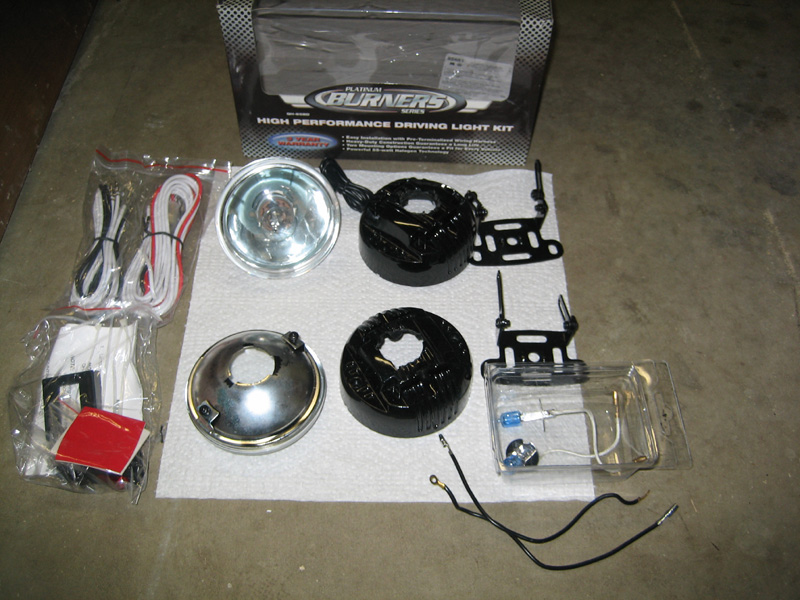
I would go with a new low beam housings from rallylights.com if your not going HID. Get some nice hella housings with drop in lamps along with the adapter and you should be good to go. I was very happy with my conversion lamps.
As far as cleaning the DRL lenses, I have never tried to clean the inside or had to. Hopefully someone else will chime in on how to do that. I would assume getting some mild degreaser and some water in there. Then either let it air dry or use a hairdryer here and there to get rid of the moisture. I would remove the housings if doing this.
-Brian
Copy & Paste Moderator


Joined: Apr 2002
Posts: 9,761
Likes: 206
From: Eastern MA
Take a look in the Lighting FAQ. Its in the "Hall of Fame" sticky and in my sig.
---
At one point I made my own conversion housings to fit a H7 bulb into a 4703 housing. Here is a thread where I talk about installing H7 bulbs into 4703 housings:
https://ls1tech.com/forums/appearance-detailing/566308-clear-head-lamps-trans-am.html
(Scroll down to my post #9 in that thread for an outline, since the original site changed and the link is no longer valid.)
H7 is a low beam only bulb instead of the H4's low/hi, but the H7 is brighter (it puts out more lumens than the H4's high filament).
Unfortunately these bulbs weren't meant to have their backside exposed like that (neither is the H4) and it eventually filled with water and a loose connection melted the stock connector. If I covered more of the back of the completed modification with clear silicone to seal it (read my post in the other thread for clarification of how its sealed) maybe it would have done a better job of keeping the water out, but the added thickness of the sealant probably would have made a worse connection to the harness since the pins are relatively short. That could be solved by cutting off the stock connector and making a sealed connection to the back of the bulb and a new custom connection to the car. Unfortunately, then it wouldn't be a quick/simple plug-and-play to install new bulbs later if one blew. Also, this is all a maybe since new, unmodified, 4703 bulbs eventually fill with water anyway,
Here is what I am talking about with respect to the custom connection:

That was an attempt I made by installing the high-beam 4701's bulb into the 4703 housing. The beam pattern was somewhat close, but way too much light went upward into peoples cars.
Here is what my stock (melted) 4703 connector looked like when I cut it off:
I now have Hella 90mm H9 projectors.
https://ls1tech.com/forums/showpost....91&postcount=6
---
At one point I made my own conversion housings to fit a H7 bulb into a 4703 housing. Here is a thread where I talk about installing H7 bulbs into 4703 housings:
https://ls1tech.com/forums/appearance-detailing/566308-clear-head-lamps-trans-am.html
(Scroll down to my post #9 in that thread for an outline, since the original site changed and the link is no longer valid.)
H7 is a low beam only bulb instead of the H4's low/hi, but the H7 is brighter (it puts out more lumens than the H4's high filament).
Unfortunately these bulbs weren't meant to have their backside exposed like that (neither is the H4) and it eventually filled with water and a loose connection melted the stock connector. If I covered more of the back of the completed modification with clear silicone to seal it (read my post in the other thread for clarification of how its sealed) maybe it would have done a better job of keeping the water out, but the added thickness of the sealant probably would have made a worse connection to the harness since the pins are relatively short. That could be solved by cutting off the stock connector and making a sealed connection to the back of the bulb and a new custom connection to the car. Unfortunately, then it wouldn't be a quick/simple plug-and-play to install new bulbs later if one blew. Also, this is all a maybe since new, unmodified, 4703 bulbs eventually fill with water anyway,
Here is what I am talking about with respect to the custom connection:
That was an attempt I made by installing the high-beam 4701's bulb into the 4703 housing. The beam pattern was somewhat close, but way too much light went upward into peoples cars.
Here is what my stock (melted) 4703 connector looked like when I cut it off:
I now have Hella 90mm H9 projectors.
https://ls1tech.com/forums/showpost....91&postcount=6
Last edited by VIP1; Jan 20, 2008 at 01:26 PM.
Copy & Paste Moderator
Joined: Apr 2002
Posts: 9,761
Likes: 206
From: Eastern MA
Originally Posted by Ten32
Thanks for the seriously in-depth reply!

Originally Posted by Ten32
Any idea about those DRLs?
My DRLs look horrible too. The outside is pitted and hazy. That can probably be fixed the same way people fix hazy Camaro headlights (Check the "Hall of Fame" sticky. Unfortunately, the inside is also covered in slime/sludge that is contributing to the the dirty/hazy appearance. Also, my housings have a melted spot where the connector attaches to the housing which is probably contributing to how water gets in. I was looking into making new glass housings by modifying fog light housings to accept a 3157 socket. I found a cheap fog light housing at Walmart for $20 that was the right size (I tried various auto parts stores and everything I found was either the next size up or had blue tinted glass). So I figured, for 20 bucks I'll try it. I was able to modify it to accept a 3157 socket and bulb and seal properly, but I didn't like how it looked on the car lit up. It looked like i belonged on an amusement park ride instead of a Firebird. Its difficult to describe. The front glass was completely clear and the rear reflector was completely smooth so you basically saw a bare lit bulb; not much diffusion or spread. I was hoping that the reflector would would more evenly light up orange, but that was not the case; partly due to the original design and partly due to the new bulb position. It did a better job of getting the light out onto the road, but that's not what's needed for a DRL/turn-signal. You need a more even-looking/diffused light. I found some housings with "rippled" front glass that would probably do what I want, but they are all too large. I may have pics of what I made. I'll try and post pics later.
I just bought new DRL's off of Ebay for $30 each shipped. They look 1000% better! I initially bought just one because water was getting in every time I washed my car blowing the bulb. After I replaced on, it made the other side look awful because they didn't match and the new one was so bright and shiny.
Trending Topics

You're Welcome.
I actually have a reply to this too (I forgot to post it earlier).
My DRLs look horrible too. The outside is pitted and hazy. That can probably be fixed the same way people fix hazy Camaro headlights (Check the "Hall of Fame" sticky. Unfortunately, the inside is also covered in slime/sludge that is contributing to the the dirty/hazy appearance. Also, my housings have a melted spot where the connector attaches to the housing which is probably contributing to how water gets in. I was looking into making new glass housings by modifying fog light housings to accept a 3157 socket. I found a cheap fog light housing at Walmart for $20 that was the right size (I tried various auto parts stores and everything I found was either the next size up or had blue tinted glass). So I figured, for 20 bucks I'll try it. I was able to modify it to accept a 3157 socket and bulb and seal properly, but I didn't like how it looked on the car lit up. It looked like i belonged on an amusement park ride instead of a Firebird. Its difficult to describe. The front glass was completely clear and the rear reflector was completely smooth so you basically saw a bare lit bulb; not much diffusion or spread. I was hoping that the reflector would would more evenly light up orange, but that was not the case; partly due to the original design and partly due to the new bulb position. It did a better job of getting the light out onto the road, but that's not what's needed for a DRL/turn-signal. You need a more even-looking/diffused light. I found some housings with "rippled" front glass that would probably do what I want, but they are all too large. I may have pics of what I made. I'll try and post pics later.
What about getting some of the clear textured plastic for flourescent lights and putting that inside the housing. Use a Dremel to cut the lens off, cut the plastic to fit and glue it in, and glue the lens back on. It won't be crystal clear anymore (where you can see the bulb), but it'll fill the lens with the light. Swat
Copy & Paste Moderator
Joined: Apr 2002
Posts: 9,761
Likes: 206
From: Eastern MA
Originally Posted by Swiat34
What about getting some of the clear textured plastic for flourescent lights and putting that inside the housing. Use a Dremel to cut the lens off, cut the plastic to fit and glue it in, and glue the lens back on. It won't be crystal clear anymore (where you can see the bulb), but it'll fill the lens with the light.
I should take some pictures so you guys can see it.
Copy & Paste Moderator
Joined: Apr 2002
Posts: 9,761
Likes: 206
From: Eastern MA
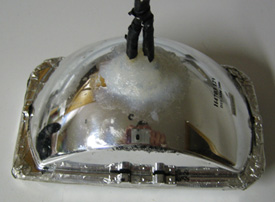
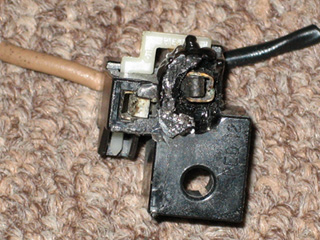
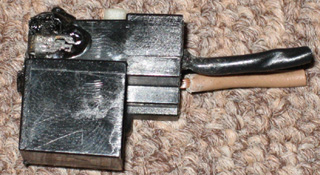
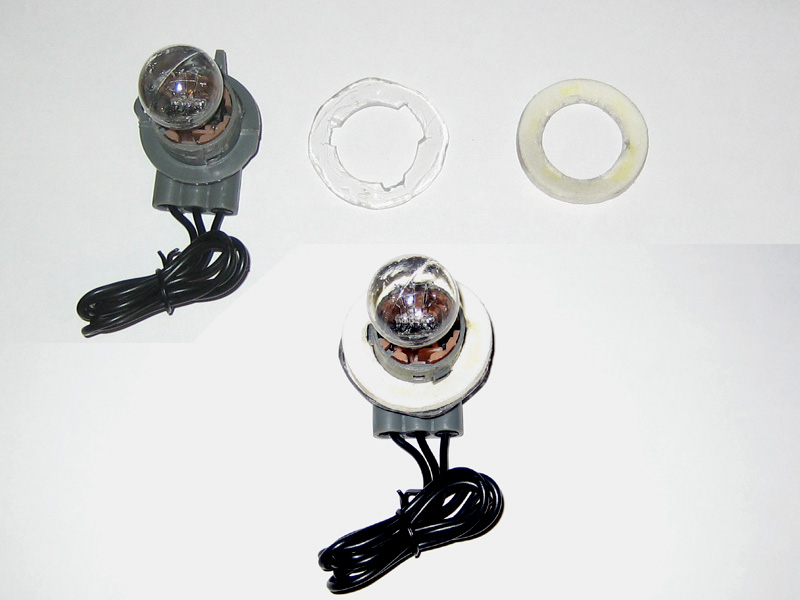
Here are the images. Click on the image to see it larger.
(I don't have any on-car or lit-up pics.)

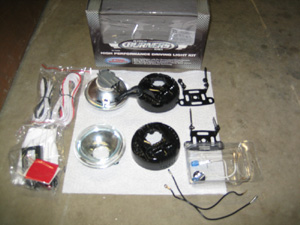

The socket and clear bulb are for fitment only (I only bought one, the picture is spliced). The actual socket I would use is the original on the car and an amber bulb. The stock socket unfortunately appears to sit the bulb further into the housing than the replacement socket that I used for testing. The bulb still fits. Its just about 50% closer to the front glass than what you see in the pics.
The only part of that fog light kit that I would have used is the actual bare glass/metal housing. Everything else (including the black back plastic) would not have been used.
The clear ring in the pic of the bulb connector is a plexyglass ring I made to increase the thickness of the seat to give a better seal since the back of the housing is thin metal instead of the thick plastic for which this socket was intended. The white ring is the foam gasket that came with the socket.
(I don't have any on-car or lit-up pics.)

The socket and clear bulb are for fitment only (I only bought one, the picture is spliced). The actual socket I would use is the original on the car and an amber bulb. The stock socket unfortunately appears to sit the bulb further into the housing than the replacement socket that I used for testing. The bulb still fits. Its just about 50% closer to the front glass than what you see in the pics.
The only part of that fog light kit that I would have used is the actual bare glass/metal housing. Everything else (including the black back plastic) would not have been used.
The clear ring in the pic of the bulb connector is a plexyglass ring I made to increase the thickness of the seat to give a better seal since the back of the housing is thin metal instead of the thick plastic for which this socket was intended. The white ring is the foam gasket that came with the socket.
Last edited by VIP1; Oct 18, 2007 at 11:04 PM.


Teching In
Joined: Oct 2006
Posts: 26
Likes: 0
I changed mine out because moisture kept getting inside and blowing the bulbs.
I got some housing that were actually exactly like the stock ones...but somehow felt better. I got mine off our favorite little auction site, but they were not $30 each....more like $20 for the pair.
I got some housing that were actually exactly like the stock ones...but somehow felt better. I got mine off our favorite little auction site, but they were not $30 each....more like $20 for the pair.

Looking to do this to my car to go better with the driving lights... Maybe there's better looking alternatives to that DRL replacement housing available now? I'll look around and see what I can find. I have a sandblasting machine that might not take too much to get running again.. So, maybe if I can't find a good option for clear DRL replacements, I can make my own textured [or non-textured] glass replacement kits... Also going to try and integrate this with LED switchbacks.
This just made me realize... In 40 years, if our cars are still around, most will probably look like rat rods - all chopped up and modified with barely anything factory remaining (because it's rusted, failed, or the original design just plain sucked).
This just made me realize... In 40 years, if our cars are still around, most will probably look like rat rods - all chopped up and modified with barely anything factory remaining (because it's rusted, failed, or the original design just plain sucked).
Last edited by ZexGX; Jan 14, 2009 at 10:25 AM.